Often, when repairing a car, it is necessary to remove the crankshaft pulley of a VAZ 2114. An experienced motorist completes this operation in a quarter of an hour, but a beginner sometimes encounters many problems during removal. The article provides detailed instructions on how to remove the crankshaft pulley of a VAZ 2114, as well as a video in which you can see the removal process.
Why do you need to twist the crankshaft pulley?
Removing the crankshaft pulley is performed for various reasons.
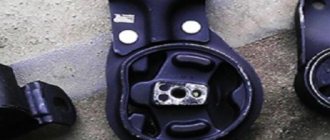
Crankshaft pulley
Most often it has to be removed when replacing the timing belt or replacing crankshaft seals. Usually the belt is changed either according to the regulations, or when defects are identified that require its replacement. Oil seals are replaced when oil leaks occur due to product wear.
On a VAZ 2114, the crankshaft pulley is secured with a bolt. During removal, a problem arises when unscrewing the mounting bolt. Firstly, it is inconvenient to get to. Secondly, at the factory they always tighten it very tightly so that it does not unscrew on the road. If a fastener comes loose while driving, it can result in costly repairs. During operation, thanks to the right-hand thread, the tightening is enhanced. In addition, coking and sticking of the part occurs. Thus, sometimes the bolt is very difficult to remove.
Tools
To successfully dismantle the VAZ 2114 crankshaft pulley and replace consumables, you should prepare the following tools:
- standard set of keys;
- jack;
- support or stump;
- socket head;
- extension;
- pulley puller;
- pry bar, screwdrivers.
It is more convenient to carry out work on a lift or ditch for inspection.
Stages of work
In order to remove the crankshaft pulley on a VAZ 2114, you need to dismantle some parts and components. The entire process of removing the crankshaft disc consists of the following steps:
- First, to dismantle the generator belt, you need to unscrew the locking bolt and loosen the tension bolt.
- Next, you need to lift the front of the car and remove the right front wheel.
- In the upper part of the engine compartment of the VAZ 2114, remove the air filter and the engine mud shield.
- Next, remove the alternator belt.
- To secure the flywheel from turning, you need to open the plug on the side of the VAZ 2114 clutch. Then insert a screwdriver or pry bar into the opened opening between the flywheel teeth.
Fix the flywheel and unscrew the bolt
- Next we move on to unscrewing the fastener. To make it easier to unscrew, you need to apply special liquids to the threaded connection that corrode corrosion. For this purpose, special WD lubricant, brake fluid, and vinegar essence are suitable.
- Then the head of the key is put on and, using a lever, it is turned counterclockwise so as to tear the bolt from its original position.
- Place the lever coming from the head against the spar or the floor in the direction of the shaft movement, and then turn the starter several times, giving the crankshaft a rotational impulse.
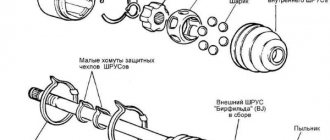
- After unscrewing the fastening element, you need to remove the crankshaft pulley. It is held in place by a key and is difficult to remove easily. You can use a special device with paws that cover the edges of the disk.
- If you don’t have a puller, you can use pry bars or screwdrivers by inserting them between the crankshaft and the pulley on each side, gradually moving the part to be removed away from the shaft. The touch point should be chosen closer to the crankshaft.
- Before removing the disk, it is advisable to tap it with a wooden hammer to avoid possible distortion. The part should be dismantled carefully so as not to damage the key and groove.
We put the head on the bolt. If you are unable to unscrew the fastening element by hand, you can use the starter.
Unscrew the fastening bolt
After completing the necessary replacement, when reinstalling the crankshaft pulley, the seats should be treated with grease so that the parts fit without effort. In this way, distortions can be avoided.
What problems might you encounter?
There is a possibility that you may not immediately notice the characteristic disc part under the hood of your car. It may also be difficult to access. It will be difficult to fix the shaft. Over a long period of time, the joints of fasteners will “stick” and you will have to use special liquids.
Related article: How to replace a timing chain in a garage
To perform all the necessary steps step by step, you will need the following tools:
- impact wrench;
- puller set;
- jack;
- a set of wrenches or other tools for removing bolts;
- presence of an inspection hole.
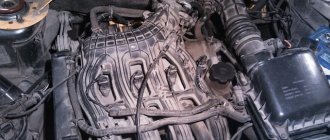
Gas distribution system VAZ-2114
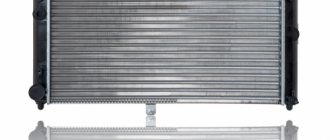
It will not be a secret to anyone that over time, any part will wear out and require replacement; for some, this period is measured in hundreds, for others, tens of thousands of kilometers.
Timing mechanism diagram
As for the gas distribution mechanism system, and specifically its belt, replacement should be done at the end of its service life, or if there is visible damage to it.
However, it should be noted that when replacing an old belt with a new one, a problem may occur such as the belt sliding out of its place, which in turn can lead to eating (wear - approx.) of the edge of the belt, which in the future will only contribute to its wear, break and another replacement.
We hasten to please you
The VAZ-2114 car was equipped only with an 8-valve engine, with a volume of 1.5 and 1.6 liters, which may indicate that when the timing belt breaks, the pistons and valves do not meet and the latter do not bend , which is certainly favorable affects not only subsequent repairs, but also the car owner’s wallet.
Using a metal plate
A plate similar in size to the metal part of the ignition key is inserted into the ignition switch. The protruding part of the plate is turned with force with a screwdriver, like a lever, to break the lock. The plate is rotated in the same direction as the key. After turning the plate, the car should start.
In addition to solving starting problems, you will have to eliminate the effect of the steering lock by making sharp turns from the extreme right to the extreme left and back.
To remove the car from the alarm system, you need to switch the alarm button to the “Vallet” mode.
The simplest way, without destructive actions and subsequent repairs, is to power the ignition coil and starter directly from the battery.
Where does the belt slip and why?
Note! The belt can slip either towards the engine or in the opposite direction from it.
This happens regardless of how exactly it was installed in the middle of the gear, since the reason for this is not only the belt itself, but also the elements and mechanisms accompanying its operation. In order to solve this problem, you need to use the methods described below.
Timing belt
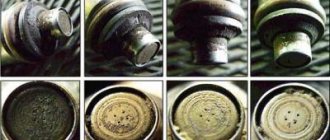
In modern times, in the automotive spare parts market, facts of counterfeits and low-quality products are becoming more and more common.
The top is the original timing belt and the bottom is a fake.
Specifically touching on the issue with the timing belt, we can talk about its uneven structure, increased elasticity (the ability to stretch excessively - approx.), as well as the presence of significant differences between the two edges (distortion - approx.).
The degree of straightness of the newly installed belt can only be determined on the mounted mechanism.
And, if even minor deviations are observed after starting the engine, then the reason is in the belt.
Belt is on and tight
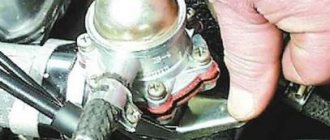
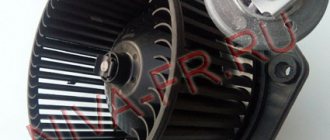
water pump
The timing belt can slip due to play in the pump (pump - approx.). It is very easy to determine its presence; you just need to grab the working surface of the gear with your hand, and if there is even the slightest play, the unit must be changed. In this case, read the material: “choosing a reliable pump for the VAZ-2114”
Leaks on the cylinder block from the timing side indicate that the pump has failed
Tension roller
The next element that needs to be diagnosed when the timing belt is slipping is the tension roller.
Although it may seem like a simple part, deviation from its performance specifications can significantly affect the overall correct operation of the part. In simple terms, a curved roller will not be able to provide the belt with linear movement , wearing out and moving it to the side.
The diagram is clear and understandable.
Another reason for discussions on popular forums about the belt moving to the side is the installation of rollers of different types, because the analogue has a different, slightly modified design.
How to set the standard clock on a Priora
The standard device is as simple as possible - the time is displayed on the display located in the center of the dashboard, under the speedometer. The total mileage is also reflected there. Analog (center console) are configured separately, manually. In the Lada Priora, everything is adjusted using the “old-fashioned method”: one press of the button in the center of the dial starts the hands moving 1 minute forward. If you hold the button, the minute hand will “run” forward even faster, followed by the hour hand.
Engineers installed the simplest classical method, passed on from older models. When setting the central panel clock: your attention should be completely concentrated on the right switch lever. On the right is a rocker with two buttons. At the bottom, under the thumb, there will be a “reset” button conveniently located.
To set up an electronic clock in 2170, you need to:
On the right switch lever behind the steering wheel, find a “rocker” with lower and upper buttons and a “Reset” button; Press the bottom button until the display shows the time; Press the “Reset” button; Change time: the top button is responsible for minutes, the bottom button for hours; Press the “Reset” button to set the time.
Other ways to adjust the roller
If you look at the standard and proper operation of the timing belt, then the tension roller should be located exactly in the middle of the pump and camshaft gears. However, some VAZ-2114 owners, in order to avoid the belt slipping, pull the roller to the side, closer to the camshaft, thus the belt, receiving the greatest bend in its upper part, is more firmly fixed in its place.
All tension roller components for VAZ-2114.
Not a tricky way to adjust the belt
There is another simple way that helps VAZ-2114 owners avoid the belt slipping by adjusting the position of the tension roller.
In order to fix it in this position, it is necessary to pre-make a blank in the form of a half washer made of aluminum (an aluminum can works well - approx.), which must be fixed between the spacer ring and the cylinder block.
Such a need can arise only if the spacer ring has differences in its thickness. You can take its measurements yourself, using only a caliper.
Camshaft and crankshaft
New camshaft gear
Also, judging by the numerous reviews of “our tubers”, it is possible to eliminate the occurrence of timing belt slippage after replacing the camshaft and crankshaft gears.
However, such a procedure can bring results if the car’s mileage on old spare parts is at least 100 thousand kilometers. Otherwise, such a replacement may not bring the desired result.
Rust on the crankshaft gear
Crankshaft gear rusted
This situation arises as a result of the lack of dirt protection. The gear rusts and begins to work incorrectly.
When you don't want to bother
If you realize that the described options cannot be implemented on your own, then you should seek help from specialists. Now in any city there are companies providing lock picking services. This is the optimal solution if the standard key was simply forgotten inside the vehicle.
Keep in mind that you will have to document that the car belongs to you.
The second option is to call a tow truck. This will have to be done if a chip key is needed to open (start) the car. Replacing the latter involves installing a new core, and this is difficult to do outside a service station.
In the described situation, access to the interior or starting the engine is a secondary task, which can be solved without any problems in a car repair shop.
After any work
After working on the timing belt, many car enthusiasts and car service technicians advise observing the condition it is in, periodically opening the hood and diagnosing its condition. But at the same time you need to remove the plastic protection!
Because in this way it is possible to notice in a timely manner emerging defects, belt slipping and other problems, which will certainly have a beneficial effect on the condition of the gas distribution system as a whole.
conclusions
As you have seen for yourself, the reason for the timing belt slipping on a VAZ-2114 can only be solved by replacement, so when choosing a similar spare part in a store, it is best to pay attention to a trusted manufacturer who has proven itself only from the best side.
Quite often, when faced with the problem of timing belt wear, drivers turn to service centers for help. But this problem can be solved with your own hands, without spending money or time. Here we will talk about how to replace the timing belt on an eight-valve VAZ 2114 yourself.
The belt rotates the camshaft and synchronizes the operation of the crankshaft and camshaft. Some other components of the mechanism also pass through this transmission. The belt is a closed hoop, on the inside of which there are teeth, with which it engages with the gears. Thanks to this, slippage is eliminated.
Signs of clutch wear
| Sign | Cause and remedy |
| Incomplete engagement of the clutch (slips) | Replacing discs, cleaning clutches |
| Incomplete shutdown (leading) | Prevention of the clutch mechanism |
| Periodic jerks | Clutch cable wear, clutch replacement |
| Vibration, beating when shifting to higher gears | The flywheel is bent, the gripper teeth are worn out. Replacing the flywheel and related consumables |
| Noise, creaking, grinding noise when activated | Damper spring wear, replacement with a new one, drive lubrication |
| Pedal free play is increased, exceeding 2 -3 mm | Tensioning the cable, replacing with a new one |
| You can hear the smell of burnt friction linings | Dismantling the clutch block, replacing worn elements |
| Increased fuel consumption | Flywheel worn, teeth damaged |
| Reduced acceleration dynamics | Replacing clutches |
Belt life
The manufacturer promises us that we should start taking an interest in the condition of the belt drive after 50,000 km. Perhaps this is actually the case, but you still need to carry out diagnostic procedures on the belt from time to time, as it can slip. It may also receive the following defects:
All these defects indicate that this consumable has already served its purpose, and it’s time to replace it with a new one. A broken belt can cause serious problems. Judge for yourself: a break will lead to a collision between the valves and the pistons. Both of them become deformed because of this, which means that serious repairs to the vehicle’s propulsion system will have to be made. Then you will need to fork out money and shell out a tidy sum not only to purchase consumables, but also to pay the labor of the craftsmen who will repair the car.
Replacement process
To carry out a repair of this complexity we will need:
- a set of screwdrivers with different tips;
- standard set of keys;
- jack;
- new consumables;
- set of rollers.
- So, first we place the car on a flat platform and put it on the handbrake.
- 3rd or 4th gear must be installed.
- Now you need to turn off the power to the car. To do this, disconnect the left terminal of the battery.
- The camshaft drive is protected by a special casing. To gain access to it, the cover will have to be removed. To do this, unscrew several bolts securing it.
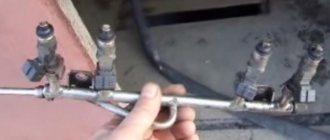
- Now remove the crankshaft pulley. We remove it along with the strap, which will have to be loosened for this.
- We put the car in neutral.
- Now a very important stage, it concerns the alignment of marks. We begin to turn the crankshaft to the right. At the same time, we observe the flywheel and the location of the marks. We rotate the shaft until the mark on it corresponds to the average value of the scale.
- The mark on the pulley should be placed opposite the mark located on the housing. Slightly loosen the nut securing the tension roller. In general, you need to pay special attention to the video. Most likely, it will also have to be replaced. Even if it seems to you that it is still in good condition, backlashes may still form on it soon. Then it will definitely have to be changed, but because of this the entire mechanism will have to be disassembled again.
9. Now we begin to prepare the belt for removal. To do this, loosen the belt using a tension roller.
10. We remove the worn-out consumable and begin to pull the new product onto the crankshaft gear. 11. Now we pull it onto the camshaft gear. We do this carefully to avoid sagging of the belt drive. We put the belt on the tension roller.
12. Turn the crankshaft 2 turns to the right and set the marks. If they do not match exactly, the belt drive installation procedure will have to be repeated. 13. Return the generator pulley to its place and tighten the bolt securing it. 14. Turn the belt to the left to adjust its tension. The tension should be optimal - the belt should not be overtightened, but sagging should also be eliminated. 15. Put on the generator strap. 16. After this, all that remains is to return the remaining parts to their place and check the operation of the mechanism. To do this, start the engine and listen to how it works. If you don't hear any extraneous noise, we did an excellent job. Well, if you still hear a whistle or grinding sound, then the installation will have to be repeated.
Note: when installing the belt, pay attention to the fact that it must be installed in accordance with the arrows marked on it - the arrows must indicate the direction of movement. It may well turn out that your belt will have no arrows. Then look at the inscriptions - after installation they should not be upside down, they should be easy to read.
Review of Manufacturer Prices
| Manufacturer article number | Price, rub.) | Resource (Thousand km) |
| Set of wheels LADA 2190-316010001 | From 3100 | 85 — 105 |
| —/— 2190-31601000 | —/— | —/— |
| —/— 302050901 | —/— | —/— |
| —/— 302052223 | —/— | —/— |
| —/— 302052307 | —/— | —/— |
| LADA 21810160118001 clutch | From 650 | 80 |
| LADA 21090160119000 input shaft guide | From 750 | 75 — 80 |
| LADA 21010160121500 fork support | From 150 | 75 – 95 |
| LADA 21810160120001 plug | From 800 | 85 – 95 |
| Connecting spring fork and clutch 21010160118800 | From 350 | 85 — 95 |
*prices are current as of October 30, 2018.
Recommendations for the selection of parts and components
The vast majority of spare parts are provided by domestic manufacturers. Foreign analogues are 10-17% more expensive. The manufacturing quality of the parts is approximately at the same level.
In order to prevent the purchase of counterfeits, use the services of official representative offices, dealer centers, and authorized service stations.
Lately, ordering parts with their subsequent installation directly in workshops has become popular. The advantages of this choice are professional installation, prompt delivery, and a guarantee.
Lada Granta clutch diagram
List of online stores selling parts (Moscow, St. Petersburg, Kyiv regions)
| № | Name | Address |
| 1. | "VIN code" | VIN-code.rf/ |
| 2. | "Avtopiter" | https://www.autopiter.ru/ |
| 3. | "DvizhCom" | https://dvizhcom.ru/ |
| 4. | "BaltKam" | https://www.baltkam.ru/ |
| 5. | "Elite" | https://eshop.elit.ua/ |
| 6. | "Clan" | https://klan.com.ua/ |