Good day to all readers of my blog! Let's begin.
1. Injector cleaner:
Let's start with the fact that after buying my car, the car consumed 10 liters per 100 kilometers.
According to the stories of the Kalinovods, 8 valve operators and owners of the 10th family, their consumption per 100 km is no more than 8 liters. I also decided to direct my path towards reducing costs. First of all, I went to the injector for diagnostics. He connected his device to the on-board vehicle, he said the engine was running like a clock, but the DMV had come to an end, I told him, “Is this the one that costs under 3000? He- yeah." Well, I think I got it, he removed the terminal from the mass flow sensor, put some crap on the contacts, put it back on, and started looking at his device, everything is fine with the mass flow sensor. When I asked why it consumes 10 liters per hundred, he shrugged and said that most likely it was my driving style. I paid him 200 rubles for the diagnosis and left him in a not very positive mood. Felix
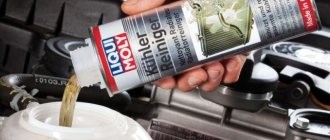
Injector Cleaner , the price of which was 54 rubles, and I actually bought it.
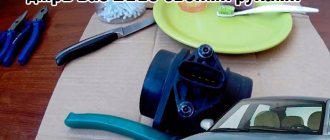
2. Self-cleaning of VAZ 2110 injectors (8 valve):
Let's go further, I started looking on the Internet for manuals on how to reduce gasoline consumption. The most common ones were that the MAF sensor was out of order, but as an injector technician he told me that it was normal, and I forgot, when I bought the car from a reseller, he told me that before selling the car, he washed the engine and screwed on the MAF, as a result of which I installed a new one, but I didn’t believe it, I found instructions on how to check the mass flow sensor on an excellent website, took a voltmeter and it showed around 0.997, therefore the sensor is in excellent condition. And the second reason is dirty injectors, in general Felix’s trust was questioned, it was decided to clean the injectors, I did everything according to these instructions. I decided to do everything civilly and bought: 1. Turn signal socket for VAZ 2110 - 25 rubles 2. Turn signal light - There was 3. Button for opening the trunk of VAZ 2110 - 50 rubles (I installed a new one for myself and connected the old one to the device since the picture with the open trunk was already erased on mine) 4. Injector terminal - 30 rubles 5. Wires - Were 6. “Mother” terminals 4pcs - Were
The current quality of roads creates great difficulties for the movement of passenger vehicles. Because of this, problems often arise with the technical side of the car and fuel consumption increases significantly. Of course, many companies are working to improve the quality of gasoline to make it easier to drive a car, but these standards are still far from ideal. To simplify engine operation, you need to know how to flush the injectors without the help of a technician.
Purpose of elements
In VAZ-2110 cars, injectors play a big role in engine operation. They are electrical type devices that operate using magnetic energy. Under the influence of an electronic signal, a valve opens in them, and fuel under high pressure is introduced into the cylinder of the internal combustion engine system. This occurs in the form of injections, which are dosed by a controlled pulse value.
The cost of such parts depends on the type of engine used and can be in the amount of 800–1400 rubles per piece. Since the VAZ-2110 model has an injection engine, its service directly depends on the injectors. Many modern manufacturers offer the purchase of special chemical mixtures that clean parts. In practice, they require serious control on the part of the motorist, because they can cause irreparable damage to the engine.
To find out if a part is working, it needs to be connected to the power system. The mechanism must be installed at the fuel outlet, in a special tank. When electricity is supplied, the valve will operate normally and inject gasoline. If this does not happen, the device is faulty.
Check Engine Error
When such signs appear, the “Check Engine” indicator lights up on the instrument panel.
Your first action in this case is to contact a service center where they can carry out diagnostics.
If it is determined that any of the injectors is not working correctly, the question of replacing it will arise.
In order not to bring the injectors to a state of wear when it becomes necessary to replace them, it is necessary to carry out their preventive maintenance at a certain time. Preventive measures include the fact that the injectors need to be washed in some way.
How to clean the injector on a VAZ 2110
How to clean injector nozzles yourself?
Idle speed sensor VAZ 2110 injector.
How to remove the heater on a VAZ 2110.
fuel pump VAZ 21099 injecto what wire is ground? Its own business.
How to remove the fuel rail on a VAZ-2111 car engine yourself.
cleaning the throttle valve of a VAZ 2110.
DIY injectors for VAZ 2113 2114.
How to clean the injector yourself on a VAZ 2110.
DIY diagnostics of VAZ 2107 injector video.
HOW to check the injectors of a VAZ 2110: how to check the injectors Fuel injectors.
How to adjust headlights on a VAZ 2106.
INJECTORS VAZ 2114 – clean or replace?
What is the consumption on Bogdan 2110 16 valves.
This method is conventional and is called washing the injector with your own hands, although...
Cleaning injectors VAZ 2110-21111 – YouTube.
Key words for the article » fuel rail. vase auto repair.
The second method is chemical flushing of the injector.
washing VAZ2114 injectors.
In the photo - cleaning the injector, myautotun.ru.
Cleaning injectors (Injector) of VAZ (foreign cars - not a big difference) with your own hands + di.
Cleaning the injector, step-by-step operation of removed injectors
It is advisable to cover the openings in the ramp so as not to accidentally drop any foreign object there. Now let's move on to cleaning the injectors. Since at 12 V and 3 W the nozzle does not open, it is necessary to use 12 V and 10 W, which will require a lamp to act as a damper. We connect the connector for the nozzle to a 12 V lamp and a microswitch.
Since the nozzles will be cleaned under pressure, all fasteners must be strong enough. You can assemble a device through which liquid for cleaning injectors will be supplied using different methods. For example, you can glue a rubber pipe in the sprayer head using hot glue/clamp or use a syringe, which is most convenient.
Injector cleaning technology:
- Remove the rubber sealing ring from the nozzle.
- We put a rubber tube on the nozzle shank.
- We connect the wires to the car battery - the polarity of the connection can be any.
- Holding the structure in your hands, you need to press the head of the cylinder until the hissing stops and the pressure is balanced.
- We direct the nozzle to the side and press the button.
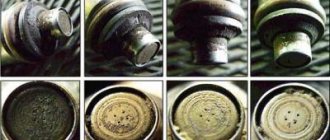
The cleaning procedure must be repeated two to three times for each nozzle. If the nozzles of the nozzles are really dirty, then after the first portion of liquid the appearance of the stream coming out of the nozzles will change.
Cleaning injectors with your own hands VAZ 2110 8 valves
And Lokomotiv protects him. By the way, Lzhetarasov spoke about the current Coach. Yes, the false DMITRY allegedly said everything correctly. Losers and Suckers are the Russian national football team. And Tarasov had better shut his mouth and not stutter about the courts. We need to take these idlers and parasites to court. They still stutter about some laws - everyone has gone completely crazy.
Cleaning VAZ 2110-21111 injectors is easy.
The one who has played the least over all the years, that is, in fact, those who have just begun this season the path to Loyalty to the club. This is: BACHURIN – 2 1 MARTYNOV – 2 1 I. BARANOV – 1 1 The path, of course, seems endlessly long, but the previous winner of the Loyalty to the Club prize KRIVCHUK also played only one match in his first season in 2013. And at the end of his sixth season he won the prize.
So everything is at our feet.
TOGETHER WITH THE TEAM Receives the player who has the highest percentage of points.
Of the participants of the last season, Afanasiev, Vasily, Koren, Kostya, Litvinov, Nozdrov, Opolchenov, Cherenkov all appeared on the field on the main days; they all played 1-2 game days. The rest tested our additional clearings more or less often. We can say that the people voted with their parish for the game on extra days. This can be seen from the attendance statistics.
The average attendance last season was 16.5 people per day.
Russia's string of victories must not be interrupted. And the European Cup too. We will take everything without difficulty. And we will not give Victory to anyone else. The will to win cannot be taken away from us. We're just used to winning everywhere.
In order to remove the ramp on a VAZ, you need to wait until the engine cools down. Therefore, it is recommended to clean injectors only as a last resort, for example, when problems arise with starting the engine, increased fuel consumption, tripping or a sharp drop in power. There are plenty of various additives on the automotive chemicals market that are added to fuel to clean the injector, but they are not always able to cope with the task assigned to them or do not perform it very well.
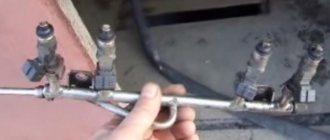
This is done in the upward direction, but without available tools this is sometimes quite difficult to do, since the fuel rail fits quite tightly. Unscrew the fuel hoses, as well as all electrical components connected to the fuel rail:
Therefore, it is recommended to clean injectors only as a last resort, for example, when problems arise with starting the engine, increased fuel consumption, tripping or a sharp drop in power. Using a hexagon, unscrew the two bolts that secure the fuel rail. After this, start the engine and let it run until it stalls.
After this, start the engine and let it run until it stalls. This is not surprising, given the fact that the ramp in which the injectors are located and, in principle, the injectors themselves can be called the heart of a car engine. Next, you will have to build a simple, yet very effective system consisting of:
Now you can actually remove the fuel rail itself. Remove the ramp strictly parallel to the ground, as any misalignment will only complicate your task.
Unscrew the fuel hoses, as well as all electrics connected to the fuel rail: Therefore, it is recommended to clean the injectors only as a last resort, for example, when problems occur with starting the engine, increased fuel consumption, tripping or a sharp drop in power. Now you can remove the ramp. First of all, you need to de-energize the fuel pump; to do this, disconnect the wires from it. This should be done until the engine stops starting; in other words, your task is to remove pressure from the fuel supply system.
About prevention
Here I would like to talk about a cleaning method in which special additives are added to the gas tank. Unlike others, this method has not been scientifically proven. In addition, an additive that is suitable for a certain type of engine may not be suitable for another.
The additive is added to the gas tank, so its chemical elements will affect the entire fuel system.
If anyone decides to use the additive as a means of prevention, carefully study the reviews, as well as the manufacturer’s recommendations. The main thing is not to harm the engine.
And the most reliable and inexpensive way to prevent the fuel system is, oddly enough, to fill in with high-quality fuel, use the same fuel filter and change it in a timely manner.
Types and symptoms of regulator malfunction
The types of RTD malfunctions are as follows. The valve does not hold - fuel begins to circulate freely throughout the fuel system, the pressure in which decreases because of this. As a result, the engine does not have enough fuel when the speed increases, and its power decreases; The pressure in the system should not change after stopping the engine, but since the valve is not able to hold it, when starting the engine, you have to work with the starter for a long time to create the required pressure.
A completely inoperative valve means fuel is not discharged into the tank, and because of this, the pressure in the system increases. As a result, the amount of fuel supplied to the combustion chambers through the injectors increases - there is overconsumption and incomplete combustion of gasoline.
Signs of a faulty RTD are the following engine operation:
- unstable;
- stalls at idle;
- insufficient pickup;
- cannot develop full power;
- the crankshaft rotates at idle speed with a reduced or increased frequency;
- dips and jerks while the machine is moving;
- difficult starting - not always;
- the content of CO and CH in the exhaust gases significantly exceeds the permissible standards;
- excessive consumption of gasoline.
To check the operation of the RTD, you will need a 24mm wrench, a 5mm hexagon and a pressure gauge (for example, a tire gauge):
- We unscrew the plug of the pressure control fitting on the end surface of the injector ramp.
- Using the metal tire valve cap, unscrew the spool valve from the fitting.
- We connect the pressure gauge to the fitting through a hose, the ends of which are secured with clamps, and start the engine.
- We check the pressure - disconnect the vacuum hose from the RTD.
Replacing the regulator: relieve pressure in the fuel line; unscrew the nut securing the fuel return pipe to the RTD; unscrew the 2 bolts securing the RTD to the injector ramp; carefully remove the RTD fitting from the ramp hole; Having disconnected the fuel pipe from the RTD, remove it; We install the new RTD in the reverse order, first moistening the rubber sealing cuffs with gasoline (we replace inelastic and torn rings).
- tsa-auto.ru
- www.drive2.ru
- vaz-2110.ru
- carnovato.ru
Fuel rail can be removed
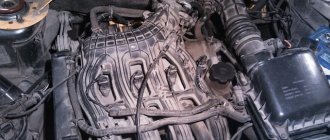
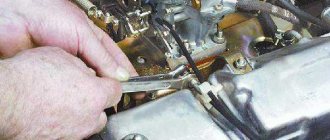
- Removed the fuel rail:
- This is how it looked:
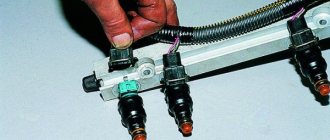
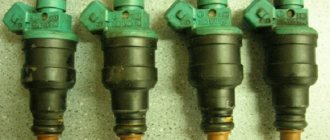
- I removed the injectors and wiped them of dirt:
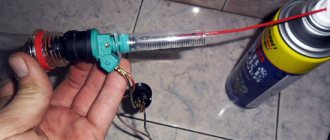
- Soaked them in carburetor cleaner:
- While the injectors were soaking, I put together a diagram for cleaning them:
The light bulb in the circuit was 10 W, a simple halogen. I brought the button without locking and the wire from work. I didn’t use anything to supply the cleaner to the nozzle - I just put the nozzle on the can and it fits quite tightly.
ready-made cleaning scheme
- The injector is connected as follows: the left contact is positive, and the right contact is negative.
Then I cleaned each nozzle in two passes of 10-15 sprays. I didn’t take a video or photo of the spray torch - it was inconvenient to take pictures, because... he did everything alone. In principle, the nozzles were not dirty - the spray pattern did not change much, and from the very first presses it sprayed normally. Then I checked the winding resistance of all injectors. Values in the region of 11.9-12.2 Ohms are within the norm.
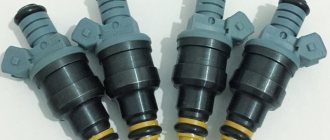
You can start assembling, but before that you replaced the O-rings on the injectors - replaced 4 out of 8, because half of the rings were in excellent condition (at the injector-ramp transition). I removed the ones to replace:
- Assembling the ramp with injectors:
ready to install
- And put the ramp in place:
At the same time I cleaned the cylinder head cover
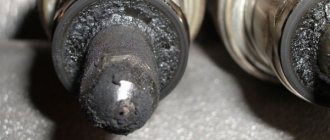
- Before installing the receiver with the throttle valve, I also cleaned the valve; since the last cleaning it has become quite dirty:
before cleaning
- Also, when removing the receiver, two pillows to which it is attached fell apart - I had to go get new ones:
- We collect everything, check it and start it.
Started with half a kick. Since in general the injectors were not dirty, I didn’t expect much of an effect, but here I was pleasantly surprised. According to the first sensations, the engine began to run more softly, and responded somehow better to the gas pedal. Let's check whether this procedure helped during a cold start in the cold winter. But the most unexpected effect was a decrease in average consumption by almost a liter.
If before this my average consumption recently was consistently 9.2-9.4 liters per 100 km, then after five days of commuting to work the average consumption is already 8.6 liters per 100 km. And at XX it used to be 0.8-0.9 l/hour, but now it’s 0.7-0.8 l/hour. So it was not in vain that I climbed into the injectors and spent several hours.
Source: https://www.drive2.com/l/4788489/
Results
As you can see from the article, you can clean the injector in several ways - at a service station or at home. The main thing is not to start this process and begin prevention after 5-7 thousand kilometers.
If the fuel system has not been cleaned for a long time, there is no need to rush - you should undergo diagnostics at a service station and listen to the recommendations of specialists. Otherwise, serious consequences are possible.
You can clean the injector of a new car using auto chemicals (special additives). They are recommended to be used at intervals of 5 thousand kilometers. If the car has traveled 100-110 thousand kilometers, it is advisable to use professional washing methods on a special stand or using ultrasound.
If the car has driven more than 150,000 km, it is useless to clean the injectors. In such cases, the part is so dirty that replacement is the only solution.
When replacement is required
There are several signs that indicate you need to at least remove and check the condition of the fuel injectors. Next, a decision is made to clean or replace the elements.
Pay attention to the behavior of your car and specifically the engine. They will tell you if there is something wrong with the injectors. This may manifest itself as follows:
- The engine produces less power, the same acceleration efficiency is not felt;
- If the engine performs poorly or lacks power, fuel consumption still increases;
- Poor starting is not a rare sign of injector failure;
- If the engine does not hold idle speed well, the injectors may well be the cause;
- The amount of toxic components in exhaust gases increases;
- At idle the speed increases.
Removing the fuel pressure regulator
The fuel pressure regulator is attached to the rail with two Allen-head bolts. They are not visible from above, but the key can be found by touch. It is better to use a torx wrench, as the heads are often clogged with dirt. In this case, the torx bit is easier to insert. The return pipe is screwed to the RDT using a fitting with a 24 mm edge. If you can’t unscrew it in place, you can remove the regulator along with the fuel pipe, and then unscrew it in a vice.
The photo shows a new fuel pressure regulator code 2112-1160010-01 and a removed tube.
Now we put the new fuel pressure regulator in place and screw the fuel pipe. Before the first start, you need to pump up the pressure in the fuel rail and fill it with gasoline, otherwise the engine may not start for a long time.
To do this, turn on the ignition three times, and each time wait until the pump stops humming. Of course, don’t forget to replace the fuel pump fuse before doing this. Then we start the engine.
Basic principles and nuances of injector flushing
VAZ 2110, wash the injector yourself
- First, you should disconnect the air filter pipe and the air filter itself;
- then disconnect the connection of the fuel level sensor from the air pipe;
- then the work moves on to the throttle assembly, since it is necessary to disconnect the wiring from it;
- now you need to free the injector itself from the wiring harness;
- then unscrew the two bolts that connect the fuel rail and the cylinder head;
- remove the holder by first unscrewing it from the fuel pipes;
- the fuel rail and the injector are contained in the cylinder head; they must be removed;
- Having unfastened the injector brackets, you need to remove it from the fuel rail.
When to flush the injector of a VAZ 2110
Components that are necessary to flush the injector:
- carburetor cleaner in an aerosol bottle;
- O-rings for injector;
- non-latching button;
- a special chip that allows you to connect the wiring to the injector;
- two light bulbs of 12 and 21 watts, respectively;
- medical syringe for 20 cubic meters;
- several small tubes.
Note. All of the above components can and should be purchased at a company auto parts store. The store’s consultants will help you understand the nuances and assemble a complete, high-quality washing kit.
Professional injector cleaning kit
Injector flushing algorithm:
- First of all, you need to remove the needle from the syringe, and insert a small tube in its place; in order for it to fit tightly, you need to use a seal;
- then place the syringe directly on the nozzle itself;
- after which, you need to connect the terminals to the nozzle;
- turn on the power (the sound of the nozzle opening will be heard);
Note. You can use a car battery as a power source.
- then you need to connect the syringe through a small tube to the balloon;
Note. It is advisable to seal the place where the tube is connected to the cylinder; for this purpose, you can use electrical tape.
- the nozzle itself must be connected to a two- or three-liter plastic bottle, where the liquid will actually flow after cleaning;
- Now you need to press the cylinder, fill the syringe with carburetor fluid, then press the button and open the nozzle (the picture resembles spraying fog).
Note. The nozzle should be cleaned until a wide droplet stream of transparent color appears.
Example of washing injector nozzles
The use of photo and video materials will allow you to create a 3D projection of the entire process in your mind. The instructions are simple; they will allow you to clean the injector yourself and in a short period of time. The price of the entire self-cleaning process is low, the main thing is to adhere to the above provisions.