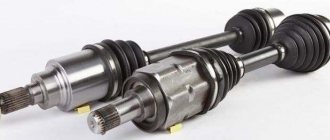
Knocks in the chassis are a frequent companion in life for VAZ 2114 owners. Many elements that can cause knocking, bad roads, and low-quality parts can cause extraneous noise in the suspension. A common source of the problem is the angular velocity distributor, or CV joint (grenade). The process of replacing a part is simple, so you can change it yourself. The question is often asked which CV joint for the VAZ 2114 is better: regular or tripoid. Among the most common arguments: tripoid is more reliable, but it hums and vibrates at high speeds. The regular one is less reliable, but the car handles better at high speed. However, you can find opposing opinions and arguments on this matter.
This article was written thanks to the help and support of the Interior Design website. This is an information portal about interior design: new products, photos, videos, the best styles, options for the perfect combination and recommendations from professionals
There is no clear answer which type is better. Operation in harsh conditions showed that there is no fundamental difference in driving sensations and reliability. The main thing is to buy a high-quality grenade made of well-hardened metal, install it correctly and monitor the safety of the anthers.
Scheme for disassembling the VAZ 2114 CV joint
Removal
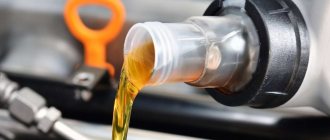
3. Drain the oil from the gearbox (see “Gearbox - oil change”).
4. Remove the hub cap and loosen the hub nut (see “Front wheel hub bearing - replacement”).
5. Loosen the wheel bolts (see “Wheel - replacement”).
6. Place the car on a reliable stand and remove the front wheel (see “Wheel - replacement”).
7. Loosen the three self-locking nuts securing the upper support of the suspension strut and unscrew the nuts a few turns (see “Front suspension strut - removal and installation”).
17 mm socket wrench
unscrew the two bolts securing the ball joint to the steering knuckle (see “Ball joint of the strut - removal and installation”).
30 mm socket wrench
Finally unscrew the wheel hub nut (see “Front wheel hub bearing - replacement”).
10. Remove the shank of the outer hinge from the hub. If necessary, knock it out through a wooden block or press it out using a universal three-jaw puller (see “Front wheel hub bearing - replacement”).
Note: When removing the left drive, turn the steering wheel all the way to the right; When removing the right drive, turn the steering wheel all the way to the left.
11. Remove the brake hose from the bracket on the suspension strut. Carefully, without allowing too much tension on the brake hose, pull the lower part of the strut outward, remove the shank of the outer joint from the hub and carefully lower the drive onto the wishbone of the suspension.
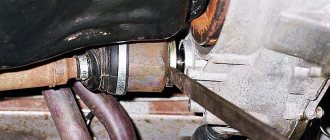
12. Using the mounting blade as a lever (resting its end against the end of the internal hinge body), we move the hinge outward, overcoming the resistance of the locking ring.
13. Supporting the internal joint, carefully (being careful not to damage the drive oil seal with the splines of the joint shank) remove the joint from the gearbox and remove the drive assembly from the car.
How to remove a vaz shruz
Having determined that it is the external grenade that is broken, we begin to remove it.
How to unscrew the hub nut on a VAZ?
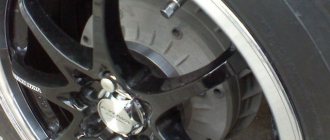
First of all, unscrew the hub nut. To do this, take a 30mm head and a lever, the larger the better. We put bricks under the wheels to prevent the car from rolling (simply putting it in gear is not an option, the wheel will spin) and begin to unscrew the hub nut.
In this matter, the more you weigh, the better, since I very often lacked my weight and leverage of about one and a half meters. I got out of the situation in the following way: I stood completely on the lever, as close to the edge as possible, thereby giving maximum tension to the nut, and hit the lever with a hammer. Usually this method helped me unscrew even the most soured wheel nuts.
One more nuance: if the outer walls of the head come into contact with the walls of the hub, it is better to lubricate the head with mining or lithol, or, in extreme cases, with silicone grease. Thanks to this trick, the head will not bite in the hub.
Installation
1. Replace the retaining ring of the splined shank of the inner joint housing with a new one.
2. Apply grease to the spline and smooth surfaces of the shank.
3. Carefully insert the shank into the oil seal, trying not to damage the working edge of the oil seal with the shaft splines. At the same time, we direct the locking ring with the gap upward.
4. We vigorously insert the drive into the gearbox and make sure that the retaining ring of the inner joint shank is securely fixed and the drive does not move out of the gearbox housing.
Tags: problems with gearbox
Comments 72
guys, help me buy a new all-wheel drive drive shaft, we installed everything on the VAZ2109 as written in the book. But when I got out and drove a couple of miles, the inner CV joint came off with a small jump. And I can't get into any gear. What could be the reason... Thanks in advance
Thank you all guys, I’m very tired, I’ll go to bed tomorrow, I’ll try again
The main thing is not to lose heart =) everything will be fixed!
but where will it go to us! Only today was the last day off (he was on sick leave) and the car is in a friend’s garage! and he needs it too!
Tomorrow I’ll look at myself and erase =) again, don’t give up - everything is fine, tomorrow let me know what can be done with the measurements and samples that I wrote to you =)
Thanks again everyone! Today I bought a new retaining ring, washed the flange on a grenade, sharpened it with a file and imagine how you sit down! Hooray! WE ALL WON! What would I do without you all!
The main task during assembly is to ensure that the holes inside these very gears opposite the holes in the gearbox housing are immediately cleaned - the splines are visible when inspected or touched by hand.
in general: image - www.mkad86.ru/acat/data/vaz/2109/v410.gif an axis is drawn on it in the center, there are two gears on it (one is drawn below) they will not go anywhere and will remain so insert the drive shafts into the gears (art. -2108-2303050) - they can turn over, but they do not peel off.
I split my body so much...
also unclear. In general, you can’t remove two disks, that’s it - I took one out and put the chopper back in place. and then remove the other disk. Reassemble in reverse order... If you don't do this, it's a penny. the differential will just fall apart
can! well you're scary
there is a closed system of gears that does not cling to anything except the grenade rods, you take out both grenades and everything crumbles...
in fact, there is an axis of the satellites; they transmit torque from the differential to the gears, which are mounted on the axle shafts. Only these gears can spin there (in the figure above they are indicated by the number 5) and nothing is destroyed there.
you speak well! they sell new boxes without a chop!
I'm talking about this: just before installing the driveshafts, you need to adjust the satellites
in fact, there is an axis of the satellites; they transmit torque from the differential to the gears, which are mounted on the axle shafts. Only these gears can spin there (in the figure above they are indicated by the number 5) and nothing is destroyed there.
Come on . the gear into which the constant velocity joint is included was changed
see below, I posted a picture there and explained everything
there is a closed system of gears that does not cling to anything except the grenade rods, you take out both grenades and everything crumbles...
nothing crumbles anywhere. Tales of grandparents from garages. Where did the chops come from in the box?
also unclear. In general, you can’t remove two disks, that’s it - I took one out and put the chopper back in place. and then remove the other disk. Reassemble in reverse order... If you don't do this, it's a penny. the differential will just fall apart
Removing and installing front wheel drives
You will need: a screwdriver, keys “17”, “19”, socket head “27”, wrench.
1. Drain the oil from the gearbox.
2. After removing the protective cap, loosen the hub nut.
3. Loosen the wheel bolts and hub nut. The hub nut is tightened with a large torque, so it is recommended to use, for example, a piece of pipe as a lever.
When unscrewing the hub nut, the vehicle must be placed on the ground!
Loosen and tighten wheel bolts only with the vehicle on the ground. The tightening torque of the bolts is 65–95 N m (6.5–9.5 kgf m).
4. Brake the car with the parking brake, install traction bars under the rear wheels and lift the front of the car, installing reliable supports.
5. Remove the front wheel and finally unscrew the hub nut.
6. Remove the thrust washer.
7. Remove the cotter pin from the tie rod ball joint nut to the swing arm.
8. Unscrew the nut securing the steering rod ball joint.
9. Using a puller, press the tie rod ball joint pin out of the strut swing arm.
10. Remove the two bolts and disconnect the ball joint of the front suspension arm from the steering knuckle.
11. Move the steering knuckle with the stand to the side...
12. ...and remove the splined shank of the outer joint from the hub.
13. Using a pry bar, press the drive inner joint shank out of the transmission.
If you intend to remove both drives, after removing one of the drives, insert a technological plug into the gearbox instead (for example, an old internal joint) and only then remove the second drive. Otherwise, the differential side gears will move and the drives will not be able to be installed.
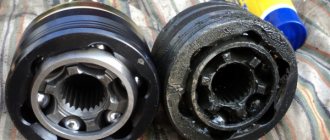
Malfunctions of CV joints
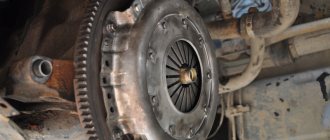
The main problem due to which angular velocity joints wear out and become unusable is dust and dirt that gets inside the bearing. The element is equipped with a boot. But often these protections are destroyed - be sure to monitor the condition of the anther. You can see it by looking under the car. In this case, the wheels are turned all the way to one side. If grease, tears or cracks are found on the rubber boot, the inner CV joint boot must be replaced.
Methods for repairing CV joints
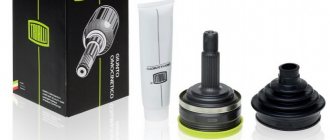
There are three methods for restoring a hinge. The first is a complete replacement of the CV joint on the VAZ-2114 with the same new one. This is how they work at service stations - even if a part can be restored, it is still replaced with a new one. The second method is to replace the cage along with the bearings from the repair kits. And it is also possible to rearrange the joints of equal angular velocities. Repair kits for the second generation Samara are on sale.
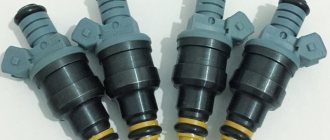
What brand of grenade should I choose and what boots should I install?
Almost all motorists who are faced with a breakdown of this element are wondering - which CV joint is better for a VAZ 2114 - domestic or imported? The answer to this question can be completely unambiguous - the best CV joints are the original ones, produced by AvtoVAZ itself.
The only difficulty that exists here is that such grenades have not been and are not on sale, so it is very difficult to get them.
You can either try to look for them at auto repair shops (however, here you can unknowingly buy used ones, which is not very good - after all, the part may already be damaged) or go to an official AvtoVAZ service center (but the price will be very high). For these reasons, it would be best to look at products from other manufacturers.
The first three companies on this list are especially popular among domestic car enthusiasts, so if there is a choice in a car store, it would be better to give preference to them. Also, when buying new grenades, you should not forget about buying new boots (mounting new CV joints with old, albeit “working” boots, would be a very big mistake).
It’s not worth talking in detail about which CV joint boots are best for the VAZ 2114. All anthers can currently be divided into two types - ordinary, almost no different from the anthers installed at the factory, and the so-called “reinforced”.
When buying the latter, it is worth remembering that along with them you should also buy mounting clamps of an increased size, since clamps from ordinary boots will not fit. All of these anthers have approximately the same quality, regardless of the manufacturer (some believe that silicone anthers last a little longer, but, as practice and reviews from many motorists show, the difference between silicone anthers and conventional ones in terms of service life is minimal).
The most important thing to do when buying anther is to check its quality. It must not have cracks, tears or other damage. The CV joint boots should be replaced with new ones at the first signs of wear.
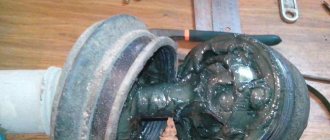
Why change CV joints?
If damaged anthers are found during the inspection, they must be replaced. Otherwise, water and sand will get inside the part through cracks in the rubber. Very soon this abrasive mixture will disable the “grenade”. When the car moves around corners, the constant velocity joint can simply fall apart into two parts. After this, the car can no longer be used. There is a significant risk that all the oil in there will leak out of the gearbox. In order to avoid such a nuisance, it is necessary to change the anthers in a timely manner. How much does it cost to replace a CV joint on a VAZ-2114? The price of the service at the service station is 1000 rubles. As for the cost of spare parts, an outer CV joint for a VAZ-2114 costs about 1,500 rubles. depending on the manufacturer. The internal one costs a little more - around 2200 rubles.
Approximate prices
In Russia, purchasing a new CV joint for a VAZ 2114 will cost from 1,100 to 3,000 rubles .
Approximate prices depending on the type of auto parts:
- External grenade - from 1200 to 1500 rubles .
- Internal - from 1500 to 3000 rubles .
Estimated cost of a grenade depending on the brand:
- AvtoVAZ - from 1400 rubles .
- TRIALLI – from 1200 rubles .
- TORQUE – from 1200 rubles .
- LOEBRO - about 1900 rubles .
- HOLA – about 1200 rubles .
- FINWHALE – from 1100 rubles .
A used, but in good condition, grenade can be bought in Russia for 800-1200 rubles .
Tools required for replacement, preparatory work
Replacing a CV joint on a VAZ-2114 with your own hands will take about one hour. But you should prepare the necessary tools. To work, you will need keys 17 and 19. You should also prepare a set of heads. Additionally, you will need a wheel wrench, mounting blades, a wrench, and a jack. They also prepare CV joint-4 lubricant, rags, and pliers. For greater convenience, the car should be driven onto an overpass or into a pit.
Factors influencing price
To buy a profitable, high-quality grenade for a VAZ 2114, you need to go to many places that sell auto parts. When comparing the cost of this spare part, novice drivers wonder why the price range for CV joints is so wide. The fact is that sellers take into account the following factors when forming prices:
- State.
- Variety.
- Quality.
- Originality.
- Place of purchase.
- Popularity of the selling company.
- Brand.
- The need for delivery or replacement of auto parts.
Source