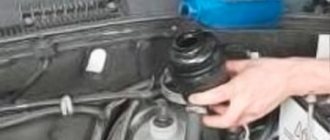
Changing oil and filters
The oil change is carried out according to the manufacturer's regulations every 15 thousand km; for more extreme use, a change every 7.5 thousand km is recommended. The viscosity of the oil used by AvtoVAZ is 5w30, brand GM dexos2.
This procedure is performed as follows:
- Removing the oil filler cap
- Removing the drain plug
- Draining used oil
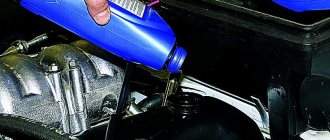
- Oil fill
Replacing spark plugs
According to the requirements, spark plugs are replaced after 30 thousand km according to the manufacturer’s recommendation. AvtoVAZ recommends the following types of spark plugs: A17DVRM, BRISK “Super” LR17YC, LR15YC. The work is carried out in the following stages:
- Removing the engine protective screen
- Disconnecting the electrical wire
- Removing candles
- Installing new items
Replacing technical fluids
The selection of liquid temperature conditions is carried out based on operating conditions. Replacement must be done after reaching 60 thousand km. Procedure:
- Removing the drain plug on the radiator
- Removing the plug on the cylinder block
- Removing the hose from the throttle pipe
- Draining liquid
- Putting the plugs in place
- Filling the fluid until the throttle comes out of the hose
- Installing the hose on the pipe
Modification of parts, installation of pumps and hoses
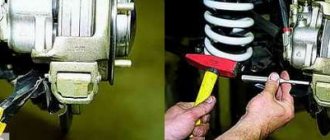
The bipod for the power steering should also be modified. Using a circular electric saw, it is cut off by 3-5 mm in part of the front stop, placed on the lower shaft of the power steering bipod, a lock washer is installed, the fastening nut is tightened, and the nut is locked by bending the antennae of the lock washer.
The power steering assembly with bipod is installed with the steering wheel in the middle position, when the mark on the end of the steering shaft (hydraulic booster) coincides with the corresponding mark on its body. The amplifier is located on the spar using three bolts from the kit, the nuts are tightened with a force of about 35-45 Nm (you will need a wrench and a socket head “17”, a torque wrench). Next, the junction of the car body and the hydraulic booster is sealed with silicone or polyurethane foam. The ball pins from the steering rods are returned to the holes in the bipod, tightened with castle-type nuts and secured with cotter pins.
Buy only original parts
Installation of the power steering pump begins with installing the drive pulley and securing it with a special bushing to an extended nut. Next, the power steering pump bracket is installed, the cylinder head is secured through the upper platform of the bracket, and the pump itself is installed. A V-belt is put on the pump drive pulley on the crankshaft, as well as the pump pulley, which must be tensioned by moving the pump through the grooves of the bracket and tightening the fastening bolts to a torque of about 22 Nm.
The standard location of the Niva 4x4 generator is at the bottom, which cannot be called a good solution. During off-road driving, water and dirt easily get on it, or antifreeze drips, which significantly reduces its service life. To protect an important part from moisture, owners resort to modifications. Let's look at how to move the generator on the Niva up.
Replacing the cabin filter
The frequency of filter replacement is 15 thousand km. It is located on the left side of the windshield in the engine compartment. Procedure:
- Remove the filter cover
- Remove old filter
- Install the new one and put the cover back on
Features of installing power steering
Briefly about the features of installing power steering on the Niva:
- First, the central nut of the steering wheel is unscrewed, after which it is dismantled. A puller may be required to remove the nut. The universal joint is also removed from the steering wheel.
- Then the fan strap is loosened.
- After installing the hydraulic booster, you need to fill the system - to do this, unscrew the expansion tank cap and fill the system with oil to the required level. After this, the steering wheel should be turned to its extreme positions several times with the engine turned off, this will get rid of the air lock in the system.
- When bleeding the system, it is recommended to jack up the front of the car or disconnect the steering rod from the bipod. Next, the engine is started and the required amount of liquid is added to the system. If you notice that after adding the oil it begins to foam, this indicates that air has entered the power steering hoses. Then you will need to turn off the engine and wait a while until the bubbles stop coming out.
- The procedure is carried out almost identically to installing the EUR, only there are some nuances. Before you begin the process, carefully read the service book that comes with the kit (the author of the video is the Andrew Humm channel).
Replacing the fuel filter
The fuel filter is changed every 30 thousand km. If operating conditions occur in arid, sandy regions, or low-quality fuel is used, replacement should be done every 20 thousand kilometers.
- Under the rear seat, unscrew the cover and remove the wiring block
- Start the engine and let the fuel burn out
- Remove the housing fastener and then remove the fuel filter
- Carry out the work in reverse order after installing the new filter.
Consequences of incorrect installation and adjustment
The gas distribution mechanism greatly influences the operation of the engine, so when replacing parts and setting marks, you must be careful and avoid mistakes. But if this does happen, the engine will immediately let you know about it.
If there is a serious error, the engine will not start. If the phase shift is small, the electronic engine management system compensates for this by adjusting the ignition. If the phases are shifted by half a tooth or a gear tooth, the system is not able to compensate for such a shift.
This leads to the following consequences:
- sudden loss of traction - the car responds poorly to pressing the accelerator pedal;
- deterioration in fuel efficiency;
- the engine runs intermittently, even at high speeds;
- the coolant temperature rises, causing engine overheating with all the ensuing consequences;
- premature wear of the camshaft, burnout of valves, broken chain followed by major engine overhaul.
Diagnostics of the brake system and replacement if necessary
Replacing brake consumables (pads and discs) is regulated and depends on the conditions, frequency and intensity of their use.
- Perform a visual inspection of calipers and pads
- If replacement is necessary, remove the wheel
- Disassemble the caliper
- Remove the pads
- Replace with new ones and assemble the brake block
How to choose a pump for Niva?
Water pumps are available for different modifications of this car; So, pump 21230-1307011-82 is suitable for all types, but in some cases the 2107 model with a wider impeller is used
When purchasing, it is important to ensure that the housing matches the impeller, otherwise it will be difficult to install the element. To avoid mistakes, you can buy the product assembled
If the Niva engine is fuel-injected, the classic pump may not cope with the high temperature, the part will have to be replaced sooner
We recommend that you pay attention to the types of spare parts:
- Standard pump with plastic impeller; the blades are located lower and have a more elongated shape. A new type pump equipped with a plastic impeller with extended blades. HEPU pump with a more durable cast iron impeller.
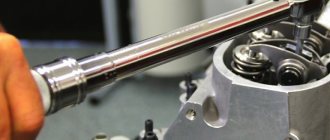
Replacing the timing belt
The condition of the timing belt is assessed every maintenance for damage and tension force, which should not exceed 0.8 per 10 kgf. Replacement is recommended after 15 thousand km.
- Remove the engine cover
- Perform a visual inspection of the timing belt for damage and tension.
- If replacement is necessary, remove the tension roller bracket
- Replace the timing belt according to the marks
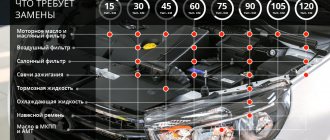
Maintenance schedule, inspections
Good technical condition of the car is an indispensable condition for traffic safety. It has been established that about 5% of road accidents occur due to technical malfunctions of cars, sometimes with serious consequences. The driver must be able to determine the technical condition of the car and detect its malfunctions in time.
The constant good condition of the vehicle over a long period of time is ensured by scheduled preventative maintenance and, if necessary, repairs. Based on the frequency and labor intensity of the work performed during maintenance, they are distinguished: daily maintenance (EO), first maintenance (TO-1), second maintenance (TO-2) and seasonal maintenance (SO).
EO is performed daily before departure, and CO is performed twice a year during the transition from spring-summer operation to autumn-winter or vice versa and is combined with the next TO-1 or TO-2. The frequency of TO-1 and TO-2 is established based on the actual mileage of the vehicle in kilometers, taking into account operating conditions.
| Name of maintenance operation | Mileage, thousand km | ||||||||
| 2 | 10 | 20 | 30 | 40 | 50 | 60 | 70 | 80 | |
| Engine | |||||||||
| Checking the absence of extraneous noise and knocking in the engine | + | + | + | + | + | + | + | + | + |
| Checking the tightness of cooling and power systems; condition of hoses, tubes and connections | + | + | + | + | + | + | + | + | + |
| Replacing the fuel filter (see here) | — | — | — | + | — | — | + | — | — |
| Cleaning and flushing elements of the crankcase ventilation system | — | — | — | — | — | — | + | — | — |
| Checking the coolant level in the expansion tank | + | + | + | + | + | + | + | + | + |
| Checking the functionality of the thermostat (see here) | — | — | + | — | + | — | + | — | + |
| Replacing the air filter (see here) | — | — | — | + | — | — | + | — | — |
| Replacing spark plugs (see here) | — | — | — | + | — | — | + | — | — |
| Changing the engine oil and oil filter* (see here) | + | + | + | + | + | + | + | + | + |
| Replacing the coolant** (see here) | — | — | — | — | — | — | + | — | — |
| Checking exhaust toxicity | + | + | + | + | + | + | + | + | + |
| Checking the absence of ECM fault codes in the controller memory. If there are codes, eliminate the causes of their occurrence and delete them from the controller’s memory | + | + | + | + | + | + | + | + | + |
| Transmission | 2 | 10 | 20 | 30 | 40 | 50 | 60 | 70 | 80 |
| Checking the condition of CV joint boots | + | + | + | + | + | + | + | + | + |
| Checking the absence of extraneous noise and knocking during operation of the clutch, gearbox, transfer case, front and rear axles | + | + | + | + | + | + | + | + | + |
| Checking the tightness of the gearbox, transfer case, front and rear axles | + | + | + | + | + | + | + | + | + |
| Checking the fluid level in the clutch hydraulic reservoir | + | + | + | + | + | + | + | + | + |
| Checking the free play of the clutch pedal (see here) | + | — | + | — | + | — | + | — | + |
| Checking oil levels in the gearbox, transfer case, front and rear axle gearboxes | — | + | + | + | — | + | + | + | — |
| Changing the oil in the gearbox, transfer case, front and rear axle gearboxes (see here, here, here) | + | — | — | — | + | — | — | — | + |
| Replacing brake fluid in the hydraulic clutch system | — | — | — | + | — | — | + | — | — |
| Lubrication of spline joints and bearings of cardan shaft crosspieces (see here) | — | + | + | + | + | + | + | + | + |
| Chassis | 2 | 10 | 20 | 30 | 40 | 50 | 60 | 70 | 80 |
| Checking the condition of: suspension arms and rods, their rubber-metal hinges; ball joints: front wheel drive joints; protective rubber covers and caps: rebound buffers, rubber shock absorber bushings | + | + | + | + | + | + | + | + | + |
| Checking the condition of the rubber cushions of the anti-roll bar | — | — | — | + | — | — | + | — | — |
| Checking the condition of hydraulic shock absorbers | — | — | — | + | — | — | + | — | — |
| Tightening the fastenings of the front and rear suspension elements | + | — | + | — | + | — | + | — | + |
| Measuring and adjusting clearances in front wheel hub bearings | + | + | + | + | — | + | + | + | — |
| Replacing the grease in the front wheel hub bearings | — | — | — | — | + | — | — | — | + |
| Checking the condition of the rims and tires of the wheels, balancing the wheels and rearranging them according to the diagram | — | + | + | + | + | + | + | + | + |
| Adjusting the angles of the front wheels (see here) | + | — | + | — | + | — | + | — | + |
| Steering | 2 | 10 | 20 | 30 | 40 | 50 | 60 | 70 | 80 |
| Checking the fluid level in the power steering reservoir (see here) | + | + | + | + | + | + | + | + | + |
| Checking the steering wheel play | + | + | + | + | + | + | + | + | + |
| Checking the tightness of seals of components and assemblies of the power steering, the condition of hoses, tubes and connections | + | + | + | + | + | + | + | + | + |
| Checking the condition and tension of the power steering pump drive belt (see here) | + | + | + | + | + | + | + | + | + |
| Adjusting the angles of the front wheels (see here) | + | — | + | — | + | — | + | — | + |
| Brake system | 2 | 10 | 20 | 30 | 40 | 50 | 60 | 70 | 80 |
| Checking the front brake pads (see here) | — | + | + | + | + | + | + | + | + |
| Checking the rear brake pads (see here) | — | — | + | — | + | — | + | — | + |
| Checking the brake performance | — | + | + | + | + | + | + | + | |
| Checking the parking brake adjustment and the position of the brake light switch (see here) | + | — | + | — | — | + | — | + | |
| Checking the functionality of the pressure regulator and vacuum brake booster (see here) | — | — | — | + | — | — | + | — | — |
| Checking the fluid level in the hydraulic brake reservoir and the operation of the level warning lamp in the hydraulic brake reservoir | + | + | + | + | + | + | + | + | + |
| Replacing brake fluid in the hydraulic brake system * (see here) | — | — | — | + | — | — | + | — | — |
| Electrical equipment | 2 | 10 | 20 | 30 | 40 | 50 | 60 | 70 | 80 |
| Checking the condition and tension of the drive belt (see here) | + | + | + | + | + | + | + | + | + |
| Checking the level and density of electrolyte in the battery (see here) | — | + | + | + | + | + | + | + | + |
| Checking the operation of the generator, lighting, light signaling and control devices, headlight beam direction regulators, windshield wipers and washers | + | + | + | + | + | + | + | + | + |
| Cleaning the starter commutator, checking the wear and fit of the brushes. Cleaning and lubrication of starter drive parts | — | — | — | — | + | — | — | — | + |
| Cleaning the generator slip rings, checking the wear and fit of the brushes | — | — | — | + | — | — | + | — | — |
| Cleaning the terminals of the wires and terminals of the battery, applying lubricant to them | — | — | + | — | + | — | + | — | + |
| Adjusting the direction of headlight beams (see here) | + | — | + | — | + | — | + | — | + |
| Body | 2 | 10 | 20 | 30 | 40 | 50 | 60 | 70 | 80 |
| Checking the paintwork for chips, cracks and corrosion; wheel arches and underbody for mastic damage | + | + | + | + | + | + | + | + | + |
| Lubrication of door hinges, rear seat hinges, hood lock drive cable; door opening limiters; hinges and springs of the fuel tank hatch cover; door keyholes; axles of springs and locking locks of door locks | — | + | + | + | + | + | + | + | + |
| Cleaning drainage holes in sills, doors and front fender cavities | + | + | + | + | + | + | + | + | + |
*Or in two years, whichever comes first. **Or after three years, whichever comes first.
same in the picture
If car maintenance (TO-1, TO-2, SO) can be carried out at service stations equipped with special equipment and specialist personnel, then the driver must be able to perform EO independently.
Before leaving the garage, you must carefully inspect the car and check: it is clean, free of dents, damage and scratches; coolant level in the engine cooling system; absence of leakage from the radiator, hoses and seals, fan belt tension (the deflection of the belt when pressing it with the thumb between the generator and fan pulleys with a force of 40-60 P (4-6 kgf) should be 10-15 mm); oil level in the engine oil pan using an oil dipstick; the presence of brake fluid in the supply tanks of the clutch and brake drive mechanisms; no brake fluid leaks; serviceability of the parking brake system; the amount of play in the hinges and connections of the steering drive and the fastening of the steering mechanism; serviceability of springs, springs, torsion bars, reaction bars, stabilizers and shock absorbers; the condition of the wheel tires (including the spare wheel) and the air pressure in them; the pressure should be checked with a pressure gauge; the difference in the readings of the right and left (especially the front) wheels should not exceed 10 kPa (0.1 kgf/cm2); presence of fuel in the tank, absence of leaks from it and fuel lines; serviceability of sound and light signals; presence of light in headlights and side lamps; readings of instrumentation; fastening and cleanliness of license plates and identification marks; condition and reliability of the coupling device of the car and trailer; the presence in the car of a first aid kit, a fire extinguisher, a warning triangle (or a flashing red light), wheel chocks and the tools necessary for the journey. Detected malfunctions should be corrected immediately.
If the coolant level in the cooling system drops, it must be topped up in a timely manner. If antifreeze is used as a coolant, then if its level decreases due to a leak, add antifreeze, and if natural evaporation occurs, add distilled water.
After the inspection, it is necessary to start and warm up the engine, make sure that there are no extraneous knocks, and check the stability of the engine at different crankshaft speeds. After driving a few tens of meters, you should check the operation of the clutch, gearbox, steering and brake system.
Upon returning to the garage, it is necessary to clean the car body and wash it (if necessary). Cleaning begins by removing dust from the interior using a vacuum cleaner (this is the most effective method). Upholstery made of leatherette, autobim, textile and artificial leather is wiped with a damp cloth, preferably made of soft material (flannel). Heavily contaminated areas can be washed with a solution of ammonia in water; the use of active solvents is unacceptable), and for washing glass use products for washing windows, mirrors, etc.
The mats should be removed from the car, the rubber ones should be washed and dried, and the dust should be thoroughly knocked out of the cloth ones.
Washing the car manually is done with ordinary tap water from a hose with a nozzle. It is not recommended to direct a strong stream of water onto the external surfaces of the body, as this will deteriorate the paint. It is necessary to first moisten the entire car body with water, directing the stream at an angle to its surface, and then wash off the dirt with a foam sponge or a soft brush, continuously pouring water on the areas to be washed. Hand movements should be directed from top to bottom, and the sponge (brush) should be pressed with little force, since grains of sand in the dirt can scratch (like an abrasive) the painted surfaces, and they will lose their shine, which is difficult to restore. For the same reason, you should not remove dust and dirt from the paintwork of a passenger car with dry cleaning materials. When washing, it is recommended to stand sideways to the car: in this position, the clothes and shoes of the washer will be less splashed. In all cases, washing must be done from the front of the car to the rear and from top to bottom.
After washing, the body should be wiped dry (preferably with suede, it absorbs water well), without allowing individual drops of water to dry, otherwise white spots from various salts contained in the water will remain on the surface of the car body.
Do not wash your car with very hot water, or with water whose temperature differs significantly from the ambient temperature.
It is undesirable for moisture to remain on the painted surface for a long time, as it can cause destruction of the coating. Freezing water on paintwork causes cracks to form in it.
The sun's rays also have a noticeable destructive effect on the car's paint. Under their influence, the color of the pigment changes, it is released on the surface of the coating, and the film former is destroyed. Therefore, when the car is not in motion, it should be kept in the shade or under a canopy.
To restore the shine of painted body surfaces, you must use only special preparations that can be purchased at hardware or auto stores in the “Car cosmetics” department.
While driving, the driver is obliged to monitor the readings of instrumentation and listen to the noise accompanying the operation of the engine and the movement of the vehicle. Every stop along the way should be used to inspect the vehicle's suspension, steering, transmission, brake system and engine.
Video
Replacing brake fluid
The fluid must be replaced every 45 thousand km according to the manufacturer’s recommendation and is done as follows:
- Remove the reservoir cap
- Fill with brake fluid
- Bleed the brakes of each wheel one at a time.
List of works for maintenance-4 mileage 60,000 km.
At the end of the fourth year of production of the car, standard maintenance of the Chevrolet Niva model is carried out according to the classical scheme. Mileage 60,000 km. obliges you to update the engine oil, check the condition of the drive belts and the coolant level.
Installing new brake pads
The air filter and a set of spark plugs must be replaced. We monitor the condition of the ignition distributor cap and the forced crankcase ventilation valve. We completely renew the brake fluid. The official list of work includes diagnostics of the brake system.
Diagnostics of the air conditioning compressor belt
Depending on the equipment, some vehicles are equipped with air conditioning. Diagnostics and replacement of the compressor belt is carried out every 15 thousand km. The belt tension should not exceed 0.8 mm at a pressure of 10 kgf. Procedure:
- Remove the protective tray
- Remove the belt guard
- Check belt tension for damage
- If necessary, or after the permissible mileage has expired, replace
Power steering pump
The power steering pump can be called the main unit, since it is it that pumps fluid, creating increased pressure in the line. The main element of the pump is the impeller, which is driven into rotation by a belt drive. Unfortunately, many power steering malfunctions are associated precisely with pump failure. Liquid starvation is unacceptable.
The presence of air can be recognized by a sudden increase in the force on the steering wheel, as well as a characteristic buzzing sound when turning the steering wheel. Bleeding the line is a standard procedure and is carried out by turning the steering wheel in one direction or the other.
Changing the gearbox oil
The gearbox needs to be serviced and the oil changed after reaching a service life of 60 thousand km; recommended oil types are 75W90, 80W85, 80W90. The fluid is replaced as follows:
- Remove the filler plug
- Unscrew the drain plug
- Drain the used oil and close the drain hole
- Fill in new oil
All this work is carried out at each scheduled maintenance. Maintenance is recommended to be carried out by specialized services in compliance with the manufacturer’s recommendations for motor life.
Compliance with these rules will allow the car to be in good technical condition, which in turn will save owners from breakdowns and failures of car systems. Timely maintenance allows the Chevrolet Niva to travel up to 500 thousand km without failure of the engine, transmission and chassis.
Features of the Chevrolet Niva maintenance regulations
Since most motorists consider the car to be an unpretentious road horse, Chevrolet Niva owners often carry out maintenance on their own using improvised means. However, the quality of such work does not always match that of specialized services.
The first and second scheduled maintenance for the new Chevrolet Niva is recommended to be carried out at a branded car service center using professional equipment.
The plant offers the model in various configurations. The “L” assembly is in demand, but there are also cars on the market in LC, LE, GLS, GLC and LE+ variants. For all machines, the list of work, maintenance frequency and established maintenance schedule will be identical. If engine oil is added for break-in, additional zero maintenance will be required after several thousand kilometers.