Maintenance of the LADA XRAY car guarantees a longer service life of the car. This procedure allows you to identify and eliminate minor faults at an early stage.
It is recommended to carry out maintenance every 15,000 km. The work is carried out in the car service center of an official dealer, who makes the appropriate adjustments to the service book.
The XRay car line includes versions:
- 1.6 liter petrol engine with 106 hp;
- 1.6 liter petrol engine with a power of 110 hp;
- 1.8 liter petrol engine with 110 hp;
- Cross;
- Cross AT.
Table with volume indicators of technical fluids
| Liquid type | Volume in liters |
| Fuel in tank | 50 |
| Cabin heating and cooling system | 7 |
| Hydraulic fluid in the clutch drive | 0,559 |
| Windshield washer | 4,7 |
| Fluid in the air conditioning system | 0,475 |
| Motor lubricant (21179 and 21129) | 4,1 |
| Motor Lubricant (H4M) | 4,2 |
| Dry sump lubrication (21179 and 21129) | 4,4 |
| Dry sump lubrication (H4M) | 4,7 |
| Gearbox oil MT JR5 518/JH3 512 | 2,34 |
| Gearbox oil AMT 21826 | 2,25 |
| Hydraulic fluid of the braking system in configurations with AMT | 0,517 |
| Expansion tank (21129) | 5,35-5,75 |
Oil selection table by season (winter, summer)
| Year | Viscosity SAE all season from +25 to -25 °C | winter from -35 to 0 °C | summer from 0 to +35 °C |
Gasoline API
Diesel API Type Recommended manufacturers
2015 10W-40 10W-50 15W-40 5W-40
| 0W-40 5W-40 5W-50 | 20W-40 25W-40 25W-50 |
SM CI-4 synthetics, semi-synthetics SHELL, Castrol, Mobil, Xado, ZIC, Lukoil, Valvoline, GT-Oil
2016 10W-50 15W-40 5W-40
| 0W-40 5W-50 | 20W-40 25W-50 |
SN CJ synthetics Mobil, Castrol, SHELL, Xado, Valvoline, Lukoil, ZIC, GT-Oil
2017 10W-50 15W-40 15W-50
| 0W-40 0W-50 | 20W-40 25W-50 |
SN CJ synthetics Castrol, SHELL, Mobil, Xado, ZIC
2018 10W-50 15W-40 15W-50
| 0W-40 0W-50 | 20W-40 25W-50 |
SN CJ-4 only synthetics SHELL, Mobil, Castrol, Xado
2019 5W-50 10W-50
| 0W-50 | 15W-50 20W-50 |
SN CJ-4 only synthetics SHELL, Castrol, Mobil
2020 5W-50 10W-60
| 0W-50 0W-60 | 15W-50 15W-60 |
SN CJ-4 only synthetics SHELL, Castrol, Mobil
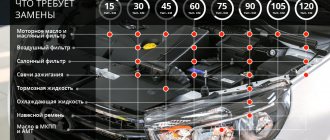
Routine maintenance and replacement of various components
| Replacement | TO1 | TO2 | TO3 | TO4 | 90,000 km |
| Engine oil | + | + | + | + | + |
| Candles | + | + | + | ||
| Air filter | + | + | + | + | + |
| Brake fluid | + | ||||
| Accessory drive belt and roller | + | ||||
| Lubrication system filter | + | + | + | + | + |
| Cabin filter | + | + | + | + | + |
| Coolant | + |
Spark plugs in versions with Renault-Nissan H4m and HR16 engines are replaced during maintenance 2 and after a mileage of 90,000 km. Zero maintenance of the Lada XRay is optional.
Signs of a clogged cleaning element
- Unstable operation of the power unit at idle speed;
- Difficulty starting the engine;
- Power reduction;
- Passive acceleration dynamics;
- The accelerator pedal is uninformative;
- Increased fuel consumption;
- Shooting in the exhaust pipe as an indirect sign of enrichment or leanness of the combustible mixture.
The list is not exhaustive; other features may be added. If detected, contact a service station to conduct a comprehensive diagnosis of the technical device using digital equipment.
Independent non-professional intervention in repairs does not guarantee full functionality of the mechanism.
List of maintenance works 1
The first maintenance is carried out after the first 15,000 km traveled or after a year of using the car. It includes:
- Cleaning and lubricating battery clamps and terminals.
- Checking the reliability of the battery.
- Replacing spark plugs in the ignition system.
- Changing the engine oil and oil filter.
- Lubricating door stops and hinges.
- Checking the tightening of the engine mounts.
- Analysis of the operation of the internal combustion engine control system (if there are errors).
- Checking the operation of the gearbox (clear operation of gears, presence of extraneous noise).
- Checking the behavior of the suspension (rear and front) on uneven surfaces. It is important to make sure there are no squeaks or knocks.
- Checking wheel angles.
- Adjusting the position of the brake light switch.
- Testing the braking system and its effectiveness.
- Checking the operation of the vacuum brake booster.
- Analysis of the operation of the optical corrector.
- Check the exhaust system for leaks.
- Checking the condition of the muffler mounting.
- Checking the integrity and tension of the timing belt.
- Coolant level measurement.
- Measuring the hydraulic fluid level in the power steering pump.
- Checking the anthers on the steering rod and rack joint.
- Analysis of the degree of wear of brake pads.
- Measuring the gearbox oil level.
- Checking the condition of the gearbox drive protective covers.
- Analysis of the density and level of electrolyte in the battery.
- Checking the generator for serviceability.
- Analysis of the rear window heating operation.
- Analysis of the operation of heated seats.
- Cleaning the door drain hole.
- Replacing the air filter in the engine air cleaner.
- Checking the quality of internal combustion engine operation.
- Checking the tightness of seals and oil seals of the motor. It is important that there are no engine oil drips.
- Checking clutch engagement/disengagement.
- Analysis of the operation of the joints on the front wheels when driving in a straight line and when cornering.
- Checking the tightness and integrity of the pipelines of the hydraulic drive of the braking system.
- Checking the hand brake.
- Measuring the brake system fluid level.
- Analysis of the lighting system, light signaling and sound signal systems.
- Optical light adjustment.
- Analysis of the condition and tension of the belt of additional components.
- Checking the condition of the radiator, as well as the pipeline of the engine cooling system.
- Analysis of the tightness of tubes in the fuel system.
- Steering wheel play measurement.
- Assessing the condition of suspension components.
- Analysis of the operation of windshield washers and wipers.
- Checking the operation of exterior mirrors and electric drive.
- Checking the door locks and hood latch for serviceability.
- Analysis of the operation of climate control systems.
- Lubricate the hinges and springs of the fuel tank hatch.
- Checking the condition of the wiring.
- Body integrity analysis. Check for corrosion.
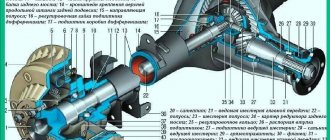
Transmission and chassis
The main load from a car's mileage is taken by its chassis, so special attention is paid to its inspection and preventive repair.
List of works of the third XRAY maintenance for chassis and transmission:
- visual inspection and dynamic testing for abnormal sounds in the clutch (when on/off);
- it is necessary to check the gearbox shifting and ensure normal operation, including monitoring for abnormal noises and sounds;
- check for excess noise from the front-wheel drive joints while driving on the road and when cornering;
- check for sounds and knocks in both suspensions, including on uneven road surfaces and off-road conditions;
- checking wheel alignment and wheel mounting angles;
- At the stand, the front and rear suspension is inspected for wear and defects.
Replacement of parts at the end of their service life
It is worth mentioning that every three years the Lada XRay requires installing a new backup battery for the ERA-GLONASS system control unit, as well as replacing the coolant and brake fluid.
Below are the manufacturer's recommendations regarding fluid replacement.
| Engine lubrication | Lukoil Genesis RN 5W-40; Lada 5/40 Ultra synthetic 88888L0540040; ROSNEFT Maximum 5W-40; ROSNEFT Maximum 10W-40; ROSNEFT Premium 5W-40; ROSNEFT Premium 10W-40; Lada 5/40 Ultra synthetic 88888L05400100 |
| Transmission oil | ZIC GFT 75W90 synthetic 162629; Lada Ultra GL-4/5 75W90 synthetic 88888L75900400; Lada Ultra GL-4/5 75W90 synthetic 88888L75900100; |
| Renault JH3 transmission oil | TRANSELF TRJ (NFJ) 75W-80 API GL-4+ or NFJ 75W-80 |
| Renault JH5 transmission oil | TRANSELF TRT 75W-80 TPM4501/B06138A or NFJ 75W-80 |
| Coolant | Cool Steam Standard or Premium; LADA G-11 88888400005082; G-Energy Antefreexe; LADA G-11 88888400001082; Felix Carbox; Antifreeze G-48 |
How to carry out maintenance of the Lada Xray on your own, watch the video:
Lada xray
VAZ cars are often called “buckets” and “basins” (from “Togliatti Automobile Plant”). And some, including me, come up with diminutive nicknames. So, is the XRAY pseudo-crossover a “basin” or a good “vasik”?
Technically, XRAY is a clone of the Sandero Stepway hatchback with significant modifications: it has almost the same power structure of the body, but all the outer body panels are different, and additional windows have appeared behind the rear side doors. It has a different set of engines and gearboxes. Original interior. However, all this has already been discussed a lot by the authors of the ZR. And I will concentrate on maintainability.
Stages of replacing lubricant Lada X-Ray
Changing the oil on this model is the same as on most cars. But there are always some nuances, which will be described in the article below.
This LADA model is equipped with 1.6 liter VAZ-21129 and 1.8 liter VAZ-21179 petrol engines. Both of them have 16 valves, like other modifications:
- Lada X-Ray (Lada Xray);
- Lada X-Ray Cross.
The replacement process for these engines and modifications will be the same. But we will make a reservation that the described instructions are carried out on a car with a volume of 1.6 liters.
Draining waste fluid
To drain oil from the X-Ray, it is advisable to have a hole or overpass, since the main actions will take place from below the car. Therefore, we place the car above the technological ditch, go down into it and remove the engine protection from below. To do this, unscrew the head bolts by 10mm.
When everything is ready, we proceed directly to the drain:
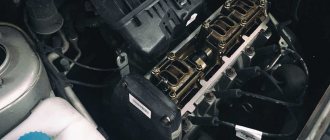
- Raise the hood, then find the filler neck on the engine and unscrew the plug (Fig. 1).
To unscrew the filter element, it is advisable to have a special puller. If it is not available, you can try to unscrew the filter using improvised means. For these purposes, you can use, for example, an old alternator belt, a regular belt, a bicycle chain or a simple screwdriver.
This method will allow you to drain as much of the used oil as possible, after which you can proceed to further actions. The main thing is not to forget, everything that we unscrewed must be put back in place.
Flushing the lubrication system
Flushing the engine on an X-Ray machine should only be carried out in exceptional cases, which include:
- Purchasing a used car when you cannot be sure of the quality and regularity of lubricant replacements.
- During operation, the service replacement interval was repeatedly exceeded.
- Engine operation with constant frequent overheating, which contributes to coking and other deposits.
- In cases of switching to another type of oil, for example from synthetic to semi-synthetic.
There are several types of flushes for the X-Ray engine:
- Five- or seven-minute, capable of cleaning even the most difficult deposits. They must be used very carefully and strictly follow the instructions printed on the packaging. It is recommended to use them only when absolutely necessary. Since there is a high probability of causing premature wear of the sealing seals. And also clog the oil channels with particles of washed away carbon deposits.
- Special compounds that are added to the oil several hundred kilometers before the expected change. They are more gentle, but there is also a possibility of clogging of the oil channels.
- Flushing oil is the most gentle method of cleaning the engine from the inside. This composition is poured after draining the waste, the engine runs for 15-20 minutes, after which the liquid with deposits is drained. The absence of aggressive additives in the wash composition gently cleans the engine, but is not able to remove heavy contaminants.
- Regular oil that you are going to use when changing. This method is not so popular due to its high cost.
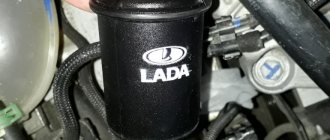
Installing a filter, filling in new engine fluid
If the X-Ray lubrication system is sealed and does not require repair work to eliminate leaks, you can proceed to adding fresh oil. In addition to the oil itself, we will need a new gasket-washer for the drain plug 21080101106200. As well as the original Livna oil filter 2108-1012005-08. But recently, dealers have begun installing LADA 2105-1012005-82 filters.
When everything is ready, let's move on to the bay:
- Replace the drain plug with a new washer.
- We wipe the seat under the filter.
- We tighten and put in place the new oil filter. Pre-lubricate the rubber sealing ring with fresh oil.
- Pour new oil into the filler neck.
- We check the level on the dipstick; it should be between the MIN and MAX marks.
- We start the engine, let it run for 10-15 seconds, then turn it off.
- After 5 minutes, check the level with a dipstick and top up if necessary.
Signs of a clogged cleaning element
- Unstable operation of the power unit at idle speed;
- Difficulty starting the engine;
- Power reduction;
- Passive acceleration dynamics;
- The accelerator pedal is uninformative;
- Increased fuel consumption;
- Shooting in the exhaust pipe as an indirect sign of enrichment or leanness of the combustible mixture.
The list is not exhaustive; other features may be added. If detected, contact a service station to conduct a comprehensive diagnosis of the technical device using digital equipment.
Independent non-professional intervention in repairs does not guarantee full functionality of the mechanism.