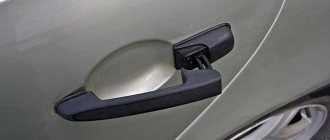
Removing and installing the Kalina front door window lifter mechanism
Tool:
1. Remove the front door glass as described here. Set the lift to the top position.
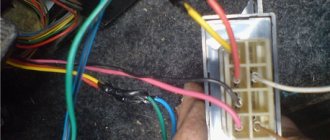
2. We disconnect the pads.
3. Using a 10mm socket, unscrew the 11 nuts securing the power window mechanism.
4. We remove the power window mechanism from the door through the lower hole in the interior panel.
5. We install the power window mechanism in the reverse order. In order to prevent knocking on the doors, we cover the connection of the pads with a soft material (foam rubber).
The article is missing:
Source
Description of the lot
Attention! Beware of fakes! From us you can purchase ONLY ORIGINAL ESP “Forward”!
Rack and pinion electric windows "Forward" for Lada Kalina, Granta (VAZ 1117, 1118, 1119, 2190) (front doors) New!
Completeness:
Electric window lifter with motor reducer, front right – 1 pc.
Electric window lifter with motor reducer, front left – 1 pc.
Additional guide – 2 pcs.
Adapter plate – 2 pcs.
Lock washer – 6 pcs.
Decorative plug complete with fastener and self-tapping screw – 2 pcs.
Specifications:
Window drive type: electric
Mechanism type: rack and pinion
Current consumption at rated force: no more than 8 A
Operating temperature range: -45. +70 °C
MTBF: at least 30,000 glass up/down cycles
Nominal force for raising/lowering glass: 12 kgf
Permissible force for raising/lowering glass: 20 kgf
Front electric windows Lada Kalina
You will need : remove the door trim, prepare masking tape, and a 10mm socket wrench.
How to remove the window regulator on Kalina:
Installation of the Kalina ESP is carried out in the reverse order, having previously lubricated the window lifter guide with grease.
Kalina rear windows
You will need : remove the door trims, prepare masking tape, a socket wrench “8” and “10”.
Removing the Kalina window regulator:
Installation of window regulators is carried out in the reverse order. By the way, if you had to remove the trim, then immediately soundproof the doors.
Source
Photo report on replacing the front right window regulator of LADA Kalina I
The parcel arrived within 5 days in the Stavropol region. They didn't deceive me.
Let's start replacing. Remove the door trim.
We unscrew the internal parts of the door that will interfere with the removal of the old window regulator.
Unscrew the glass from the window regulator.
And then unscrew all the nuts securing the window regulator and dismantle it.
We are starting to install a new window regulator that we ordered from the Steklopodem.RF store. We unscrew the “lambs” from the old window regulator and install them in a new place (on the motor).
We install a new window regulator. After installation, it is necessary to lubricate the window lift cable, initially there is grease there, but it seemed to me not enough. I used this lubricant.
After complete installation, we install the button and check the work (at one time we will lift the glass fasteners to the right place).
We tighten all the nuts back.
Reassemble the door in reverse order. Everything works fine for me.
Thanks to your team for your work!
Thank you, Alexander Gennadievich, for the prepared report. We will transfer the promised prize to your mobile phone account.
Buy power window LADA Kalina I front right | SAV you can in our online store
Source
Replacing a window regulator on Kalina
Lada Kalina is a good model, but like any domestic car, it has a number of vulnerabilities. One of them is unreliable window regulators, which quite often fail to work. This article will tell you what this device is, what malfunctions there are, and how to replace the part yourself.
Design and types of window lifters
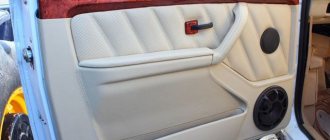
Kalina front window lift
Window regulators are a device designed to raise or lower car windows.
At the moment, there are a huge number of options for these devices, but the design, despite the differences in component parts for different models, is similar, it includes:
A window regulator of any design consists of two main elements:
The drive is divided into two types:
In addition, window regulators differ depending on the mechanism of glass movement:
Each option has its pros and cons and technical features. All these device options have one thing in common: one day they fail; this problem especially often occurs in a model that is so popular today as the Lada Kalina.
There can be dozens of reasons why power windows malfunction, but the most common are the following:
When it is impossible or too problematic to repair the device, it is more advisable to replace it with a new one. are suitable for the Lada Kalina :
Of course, the price is directly related to quality, but if the budget is limited, then the domestic option is not bad.
Now let's talk about how to install window regulators yourself.
Removing the power windows
Let's start with the front mechanisms
Before proceeding with repairs, it is necessary to dismantle the defective device. But in order to remove the window regulator, you will first have to remove the door trim.
So, for work we need:
Now let's get down to business.
The front window lifters have been removed, let's proceed to dismantling the rear ones (if the problem lies in them too).
Here we need:
Dismantling has been completed. Carefully examine the condition of the device; if it cannot be repaired, replace it with a new one.
Installation
As you can already guess, installing the window regulator is carried out in exactly the reverse order of dismantling it; the only thing is that you first need to treat the guide of the device with lubricant.
The installation procedure for the front lifts is as follows:
You need to look at how the window opens and closes, whether there are any distortions, whether all the screws are tightened well. If a mistake was made, what to do, you will have to repeat the work again. If everything goes well, you can praise yourself for a job well done.
The rear window lifters are installed in the same way, in the reverse order.
We check the quality of work
As you can see, this work is not at all difficult, it can be done independently, saving a lot of money on a car service, which will charge you a tidy sum for it.
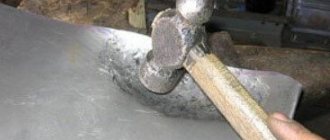
fastening wooden bars to a concrete wall
In addition, since we had to remove the door trim, we can also carry out sound insulation, which in the Lada Kalina is also not at the highest level.
At the end, a small bonus on how to make the power windows work without the ignition.
Electrical faults
The first and most difficult problem with the operation of window regulators is that the brushes get stuck in the commutator of the electric motor, which drives the window raising/lowering mechanism. This happens because during operation of the electric motor the graphite brushes overheat, and the plastic socket in which they are installed melts due to high temperatures. This leads to the fact that the brushes simply stick to the plastic socket. Since AvtoVAZ does not want to give up plastic and replace the socket with a metal one, the car owners themselves will have to modify this design.
How to replace the power window button on a viburnum
Lada Kalina window lifter does not work (Repair)
Another main disease of the Lada Kalina is electrical equipment. Everything breaks completely, from the electric power steering to the power windows. Now we will tell you how you can repair the power windows on a Lada Kalina with your own hands .
Even before winter, the left window regulator of the driver's door began to damage my brain. To be more precise: it goes down, but it comes up with problems. With jerks and sometimes with mechanical force, he helped with his hand. And now the time has come to replace it or rebuild it. I was hoping for the latter. I bought two gears in advance, but didn’t know which one would be suitable.
Lada Kalina window lift repair:
1. The first thing we do is prepare the car, tools and components for repairing the power window.
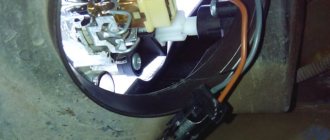
2. Next, remove the door trim ( photo No. 1
), after removing the switch block.
3. The next thing we do is unscrew 3 pieces of M6 nuts securing the gearmotor. ( photo No. 2
4. Unscrew the 4 M6 nuts securing the right side of the window regulator ( photo No. 3
), we also unscrew the two M6 bolts securing the glass and disconnect the wiring harness block of the window lift motor gearbox.
5. After unscrewing the right part of the window regulator, tilt the right window regulator pillar to the left, i.e. in the middle of the door and take out the gear motor ( photo No. 5
Repair of the Lada Kalina window lifter button
Channel about do-it-yourself and repairs
Repair of the window lifter button KALINA.
Looks like two identical buttons
but the filling is different. PARADOX.
6. Unscrew the 4 self-tapping screws of the gear motor cover and remove the cover.
7. Take a screwdriver and remove the gear by hooking it under the “clutch clamp” ( photo No. 7
8. Clean the housing from dirt and old grease, lubricate the worm, gear and bearing.
9. We install the new assembled gear with the “bracket-clutch” in reverse order, not forgetting to put two gaskets in the form of disc washers between the gear and the window regulator .
conclusions
Thus, it can be seen that the reasons for the malfunction of the window regulator are quite simple to eliminate. If you find the reason, you can easily repair the unit yourself. On the Lada Kalina there are only a few reasons why the window regulator fails.
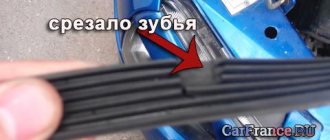
There are several reasons why the window regulator on the Lada Kalina does not work. Repair of the window regulator is carried out when a cracking sound appears when the mechanism is started. In this situation, a cracking sound indicates that the teeth of the worm gear have been cut off. It is recommended to install a new gearbox.
"Kalina" and replacement of the window regulator
First you need to purchase a gearbox. Now they are sold in the same housing with the motor. Then the door trim is dismantled. Experts do not recommend performing this operation outdoors on a frosty day in winter, since the Kalina’s casing is secured to soft plastic pistons. If a fastener element falls off, you will have to glue it. Then you should unscrew the screws and other fasteners that hold the internal opening handle. The wiring harness and the speakers are disconnected.
The next step is to unscrew the glass itself, which is held in the guides. You need to unscrew the four bolts with a 10mm wrench. As a result, the glass will drop to the bottom. You should also remove the curtain that is attached to the bottom of the glass unit. The window regulator itself is secured with 4 nuts on the left and 4 on the right on the guides. The gear motor is also held in place by three nuts.
The block is dismantled through technological holes. This is a carriage and two guides. The gearbox control cable is passed through the latter. There are rings on the cable in two places, attached to the carriages.
After replacing the gearbox, you need to reassemble everything in the reverse order and you can enjoy the reanimated mechanism. The gear motor is inexpensive and replacing it is quite simple.
Before assembly, you must carefully inspect and lubricate the cable. If after this the driver's window lifter does not work on the Kalina car, then it is recommended to check the amplifier tube. In order for the glass to go down completely, the rubber bumpers are shortened.
Mechanical problems
The car owner will have to dismantle the ESP for diagnostics. You can remove it quickly and without much effort using the instructions:
- remove the door card;
- remove the window regulator;
- inspect it for damage;
- remove the motor.
Most often, the malfunction is associated with wear on the roller teeth or a broken traction cable. They will need to be replaced, but it is better to change the entire mechanical part of the device.
If the ESP functions but poorly, for example, it rises jerkily, using additional physical force, then you can try replacing the gear and cleaning the housing from dirt.
The reason why the window lifter does not work on a Lada Kalina car is quite possible to diagnose and correct on your own.
Today, Lada Kalina is one of the most popular modern domestically produced cars. But like any Russian cars, this model has a number of vulnerabilities, in particular, we are talking about electric windows. In this article we will talk about how to install the window lift button and the device itself on the Lada Kalina, as well as what malfunctions are typical for this unit.
How to Remove the Window Lifter Button Kalina
Power window (ESP). a car device that allows you to raise and lower the door window using a button. The ESP consists of a drive mechanism, a lifting mechanism and a control unit.
Like any other heavy-duty system, window regulators have an extended service life. about 30,000 opening/closing cycles.
This resource is sufficient for trouble-free operation for 10 years or more, however, if the device is carelessly operated and/or exposed to other negative factors (such as water ingress), it may fail much earlier than the specified time.
Most often, problems arise with the mechanical part, that is, some part of the elevator itself fails. In this case, when you press the button, the sound of a running motor will sound, but the glass will remain in place.
It is worth examining the lifting mechanism for damage to the guides along which the glass moves.
To solve this problem, the entire mechanism will have to be replaced, since the parts are rarely sold separately.
If the ESP drive suddenly stops responding to button presses, do not rush to a car service center.
In this case, you can repair the glass yourself. First, find the cause of the problem, and there may be several.
Here are the most common ones:
Check the fuse
Another common cause of problems with the operation of the window lift system is related to the heavy load experienced by the contacts on the common window lift control panel. Since AvtoVAZ specialists did not provide a discharge relay in the electrical circuit, the remote control is unable to withstand these loads. As a result, both the front and rear power windows fail. In this case, the owner will have to fix problems in the remote control.
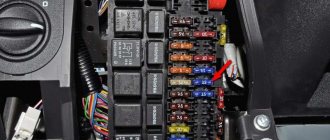
If the window regulators refuse to perform their functions on all sides at once, then it is recommended to check the integrity of the 30 A fuse. You should look for it under the hood, in the mounting block. If this element is burned out, then a dark place will be visible where there was a short circuit. It would also be a good idea to check the condition of the wire insulation. In this case, you need to look especially carefully at the wires at the transition points from the body to the doors.
Step-by-step installation of power windows
The cable is inspected for damage and generously coated with lubricant. The new mechanism is inserted into the drum with the shaft forward. The mounting holes are aligned, and the damper studs are tightened. If the front windows do not go down completely, then inspect the power window amplifier tube of the Lada Kalina.
The last element is located on the outside of the glass. In order for it to lower without problems, you will need to shorten the rubber bumpers of the window lifter. To do this, use wire cutters. The elastic band is shortened by 1 cm. The cable is lubricated and moved to another position. The window control unit and the gear motor are assembled in reverse order.
How to get to the gearbox
If the gearbox operates in the other direction, then the polarity changes. To do this, the pins are pulled out of the connector. They are inserted into the corresponding recesses using a thin screwdriver. Disassembling the window regulator of the Lada Kalina will allow you to clean the seal from dust and dirt, lubricate the lock well, and treat the inner lower part of the door with anticorrosive. If possible, sound insulation is installed.
how to put plywood on an uneven wood floor
If the window regulator does not raise the glass, and the electrical network of the Lada Kalina is under load, then replace the window regulator motor
When purchasing a new unit, you need to pay attention to the design of the old one.
First, the entire mechanism is dismantled. The motor is disconnected from it. After unscrewing the bolts, remove the back cover. The plastic gear is carefully inspected. The place where the armature is fixed with the last element will need to be lubricated. To check the serviceability of the armature and brushes, unscrew 3 bolts. The anchor is dismantled from the place of its fixation and from the casing. If the brushes are not damaged, then they are not replaced. A working anchor is wiped and replaced. Otherwise, it is replaced with a new unit.
To avoid problems with the brushes when installing the anchor, it is recommended to clamp them with needles. The casing is mounted, the motor is connected to the battery.
Vehicle Maintenance
It is recommended to replace any parts in the car only with original ones. Compliance with this requirement will eliminate subsequent unscheduled repairs. If Kalina's power window button requires servicing, then first you will need to find the necessary tools.
Using 2 small flathead screwdrivers, you need to remove the block from the grooves. Direct replacement is carried out without sudden movements, so as not to break fragile elements. As soon as it becomes possible to get to the wiring, you need to get rid of the plug with equal care. This can be done with little physical effort. A latch is used to disconnect the second plug.
After the glass power supply is removed, it must be inspected. The presence of any mechanical damage indicates the need for mandatory replacement. Even in-depth repairs will not help restore its functionality. Before installing a new unit, another check must be carried out. Its relevance increases when it comes to replacing a relay.
After removing the faulty part, you should manually check all connecting fasteners and wires. Traces of charring or damage are a sign that the Kalina power window button most likely needs to be replaced. If this is not done, then the need for repeated repairs will arise within 2-3 months. This is due to the increased load on the Lada window regulator.
Installation of a working unit occurs strictly in the reverse order. First, carefully connect the wires and 2 plugs. If the window lift button has been manipulated in any way, the reliability of its fixation must be checked manually. If a visual inspection does not reveal any problems, then the Kalina window lifter button is placed in its place.
Once all the wires are connected, the unit is secured using the provided latches. The repair is completed by checking the efficiency of the system.
You need to pay attention to the smoothness of the ride and the absence of the slightest delays. In the future, if the window regulator on Kalina does not work, you can fix the problem yourself. Characteristics of the Kalina electrical package control unit Why does the speed sensor on a Lada Kalina car break down and how to fix it?
Characteristics of the Kalina electrical package control unit Why does the speed sensor on a Lada Kalina car break down and how to fix it?
Sometimes, owners of Lada Kalina are faced with a problem when the power windows do not work. One or both may not work at once. But how to find out the reason why this happens? In fact, there are not many reasons and they are quite easy to eliminate.
The window regulator consists of mechanics and electrics, and therefore the reasons must be sought in these parts. Let's look at where the problem may lie:
Troubleshooting Methods
So, when the window regulator stops working, it is necessary to find and eliminate the cause. Let's look at the whole process and steps step by step:
The first thing you need to pay attention to is the fuse. In the block it is marked as F5. You need to take it out and look
If it burns out, it should be replaced with the same one with the appropriate marking. If the fuse is intact, then the problem is in the power supply and you need to look for the problem of a broken wire. We take out the fuse and use a tester to check whether there is voltage in the on-board circuit. To do this, you need to insert the probes into the sockets and see if there is power supply. If not, then you should check the wires, relays, and control unit
You need to take it out and look. If it burns out, it should be replaced with the same one with the appropriate marking. If the fuse is intact, then the problem is in the power supply and you need to look for a broken wire problem. We take out the fuse and use a tester to check whether there is voltage in the on-board circuit. To do this, you need to insert the probes into the sockets and see if there is power supply. If not, then you should check the wires, relays, and control unit.
The power windows of the Lada Granta do not work, why?
Car : Lada Granta. Asks : Evgenia Kislyakova. Question : The glass went down, but didn’t go back up, what happened to the window regulator?
Good afternoon. I stopped in the parking lot, raised the right passenger window all the way, began to lift the left one, and it stood in the middle. I had to put Grant in a friend’s garage; I was afraid to put it in the parking lot in case it rained or a bird flew in.
Two front windows broke at once. I don’t have electrics at the back; the windows are lowered and raised using handles. When I press the power window button, nothing happens. I tried it with the machine turned on too.
Main causes of failure
Most likely the power window fuse is at fault.
The angle is not good, but this is exactly what the mounting block looks like when you look at it from above
From the situation you described, it follows that the fuse is to blame. There are enough symptoms and prerequisites for its breakdown. First, you raised one glass, which is already good, since raising both windows at the same time is not recommended due to the increased load. Then they started to lift the second window, and the fuse burned out.
F2 (30A) - fuse number in the mounting block.
If one of the glasses works, then the fuse is good.
The button is broken
The power window buttons in the Norma configuration usually do not cause problems
If only one of the two or four power windows does not work, depending on the configuration and equipment of the car, then the problem is most likely in the button or in the wiring to it. It is necessary to remove the front door trim and ring the buttons, you can also look at the voltage on them.
Front passenger window button
Motor failure
Appearance of the new motor (purchased to replace a broken one)
The window lift motor on the Lada Granta rarely causes problems. This part is reliable, but it can also fail. You can check the motor by applying voltage to it forcibly, that is, directly from the battery.
If all else fails
If the buttons are working properly and the fuse is intact, then you should contact an electrician. Or you need to “ring” the wires yourself and look for where the break is.
An absolutely similar situation happened to me, I even fell into a stupor at first. I went online and read this article, called an electrician I knew, he “ringed” the wires and fixed everything. Thanks for the advice, you don’t always immediately know what to do.
Yesterday I had this unpleasant situation. I was looking on the Internet for a solution to the problem and came across this article. I called a friend, he fixed everything as written in the article.
I had the same situation! Last week, when I was out in nature with my family. At first I thought maybe the nephews were to blame, well, they are small, playing with the window regulators... And then the eldest daughter looked on the Internet and showed your article. Well, then I understood everything and went to the nearest salon... They did everything well, and they also said that I was not the first Lada Granta driver to come to them with a similar problem... Are there really such defects in many cars?
The window lifters were not working well, I puzzled over this problem for a long time, I decided to lubricate the window lifter motor with machine oil, which helped.
I am a novice driver, and when such a disaster happened, I decided that I would do it myself and started looking for videos and articles with a detailed description. And then a miracle happened. I studied everything and went to the garage to my Lada Granta. I got it done, I won’t say it was quick, but I did it all
How to replace the door trim on a VAZ 2170-VAZ 2172?
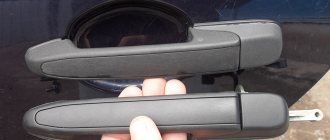
Removal: 1) At the very beginning of the operation, the trim from the door opening handle will need to be removed, the trim itself is fastened with one screw, it is also indicated by an arrow in the photo below for clarity, as soon as you unscrew this screw, carefully pry up the trim with a sharp knife or a thin screwdriver (see small photo) and then remove it and put it aside so as not to interfere.
2) Now proceed to removing the inner door handle, to do this, unscrew the two internal screws that secure it (By the way, your cover may still cover these screws, so remove it) and then remove the inner handle from the door trim; when the handle is removed, squeeze Use your hand to secure the wire block to the power window buttons and then disconnect the block itself (see the small photo below, where the wire block is indicated by an arrow) and thereby remove the inner handle completely from the trim.
Note! Before performing this procedure, we recommend that you disconnect the minus terminal from the battery, this especially applies to you if you are changing the casing in rainy weather, because if moisture gets on the electronics (In our case, on the wire block), a short circuit will occur due to this maybe because of which the wiring will fail, for more details on how to remove the minus terminal from the battery, read the article entitled: “Replacing the battery”, everything is written in the first paragraph!
3) But not all cars will have electric windows on the trim, for example, if we take the rear trim, then on most cars of the Priora family (depending on the configuration) electric windows are not installed, but mechanical windows are installed and the handle is still present at the back, so it ( If you have one) you will have to remove it, this is done as follows: use a screwdriver to press the latch away from the handle itself (see photo 1) and then the latch is brought to the top (see photo 2) and as soon as the latch is removed, you can remove the handle itself from socket (The socket is a ring that will be behind the handle, in general, as soon as you remove the handle you will understand what we are talking about).
how to lay tiles on a heated floor yourself
4) Well, after all the operations performed (This only applies to the trim that goes to the rear doors, but if you remove the front door, then also read point 4 and don’t forget about point 5) you can disconnect the trim from the door, for this you can use a screwdriver (We recommend this do, because the paint can be scratched) insulating tape is wound and with this screwdriver the trim is picked up in all places where it is fastened to the door with clamps (The places where the clips that secure the trim to the door are indicated by arrows in both photos below, but only in the photo numbered 1 the front door trim is shown, and photo number 2 shows the rear door trim).
Removal instructions
The device will be dismantled starting from the front windows. Before making repairs, you need to remove the defective unit, but first you need to dismantle the door trim.
Detailed instructions for dismantling the joint venture:
- First of all, you need to lift the glass all the way and fix it at the highest point with tape. It will be a right or left window regulator, it doesn’t matter.
- After this, using a 10mm wrench, you need to unscrew the two bolts that secure the glass itself. In addition, you will need to unscrew the screw on the inner handle of the lock.
- Then you need to disconnect the system motor and wiring from the power circuit.
- Unscrew the nuts on the mechanism, there are eleven in total, and dismantle the joint venture.
- Now let's move on to the rear joints. In this case, the dismantling procedure is almost identical - first, the glass must be lifted up all the way and fixed.
- Using a size 8 wrench, you need to unscrew the three nuts securing the assembly. Then, using a 10mm wrench, unscrew two screws and three more nuts. After completing these steps, you can dismantle the unit through the corresponding hole in the bottom of the door. Having removed the joint venture, you need to assess its condition. If the problem can be solved without replacing the mechanism, then repair the device; if the malfunction is “lethal”, for example, the window lift motor or gear has failed, then installation of a new mechanism will be required.
1. Secure the glass with tape. 2. Unscrew the bolts and remove the motor. 3. Remove the screws on the rear door.
How to disassemble the grant window lifter button
Restoring the power window button
An electric window regulator (ESP) is a car device that allows you to raise and lower the door windows using a button. The ESP consists of a drive mechanism, a lifting mechanism and a control unit.
Like any other systems subject to intensive use, electric windows have an increased service life - about 30 thousand opening/closing cycles.
This resource is sufficient for 10 or more years of uninterrupted operation, however, if handled carelessly and/or under the influence of other negative factors (for example, water ingress), the device may fail much earlier than the stated period.
Most often, problems arise in the mechanical part, that is, some part of the lift itself breaks. In this case, when you press the button, you will hear the sound of a running motor, but the glass will remain in place.
It is worth inspecting the lifting mechanism for damage to the guides along which the glass moves.
Mechanical defects
What can interfere with the proper operation of an electric motor? It is recommended to inspect the drive panel.
If, when pressing the button, the driver hears a characteristic growl, but the windows do not move, it means that the plastic gear of the gearbox is badly worn. Repair is not possible here - only replacement.
Another reason why the window regulator (Kalina station wagon is no exception) does not work is moisture getting inside the door and oxidation of the moving systems. As a result of oxidation, the mechanisms jam.
If a very loud noise is heard while the glass is moving, then the gearbox bearing needs to be replaced. If the glass twitches when you try to close the window, it means it is warped or foreign objects have gotten into the roller.
It also happens that the mechanism does not work even after replacing the electric motor. Then the problem is hidden in the cable. It should be replaced. For a Lada Kalina car, the replacement price will be approximately 300-400 rubles, since this cable is not sold separately.
How to disassemble the grant window lifter button
Hello :) When my driver's window lifter button failed (namely, the window opened and did not close and I had to drive at night, in sub-zero temperatures, with the window wide open) And so, with a frozen beard, I realized that I needed something with this button -do :) Buy a block for 600 rubles. I didn’t want the minimum, so I bought a button for 120 rubles. I immediately ran into the problem of replacing it in the button block, and either there was little information about this on the Internet, or I entered the wrong queries, in general, I never found anything useful. And so at 3 o’clock in the morning, taking a friend and a screwdriver, we decided to dismantle this block, no matter the cost, and replace the button. And we did it :) I don’t claim to be the pioneer in replacing buttons, and I’m not saying that my replacement method is the only correct one, but still, maybe it will help someone :)
The first thing to do is pull out the block itself by prying it off with a screwdriver
2. disconnect the wires from the button. 3. Disassemble both buttons. (The one in the block, and the one we bought) This is necessary because the purchased button has a side we don’t need, which will not fit into the ESP block.
First you need to remove the rocker itself. To do this, pry it with a screwdriver in the location shown.
You will need a flat blade screwdriver.
1. Remove the wire from the “–” terminal of the battery.
2. Pry up the rear edge of the block.
4. Pressing the plastic lock with your finger, disconnect the wire blocks from the buttons. After this, remove the block.
5. Install the parts in the reverse order of removal.
Reference manual for servicing VAZ, LADA 110 cars.
Ignition adjustment 2110. Engine compression for VAZ 2112, immobilizer for VAZ 2111. Valve cover for VAZ 2112, cylinder block gasket for VAZ video. The cost of a generator for a VAZ. replacement of fuses for VAZ 2112, design of the oil receiver for VAZ 2112. oil recommended by the factory for the box of VAZ 2112. replacement of the water pump (pump) for VAZ 2112. Replacement of valve stem seals for VAZ 2110.
How to change a VAZ window regulator 2110
Electronic windows on a VAZ 2110 break down quite occasionally, but such a problem cannot be ruled out. In particular, the problem causes enormous inconvenience in this case, when the mechanism jams when the window is lowered. The problem can be solved by repairing or replacing the window regulator.
Electric windows for VAZ 2110
Many owners of VAZ 2110 seek to save on repairs of various parts of their vehicles. Instead of contacting specialized workshops, they carry out repairs themselves. As for electric windows, it is better to replace them immediately without wasting time on restoration work. In addition, these mechanisms are not very expensive.
In car stores today you can find single kits that are designed specifically for the VAZ 2110 . Unlike standard kits, these kits include only one gear motor, which is enough to replace a broken unit.