| EXECUTION ORDER |
| 1. The central locking system uses two-way solenoids to lock and unlock the doors. Lock switches have two operating states: Locked and Unlocked. These switches operate a relay, which in turn supplies voltage to the door lock solenoids. Depending on what signal is sent to the relay, it changes its polarity, allowing both parts of the circuit to have a positive or negative voltage. |
| 2. Always check the electrical circuit protection first. Some vehicles use circuit breakers and fuses together. |
| 3. Switch the switches to both positions (Lock and Unlock) with the engine off. Listen to the faint click of the relay being activated. |
| 4. If you do not hear a click, check for voltage at the switches. If voltage is present, check the wires between the fuse box and the switches for shorts or opens. |
| 5. If voltage is present, but a click is not heard, check the switch for current continuity. Replace the switch if it does not conduct current in any of the positions (see table. Table of connection of the tester and conductivity of the main block of switches for the central locking system). |
| 6. If the switch is conducting but the relay does not click, check the wires between the switch and the relay. Reestablish the connection if there is a break in the circuit. |
| 7. If the relay receives power from the switch but does not send it to the solenoids, check that the relay case is properly grounded. If the relay case ground is OK, replace the relay. |
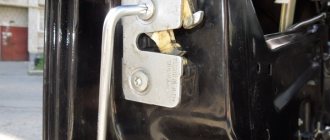
| 8. If the solenoids of all locks work except one, remove the trim panel from that door (see subsection 11.12) and check for voltage on the solenoid when the lock switch is turned on/off. There should be voltage on one of the wires when the switch is in the closed position; the second wire must be live when the switch is in the open position. |
| 9. If voltage is present at the inoperative solenoid, replace it. |
| 10. If there is no voltage at the inoperative solenoid, check the wire between the solenoid and the relay for an open. Warning Wires often break in the part of the wiring harness that is located between the body and the door (constant opening and closing of the door leads to the accumulation of fatigue in the wires and, ultimately, to wire rupture). |
Features of the VAZ central lock
Everyone knows that the Lada models listed here use central locking controlled by negative polarity. This literally means the following: we apply “0 Volt” to one wire - all locks close. We apply the same voltage to the other wire (second) - they unlock. This is done in many European cars. What does it mean to “supply “0 Volt”? This means connecting the wire to ground.
The central locking control unit has the following wiring:
- Black wire – ground (connected all the time);
- Pink – power supply “+12V” (built-in fuse is used);
- Yellow, red - connected to the actuators in the doors (these wires are not connected to the signaling system!);
- Brown, white - control wires, just those that have already been mentioned.
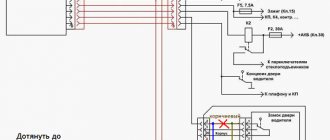
Let's look at the central locking connection diagram, which is implemented “from the factory”:
First, we may decide that the triangular connector (labeled “C”) is suitable for our purposes, since it contains control contacts. But please note that the standard circuit uses a microswitch located in the driver's door. We will break two wires coming from this switch, and the relays built into the alarm unit will be connected to the breaks. Other options are excluded.
Let's make the alarm system and central locking together
Any modern alarm unit is equipped with two relays connected to the central locking control unit. One relay is opening, the second is locking, and the circuit in the general case looks like this:
In our case, the green and white cords coming from the signaling unit will be required, as indicated in the diagram. However, they will not be the only ones needed. We will connect the relay contacts to breaks in the standard wiring. This means there will be not 2, but 4 cords.
Connection diagram for VAZ central locker
Take another look at the diagram published in the first chapter. We will connect the relay to the gap in the white and brown wires going from the microswitch to the central lock control unit. And it is obvious that it is easier to break these wires near the 8-pin connector. The same one shown at the beginning.
Installation of the VAZ-2110 lock actuator
You begin to appreciate many things after they are gone. The same applies to the additional options of the VAZ 2110. Central locking (CL), for example, you can not notice as long as it works properly or you can do without it altogether. But you quickly get used to good things, don’t you? Therefore, when something that provides us with a comfortable ride fails, you immediately begin to rush around in search of answers “how to fix it.”
Central locking device VAZ 2110
VAZ cars are not least good for their high maintainability. Whenever something happens to your iron horse, you can almost certainly solve the problem yourself without the help of specialists at a service station. “Ten” was no exception in this regard.
How to lift a door
If the structure continues to sag, it needs to be raised. We list the main methods:
- Open the door, loosen the hinge bolts. Grasp the edge of the body with your hand. Gradually lift until the fragment is in place. Tighten the hardware.
- Use a jack to raise the blade and then lower it with a sharp movement.
- Buy washers with a diameter of 20x10 mm. The greater the sagging, the greater the width of the part should be: from 1 to 2 cm. The screw of the lower hinge is unscrewed, a washer is inserted onto its post, and the mechanism is tightened.
An integrated approach is recommended during adjustment, so you should carefully study all the information before undertaking independent repairs.
Source
What is the central locking on the VAZ 2110?
The purpose of this type of device is to centrally control the automatic mechanism for opening and closing all doors in the car at once. This is especially convenient for working in conjunction with an alarm system and when operating a car in general. However, the reliability of the operation of the central locking system should definitely be checked every time by moving the handles of all four doors before going about your business for a long time, since the actuator can often fail and one of the doors may remain unlocked.
Structurally, the VAZ 2110 central lock consists of the following elements:
- electronic transistor control unit;
- gearmotor actuators, also known as activators (one for each door);
- a limit switch that determines the current state of the door (open or closed);
- electrical wiring and other installation elements.
Central locking diagram for VAZ 2110
Installation algorithm
Note: in order for it to hold better, it needs to be screwed on with self-tapping screws.
VAZ 2110 electric trunk lock
Note: their diameter should not be more or less than 2 mm. In this case, the higher the holes are drilled, the better, otherwise the lock drive may then touch the cable.
VAZ 2110 installation of locks
Note: you should check whether the lock rod is caught on the cable, as this may complicate the operation of the trunk.
Note: if you need to shorten the length of the cables, they do not have to be cut. You can simply twist them together.
VAZ 2110 lock device
Note: most often a black wire is connected to ground, and a pulse is applied to another (it can be of different colors).
Option 1
To implement it you need:
Note: the control pulse of the alarm must be negative. It must be connected to terminal 86 of the relay. The terminal itself must be connected to the activator wire through which the pulse passes. There must be a fuse between them.
Option 2
This option is much simpler. The trunk will be opened by pressing a button in the cabin:
Why the central locking on the VAZ 2110 does not work correctly
The problem of improper operation of the actuator is not at all uncommon for cars in the domestic automobile industry. Despite the fact that there are a number of reasons for the failure of mechanism parts, the principle of operation of the automatic door closing system is quite simple, and the malfunctions are very typical in their entirety. This means that any motorist can deal with them.
You don’t have to grab your head and run to the workshop in search of a qualified specialist. Thanks to the diagnostic recommendations below, you yourself are very likely to become one. If, for some reason, you don’t want to get your hands dirty, at least no one else will dare to mess with you. And this, you see, also costs a lot.
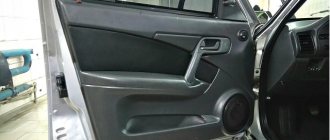
Why adjust doors?
The door of a modern car should close silently, with a slight push. Understanding that adjustment is required will come if the cause of the breakdown is identified:
- The hinges are in the wrong position - the parts are checked for mechanical damage.
- The gaps between the door and the body part have been increased - poor adjustment was previously carried out.
- The door handle or lock needs to be replaced - the fasteners are poorly secured.
- Body deformation occurs as a result of an accident, locksmith work, or improper installation of the door card.
If the driver carefully inspects the car, he will be able to replace sagging or sagging doors. When the door closes with a loud knock or this action requires force, the position of the door leaf has changed.
Problems in the operation of the activator electric drive
The central locking actuator is quite fragile and does not tolerate overload. The activator body, made of plastic, can easily melt if the frequency of door closing is excessively high. The duration of the control pulse also plays an equally important role. Try to always remember about the extreme fragility of the activator and not to load it during operation.
It is easy to guess that the activator is located in each individual door of the car. If the body of one of them melts due to overheating of the electric drive commutator, this becomes the cause of many problems:
- the activator on individual doors stops functioning;
- Constant overloads in a jammed electric drive cause the fuse to fail.
The actuator mechanism is entirely made of plastic. Gears can easily wear out and break during operation, or melt when the commutator overheats. As a result, when the central locking operates, characteristic creaking sounds are heard - a sure sign of imminent failure of the activators. Likewise, if the gearbox of the mechanism is humming, but the doors do not open or close.
Malfunctions of this kind can also be associated with all sorts of defects in the gearmotor and its traction. If you have recently replaced your central locking system, the reason may be that it was installed incorrectly. The mechanism may also be incorrectly adjusted or the fastening may be damaged. In any case, the door trim should be removed and checked visually.
What to do if your car door is sagging
| Sagging car doors are a “disease” of used cars. To solve this problem, you often have to resort to a radical method of replacing (digesting) the hinges, and for this you need to dismantle the doors, which takes a lot of time and effort. However, in most cases, doors can be straightened using simpler and faster methods. |
Signs of a sagging car door:
- The doors do not close well or require force to open them.
- When driving over uneven surfaces, the doors squeak (metal squeak).
- After rain, water appears in the cabin.
- There are scratches on the sills.
- Due to the skew of the door, uneven gaps appear.
You should start by tightening the door hinge bolts. If this doesn't help, then try the following tips:
How to straighten car doors
The same method can be applied using a jack. The door should also be slightly open. We place a jack under the edge of the door through a block so as not to bend the door. We lift the door in the same way, at first a little, if this is not enough, we increase the force.
Problem in the operation of the central locking electrical circuit on VAZ cars
The first possible problem follows smoothly from those mentioned in the previous section. Overload in the operation of activators leads to an increase in the operating current in the supply circuit above the rated value. As a result, the fuse blows and the central locking of the VAZ 2110 simply “dies”.
It is by checking the fuse that the diagnosis of central locking malfunctions begins. By the way, it is located in a very specific place and it is not easy to find it right away even if you know where to look. In order to get to it, you will need to fold back the central panel with the fuses and dig into the entire wiring harness in the niche that opens behind it. The “comrade” you need is packaged in a special plastic cup and connected to the pink wire.
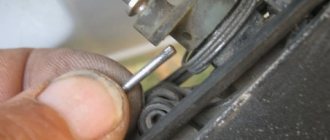
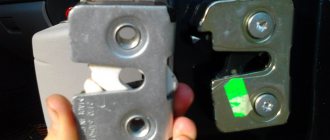
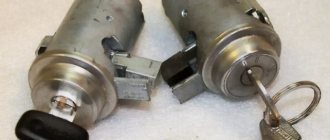
Replacing the larva
In some cases, it is not necessary to change the entire door lock on a VAZ 2110. It is enough to limit yourself to replacing the larva, which may jam.
The cylinder is a small metal cylinder containing a mechanism that is turned by a key. Each such element is individual; only one key can fit it.
To dismantle and replace the cylinder, you will need a flat-head screwdriver and pliers. Step-by-step work:
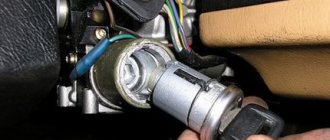
Problem with the operation of the VAZ-2110 central locking control unit
Electronics, of course, are reliable things. Modern control modules for the central locking VAZ 2110 are assembled using a transistor control circuit. This eliminates their mechanical wear. The shelf life of key components is measured in tens of years. The control unit is located under the plastic dashboard cover on the right side of the driver's seat.
However, power transistors can easily fail when the activators are overloaded and the collector is short-circuited. It may even happen that the signal from the control unit will constantly be sent to the lock drive if the transistor is broken. Otherwise, it will simply not turn on.
Checking the control unit is extremely simple. The voltage from the negative terminal of the battery, or directly from the pink wire supplying the control unit, is supplied to the contacts of the gearmotor (activator) in series to the red and yellow conductors. All of the above contacts can be found directly on the eight-pin connector of the control unit.
Thanks for subscribing!
Also, the control unit may issue erroneous control commands due to incorrect operation of the limit sensor. Being a mechanical device, the main door switch can simply wear out. As a result, the control unit simply will not be able to function correctly, since it will not know in what position the car doors are currently located, whether the driver's door lock is closed or open.
Adjusting the position of the door in the body opening.
10.2. Removing the tailgate of a VAZ-2111 car: 1 – bolt securing the fixed hinge link; 2 – movable link of the loop; 3 – tailgate; 4 – tailgate lock; 5 – bracket for fastening the gas-filled stop; 6 – gas-filled stop; 7 – lock retainer
To adjust the position of the door in the opening of the VAZ-2111 car body, unscrew bolts 1 (see Fig. 10.2) securing the fixed hinges and, using the enlarged holes in the body, adjust the gaps around the perimeter of the door. On VAZ-2112 cars, unscrew the nuts 1 (see Fig. 10.3) securing the fixed hinges 2 to the body. After completing the adjustment, tighten the bolts (or nuts).
10.3. Removing the tailgate of a VAZ-2112 car: 1 – nut; 2 – fixed link of the loop; 3 – bolt; 4 – tailgate; 5 – tailgate lock; 6 – gas-filled stop; 7 – lock retainer
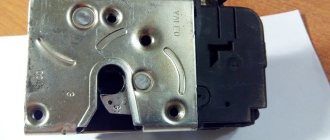
10.4. Tailgate lock: 1 – gear motor for the electric drive of the lock; 2 – gear motor bracket; 3 – gasket; 4 – lock drive; 5 – bracket; 6 – upper links; 7 – bracket for the lock drive lever of the VAZ-2112 car; 8 – nut; 9 – lever of the lock drive of the VAZ-2111 car; 10 – lower links; 11 – electric drive thrust; 12 – lock; 13 – lock socket; 14 – nut securing the retainer socket; 15 – lock retainer; 16 – bolt; 17 – lock fastening nut
If the tailgate closes too tightly, loosen the fastening of the latch 15 (Fig. 10.4) and, using the enlarged holes in the latch, move it to the desired position. Before making adjustments, it is recommended to outline the contours of the clamp on the body. After completing the adjustment, tighten the fastening bolts of the clamp. The lock of the VAZ-2112 car differs from the lock of the VAZ-2111 car only in the length of the rods 6 and 10 and the brackets 7 of the drive levers.
How well do central locking and alarm systems work together in VAZ-2110 cars?
As you know, a modern alarm system involves autonomous control of all opening parts of the car. For this reason, it is possible to connect the VAZ 2110 central locking system to the alarm system. The connection diagram for the signaling device is included in the operating instructions for the device. The central locking control circuit also seems to have an additional unused connector for this purpose.
However, in reality it is not so simple. Control signals from the alarm system to the central locking system will conflict with the information received from the limit switch installed in the driver's door. For this reason, the standard central locking control circuit with which VAZ 2110 cars are supplied from the factory should be slightly altered.
The essence of the modification is extremely simple. According to the circuit diagram, the limit switch is connected to the eight-pin connector of the central locking control unit via two wires: brown and white. These wires from the unit should be disconnected.
Now the limit switch will be connected to the alarm control circuit, and the alarm will set control signals to the electronic unit of the central locking. Perhaps the diagram described “on fingers” may seem somewhat incomprehensible to you. But it will be very easy to understand the above by studying the diagram proposed below.
Central lock VAZ 2110
To better understand the idea of connecting an alarm, it is still worth studying the instructions included with it. Thanks to this, you will have a clear idea of how to implement this idea in practice. But the essence of the connection will remain the same. The work requires minimal effort and is generally very simple.