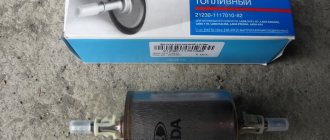
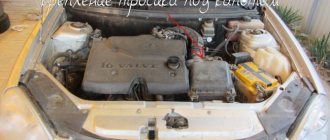
Lada Priora began to be produced in 2007 and received 8 and 16 valve injection engines. Depending on the year of manufacture and restyling in 2010, the fine fuel filter will have its own distinctive original part number, but in essence it is one filter that is designed to clean gasoline. The original manufacturer of this part is the Big Filter company (Russia), its price is about 500 rubles, so very often Prior owners want to choose a suitable analogue with the same or even lower cost.
How to replace the fuel filter
Those who don’t know where the fuel filter is located can see it in the photo; it is mounted on a body bracket above the rear suspension beam:
Procedure:
- Remove the tip of the outlet and inlet tubes from the filter fitting by pressing the spring lock.
- Loosen the clamp.
- Remove the fuel filter.
Installing the fuel filter is carried out in reverse order. Please note that the arrow on the filter housing is directed in the direction of fuel flow, that is, towards the right side of the car. We put the tips of the fuel pipes on the filter fittings until the clamps snap into place and tighten the clamp. All that remains is to replace the fuel pump fuse and start the engine to check.
The process of changing the fuel filter on a Priora is also shown in the video:
By the way, the process is completely similar, regardless of the engine (16 valve or 8). Let us remind you that other instructions for repair and operation of the Lada Priora are in this category. What kind of gasoline do you put in your car's tank?
Source
Preparatory stage
You will not need any skills when replacing the filter, you will not need specialized devices, just a key to “10”, know where the element to be replaced is located, and how to change it correctly, and for this there are detailed step-by-step instructions. To carry out the work, you need a lift or inspection hole, since the filter is located on the bottom of the car in the rear. Stock up on rags. Also prepare an unnecessary container. Inspect the fuel hoses and fasteners, pay attention to their integrity. If necessary, clean them from dust and dirt.
Fuel filters for the Lada Priora car
"Lada Priora" is a deep modification of the previous VAZ-2110 model. The fuel supply systems for the engines of these cars are very similar.
A diagram of the fuel supply system for the engines of the Lada Priora car will help you understand the nuances of its operation.
Gasoline in the Lada Priora is cleaned by two filters. The mesh filter of the electric fuel pump cuts off large fractions of contaminants. This is an inexpensive part costing about 50 rubles.
The mesh filter of the electric fuel pump performs primary filtration of fuel
Small particles are retained by the fine fuel filter.
Small particles of contaminants are retained by a fine fuel filter
The first prototype of the Lada 2170 was presented in August 2003 at the Moscow Motor Show. Even then, this concept clearly resembled the current Priora, except that a number of exterior details had not yet been worked out. But the car went into production only 3 and a half years later, in March 2007 - the plant was busy launching another model, which reached the assembly line only by November 2004 - Lada Kalina. By the way, compared to the Kalina (not to mention the ancestor of the Priora, the “ten”) the Lada Priora project was implemented quite quickly.
Innokenty Kishkurno
Which filter is better: expert opinion
When choosing a filter, pay attention to the way the fuel pipe hoses are attached. Lada Priora uses clips. Products with threaded fittings are not suitable.
You can find fuel filters from various manufacturers on sale. Their approximate cost is in the range of 200–500 rubles. It is almost impossible to assess the price-quality ratio “by eye”, since the paper filter element is installed in a non-separable metal housing.
The magazine "Behind the Wheel" conducted a study and found that all popular filters on the market are suitable for use. For this reason, the principle of “spend as much as you don’t mind” has the right to life. If it doesn’t fit and you want certainty, pay attention to the technical characteristics of the part.
Fuel filters have two main parameters: screening fineness, which determines the minimum size of retained dust, and hydraulic resistance. For reliable and uninterrupted operation of injection engine injectors, the power system filter must retain 95% of particles measuring 10 microns in diameter or less. Less is better.
But who needs a “tight” filter that impedes the movement of fuel? At a flow rate of 2 liters per minute, its hydraulic resistance - pressure drop - should not exceed 5.1 kPa. And again: the less, the better.
Another significant parameter is the area of the filter element. The standards do not standardize it, since they establish a maximum hydraulic resistance that depends on the area. But, apart from resistance, the parameter affects the duration of operation without replacement when the quality of gasoline is low.
Thus, the ideal filter should have a large surface area, retain the smallest particles and not create resistance to the flow of gasoline.
Those who want to clean the fuel to the maximum extent can be recommended to look for filters with the smallest screening fineness. When frequent replacement of a part is unacceptable, pay attention to the filter surface area.
The external differences between fuel filters from leading manufacturers are only in color and inscriptions containing the brand name
Where are the fuel filters for VAZ cars?
A coarse strainer is installed at the inlet of the electric fuel pump and is located together with the entire fuel module inside the gas tank. To get to the “mesh”, you need to open the hatch cover under the rear seat and remove the module.
How to replace faulty devices
The power system filters are replaced by first disconnecting the battery. The replacement sequence for car modifications with different engines is the same. It is more convenient to remove a fuel module with a coarse filter when there is little fuel in the tank.
- screwdriver;
- socket wrench 10;
- 0.5–1 liter container for draining gasoline from the filter.
Before removing the fuel filter or opening the gas tank, relieve the fuel pressure.
Fuel pressure relief algorithm
Proceed according to the sequence below:
- Turn off the ignition.
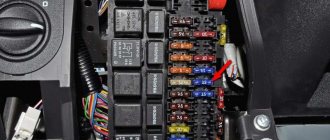
- Remove the right floor channel lining panel.
- Remove the fuel pump fuse.
- Start the engine and wait until it stops after running out of fuel.
- Turn on the starter for a few seconds.
- Turn off the ignition.
- Replace the fuse.
Photo gallery: relieving fuel pressure on the Lada Priora
Replacing the device: photo and procedure
To replace a faulty part in a garage, follow the recommendations below:
- Place the machine on the inspection hole.
- Relieve pressure in the fuel system.
- Disconnect the battery.
- Squeeze the clamps of the supply (left) hose and disconnect it.
Squeeze the clamps of the inlet (left) hose, then disconnect it
Disconnect the outlet (right) hose from the fuel filter
Holding the holes in the fittings with your fingers, remove the filter from the clamp
Please note that there is no difference in the procedure for replacing filters on an eight- and sixteen-valve engine.
After the launch of the new model, cars of the Priora and Lada 110 families were produced in parallel for some time, but Priora quickly supplanted its predecessor model: in March 2007, the Priora sedan, VAZ-2170, was launched, in February 2008 - the VAZ-2172 hatchback, and in May 2009 - VAZ-2171 station wagon. Later, small-scale modifications were also produced - the extended Priora Premier, the three-door Priora Coupe and the sporty Priora TMS.
Innokenty Kishkurno
How to install the electric fuel pump strainer correctly
To dismantle the part yourself, proceed as follows:
- Relieve pressure in the fuel system.
- Disconnect the battery.
- Unscrew the fastenings of the hatch under the rear seat, open access to the fuel unit.
Unscrew the fastenings of the hatch under the rear seat, open access to the fuel unit
Clean the fuel assembly cover from dust and dirt
Carefully disconnect the power connector
Press out the spring clips that hold the fuel hoses in place, then disconnect them
During the dismantling process, be sure to check the technical condition of the parts.
Remove the fuel assembly by holding it with both hands
If everything is done correctly, the fuel pump assembly will be in your hands
Why are they needed at all?
Forced fuel cleaning is a necessity to ensure the performance of any engine running on liquid fuel. Filling the filter cavity, gasoline passes through a layer ( there may be several
) filter material, leaving on its surface particles of dust, dirt and other solid inclusions that have a detrimental effect on engine parts.
If the “food” ration of a car engine is diesel fuel, then an additional separator is required, which will help clean the fuel, in addition to mechanical inclusions, from water content.
Its operating principle is based on the fact that water is heavier than diesel fuel, and centrifugal force helps separate them from each other. Due to the specific operation of separators, most of them are heated.
Regulations for installing the Lada Priora power system
The manufacturer advises changing the fuel filter every 30 thousand kilometers or after 2 years with less mileage. But for this car this is not the norm, but a recommendation that can be accepted with reservations.
The duration of the filter operation is affected not only by mileage, but also by the quality of the fuel. If there are a lot of foreign inclusions in gasoline, the filter quickly becomes clogged to such an extent that it significantly reduces the pressure in the fuel supply system and disrupts the normal operation of the engine.
In practice, many owners change fuel filters twice as often as the designers advise. The most cautious citizens are after 7–10 thousand kilometers.
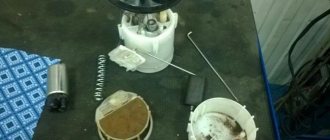
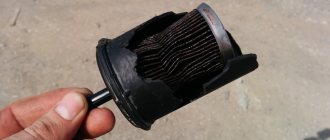
Indirectly, the timeliness of the filter replacement can be determined by examining the filter element. Saw the housing and see how much dirt the used filter “caught”.
If the inspection shows significant clogging of the filter element, the part must be replaced
The frequency of replacing the Lada Priora strainer has not been determined. The filter cells are quite large, so when the tank and gasoline are clean, the “mesh” is often forgotten.
People rarely look into the tank, so it is advisable to change the filter or at least check its condition in each case that requires dismantling the fuel module.
The strainer may be one of the reasons for low pressure in the fuel rail. According to this criterion, the fuel pump mesh is changed if replacing the fine filter does not change the situation.
Timely replacement of fuel filters ensures the purity of gasoline and extends the life of the engine. For this operation, which is feasible for any car enthusiast, no special skills or complex equipment is needed.
Source
Operating principle of a lambda probe
The main task of the lambda probe is to determine the chemical composition of exhaust gases and the level of oxygen molecules in them. This figure should range from 0.1 to 0.3 percent. Uncontrolled excess of this standard value can lead to unpleasant consequences.
During a standard car assembly, the lambda probe is mounted in the exhaust manifold in the area where the pipes connect, however, sometimes there are other variations in its installation. In principle, a different arrangement does not affect the operating performance of this device.
Today you can find several variations of the lambda probe: with a two-channel layout and a broadband type. The first type is most often found on older cars produced in the 80s, as well as on new economy class models. A broadband sensor is typical for modern mid- and high-class cars. Such a sensor is capable of not only accurately determining the deviation from the norm of a certain element, but also promptly balancing the correct ratio.
Thanks to the hard work of such sensors, the vehicle's operating life is significantly increased, fuel consumption is reduced and the stability of idle speed is increased.
From an electrical engineering point of view, it is worth noting that the oxygen sensor is not capable of creating a uniform signal, since this is prevented by its location in the collector zone, because a certain number of operating cycles may pass in the process of reaching the device with exhaust gases. Thus, we can say that the lambda probe reacts rather to destabilization of the engine, which it subsequently notifies the central unit about and takes appropriate measures.
Replacing the fuel filter on a Priora
Welcome! The fuel filter is the main part of the fuel system of a car, thanks to this unit, the fuel that goes from the tank to the engine is cleaned, namely, it is cleaned of water and dirt particles that are in gasoline, so this part is very necessary for the car, but when through it particles of dirt pass through, they are accordingly inside the filter itself and thus remain, it becomes dirty over time, and because it is dirty, it will be harder for fuel from the tank to go into the engine and thus the car will drive worse!
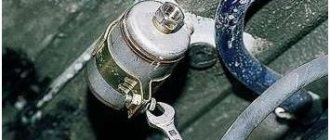
Note! In order to replace the fuel filter on a Priora, you will need to collect some things for replacement, namely: You will need to stock up on a wrench of about “10” and gloves, because when replacing the filter, most likely some of the gasoline will get on your skin in this regard, if you then start lighting a cigarette, for example, there is a chance that you will catch fire, so you need to use gloves when replacing!
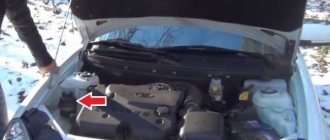
Where is the fuel filter located? It can be seen very easily if you climb under the bottom of the car, since the filter itself is located near the tank and the tank itself is located in the lower part of the car, so in order to see the filter itself you will need to have either a very high raised car, or a lift, or inspection hole, and after that you will need to crawl under the bottom of the car and there in the central part (Rear) find the rear part of the muffler (Indicated by a blue arrow) and at the very center there will be the fuel filter itself, which is indicated by a red arrow in the photo below.
When should you change the fuel filter? As was said earlier, when it becomes clogged, it needs to be changed, but how can you tell when the filter is clogged, you ask? Firstly, the first signs of its clogging will be a loss of power, and jerking may also occur at the beginning; they will begin to occur during sharp acceleration, and when the filter is completely clogged with dirt, they will overtake you even with a normal driving style (Leisurely), and also if If the filter is clogged, you will hear the noise of the fuel pump during sharp acceleration, and then when driving, so listen to extraneous sounds in the car.
Note! Well, according to the VAZ car manufacturer, the fuel filter on a Priora needs to be replaced at intervals of 30,000 thousand km, but the filter will not always need to be changed at such intervals, there are also situations when it fails earlier, read about this below!
What causes a fuel filter to fail? Sometimes they ask us such questions, basically it becomes unusable only from dirty gasoline, so refuel your car at proven gas stations and, as the manual says, it is best to fill such cars with 95 gasoline, not 92, and the filter itself will live a longer life, and in general the entire fuel supply system suffers from dirty gasoline, for example the fuel pump mesh, which must also be kept clean.
And now in more detail
Lada Priora Sedan constructor, assemble it yourself Logbook Mileage and clutch replacement
How can I check the functionality of this device? The fundamental element in the absorber is the valve. To understand the function, let’s look at how the adsorber works. When a car is parked, a huge amount of gasoline vapor can accumulate in its tank. Some of the vapor is caught by the recuperator, and the rest settles back into the tank. The part that was caught goes into the adsorber. When the engine is running, the absorber valve closes and interrupts the access of vapors, now they are sent to the combustion chamber. What is it for? When you start the car, our device prevents vapors from entering the exhaust manifold, thereby reducing the amount of harmful substances in the gas.
In a car, the adsorber absorbs fuel vapor from the gas tank ventilation system and supplies it to the intake, because according to environmental standards, the gas tank must be isolated from the atmosphere.
From Wikipedia;
Adsorber (from Latin ad - on, with and sorbeo - absorb) is a device for absorbing (thickening) a surface layer of a solid, called an adsorbent (absorber), of dissolved or gaseous substances, not accompanied by a chemical reaction. The adsorber is used in chemical, oil refining and other industries. The process occurring inside this apparatus is called adsorption.
Gasoline vapor filtration system. The diagram is quite conventional, but it reflects the essence. Gasoline vapor from the tank passes through a carbon filter, is cleaned and supplied to the inlet through a solenoid valve controlled by the ECU.
Now the first question is - why filter gasoline vapors if they still go into the intake? The answer is simple - adjusting the internal combustion engine control program by adding the nth number of clean air at the inlet is much easier than making adjustments based on the fuel-air mixture (gasoline vapor from the tank) of an unknown proportion.
And now the answer to the main question - why delete it? So, although some manufacturers claim that this device will have enough resources for the entire life of the car, we know that they are lying)
In general, over time, the adsorber becomes clogged and stops passing air. As a result, we get excess pressure in the tank, which interferes with the normal operation of the fuel pump. In the cabin (sometimes under the hood) we get a periodic smell of gasoline, the vapors of which are squeezed out of the ventilation tube. And the engine starts running on a rich mixture due to lack of air.
Now guess how our country solves this problem? That's right, most people simply throw out the adsorber and turn off the system as shown in the diagram:
A fuel filter from a carburetor classic is usually placed on the tube from the gas tank, and the solenoid valve, through which clean air should flow into the engine, is simply shut off with a bolt.
In the picture I already wrote that this is wrong and here’s why. This method of removing the adsorber only partially solves the problem. Yes, the smell of gasoline disappears, the tank is ventilated, but no air is supplied to the intake and the engine continues to run on a rich mixture.
And now the following diagram:
And now it already shows how it SHOULD be done. The same filter from the classics is put on the hose from the valve to the adsorber, which now serves as an air filter and prevents dirt from getting into the receiver. This is how the fuel-air mixture is brought to normal parameters.
Well, now a couple of visual photos of what it all really looks like:
Everything is clear here, one tube goes to the gas tank, the second through the valve to the engine.
Bottom part of the adsorber. There is a fitting for supplying air from the atmosphere so that a vacuum is not created in the adsorber.
So this is all done on my machine. I didn’t take a photo of the tube from the tank, it’s hard to get to it even without a phone