Replacing the fuel filter on a VAZ 2110 is one of the main points of vehicle maintenance.
Indeed, in recent years, low quality gasoline has been a real problem for car owners.
In such a situation, you have to closely monitor the fuel system of the car and replace the main components from time to time.
Thus, the fuel filter plays a peculiar role of the “liver” in the automobile “organism”.
The reliability, dynamics and durability of the main component of the car - the engine - depend on its operation.
In addition, failure of the fuel filter can cause increased fuel consumption, which is a very important parameter for most car enthusiasts.
When to change the coarse filter
The condition of the fuel system can be determined by the developed pressure and performance. For these purposes, a pressure gauge is connected to the fuel system through a special adapter. It is better to do such diagnostics at a service station. At home, you can determine the performance of the fuel pump approximately this way:
- The ignition turns on. At the same time, the absence of a characteristic hum indicates that the pump is not working or, conversely, strong noise when the pump operates under heavy overload, which shortens its service life.
- If, when the car is moving in fourth or third speed, the driver presses the pedal and the pump performance drops, this indicates a problem in the fuel system.
- A spontaneous drop in speed while driving indicates problems with fuel supply from the gas tank.
- The reasons for such deviations will most likely be clogging of the coarse filter or fine fuel filter. In the first case, replacing the VAZ 2110 coarse filter may not be necessary; it is enough to try to wash the element, although this will only have a temporary effect. It is better to purchase a new part, the price of which is reasonable, and installation by yourself is quite simple and will not take much time, but the reliability of the gas pump will increase for a long time.
How to clean the coarse filter of a VAZ 2110 car
Before starting work you need to purchase:
- Gaskets for installation under the fittings located in the fuel line.
- Seal for VAZ fuel pump.
- Compressor.
The instructions indicate that cleaning the coarse filter on a VAZ 2110 car is carried out after removing it from the gas tank. To do this:
- The car is de-energized.
- The cushion is removed from the rear seat.
- The cover is removed from the hatch after unscrewing the screws.
- The electrical connector is removed.
- The fitting on the tube through which fuel is supplied is disconnected.
- The tube is moved to the side.
- In the same way, the fitting on the drain pipe tube is disconnected, which is also moved to the side.
- The pressure ring is removed.
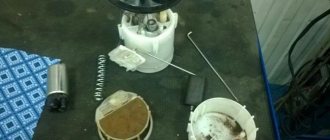
- The fuel pump is lifted, the float is removed from the hole in the tank, and the fuel pump is removed simultaneously with the fuel level sensor.
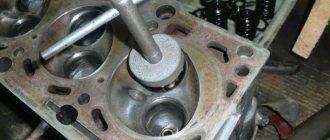
- In the fuel pump, in its lower part, there is a filter for coarse fuel purification. The detail is shown in the photo.
Coarse filter for VAZ 2110 car
It is difficult to visually identify very small, translucent particles of dust or dirt; the filter seems clean, but you still need to wash it.
- The element is washed well with the same detergent and a brush with fine bristles (for example, a toothbrush).
- The coarse filter must be blown from the compressor with compressed air. If there is no compressor, the mesh simply dries out in the open air. It is necessary to prevent the entry of dust and dirt during this period.
- Assembling the fuel pump on a VAZ 2110 car is carried out in the reverse order of removal.
- The ignition is turned on and the operation of the fuel system is checked.
How to properly replace the VAZ 2110 coarse filter is clearly visible in the video. With timely and proper care of the fuel pump mesh, major problems with the operation of the fuel system can be avoided.
Where is it located?
If you feel how, while driving, your “iron horse” loses power from time to time and moves jerkily when changing gears, then changing the fuel filter (hereinafter referred to as TF) of the VAZ 2110 is simply necessary. If you decide to change an element yourself, then first you need to know where it is located. Unlike its predecessors, where the TF was installed under the hood, engineers installed this component of the system in the VAZ 2110 injection cars next to the gas tank. To gain access to the element, simply crawl under the bottom of your car.
Location of TF VAZ 2110
Detailed instructions for replacing the VAZ 2110 fuel filter
It is located under the bottom of the car on the gas tank side and is attached directly to the body of the VAZ-2110 with a tightening clamp using just one bolt and nut. Structurally, it is a small barrel with outlets for hoses in the upper and lower flat parts. If you look in the direction of travel of the car, it is mounted slightly to the right of the muffler. As you already understood, all that remains is to remove it, for which you need to:
'); if("undefined"===typeof loaded_blocks_drive){loaded_blocks_drive=[]; function n(){var e=loaded_blocks_drive.shift(); var t=e.adp_id; var r=e.div; var i=document.createElement("script"); i.type=”text/javascript”; i.async=true; i.charset=”utf-8″; i.src=»https://www.drivenetwork.ru/data/»+t+».js?async=1&div=»+r+»&t=»+Math.random(); var s=document.getElementsByTagName("head")||document.getElementsByTagName("body"); s.appendChild(i); var o=setInterval(function(){if(document.getElementById(r).innerHTML&&loaded_blocks_drive.length){n(); clearInterval(o)}},50)} setTimeout(n)}loaded_blocks_drive.push({adp_id:e ,div:t})})(47602)
- Unscrew the fuel pipes on both sides of the barrel. Holding the nut on the filter itself with a 19mm wrench, use a 17mm wrench to unscrew the nut directly on the fuel pipe.
After that, a certain amount of gasoline remaining inside should flow out of the filter, so you can place a small container or rag under the bottom in advance, this will be enough.
- All that remains is to loosen the fastening clamp. Here you will need a key for 10.
The tightening nut does not need to be completely unscrewed. When the clamp is loosened enough, you can simply remove the VAZ filter from its seat. Again, when you turn it over, a small amount of fuel will spill out of the holes.
Recommendations before installing a new VAZ-2110 fuel filter
To prevent gasoline leaks while driving, you need to check the condition of the rubber gaskets on the fittings connecting the product to the fuel system of the VAZ-2110. If they are crushed, torn or have other signs of wear, they need to be replaced. Fortunately, such gaskets cost mere pennies and, for the purpose of prevention, they can be changed without even looking after each filter replacement.
Also do not forget about the correct connection of the purifier when reinstalling it. Any VAZ 2110 fuel filter on the body contains an arrow indicator with the correct direction of fuel movement through it. Mark in advance or remember the direction of movement of gasoline according to the previously removed filter and connect the new one in the same way.
We also remind you that when reconnecting the fuel connections of the VAZ 2110, you must use two keys, similar to the dismantling process. Use a 19 wrench to hold the nut on the barrel and tighten the nut on the pipe with a 17 wrench. At this point, in principle, the replacement process can be considered complete. Don't forget to also reconnect the electrical connection to the fuel pump and you're good to go.
Preparatory activities
You don't have to spend a lot of time replacing the fuel filter. The process is easy and does not require the involvement of experienced specialists. In addition, the services of technicians from service stations are expensive. You can do everything yourself and no less efficiently than experienced specialists.
To get started, arm yourself with a set of tools and auxiliary materials, which include:
- A set of keys for 17 and 19 millimeters;
- Almighty lubricant WD40;
- A container for draining excess fuel and unprocessed fuel onto the filter;
- Dry, lint-free rags;
- Gloves and closed shoes.
Let’s say right away that if you don’t want or are not ready to do such work with your own hands, it’s not too late to stop. You can entrust your VAZ 2110 and the replacement of the fuel filter on it to specialists. It will cost money, but you guarantee yourself a high-quality task.
If the work doesn’t scare you, then let’s get started.
Types of filters: which ones are better
Car enthusiasts who are about to change coarse or fine filters for the first time often ask other VAZ owners which filter element is best to choose. The cost of products from all manufacturers is approximately the same, so you want to get competent advice “first-hand” and avoid incorrect recommendations.
On car owner forums, filters from the Big and Mahle brands are most often mentioned. It should be remembered that no one is insured against manufacturing defects.
However, VAZ owners often support domestic manufacturers by purchasing Salyut filters. The most popular parts are:
- article UT-00002606, catalog number 21080–1117010 - with sump;
- article 00000011756, catalog number: 21230–1117010;
- article: 00000009674, catalog number 21120–1117010.
The Salyut filter differs from analogues in its acceptable quality and more than attractive price
When the fuel filter is dirty
The quality standards of gasoline at gas stations are constantly increasing, but it is not yet possible to get rid of the presence of mechanical particles and other contaminants in their composition. In addition, dirt, corrosive deposits and other fractions are also found inside the fuel tank. All this does not have the best effect on the operation of the power plant.
To prevent foreign particles from entering the cylinders and to rid the fuel-air mixture of excess condensate, coarse and fine fuel filters are used
Operating a car without these parts will lead to premature wear of the fuel pump, injectors responsible for stable injection of the mixture into the engine block with combustion chambers and the entire system as a whole, no matter whether it is 8-valve or 16-valve.
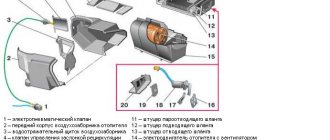
Fuel filter location
The Lada Granta has 8 and 16 valves, in luxury or in base - it doesn’t matter, the filters are in standard places. Fine cleaning element to the right of the gas tank at the bottom of the sill. This applies to all body types, sedan or liftback. It is secured with nylon or plastic clamps. To get to it, you need to use an overpass; if you wish, you can crawl under the bottom by lifting the desired side with a jack.
In order to secure such a procedure, you should duplicate the position of the car with an additional support, since the jack may fall off. The coarse filter, or simply a mesh, is located inside the gas tank on the gas pump. To access it, you need to fold down the rear seat. Under it there is a hatch through which you can get to the block with the fuel pump.
Replacement Regulations
The frequency of replacement of fuel filters on the Lada Granta is not of fundamental importance, regardless of the configuration, type of power plant and body design. According to the manufacturer, the mesh does not require replacement and is designed for the entire service life of the fuel pump. Considering the low quality of gasoline, this is not true. Such a statement can be justified if only high-quality and clean fuel is used. Of course, this does not mean that you need to change the filter often. But it is recommended to do this every time the fuel pump is removed for some reason.
They are considered consumables, i.e. such parts become dirty and wear out relatively quickly and must be replaced on time. The fuel filter under the gas tank (fine cleaning) according to the regulations on the Lada Grant 8 valves or 16 should be changed every 30,000 kilometers. In reality, everything looks a little different, since pollution directly depends on the purity and quality of gasoline at the gas station. Experienced car enthusiasts try to change the fuel filter twice as often, i.e. after 15,000 kilometers. Or once a year. And for some, even more often - during a seasonal oil change in the engine.
Signs of a faulty filter
The main problem of a clogged mesh is a decrease in fuel throughput. Accordingly, insufficient supply leads to a decrease in pressure in the fuel rail. The filter does not become dirty overnight, and therefore the pressure in the fuel system does not decrease immediately. At first, the effects of pollution are almost invisible. The lower the pressure in the system, the worse the fuel-air mixture. An insufficient amount of gasoline depletes the mixture with air, and accordingly, this negatively affects the stable operation of the power plant.
A clogged element can be identified by the following signs:
- unstable operation of the propulsion system;
- the engine stalls at idle;
- revolutions “float”;
- decrease in dynamic characteristics and power failures;
- When driving, sharp jerks are felt without pressing the accelerator pedal.
If any of the above symptoms occur, the first thing you need to do is determine the pressure in the fuel rail. If the level is below the values set by the manufacturer (less than 4 kgf/cm), the consumables should be checked and, if necessary, replaced. Since the fine filter is easier to change, you need to start with it.
Next, you can replace the filter in the gas tank. A dirty mesh in the tank negatively affects the proper operation of the fuel pump, since not enough fuel enters the fuel line. The gas pump increases speed, trying to capture more gasoline, as a result of which its already limited resource is sharply reduced. At the same time, do not forget that gasoline is also used to cool the working parts of the gasoline pump and lubricate them. Insufficient fuel leads to lack of lubrication and overheating.
Why is it needed?
There is a coarse filter that comes first from the gas tank. After all, first the lid where the fuel tank is located is opened, a gun is inserted there, the magic button is pressed and the fuel flows. Yes, it takes a lot of your money along the way, but what can you do? The location of the tank can be on the left or right, but this does not play a special role. Coarse cleaning, which is a mesh that traps large particles of debris.
This is followed by a fine filter. This is exactly what we will talk about. This element is called a fuel filter. With its help, small particles are retained. But even they can penetrate your diesel engine or gasoline injector.
Dust, dirt, debris, rust elements. All this can penetrate the system, causing a clogged pipe, tube, valve, fuel hose, or fuel pump components. Nothing good will come of this if timely replacement is not made.
To understand how to replace the filter, which element to choose and how to choose an analogue for the device you are going to change, you need to have at least a basic understanding of such an important component of the car.
I suggest starting with varieties.
Kinds
Modern fuel filters installed on Ford Focus, Nissan Almera, Hyundai Solaris, Nexia, Mazda, Opel, BMW e60, Renault Logan and Megane, Kia Rio and many others have at least two degrees of purification.
- First degree. This is a rough cleansing that allows you to get rid of large contaminants. Not to be confused with a regular mesh in the tank, which is not available everywhere.
- Second degree. Fine cleaning. This is the main task that falls on the shoulders of the filter.
And here you probably have the main question - where is the filter device located? I don't know. No, I can answer, but if you tell me specifically what make of your car or what year of manufacture. After all, on the same Chevrolet Niva, different Opel, Toyota, Mazda models, on the Volkswagen Passat B3, as well as on the domestic VAZ 2114, 2112 and 2110, the location may differ.
However, they are always located somewhere between the engine and the gas tank, since the filter's job is to prevent contaminants from entering the engine while the fuel moves from the tank to the engine. What's in the gas tank itself? That's right, a coarse cleaning device. This is an additional filter element so that any unscrupulous gas stations do not spoil your car.
Now let’s talk about the types of filters themselves. What element will be on the car? It depends on the type of engine. There are three of them, as you know. Except for electric motors. Well, there is no need for a fuel filter, as you understand.
Therefore, there are three types of filters:
- carburetor;
- diesel;
- injection.
Location
So you bought yourself a brand new sedan and you think it’s time to change the filter for this engine. Want to choose the best? Well then, take a closer look at Cummins devices. Mann, Hertz. They have proven themselves well, and they cost quite a bit.
You probably know whether your engine is diesel, injection or carburetor
This is important to understand the location of the fine filter, that is, our today's hero
- Carburetor. In these engines, the TF (fuel filter) is placed in front of the carburetor itself, and is often in a transparent housing to control contamination. These are the most basic devices, because the carburetor is the least demanding on the quality of fuel.
- Injector. It uses nozzles and therefore requires high-quality filtration. And the fuel is supplied under high pressure. Therefore, the filters are enclosed in durable metal housings. The TF has to be regularly maintained, cleaned and monitored for its condition. They are placed mainly under the bottom of the car to make it easier to dismantle and replace.
- Diesel. A diesel engine also needs high-quality purified fuel, since the system is quite sensitive. Diesel fuel has a higher moisture content than gasoline. The TF is designed to filter debris and remove accumulated moisture. A separator is provided for this purpose. The location is quite simple - between the engine and the pump that pumps fuel.
Any fuel system must include a TF. They are replaced assembled, that is, there is no point in removing the filter elements themselves (usually special paper), leaving plastic or metal. Be sure to look at the number and article number of the filter that is installed on your machine, and check the operating manual from the factory. This is the only source of truthful information regarding the maintenance of your particular vehicle in this configuration and with this type of engine.
Replacing the fuel filter yourself
The procedure for replacing the fuel filter takes approximately 10–15 minutes. The car owner can easily spend this time, saving on the services of service station specialists.
This is interesting: Auto parking sensor - parking sensor
On different VAZ modifications, the fuel filter may be located differently:
- On carburetor engines, the filter is located between the gas tank and the engine itself. To make it easier to find it, you can open the hood, find the vacuum brake booster, and above it is a reservoir with brake fluid. The filter is located near this tank;
- On injection models, you do not need to open the hood - the filter is located on the bottom of the car. That is, access to it is possible only from below. The fastening area is under the second row of seats in the middle of the beam.
Signs of abnormal fuel system operation
Even if the car is operating normally, it is necessary to change the filters according to the manufacturer’s recommendations (every 30 thousand kilometers). Premature replacement is carried out if certain symptoms are present:
- the car begins to twitch when driving;
- fuel supply to the engine is difficult due to severe pollution;
- It becomes difficult to start the engine when cold.
Video: a common cause of engine breakdowns is a clogged fuel filter
How to replace the fuel filter on an injector
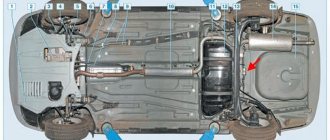
VAZ of the tenth family, running on injection-type engines, have a more complex structure. This is due to the fact that the filter is located under the car body. To remove it, you will have to either crawl under the car or drive the car into a hole.
The location of the filter on the rear beam on the bottom is typical for injection modifications of the VAZ
In any case, before starting work, it is necessary to relieve the gasoline pressure in the fuel system. The easiest way to do this is this:
- Fold down the rear seat cushion in the passenger compartment. Below it is the fuel tank hatch.
- Open the hatch and disconnect the wiring harness from the fuel pump located in the tank.
- After this, start the engine and wait until it stalls on its own.
- Start the engine again to achieve a maximum reduction in the fuel level in the system and, accordingly, pressure.
Is it possible to change the filter without involving specialists?
The procedure for removing the filter from the injection VAZ 2110, 2111, 2112 is as follows:
- Provide yourself with convenient access to the rear beam of the vehicle.
- First, wipe the filter itself with a rag to remove any dirt and grime from it, then spray the fastening joints with WD-40.
- After 5–10 minutes, when the liquid is absorbed, you can unscrew the fuel lines from the filter: use one wrench to secure the filter nut, and use the other to turn the line nut.
- After disconnecting the tubes, gasoline may leak out (it is better to place clean containers or a rag under the filter to absorb flammable liquid).
- You will see rubber rings at different ends of the filter after disconnecting the hoses. They can be immediately disconnected with the blade of a flat-head screwdriver.
- Next, remove the filter itself.
This is interesting: Passive body safety systems: from the 50s to the present day
The product is replaced in the reverse order. Before installing the filter, it is recommended to lubricate the rubber seals with gasoline.
How to install a fuel filter on a carburetor
The simplicity of the design of carburetor modifications of the VAZ 2110–2112 allows you to replace the fuel filter in a matter of minutes. However, to avoid injury, work should only be carried out with a cooled engine and after releasing the pressure. You need to do this:
- Fold down the rear seat in the cabin. Directly below it is the fuel tank flap.
- Use a flat-head screwdriver to unscrew the hatch screws, after which the cover is removed.
- There is a pump in the gas tank itself - you need to disconnect the power harness from it (remove the terminal with the wire cable).
After this, you will need to start the engine and wait until it stalls due to lack of fuel. It is recommended to start it several times until the engine stops starting.
On carburetor VAZ models, the filter is located under the hood
Then you can proceed directly to dismantling the fuel filter:
- Open the hood.
- Next to the brake fluid reservoir there is the filter itself, two fuel lines are connected to it.
- Using a Phillips screwdriver, first one pipe is disconnected, and then the second. It is possible that there is still fuel left in the system, then gasoline will flow from the hoses. It is best to immediately place a container under them or plug the holes with a bolt of suitable diameter.
- The filter can be easily removed and a new one can be installed in its place.
The hoses can be connected in any order. The main thing is not to mix up the fuel supply and return hoses when working.
Dependence of engine cleanliness on the brand of oil and type of fuel
It's no secret that the engine must be clean inside throughout its operation. Its purity is affected by several indicators - the type and brand of motor oil used, as well as the fuel used. If you use liquefied natural gas, it forms much less deposits than gasoline. By running on such fuel, the engine increases its service life. Motor lubricant can also be changed much less frequently.
High-quality synthetics should be changed every 10 thousand km when using gasoline. Using gas, you can increase the interval to 15 thousand. If the car owner uses semi-synthetics, the oil composition needs to be changed more often, after 6–7 thousand km. Using gas, you can change it less often - every 10 thousand. Then the engine will be clean with minimal wear.
DIY replacement
If this is your first time changing the TF yourself, we strongly recommend that you use our step-by-step instructions. Without relevant experience, it is better to entrust this matter to specialists at a service station. But if you are confident that you can do this, then just follow all the instructions in the instructions.
What will you need?
Before you start changing, keep in mind that it is more desirable and much more convenient to carry out this process in a pit or overpass. Also prepare in advance:
- new TF;
- a set of wrenches (you will need wrenches “10”, “17” and “19”);
- a small container for gasoline, which is in the filter;
- rags;
- liquid "VD-40".
Replacing TF with VAZ 2110
Element replacement process
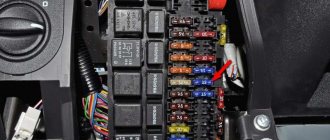
First of all, we drive into a pit or overpass and turn off the car. Then you should relieve the pressure in the fuel line. To do this, open the fuse box and dismantle the one that determines the functioning of the fuel pump. Next, you need to start the engine and wait until it stalls. Now you need to crawl under the car and find your TF in the gas tank area. You will see it right away; two gas pipes connect to it. We take a container prepared in advance and place it under the gasoline filter (this is done in case there is gasoline left in it). Next, if necessary, take VD-40 liquid and treat the gas line fittings (this is done to clean them of dirt and rust). After this, take the keys “17” and “19” and unscrew the nuts of the fittings, as well as the bolt securing the clamp
Dismantling TF
Then carefully remove the old TF and throw it away. We install the new element (pay attention to the arrows) and assemble everything in the reverse order, while tightly tightening the nuts of the fittings and not forgetting to check the tightness of the connections. Next, replace the fuel pump fuse and start the engine. Having done this, crawl under the car again and check if gasoline is leaking at the fuel line.
conclusions
The process of replacing the fuel filter on a VAZ 2112 is quite simple and requires special skills and knowledge. If you follow the given instructions, everything will work out. It is worth paying special attention to the choice of fuel cell, since the operation of the engine depends on the quality of this part.
Sources used:
- https://vaz-2110.ru/dvigatel/zamena-toplivnogo-filtra-na-vaz-2110.html
- https://m.etlib.ru/blog/941-toplivnyj-filtr-na-vaz-2110-2111-i-2112
- https://zapchasti.expert/toplivnyj-filtr/toplivnyj-filtr-vaz-2110.html
- https://auto-gl.ru/toplivnye-fil-try-na-vaz-2110-2112-zamena-svoimi-rukami/
- https://carfrance.ru/menyaem-toplivnyj-filtr-na-vaz-2112-16-klapanov-svoimi-rukami/
Replacing the fuel filter VAZ 2110
You can change the fuel filter on both carburetor and injection models of the VAZ 2110 using keys “17” and “19”, as well as a screwdriver.
The only rule for both options is that you must first remove the wires from the terminal on the gas tank to avoid sparks. To do this, lift the rear seat, unscrew the hatch bolts and temporarily remove the wires.
Replacement on the carburetor
Replacement procedure after removing the wires from the gas tank:
Removing the fuel filter for VAZ 2110, 2111, 2112 carburetor
- Open the hood.
- We find the fuel filter near the brake fluid reservoir.
- Using a Phillips screwdriver, remove the two fuel pipes (some gasoline will come out of them).
- Remove the old filter and put on the new element.
- We install the fuel lines in place.
- We check the tightness of all connections; gasoline should not drip from under the lines.
During the installation process, it is important not to confuse the fuel supply and return pipes
Replacement on the injector
Unscrewing the fuel filter fasteners on the injector
Step-by-step replacement process on a 1.5 and 1.6 liter injection engine:
- Clean the filter with a metal brush, then wipe with a rag.
- The nuts that hold the filter in place should be lubricated with WD-40.
- Use the key set to “19” to hold the filter housing, and use the key set to “17” to unscrew the fitting.
- There are rubber rings at the ends of the fittings; they need to be replaced.
- We install the new filter in the reverse order, tightening the nut on the fuel line well.
The filter housing indicates the direction (arrow) for correct installation.
After installation, you need to return to the cabin and put the wires on the tank terminal, install the hatch in place, wipe the surface and lower the seat.
On VAZ 2110 cars, a fuel filter is used to clean the gasoline entering the engine.
During operation, it gradually becomes clogged with debris, so the installation of a new consumable is periodically required. Replacing the filter is easy to do with your own hands, both on a carburetor VAZ 2110 and on an injection one.
On the VAZ 2110 the injector has two filters. The first is responsible for fine fuel cleaning, and the second for coarse cleaning. On cars with a 1.5 liter engine with 8 and 16 valves there is a filter 21120-1117010.
Fuel filter 21120-1117010
Its price ranges from 200 to 300 rubles. You can see analogues of native consumables in the table below.
Table - Optimal analogues of a fuel filter with nuts
| Brand | vendor code | Approximate price, ruble |
| Fram | G5915 | 270-360 |
| BOSCH | 0986450124 | 330-450 |
| BIG Filter | GB-302 | 190-250 |
| Baker | 21121117010 | 230-280 |
| Nipparts | J1330502 | 240-260 |
On cars with 1.6 liter engines 16 and 8 valves, filter 21230-1117010 is used. Unlike the previous consumable, it has clips instead of nuts for connecting fuel pipes. The cost of the filter is 200-300 rubles. You can see its analogues in the table below.
Filter 21230-1117010
Table - Analogs of fine fuel filter with clips
| Company manufacturer | Article number | Price, ruble |
| Mann-Filter | WK512 | 460-500 |
| Purflux | EP155 | 230-270 |
| Febi | 17635 | 320-400 |
| Denckermann | A110003 | 330-350 |
| Knecht-Mahle | KL83 | 20-320 |
On injection VAZ 2110 with a 1.5 liter engine there is a filter mesh 2112-1139200. Its price is 30-80 rubles. Analogues of the original coarse filter can be found in the table below.
Table - Fuel filter meshes for a VAZ 2110 car with a 1.5 liter engine
| Firm | Catalog number | Approximate price, ruble |
| WEBER | 21121139200 | 65-100 |
| StartVolt | SFF0115 | 80-110 |
| Cliff | 21121139200 | 95-115 |
| FARET | 21121139200 | 110-150 |
| Zommer | KRFS2112 | 160-200 |
On cars with a 1.6-liter engine, a coarse filter 1118-1139200 is used. Its cost ranges from 50 to 100 rubles. Analogues of the branded mesh can be found in the table below.
Table - Fuel filter screens for a VAZ 2110 car with a 1.6-liter engine
| Manufacturer brand | Catalog number | Approximate price, ruble |
| StartVolt | SFF011 | 80-100 |
| FARET | 11181139200 | 110-130 |
| Soate | 11181139200 | 130-170 |
| Zommer | KRFS1118 | 120-160 |
| TSN | 93631 | 170-230 |
On carburetor VAZ 2110 there is a fuel filter 21080-1117010. Its cost varies from 50 to 120 rubles. The table below shows the best analogues of native consumables.
Table - Alternatives to the original fuel filter for a carburetor VAZ 2110
| Company | Article number | Article number |
| Knecht-Mahle | KL63OF | 340-400 |
| Filtron | PS822 | 40-60 |
| Mann-Filter | WK422 | 240-250 |
| Bosch | 450904159 | 330-380 |
| Fram | G121 | 65-95 |
Payment via PayPal
After selecting payment via PayPal, the PayPal payment system will launch, where you need to select the payment method: bank card or PayPal account.
If you already have a PayPal account, then you need to log into it and make a payment.
If you do not have a PayPal account and you want to pay using a bank card via PayPal, you need to click on the “Create an Account” button - shown with an arrow in the picture.
PayPal will then prompt you to select your country and provide your credit card information.
After specifying the information required to make the payment, you must click on the “Pay Now” button.
Instructions for replacing filter 21120-1117010 are presented below.
- Relieve pressure in the fuel circuit.
- Unscrew the fuel pipes.
Loosen the clamp.
Remove the filter.
- Check the O-rings and replace them if necessary.
- Install a new filter.
Precautions
When replacing the fuel filter, it is recommended to adhere to the following precautions:
- It is imperative to avoid smoking in dangerous proximity to the car.
- Place a fire extinguisher within reach.
- Use safety glasses to avoid the possibility of gasoline getting into your eyes.
- If work is carried out in a viewing hole, then it is necessary to ensure that the room is well ventilated.
- If gasoline gets on your skin, it is recommended to immediately wash it with soap and water.
- Try to avoid spilling fuel on the ground or nearby body of water to prevent environmental pollution.
The process of replacing the fuel filter is a fairly simple procedure that can be performed in a “garage” environment and without the use of specialized tools . Timely implementation of this procedure guarantees stable operation of the engine, eliminating the likelihood of its clogging, as a result of which it is possible to significantly increase its service life fusion and increase traffic safety.
Replacing the fuel filter on a VAZ 2101-VAZ 2107
Welcome! Have you ever had this happen to your car? You're driving along the highway and suddenly there are jerks while it's moving? If yes! It is most likely that something called a “fuel filter” is to blame for this. You will find more details about when the filter needs to be replaced just below, in the section: “When you need to change the fuel filter.”
Note! To replace the filter with a new one, you will need: a pair of screwdrivers, as well as a bottle to drain the remaining fuel from the filter into, and of course the new filter itself!
You will also need some kind of plug with which you will close the hole in the fuel line hose. (To understand what we are talking about, see the “withdrawal” section in this article, paragraph “3”. Namely, read the “Note!” to this paragraph)
Where is the fuel filter located? The location of the filter is very simple, but to look at it you will need to first open the hood of the car and then in the engine compartment find the brake master cylinder, which is indicated by the red arrow. Found it? So, under the main brake cylinder there is immediately a filter for fine fuel purification, which is popularly called a fuel filter, it is indicated by a blue arrow.
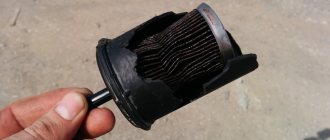
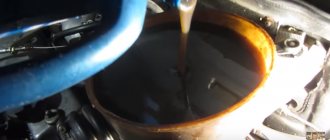
When should you change the fuel filter? As such, there is no frequency in filter replacement, but why do you ask? Yes, because it needs to be changed only when it is dirty, and if we take into account the fact that each owner operates his car in his own way, then the filter of different cars will also become dirty in his own way. For example, look at the photo below which shows a heavily dirty filter. By the way, if the filter is dirty, the car’s engine will start to work intermittently, namely:
By the way, if the filter is dirty, the car’s engine will start to work intermittently, namely:
- The car will experience jerking when moving, both at high engine speeds and at low speeds.
What affects filter contamination? The fuel that you pour into your car plays a very important role in pollution; if the fuel is terrible, then the filter will not live a very long life, and other parts too.
When should you check the filter for cleanliness? You need to check the filter more often, especially if you are not sure of the purity of the gasoline you are pouring into your car.
Note! Unfortunately, at the moment, not all filters are equipped with a transparent housing, through which you can easily determine whether the filter is dirty!
How to replace the fuel filter on a VAZ 2101-VAZ 2107?
Note! Don’t even try to repair a dirty filter in any way, because the fuel filter is not dismountable, and even if you somehow disassemble it, you are unlikely to be able to put it back together!
Removal: 1) First, place a bottle under the fuel filter.
2) Next, unscrew the clamp screw that secures the fuel pump hose to the filter. And then disconnect the hose from the filter.
Note! After you disconnect the hose from the filter, immediately direct it into the bottle so that all the remaining fuel is drained from it!
3) Then remove the clamp screw that secures the fuel line hose to the filter. And then disconnect the hose from the filter, directing it into a bottle to drain the fuel and also removing the fuel filter from the engine.
Note! After removing the filter, immediately close the hose holes with some kind of plug, otherwise all the gasoline that you have in the tank will pour out of it!
Installation: 1) First install the new filter and all hoses to it, in the reverse order of removal.
Note! Install the new filter so that the arrows located on it are directed towards the fuel pump! (For information about where the arrows are on the fuel filter, as well as the fuel pump itself, see at the very bottom of the article, in the “For Beginners!” section)
2) After completing the entire filter replacement operation, prime the fuel pump in the engine. (For information on how to prime the fuel pump in an engine, see the article “Priming the Fuel Pump”)
- When working to remove the fuel filter, it is not allowed to smoke or use open flames near the car, because this can lead to a fire!
- After you complete everything, check whether the fuel filter itself, as well as both hoses that are attached to it, are leaking!
Note! If you detect any gasoline leaks, immediately take the necessary measures to eliminate the cause of the leaks and remember that even the smallest leaks can lead to a fire in your car!
For newbies! Question: Where are the arrows on the filter that indicate it should be installed? Answer:
Question: Where is the fuel pump located in the engine? Answer:
Important points during work
You should always remember that even when the fuel pump is turned off, there is still fuel in the system, which will flow out through these hoses. It is for this simple reason that you should not smoke while doing work or illuminate yourself with a candle or match. It is advisable to take a 0.5–1.0 liter can with you to drain the remaining fuel.
If while driving you notice jerking at speed or weak engine thrust, then it is quite possible that it is time to change the filter. Before doing the work, you need to go to a car store and buy a new one for the VAZ-2110 model.
It is advisable to acquire keys for 10, 17, and also 19 and a head. All this will allow you to make the change more quickly and comfortably. Every driver must remember that there is a lot of pressure in the pipeline system, so you need to be extremely careful. Once again, it is worth noting that you need to purchase only a high-quality, original VAZ-2110 fuel filter. The price for it can be about 200 rubles.
Symptoms of a clogged fuel filter
A clogged fuel filter affects the operation of an injection engine slightly differently than a carburetor engine. Firstly, the injection engine itself requires more accurate supply and dosage. Secondly, the design of the fuel rail, and especially the injectors, can simply become clogged. And the impact of moisture particles and their corrosive consequences can cause more harm than in carburetor engines.
The main signs of a clogged fuel filter:
- deterioration of vehicle dynamics;
- depending on the degree of clogging, instability of operation at high or low speeds; difficult engine starting;
- signs of a lean mixture - popping noises in the air filter, dips during a sharp increase in speed;
- in some cases, deterioration or failure of the fuel pump.
But in any case, if the filter has already traveled more than 20 thousand, it is recommended to change it without waiting for the inevitable consequences.
How to identify a malfunction?
Problems with the fuel filter can be indirectly determined by a number of signs:
- the engine begins to “trouble”, operate unstably at idle and stall at the most unexpected moment;
- engine power decreases;
- fuel consumption increases (an experienced car enthusiast will immediately notice such changes).
All these manifestations may indicate a number of other malfunctions, which significantly complicates the diagnostic procedure.
If you ignore the problems and do not replace the fuel filter in a timely manner, then the final stage may be the engine failure to start at all.
As a result, this will lead to more serious expenses for repairs.