The main distinguishing feature of an automated transmission (AMT or “robot”) from a mechanical one is the electric actuators produced by ZF, which change gears at the command of the electronic “brains”. The manufacturer claims that the actuator unit is maintenance-free and cannot be repaired, but craftsmen have found a way to repair it with their own hands.
If the car’s warranty has already expired, then replacing the clutch release mechanism actuator yourself will cost tens of thousands of rubles (article numbers: 21820160901200 and 21820170501200). In an attempt to save money, you can try to repair it.
Replacement and repair of the AMT clutch actuator on LADA
The main distinguishing feature of an automated transmission (AMT or “robot”) from a mechanical one is the electric actuators produced by ZF, which change gears at the command of the electronic “brains”.
The manufacturer claims that the actuator unit is maintenance-free and cannot be repaired, but craftsmen have found a way to repair it with their own hands. If the car’s warranty has already expired, then replacing the clutch release mechanism actuator yourself will cost tens of thousands of rubles (article numbers: 21820160901200 and 21820170501200). In an attempt to save money, you can try to repair it.
When should adaptation be made?
Adaptation of AMT should be done in the following situations:
You have a pre-production car, and you need to update the settings to more recent and correct ones.
The fact remains that the first cars turned out to be a little damp and there’s nowhere without it, but fortunately AvtoVAZ quickly solves the problem, as it has already done with bushings and stabilizer struts, with the clutch.
When replacing the clutch
It turned out that the Turkish Valeo clutch, which was installed on the first cars, is not suitable for the weight of the car. As a result, the owners of the first West felt the clutch slipping, felt that the car was moving poorly and needed to increase the speed. When replacing the clutch with a new one, adaptation is carried out. If for some reason you changed the clutch not from an official dealer but on your own, do not be afraid to move on the new clutch without adaptation as necessary. But it will need to be done.
Replacing the AMT clutch actuator
How to remove the actuator
:
- Disconnect the negative terminal of the battery.
- The engine air filter has been removed.
- Remove the screw securing the wiring harness.
- Remove the three screws securing the AMT actuator unit.
All that remains is to disconnect the connector (press the fasteners, the direction is indicated by the arrow) and pull the actuator out through the top.
Install actuator 1, Figure 8-6, clutch release on bracket 3 and tighten three self-tapping screws 2. Screw tightening torque 7. 12 N.m (0.7. 1.2 kgf.m) (replaceable attachment Torx T30, knob, torque wrench).
Attach block 4, Figure 8-5, of the additional wiring harness to connector 2 of actuator 1 of the clutch release mechanism and secure the harness to bracket 3 with two fastening brackets 6.
Install actuator 3, Figure 8-4, clutch release assembly with bracket and additional wiring harness on the gearbox, install the outlet hose bracket on the actuator bracket and tighten, without tightening, two bolts 2 and nut 4 of the fastening (replaceable head 13, knob).
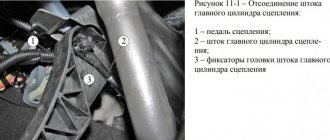
Adjust the extension of rod 6, Figure 8-7, of the actuator, for which you need to:
- move the actuator 5 in the direction of the arrow until the rod 6 touches the clutch release fork 7 and mark the position of the bracket 4 relative to the gearbox using a non-stress method.
- using the mark, additionally move the actuator in the direction of the arrow by an amount of 6±2 mm and finally tighten two bolts 1 and 2 and fastening nut 3. The tightening torque of the bolts and nuts is 16...25 N.m (1.6...2.5 kgf.m) (replaceable head 13, wrench, torque wrench, ruler or caliper).
Figure 8-7 — Installation of the clutch release mechanism actuator: 1,2 — bolts securing the actuator to the gearbox; 3 — nut securing the actuator to the gearbox; 4 — actuator mounting bracket: 5 — clutch release actuator; 6 — actuator rod; 7 — clutch release fork
Connect the additional wiring harness connectors to the gear shift actuator connectors, the control controller connector, and the input shaft speed sensor.
Secure the additional wiring harness with brackets built into the harness to the radiator outlet hose, to the left engine mount bracket and to the fan housing.
Also, the process of removing and installing the clutch release mechanism actuator is described in TI 3100.25100.20583 (download).
Disassembling the AMT clutch actuator
Unscrew the top cover. We “discharge” the actuator (turn the gear as in the video) and remove the cover (do not open without the clutch load).
Remove the white compensator (Caution! The spring is very powerful!). The thrust rod is simply removed with force.
When assembling, carefully “cock” the mechanism (photo 1 - unloaded, photo 2 - cocked).
There is no need to make any adjustments to the clutch actuator after installation on the vehicle.
AMT clutch actuator repair
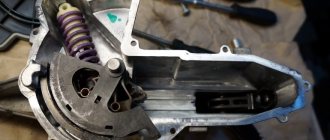
Clean the inner surface with solvent. Let's examine the insides. In this example, wear on the ball stops and a crack on the plastic part of the actuator were detected. The problem is that there are no repair kits. That is, AMT clutch actuator parts are not sold separately. If you cannot restore the old ones, all that remains is to lubricate the mechanism.
LIQUI MOLY Thermoflex Spezialfett was used as actuator lubricant. It is very similar to the one that was in the actuator from the factory. Read more about actuator lubrication here.
We perform reassembly and installation of the AMT actuator on the car (see above).
Let us remind you that if other malfunctions occur in the operation of the AMT (howling, crackling, the car jerks, jerking, rattling, etc.), you can determine the cause using these instructions.
Share on social networks:
Found an error? Select it and press Ctrl+Enter..
Source
How and with what to lubricate the clutch actuator on Vesta: a guide to action
06 September 2022 Lada.Online 72 584 12
The main distinguishing feature of an automated transmission (AMT or “robot”) from a mechanical one is the electric actuators produced by ZF, which change gears at the command of the electronic “brains”. The manufacturer claims that the actuator unit is maintenance-free and cannot be repaired, but craftsmen have found a way to repair it with their own hands.
If the car’s warranty has already expired, then replacing the clutch release mechanism actuator yourself will cost tens of thousands of rubles (article numbers: 21820160901200 and 21820170501200). In an attempt to save money, you can try to repair it.
Problem
As a rule, car owners are faced with a situation where the actuator begins to creak, which is especially common in hot weather. This component is responsible for pressing the clutch fork. However, it is not difficult to independently eliminate the creaking of the AMT actuator of Lada Vesta and X-Ray. To do this, simply lubricate it.
Vesta's AMT is equipped with actuators from the German company ZF, which has made the unit maintenance-free. However, this limitation can be circumvented. It is worth noting that the service station also offers this service. The price varies between 2,000 rubles.
Replacement and repair of the AMT clutch actuator on LADA
The main distinguishing feature of an automated transmission (AMT or “robot”) from a mechanical one is the electric actuators produced by ZF, which change gears at the command of the electronic “brains”. The manufacturer claims that the actuator unit is maintenance-free and cannot be repaired, but craftsmen have found a way to repair it with their own hands.
If the car’s warranty has already expired, then replacing the clutch release mechanism actuator yourself will cost tens of thousands of rubles (article numbers: 21820160901200 and 21820170501200). In an attempt to save money, you can try to repair it.
Automated transmission design
You can eliminate the creaking of the clutch actuator on Vesta with your own hands after understanding the design features of the mechanism. The robot is based on a conventional VAZ 21807 manual gearbox. A ready-made technical solution allows you to reduce the cost of car production and minimize the difference in cost with the manual version of the car. The main difference from a manual transmission is the replacement of the clutch pedal and gear shift knob with corresponding electromechanical type switches. To manage them, the following have been additionally implemented:
- Control block.
- Shaft speed sensor.
- Fork position sensor.
- Interior gear selector position lock.
Reliability and operating features of the robot box in the Lada Grant
The design of a robotic gearbox is simpler than an automatic one with a torque converter: the cost is lower. Therefore, AMT began to be actively installed on inexpensive car models.
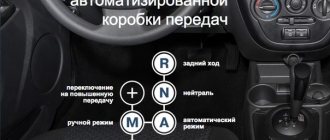
A robotic gearbox is a kind of compromise between a manual and an automatic transmission. The Lada Granta is equipped with a VAZ-2182 manual transmission. AMT (Automated Manual/Mechanical Transmission) is equipped only with cars with a 16-valve engine. How long the robot can walk on the Grant largely depends on its driving style.
Why does the Vesta clutch actuator creak and how to eliminate it on your own?
Annoying sounds from the mechanism for controlling the position of the friction discs, as well as vibration of engines 21129 and 21179 at idle, usually appear after the break-in is complete. Most often, the specific acoustic design of transition modes occurs between 20,000 and 30,000 km.
Cause
At first, the defect appears inconsistently. Usually the clutch squeaks slightly in dry, warm weather, as well as in cold weather. This behavior is evidence that there is not enough lubrication on the rubbing surfaces. It is at this stage that you already need to think about how to lubricate the clutch actuator on Vesta or what lubricant to buy. Ignoring the initial symptoms is unacceptable - the effect will only intensify, manifesting itself in any weather conditions.
Dealers are reluctant to replace the actuator due to creaking. In most cases, representatives of the technical center activate a program to request the plant about the causes of the malfunction. The process is long and not always effective. Only a small percentage of dealerships will unconditionally replace the servo with a new one.
It is expensive to change the mechanism at your own expense - the price for a clutch actuator is at least 13,500 rubles. However, it is unlikely to be possible to find a new one yet - due to their scarcity, they are supplied only to officials.
How to fix
The manufacturer of electric actuators for Lada Vesta, represented by ZF, confidently declares that the drive is maintenance-free. If the clutch squeaks, he recommends replacing the assembly. Craftsmen believe otherwise - the servo drive can be disassembled and lubricated. At specialized service stations, a corresponding service has even appeared, the price of which is from 2,000 to 3,000 rubles.
Tool
When performing the operation, you will not need any exclusive devices. An ordinary “garage first aid kit” will be sufficient at all stages of dismantling and assembling the unit:
- Ratchet crank.
- Screwdriver for bits or screwdriver.
- Heads for “10” and “13”.
- Open-end wrenches for “13” and “27”.
- Attachments for a screwdriver or screwdriver Torx 20, 30.
It is convenient to carry out manipulations to eliminate the creaking of the Lada Vesta clutch actuator on a lift, overpass or pit. If there are no such means nearby, you can use a good rolling jack and safety stands.
Dismantling method
All work on applying the lubricant is carried out exclusively on the dismantled servo drive. Although access is limited, the assembly is easy to remove. Getting to the inside of the structure is also easy.
Important! Further measures are carried out with the negative terminal of the battery disconnected. The system does not identify dismantling, therefore, there will be no need to perform adaptation (setting up the drive using a computer).
The initial task is to free up space around the device. Two elements must be dismantled: the air filter housing and the engine crankcase protection. The actuator itself is mounted on a black bracket. It is more convenient to remove the drive assembled with the fastening element using the following method:
- Disconnect the power connectors (one is located on top, the other on the bottom). This is easier to do with the wiring fasteners unscrewed.
- Unscrew two nuts from the hood side and two from under the bottom.
- Remove the assembly.
Disassembling the electromechanical drive involves disconnecting the bracket and removing the cover. All parts are secured with Torx screws. You can unscrew them quickly and conveniently using a screwdriver.
Possible malfunctions of the robot box
The most common malfunctions are of two types - mechanical and caused by electronic failure. They say about a breakdown in the Lada Granta robotic box:
- indicator lights on the instrument panel;
- howling or buzzing when moving;
- lack of response to an increase in speed - the speed does not increase;
- leakage of liquid from the box;
- stopping the operation of the unit and stopping the machine.
Mechanical failures are caused by worn or damaged parts. In this case, replacement is required. The most common malfunctions are wear of the gear selection fork and rolling bearings.
The most common failures of electronic components are:
- burnout of contacts of electric drives - requires replacement at a service center;
- breakdown of switching drives;
- burnout or contamination of the brushes of the electric motor responsible for operating the shift levers.
Source
AMT clutch actuator repair
Clean the inner surface with solvent. Let's examine the insides. In this example, wear on the ball stops and a crack on the plastic part of the actuator were detected. The problem is that there are no repair kits. That is, AMT clutch actuator parts are not sold separately. If you cannot restore the old ones, all that remains is to lubricate the mechanism.
LIQUI MOLY Thermoflex Spezialfett was used as actuator lubricant. It is very similar to the one that was in the actuator from the factory. Read more about actuator lubrication here.
We perform reassembly and installation of the AMT actuator on the car (see above).
Let us remind you that if other malfunctions occur in the operation of the AMT (howling, crackling, the car jerks, jerking, rattling, etc.), you can determine the cause using these instructions.
Categories of products that may be of interest to you based on the article “Replacement and repair of the AMT clutch actuator on LADA”:
Lubrication
By unscrewing the 3 fastening screws, the actuator cover is removed - this will provide access to the mechanisms.
It is necessary to thoroughly lubricate all hinges and load points with special lubricant. For work, you can use LIQUI MOLY Thermoflex Spezialfett or Liqui Moly 3352.
A distinctive feature of the design is that there is no need to disassemble the mechanism. This not only reduces time costs, but also allows you to do without adapting the actuator after installation.
At this point, the independent elimination of the squeaking actuator of the AMT Lada Vesta and X-Ray is completed.
IMPORTANT! Another reason for this squeak is corrosion on the release lever stop. If there is one, it must be lubricated with Bechem High-lub L2 MO grease.