Removing the stove pipes for heating the interior
To maintain the desired temperature inside the VAZ 2110 car, there is a device called a heater or stove. The automatic control system allows you to adjust the temperature with an accuracy of two degrees. On a VAZ 2110, the stove in which the pipes can fail can fail.
Features of operation
Before we begin to analyze the reasons why problems arise with the stove, we will touch upon the operating features that will allow you to maintain the stable service of the VAZ 2110 heater for a long time:
- in cold weather, especially in frosty conditions, it is best to control the stove using two modes. First, when starting the car, direct the position of the regulator “all to the glass”, and then, when the car is already moving, direct all the heat to the legs;
- do not block the nozzles through which air is supplied. If there are carpets on the interior floor, the nozzles should be raised higher;
- glass must be cleaned of dirt;
- Air conditioning, if available, should be used when it is damp outside.
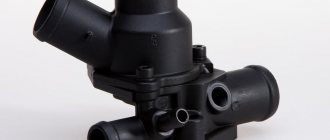
Heater diagram VAZ 2110
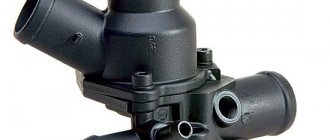
Hoses in the heater system of a VAZ 2110 car
Replacing a hose from a VAZ 2110 stove
Each car has its own heating system, which most often uses liquid. In order to connect all the elements, you will need a variety of hoses
During the operation of the machine, close attention is paid to them. If the defect is not identified and eliminated in time, or the hose on the stove is not replaced, problems may arise with the vehicle engine.
Note! Pay attention to both hoses and clamps, which ensure better sealing of the connection. A loose or improperly tightened clamp can cause an unplanned engine overhaul.
List of necessary tools
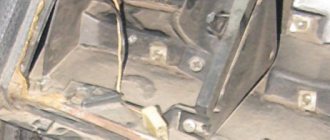
If a motorist is going to disassemble a VAZ-2110 heating unit, he must be prepared for the fact that the removal of a large number of structural parts is carried out under the hood, and not in the cabin.
In order for the replacement of the VAZ-2110 stove pipes or other parts to be successful, you should first purchase 4 clamps, tweezers and a screwdriver (a short Phillips head is best). If the owner plans to completely replace the heating device, then, among other things, you will have to buy a new radiator of good quality.
Most repairs are done under the hood, not in the interior.
In modern car shops and car markets, there is a wide range of radiators for the “ten”, which belong to the old or new model. The old-style heater is a stove, the production of which was discontinued in 2003. Accordingly, all devices released later are considered new models. As practice shows, installing a new generation device is quite simple; installing an old stove model will take a little more time.
Replacing the stove pipe of a VAZ 2110
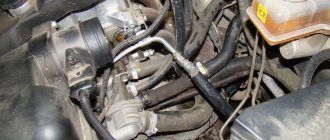
In our climate, a car heater is an irreplaceable thing. It can sometimes come in handy even in summer))) Having driven through the winter without much hassle, the other day I discovered a wet spot under the car. You could even say puddle. It's always not pleasant when your car leaks.
By the smell it was determined that it was antifreeze. Having examined the space under the hood, I found nothing. Only wet pan. I decided to go to the garage and figure it out. I got there without any problems, although upon arrival I saw that the level of antifreeze in the tank had dropped significantly. And again, the source of the leak did not reveal itself.
It was decided to drive the car at idle. Before the fan operates. Only after sufficient pressure had been created did I discover that the supply pipe to the stove was leaking. From under the clamp. Half the job is done, the problem has been identified)))
Leak search
Finding out the reason for this state of affairs is not always easy. To do this, the driver will have to carefully examine the situation under the hood. Usually you can only notice a wet pan. In this case, it is worth checking the coolant level in the system. Most likely, there has clearly been a decline.
The cause and location of the leak is not easy to recognize. It is useful to “drive” the car at idle for some time so that the thermostat opens. And only when the optimal pressure is reached will the source of the leaks reveal itself. Most likely, one of the connections of the pipes is leaking, often it can be the pipes for supplying antifreeze to the heater radiator; if this is the case, we proceed to replacement.
Replacing the pipe
I went to the store, bought a set of pipes (in reserve), clamps, and antifreeze to top up. I returned to the garage and began to disassemble. This was my first time replacing this pipe. I knew that it was going to the stove and I also knew that I would have to take a lot of disassembly, plus drain the antifreeze.
First things first. First, I unscrewed several screws and removed the left trim (aka sound insulation). Then I removed the air pipe, loosening two clamps, and also disconnecting the crankcase ventilation pipe.
Next, I proceeded to dismantle the front window trim and removed the wiper arms.
After all the operations performed, I finally saw where the damaged pipe ends. But it is blocked by the heater fan housing.
So we’ll remove it too. It is held on by three screws and two top latches. There were no problems with withdrawal. In one step I cleaned the fan of debris.
I didn’t take out the fan itself, I just moved it a little to the left. And now I had access to the clamp and pipe.
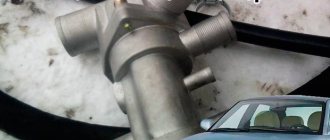
Replacing the pump and pump supply pipe — Lada 2109, 1.5 l., 1999 on DRIVE2
Not even after 20 thousand the pump started leaking. I also noticed that antifreeze was leaking at the junction of the pump supply pipe and the block. For those who don’t know, it is located at the rear of the block, in the most inconvenient place in the front-wheel drive family.
At first the pump did not flow much, then a river appeared.
I chose the time and started replacing. I carefully drained the antifreeze and had to come up with a whole system. It was not difficult to remove everything. When I removed the carburetor heating hose, I saw that it was all cracked and dry. It's strange that it hasn't leaked yet.
The oil seal on the pump leaked and a creaking sound appeared when rotating. The gasket on the supply pipe is rotten. In principle, I could have left the old pipe, but I immediately stocked up on a new one.
I bought the pump from Mstart. To be honest, I have never heard of this, but the seller assured me that it was good. I immediately took a roller of some kind, a Continental Contitech belt, I had heard a lot about its quality.
in the photo above, the Finwhale belt is on top - 23 thousand km, in the middle Goodyear - it's unknown how long, but more than 15 thousand km, on the bottom is a new Contitech
I cleaned the seats of old gaskets and spent a long time fiddling with the seat pipes. It was very inconvenient, I had to jack up the car and clean it while lying under it. I wiped off the old traces of antifreeze a little to suddenly see a new leak.
While I was taking pictures of the whole thing, in the light of the flash I saw fogging on the intake manifold. You'll have to change the gasket.
The new pipe laying was sealed with sealant. It is extremely inconvenient to put it in place. While baiting, I reapplied the sealant 2 more times: it had time to dry, and rubbed a callus on my finger. Tightening is also inconvenient; you can’t get anything in there except a spanner.
I assembled everything, installed it, tightened it. Replaced the carburetor heating hose. Filled with antifreeze. Everything is fine. Everything is working.
After that I drove another 1000 km. Everything is dry, you can only see that the belt has eaten a little. Now I'm wondering why he's slipping. Most likely the pump is crooked. We'll watch.
Well, according to tradition - smooth roads to everyone))
Price: 1,500 ₽ Mileage: 200,300 km
Noisiness
Another fairly common “disease” of the VAZ 2110 associated with the stove is that it is very noisy. This doesn’t interfere with the flow of heat into the cabin, it’s annoying, and you expect: something is about to break.
So:
- if the noise is sharp, even “squealing,” the lower part of the heater, which is attached to the hooks, may have come unfastened;
- sometimes it is necessary to replace the stove body if the protrusions that hold the latch are broken;
- The fan is noisy. It needs to be dismantled, cleaned, and its electric motor inspected;
- The textolite washers hum, eliminating the axial play of the fan. You can use washers made from fluoroplastic or other material that provides the least friction to replace them. It is better to lubricate the washers additionally. Some craftsmen use machine oil for lubrication. This helps, but not for long because it is fluid. It is better to use a thick lubricant such as lithol, graphite, etc.
Changing tee hoses
As with any other repair work, you must follow the instructions below:
- the clamp that secures the filling hose to the tee must be loosened;
- the coolant is drained from the expansion tank;
- the clamp that fastens the tee hose to the branch pipe of the supply pump pipe becomes loose. Next, this hose is removed and the remaining antifreeze is drained;
- a rubber belt with all fastenings is detached from the expansion tank;
- dismantle the connector of the coolant sensor in the tank;
- the outlet hose is detached from the tank;
- this tank is removed and put aside, the same applies to the second steam exhaust hose;
- The screws securing the left soundproofing trim in the engine compartment are unscrewed.
Removing the upholstery should be done in this order:
- unscrew the self-tapping screw located on top, which secures the central upholstery;
- in the tank, remove the connector from the sensor designed to monitor the coolant level;
- the nuts that are located on the vacuum booster of the main brake cylinder are removed;
- then this cylinder and brake pipes are removed from the studs, they are removed forward, the pipes will bend;
- The hose is removed from the amplifier pipe; in this case, you need to bend the required angle of the upholstery in advance.
Now repair work will take place inside the car:
- The assembled vacuum booster with bracket and brake pedal is moved to the side. This frees up the necessary access to the hoses that are attached to the heating radiator;
- to disconnect the lower hose, you will first need to remove the upper supply hose;
- it is removed after loosening the clamp.
Installation of new parts must be carried out in reverse order.
Note! For better quality connections, it is recommended to install additional clamps immediately before installing the tee.
It is better to assess the performance of the stove at certain intervals. Timely inspection and necessary replacement of the hoses of the heater and cooling system of the car is the key to reliable engine operation. Naturally, to save time on repairs, you can turn to specialists at a service station, but, as practice shows, any repair is not cheap. Therefore, a good alternative would be to replace the hoses on the stove using the photo instructions with your own hands. To better complete the process, it is advisable to do everything as required by the instructions. And the price of the hoses themselves is not that high.
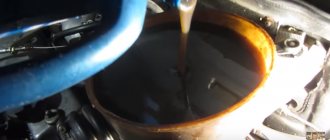
How to drain antifreeze
Now all that remains is to drain the antifreeze into a container. I used a 5L bottle and only drained from the block. See how to drain antifreeze here.
A piece of garden hose (about 1.5m) worked very well for draining.
That's all. After draining the coolant, I unscrewed the two clamps of the torn pipe and replaced it with a new one. That's where the pipe broke.
I didn’t encounter any particular difficulties in my work, even though I was doing it for the first time. As a result, I gained invaluable experience and money savings. The service would charge from 600 to 800 rubles. In addition, I wiped all the hidden cavities and removed debris from them. It's unlikely that a service station would do this to you. Video to help))) (replacing the stove)
https://youtube.com/watch?v=rH5QtJFwLUo
Replacing the supply pipe from the pump to ICE 2111, VAZ 21102 — DRIVE2
Hello everyone. I'm going to change the saxophone on my TORPEDO. I purchased the saxophone itself, everything else is mine. First you need a gasket to install the pipe to the pump. To make it you need: paper cardboard, a pen, scissors, a razor blade, and the saxophone itself.
Repair for removing the pipe: 1 pull out the armored wire from the 4th spark plug to easily unscrew the ignition module. 2 unscrew the clamps on the air filter pipe with the mass air flow sensor, the throttle and on the valve cover. 3 pull out the pipe with the filter and mass air flow sensor. 4 unscrew the ignition module. 5 drain the coolant into container.6 unscrew the clamps on the pipes in the pipe.7 pull the pipes out of the pipe.8 unscrew the nuts securing the pipe from the pump.
9 pull out the pipe from the battery side.
Repair for installing a pipe: 1 smeared the pre-cut gasket on both sides not with sealant but with solid oil. 2 stuck it to the place where it should stand on the pipe. 3 push the pipe to the installation site. 4 jacked up the right front part with a rolling jack. 5 drive up the car. 6 I put a bolt with a regular washer + a lock washer into the lower part of the pipe mount. 7 I baited it, screwed it halfway. 8 I put a bolt with a regular washer + a lock washer into the upper part of the pipe mount. 9 I baited it, and screwed it halfway.
10 Then I tightened everything with a wrench on the right side.
Repair to check what has been done: Tighten the plug on the side of the ignition module, Tighten the ignition module itself, Put the pipes on the supplied pipe, Tighten the clamps, Put the air filter pipe with the mass flow sensor in place, Tighten the clamps, Fill in the missing coolant, Start the engine, Warm it up, Look at the bottom the presence of a leak, Smile at the work done, Be proud of the hands from the right place and that you did it yourself and did not give money to a service center, And drive with confidence in your car until the next repair. All. Not a nail, not a rod.
Blowing cold
The most unpleasant thing is when the stove stops working completely and only blows cold air. In 90 cases out of 100, the gear motor is to blame, which on a VAZ 2110 is changed as follows:
- Wipers are dismantled;
- Remove the frill;
- The three self-tapping screws securing the gearmotor are unscrewed with a Phillips screwdriver (a short one is needed);
- Unfasten the wires;
- A new one is installed in place of the old gearmotor. To do this, it is better to ask an assistant to switch the regulator modes while you are installing this part;
- They install the frill back and install the windshield wipers.
There are also situations when you have to change the heater because the old one is completely worn out. In this case, experts recommend models “2112-01” or “2112-02”. They are ideal for the VAZ 2110, and the difference between them is that the first is without an air filter, and the second with a filter.
How to remove a stove radiator
The process of dismantling the heater radiator on VAZ-2114 cars can be carried out in two main ways. The first involves removing the entire control panel, as well as other elements surrounding the part being replaced. We recommend carrying out repairs in this way only if you have the appropriate experience and are completely confident that after completion of the work there will be no “extra” components left. No such confidence? Then it is better to contact a car service or carry out repairs in a simpler way, which we will describe below.
It does not require dismantling the torpedo, but to perform repairs in this way you will definitely need an assistant. Work is carried out in the following order:
- remove the console and glove compartment;
- unscrew the bolts and screws that hold the front panel so that it moves freely in different directions;
- remove the cables for controlling the operating modes of the stove, which are located on the driver’s and passenger’s sides;
- remove the radiator cap;
- dismantle the rubber radiator pipes. It is advisable to first place a basin or other container under the device so as not to spill antifreeze on the floor;
- We hire an assistant. His task will be to carefully move the torpedo to the side, which will allow the radiator to be removed. In this case, you need to be extremely careful not to break anything or tear out the front panel of the car by the roots.
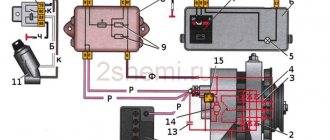
Design and diagram of the heater (stove) VAZ-2110, 2111 and 2112
Winter is coming, and no matter how popular the saying is ready to sleigh in the summer, we begin to put the heater in order only closer to winter. This small cutout from the Murzilka will help us with this, which will tell us how the stove in the tenth VAZ family works. We present to your attention a diagram of the heater air ducts and control parts for the VAZ-2110 heater
1 – rear heating air ducts 2 – floor tunnel lining 3 – foot heating ducts 4 – central cabin ventilation nozzles 5 – side cabin ventilation nozzles 6 – front door window heating nozzles
7 – control lever for the interior heating system 8 – air distributor housing 9 – foot heating flap 10 – windshield heating flap 11 – heater
And here is a diagram of the parts of the VAZ-2110 stove, the design of dampers, valves, etc.:
1 – electro-pneumatic valve 2 – front heater air intake housing 3 – air intake water deflector flap 4 – recirculation damper control valve 5 – air intake recirculation damper 6 – rear heater air intake housing 7 – heater duct damper 8 – heater control damper 9 – radiator 10 – heater radiator casing
11 – steam exhaust hose fitting 12 – supply hose fitting 13 – exhaust hose fitting 14 – heater electric motor with fan 15 – electric motor housing 16 – support platform for the heater control damper drive lever 17 – heater control damper drive lever 18 – damper drive micromotor 19 – resistor 20 – heater casing cover
Note that the VAZ-2110 heater has an air recirculation system, that is, the air is not taken from the street, but simply circulates inside the cabin. The advantages of recycling are that dust, odors from the street, etc. do not enter the cabin. Cons: the windows fog up, the air in the cabin is not updated. When the recirculation system is turned on, the air flow during movement does not flow by gravity into the cabin, so the heater motor must be turned on. The electric motor in the tenth stove is essentially not repairable; it is recommended to change it in case of any malfunctions. The heater is controlled by an electronic control unit. There is no faucet that shuts off the flow of coolant into the heater radiator in the VAZ-2110 and is not provided for by the design. That is, the radiator is always on.
Cooling system diagram
All the main elements are described below.
1 – heater radiator; 2 – steam removal hose of the heater radiator; 3 – outlet hose; 4 – supply hose; 5 – coolant temperature sensor (in the block head); 6 – pump supply pipe hose; 7 – thermostat; 8 – filling hose; 9 – expansion tank plug; 10 – coolant level indicator sensor; 11 – expansion tank; 12 – exhaust pipe; 13 – liquid chamber of the carburetor starting device; 14 – radiator outlet hose; 15 – radiator supply hose; 16 – radiator steam outlet hose; 17 – left radiator tank; 18 – sensor for turning on the electric fan; 19 – fan electric motor; 20 – electric fan impeller; 21 – right radiator tank; 22 – drain plug; 23 – electric fan casing; 24 – timing belt; 25 – coolant pump impeller; 26 – supply pipe of the coolant pump; 27 – coolant supply hose to the throttle pipe; 28 – coolant drain hose from the throttle pipe; 29 – coolant temperature sensor in the outlet pipe; 30 – radiator tubes; 31 – radiator core.
Cooling system components
Now that you know the entire diagram of the VAZ-2112 cooling system, you should learn about all its main details in more detail:
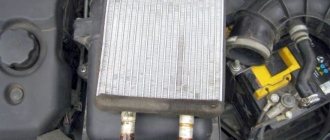
Cooling radiator
Copper cooling radiator
The radiator is designed to cool the fluid in the system as it passes through it in the so-called “great circle” . It is made of aluminum, has a tubular-plate, two-pass design, and is equipped with plastic tanks, one of which has a special partition designed to allow coolant to pass through. The liquid to pass through the “large circle” flows through the upper pipe and exits through the lower one.
Expansion tank
This tank is quite reliable, but its connections sometimes have to be checked for leaks.
The expansion tank, made of translucent polyethylene, is designed to fill and control coolant. When the fluid in the system is completely filled, it should be in the tank between o and “MAX”. Two pipes for removing steam are built into the tank, one from the heater radiator, the other from the cooling radiator.
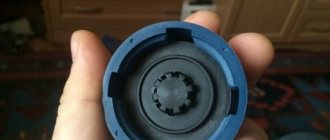
Expansion tank cap
Two types of expansion tank caps.
The tightness of the cooling system is ensured by the expansion tank cap, or rather by its inlet and outlet valves. The exhaust valve maintains increased pressure on a hot engine compared to atmospheric pressure, due to which the boiling point becomes higher, reducing the loss of steam.
Thermostat
The thermostat is designed to distribute coolant flows, controlling its temperature. On a cold engine, the coolant circulates only in a small circle, passing through the heater radiator and the throttle assembly heating unit. When the temperature rises to 87°C, the thermostat valve begins to open, and reaches full open at 102°C, releasing fluid in a “big circle”. The thermostat for the VAZ-2112 has an improved resistance of the throttle opening, due to which the fluid flow increases.
water pump
The more blades the pump has, the better.
The pump is designed to circulate coolant in the system. A pump is a pump. It is bladed and driven from the crankshaft by a timing belt. If the pump “jams”, the timing belt will break, so watch and check its condition. The pump body is made of aluminum, with a toothed pulley pressed onto the front end and an impeller at the other. If it fails, the timing belt will break; on the 124 engine the valves will not bend, but on the 21120 it will bend. Therefore, follow the pump replacement regulations and choose good pumps.
Work order
Every slave must have its own consistency. Then it can be done efficiently.
- The wire from "-" is disconnected from the battery.
- The coolant is drained.
Tip: Before draining the coolant, you must allow the engine to cool, otherwise the temperature of the drained liquid will be high.
- The lining, frame trim on the windshield, and sound insulation upholstery are removed.
- The heater fan is removed.
- The vacuum hose clamp is disconnected from the stove body.
- Using a screwdriver, remove the three spring clips that secure the front housing of the heater air collector.
- Remove the screws securing the front housing.
- The front housing is removed.
- The tightening of the clamps is loosened and the hoses are disconnected from the fittings.
Installation of new pipes
When replacing the stove pipes on a VAZ 2110, it is better to replace the clamps connecting all the elements. So:
- Replacement in progress. New pipes have been installed on the VAZ 2110 stove for supplying coolant and draining it from the radiator.
- The remaining parts and assemblies are installed in the reverse order.
- Coolant is poured into the cooling system and the tightness of the pipes and all connections is checked, if necessary they are tightened.
Replacing a tee or outlet hose of a VAZ 2110 heater radiator
Attention: There are cases when coolant leaks at the junction of the tee with the heater, expansion tank and engine cooling pump. Sometimes it is enough just to tighten the hoses on the pipes with new clamps
Sometimes it is enough just to tighten the hoses on the pipes with new clamps.
Tip: Tightening the clamps must be done very carefully so as not to cut through the rubber of the hose, which may lead to the replacement of the hose
Repairing a hose without removing it from the car
- The damaged end of the element is cut off.
- A piece of the same hose is attached to a metal pipe approximately 60 millimeters long and 20 millimeters in diameter. The price of such an element is low, which saves money and repair time.
- To reduce the tension of the hose, its length should be increased by 8 millimeters.
- If antifreeze leaks from the joint between the hose and the heater radiator, then it is necessary to remove the vacuum booster.
How to replace the stove pipe of a VAZ 2110 is clearly visible in the video presented.
Replacing tee hoses
Instructions and work order:
- The clamp securing the filling hose to the tee branch pipe is loosened.
- Coolant is drained from the expansion tank.
- The clamp connecting the hose of the tee and the branch pipe of the pump supply pipe is loosened, the hose is removed from the branch pipe, and the remaining liquid is drained from it.
- The rubber belt securing it is unfastened from the expansion bull.
- The connector is removed from the sensor that monitors the level of cooling liquid in the tank.
- The hose that removes steam from the tank is disconnected.
- The tank is removed from the niche and moved to the side, along with the second hose that removes steam.
- Unscrew the screws securing the left noise-insulating upholstery of the engine compartment.
- The top screw holding the central upholstery is removed.
- Remove the connector from the sensor in the brake reservoir, which monitors the fluid level in it.
- Unscrew the nuts securing the vacuum booster of the main brake cylinder.
- The cylinder is removed from the studs and, together with the brake pipes, is moved forward. This causes the tubes to bend.
- The hose is removed from the vacuum booster pipe, having first bent the upper corner of the upholstery.
Further work is performed inside the car:
- We move the vacuum booster, bracket and brake pedal assembly to the side and free access to the pipes located on the heater radiator.
- To disconnect the lower hose, you must first remove the upper supply hose.
- The clamp is loosened and the lower hose is removed from the pipe.
Installation of new elements is carried out in reverse order.
Tip: For greater reliability of the connection, before installing the tee on the pipes, it is better to install additional clamps.
A timely inspection and, if necessary, replacement of the hoses of the VAZ 2110 stove and the car’s cooling system with your own hands is the key to reliable operation of the car’s engine.
The most labor-intensive work associated with the interior heating system on VAZ 2110-2112 cars is replacing the heater radiator, or heater, whatever you want to call it. Of course, it is not so easy to carry out this repair on machines of the tenth family, and there is little pleasure in it, but it is quite possible for everyone. The main thing is patience and, of course, having the right tool.
Features of draining antifreeze and replacing the pump pipe on a Priora
The coolant pipe on the Priora is connected through a hose to the thermostat. It regulates the circulation of antifreeze in a small or large circle, depending on its temperature. If a defect is detected on the pipe itself or at the junction with the pump and the unit, it must be dismantled. The procedure involves preliminary draining of antifreeze.
The work is performed in the following order:
- The engine protection is removed;
- The expansion tank cap opens;
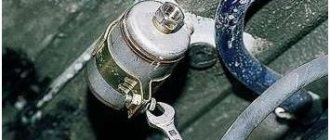
- Carefully unscrew the “lamb” of the drain located at the bottom of the block;
- Antifreeze is poured into the prepared container.
Drain hole on Priora
Draining is performed on a cold engine. To completely drain the coolant, you need to turn the motor shaft using the starter.
The supply pipe is dismantled after unscrewing the 2 mounting bolts on the cooling pump and removing the thermostat hose. The new part and gasket are installed in the reverse order. After adding antifreeze, it is necessary to test run the engine and check for fluid leaks at the connections.
Replacing a hose on a VAZ 2110 stove in different ways
Heater hoses VAZ 2110
As a rule, any car has a heater or, in other words, a stove. The role of such a device is important; the stove ensures the required temperature inside the cabin. With the help of an automated control system, it becomes possible to regulate the temperature with high accuracy. Of course, no one is immune from a breakdown of the stove on a VAZ 2110, so to reduce the risk of such a situation occurring, you need to check the outlet and inlet hoses more often. Replacing a hose on a VAZ 2110 stove is an important process. And in this article we will talk about how to replace the VAZ 2110 stove hose.
What you need to have on hand for repairs
- Lower hose for draining fluid from the radiator.
- Upper inlet hose.
- Short pieces for the water pump couplings, as well as the thermostat.
Replacing hoses for the stove on a VAZ 2110
Heated liquid is supplied to the radiator through the upper hose, and cooled liquid is removed from the radiator through the lower hose.
Note! If leaks are detected from the hoses, the damaged elements must be urgently replaced.
Step-by-step instructions for removing and installing the stove
The heat exchanger of the VAZ 2114 car is located in an extremely inconvenient place. Therefore, when removing and installing it, you will have to do a fairly large amount of disassembly and assembly operations.
The VAZ 2114 heater is equipped with air ducts, ventilation nozzles and levers for regulating the warm air flow
Tools and consumables
To work you will need the following tools:
- Phillips and slotted screwdrivers with short and long handles (screwdriver);
- set of wrenches;
- container and rubber hose for draining coolant;
- rags, a piece of oilcloth.
Procedure for replacement
In order to remove the heater radiator of a VAZ 2114 car, you should perform the following operations:
First, drain the antifreeze on a cold engine. Then unscrew the screw located behind the plastic plug.
Remove the glove compartment. First, unfasten and detach the bottom half. Then remove the cover along with the light bulb. Unscrew the screws securing the upper part and, with slight pressure and rotation, lower it down. In total, you will need to unscrew six screws.
Unscrew the two upper and two lower self-tapping screws securing the instrument panel.
Remove the lower protective cover from the steering column. To do this, remove three self-tapping screws and three screws from below.
Pull the plug out of the cigarette lighter socket.
Disconnect the connectors of the pads from the car radio and remove it from the slide.
On both sides, unscrew the screws securing the plastic console.
Pull out the flags that regulate the position of the damper and remove the heater fan mode switch.
Disconnect the console from the panel.
On the console, disconnect the terminals from the buttons for turning on the lights, heated rear window, fog lights, etc.
Be sure to mark them with a marker or notches in order of location. Disconnect the console from the panel.
Disconnect the ashtray light connector.
Unscrew the two screws from the diagnostic connector and carefully completely disconnect the console.
Carefully remove the console and set it aside.
Unscrew the two screws securing the metal base to the floor - one on the left and the other on the right side of the bracket.
Unscrew the four self-tapping screws securing the front panel (“dashboard”) - two each to the left and right of the center of the console mounting.
First remove two large screws, then two smaller screws that secure the iron structure.
Pull the electronic control unit out from under the console.
To access the heating radiator, lift the left side of the dashboard using a jack.
In case antifreeze spills, place an oilcloth under the hoses and rags on it.
Unscrew the clamps from the hoses connecting the radiator to the engine cooling system. Remove the rubber tubes from the heat exchanger pipes. Drain the coolant from the radiator into a prepared container.
Remove the heater core from its socket. Install the new radiator by performing all operations in reverse order.
To prevent an air lock from forming in the cooling system, remove the hose from the throttle body after loosening the clamp. Pour antifreeze into the expansion tank in a thin stream.
At the same time, watch the end of the disconnected hose - as soon as liquid flows from it, put it in place and tighten the clamp.
Video: replacing the radiator of a VAZ 2114 stove
https://youtube.com/watch?v=JYC8ijuYJdg
During the operation of a car, situations arise that any car enthusiast can resolve independently. Replacing a stove radiator is precisely this type of operation. As you can see from the article, doing this yourself is quite simple. The main thing is that after removing and installing the radiator, you do not have any unnecessary parts left, and all screws and clamps are tightly tightened. Good luck on the roads!
Why do you need a pump in a car?
If we talk about the operation of a car engine, then we immediately touch upon the topic of its cooling. Indeed, without high-quality cooling, the engine will not be able to work for a long time and will definitely “boil”. Thanks to the circulation of coolant, it becomes possible to operate the engine at any time of the year under any external conditions.
The power component on the VAZ of the tenth family has a rather complex structure. During the working cycle, the pistons rub strongly against each other, which invariably leads to strong heating of the surfaces. The only way to prevent engine overheating is to constantly maintain the desired temperature in the friction zone through the circulation of coolant. It is for this purpose that the VAZ design includes a cooling system.
Coolant (antifreeze or antifreeze) is poured by the driver into the expansion tank of the car. From it, the liquid is transferred through pipes to the water pump, and from there it goes to the radiator and cylinder block. The water pump (or pump) is designed to pump antifreeze through the system while the engine is running. That is, the pump starts together with the engine and turns off after the driver turns off the car. Without a pump, the entire cooling system can be considered ineffective, since only the pump can create rapid circulation of liquid throughout all parts of the system.
The pump is designed to create the necessary pressure in the cooling system to move the liquid.