The parking (hand) brake in a car is one of the important parts of the safety system. In extreme situations or during traffic accidents, the handbrake can save the health and even the life of the driver, passengers or pedestrians. This is why the handbrake system must always be maintained in perfect condition and ensure that the parking brake is always in full working order.
To do this, you should regularly tighten it, or, more precisely, adjust it, because there are cases when, for the purpose of adjustment, sometimes it is necessary not only to tighten, but also to loosen the handbrake. It is necessary to test the parking brake of the Lada Grant (VAZ-2190) for proper and uninterrupted operation when there are even the slightest complaints about its functioning.
Repair of parking brake Lada Granta
Some drivers, in an effort to wear out the parking brake cable less, try to use it less often.
This “saving” leads to a bad result: the cable, rarely moving in the shell, gradually loses mobility and ultimately jams and breaks.
Use the parking brake whenever necessary.
Replacing the parking brake pawl rod spring
If the parking brake lever does not lock into the selected position, first check the pawl spring. If the spring is OK, replace the lever.
Unscrew the button from the lever
Remove the pawl spring.
Replace the defective spring
Parking brake lever repair
We install the car on a lift or inspection ditch
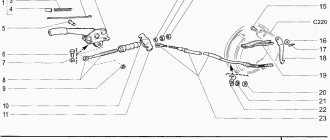
From the bottom of the car, unscrew the four nuts 1 securing the body floor protection, remove the spring and flat washers.
We disengage screen 2 from the fastening studs and move it forward in the direction of vehicle travel, thereby freeing up the location of the elements of the manual brake system.
From the bottom of the car, using a 13mm wrench, unscrew the locknut and the parking brake adjusting nut and remove the equalizer 1 from the rod 2.
4. Remove the protective cover from the hole in the floor and remove it from the rod.
Using a Phillips screwdriver, unscrew the three screws 3 securing the cover of the protective lever of the manual brake drive
Removing the parking brake lever trim
Disconnect the wiring harness from the parking brake warning switch
Use a Phillips screwdriver to unscrew the self-tapping screw
Removing the push-button switch
Using a 13mm socket, unscrew the two bolts securing the parking brake lever bracket to the floor tunnel
Remove the parking brake warning switch mounting bracket
Remove the parking brake lever with bracket and rod assembly, pulling the rod through the rubber sealing boot
Using a screwdriver, pry up the fixing bracket of the thrust axis and remove it
Remove the axle and rod from the parking brake lever
Install the lever in the reverse order.
Adjusting the parking brake.
Replacing parking brake cables
The cables must be replaced simultaneously, left and right.
We install the car on a lift or inspection ditch
Unscrew the locknut and adjusting nut from the parking brake lever rod
Remove the cable equalizer from the parking brake lever rod
We take out the cable ends from the equalizer and remove it
Remove the end of the left cable sheath from the bracket
We disconnect the rear end of the left cable from the parking brake lever (described in the article How to repair the rear wheel brakes of a Lada Granta)
We remove the end of the cable and the brake shield
Using a 10mm wrench, unscrew the nut and remove the bracket securing the cable sheath to the rear suspension beam
We remove the cable sheath from the holder on the rear suspension beam mounting bracket
Use a screwdriver to bend the cable mounting bracket on the body and remove the cable from the bracket
Using a 10 mm high socket, unscrew the four nuts securing the heat shield of the tank
Removing the screen
We remove the cable from the holder on the body
We remove the left parking brake cable from behind the protective screen of the fuel lines
Installing the parking brake cables
Place the parking brake lever rod into the hole in the equalizer and tighten the adjusting nut several turns.
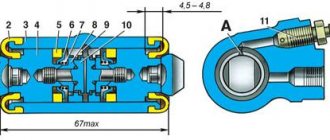
To install another cable, you can make a device from a metal tube about 30 cm long and a hole with a diameter of 15-16 mm.
At one end of the tube we drill a hole and cut a thread in it for a screw (M4-M6).
Cable installation tool
We fix the cable in the holders on the body and the rear suspension beam mounting bracket
We put the tube on the rear end of the cable and fix the cable sheath on the end with a screw
Use a rod (you can use a wrench) to press on the tip of the cable, compressing its spring
In this case, the front end of the cable will come out of the sheath and can be inserted into the equalizer.
Further installation of the cable is carried out in the reverse order.
After replacing the cables, we adjust the parking brake.
The parking brake should hold the vehicle on a 23% grade.
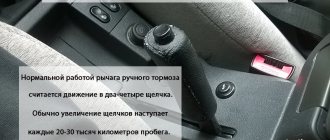
The full travel of the parking brake lever should be from 2 to 4 teeth (clicks) of the ratchet device
Installation method No. 2
First you need to do a few manipulations under the hood:
- Unscrew the tube that goes to the left brake mechanism and put a plug on it.
- Unscrew the tube going to the front right wheel. Install it in the hole intended for the right rear brake mechanism.
Before starting work, be sure to drain all liquid. Try to do everything carefully so as not to damage the hydraulic mechanisms. Try not to let the liquid come into contact with the metal, as it will corrode it. Further actions:
- Install a new handbrake between the seats.
- Install the bolt instead of the regulator pendulum. Screw it to the bottom of the body. It is recommended to temporarily remove the front seats so that they do not interfere and do not get dirty during work.
- A tube is laid from the engine compartment along the bottom to the new handbrake.
- You lay pipes from the regulator along the bottom of the cabin.
- Select the tube sizes and install them on the rear axle.
- Attach a flexible hose to the rear beam on the bracket.
- Be sure to install a rubber ring so that the hose does not rub during operation. To make it easier to put on, cut this ring.
- Connect the hose to the tubes. To secure metal tubes, use plastic zip ties.
Payment via PayPal
After selecting payment via PayPal, the PayPal payment system will launch, where you need to select the payment method: bank card or PayPal account.
If you already have a PayPal account, then you need to log into it and make a payment.
If you do not have a PayPal account and you want to pay using a bank card via PayPal, you need to click on the “Create an Account” button - shown with an arrow in the picture.
PayPal will then prompt you to select your country and provide your credit card information.
After specifying the information required to make the payment, you must click on the “Pay Now” button.
Replacing the parking brake pawl rod spring
If the parking brake lever does not lock into the selected position, first check the pawl spring. If the spring is OK, replace the lever.
Unscrew the button from the lever
Remove the pawl spring.
Replace the defective spring
Parking brake lever repair
We install the car on a lift or inspection ditch
From the bottom of the car, unscrew the four nuts 1 securing the body floor protection, remove the spring and flat washers.
We disengage screen 2 from the fastening studs and move it forward in the direction of vehicle travel, thereby freeing up the location of the elements of the manual brake system.
From the bottom of the car, using a 13mm wrench, unscrew the locknut and the parking brake adjusting nut and remove the equalizer 1 from the rod 2.
4. Remove the protective cover from the hole in the floor and remove it from the rod.
Using a Phillips screwdriver, unscrew the three screws 3 securing the cover of the protective lever of the manual brake drive
Removing the parking brake lever trim
Disconnect the wiring harness from the parking brake warning switch
Use a Phillips screwdriver to unscrew the self-tapping screw
Removing the push-button switch
Using a 13mm socket, unscrew the two bolts securing the parking brake lever bracket to the floor tunnel
Remove the parking brake warning switch mounting bracket
Remove the parking brake lever with bracket and rod assembly, pulling the rod through the rubber sealing boot
Using a screwdriver, pry up the fixing bracket of the thrust axis and remove it
Remove the axle and rod from the parking brake lever
Install the lever in the reverse order.
Adjusting the parking brake.
Crib
Instead of a conclusion, let's summarize :
- Carry out work on a lift, pit or overpass;
- Tools: open-end wrench 13, ratchet with heads 10 and 13 (preferably long);
- It is not necessary to remove the heat shield - just move it forward as the vehicle moves;
- The ideal stroke is 3-4 clicks of the handle until the rear wheels come to a complete stop.
If you've already started adjusting the brakes, maybe change the rear pads too? Detailed instructions with description and photos are here.
Have something to add to the article, share your opinion or recommend? Write in the comments!
Source
Examination
But if you twisted the nuts there, this is not a guarantee that the handbrake now works perfectly. This needs to be clearly verified.
To do this, it is enough to go through a successive stage of verification activities.
| Stage | Explanation |
| Spin the wheels after tensioning is completed | The wheels are lifted one by one on a jack. When the handbrake lever is turned off, they should rotate freely without obstacles. By squeezing the brake, the wheels should lock. |
| Drive up a slight slope, stop and engage the handbrake | The fact that the wheels do not spin when suspended is good. But you need to make sure that the handbrake holds the car even when exposed to gravity. |
If the check shows that the handbrake still does not hold, even if the cable was tensioned exactly according to the instructions, the handbrake is probably simply worn out and the cable needs to be replaced.
Hydraulics or mechanics
It is worth noting that at the moment not all rear brakes are cable or mechanical; now there are quite a large number of handbrake brakes that operate hydraulically, this is especially true for rear disc brakes rather than drum brakes . Hydraulics duplicate the operation of the main braking system.
That is, when you lift the handle, a special piston creates pressure on the rear discs and they are blocked. If the handbrake does not work in such a system, then the reasons are significantly different from its mechanical counterpart.
Lada Granta: repair, operation, tuning and maintenance
Perhaps checking the brakes of any car is the key to your safety
In my opinion, the car’s brakes need to be prevented and checked at least once every two weeks, this will make your driving comfortable and safe, which is the most important thing, but now we will talk about the brakes of the Lada Granta. So, let's get started!. Take the jack in your hands, lift the rear of the car with it and remove the wheel
Then remove the brake drum and unscrew the guide pins
Take the jack in your hands, lift the rear of the car with it and remove the wheel. Then remove the brake drum and unscrew the guide pins.
Next, we loosen the handbrake cable and remove the cotter pin that holds the block, after all, pull out the lever, then remove both springs, the upper one and definitely the lower one, and then remove the blocks.
First the pads, then the upper tension spring and install the lower tension spring, and of course, don’t forget to put the handbrake cable on the lever! Install the brake drum, it is advisable to clean it and lubricate it with special lubricant. It's called graphite.
After cleaning, we put it in place, then the most basic procedure is bleeding the brakes.
Bleeding the brakes.
For this you will need a partner. One person will sit in the car and press the brake 5-6 times until it hits the floor. And the second one needs to sit near the brake disc.
When you unscrew, the second one should begin to press the brake pedal; when the pedal rises, the screw will need to be tightened. And so 5-6 times.
As a result, air will escape. This will then lead to the release of brake fluid.
Please note that when the liquid pours, it should be free of bubbles. When the procedure is completed, put the wheel in place. Press the brake pedal again 2 times and try to spin the wheel, if the brake drum clings a little to the pads, everything is fine! As soon as we have pumped the front brake, we move along the diagonal to the rear brake pad, and do the same thing.
Press the brake pedal again 2 times and try to spin the wheel, if the brake drum clings a little to the pads, everything is fine! As soon as we have pumped the front brake, we move along the diagonal to the rear brake pad, and do the same thing.
All we can say is that we are almost done with the brakes. Next we tighten the handbrake. Use a special wrench to tighten the handbrake.
Keys are sold in all auto parts stores, so you should not have any difficulties buying a key.
That's all, I wish you good luck and stop breaking your brakes!
‹ Possible malfunctions Up Replacing brake fluid ›
How do they work?
The operation scheme is banal and simple - there is a handle that is connected to a cable, which in turn is in a special braid (that is, the cable runs in it). Then this cable is hooked onto a special adjusting bolt (it can be tightened and loosened), which is engaged with a bar, along the edges of which there are two more cables that go to the two rear wheels. And these cables (extending to the wheels) are engaged with a special bracket, it is this that opens the pads and blocks the drums.
That is, in simple words, when you move the handle up (raise the handbrake), the cable stretches and pulls two separate cables to the wheels. Inside the drums, the brackets are unclenched, which spread the rear pads, due to which the wheels are blocked.
Removing elements of the parking brake system
We replace the parking brake cables when they are broken, pulled out, or stuck inside the sheaths, when adjusting the parking brake fails to keep the car stationary on a slope - up to 23% inclusive. We remove the parking brake lever to replace it or to replace the lever rod. The cables should be replaced simultaneously - left and right. We carry out the work on an inspection ditch or overpass. We show the replacement of the left cable. The right cable is removed in the same way, but it is not necessary to remove the fuel tank heat shield. We unscrew the locknut and the adjusting nut from the parking brake lever rod (see “Adjusting the parking brake”). Remove the cable equalizer from the parking brake lever rod.
We take out the front ends of the cables from the equalizer and remove it.
Remove the end of the left cable sheath from the bracket. Disconnect the rear end of the left cable from the parking brake drive lever (see “Replacing the rear wheel brake pads”).
We remove the cable tip from the hole in the brake shield.
Using a 10mm wrench, unscrew the nut... ...and remove the bracket securing the cable sheath to the rear suspension beam.
We remove the cable sheath from the holder on the rear suspension beam mounting bracket.
Using a screwdriver, bend the cable mounting bracket on the body... ...and remove the cable from the bracket. Remove the heat shield of the fuel tank (see “Removing the fuel tank”).
Remove the cable from the holder on the body.
We remove the left parking brake cable from behind the protective screen of the fuel lines. We install the cables in the following order. We mount one of the cables in the reverse order and insert its front end into the cable equalizer.
We insert the parking brake lever rod into the hole in the equalizer and tighten the adjusting nut several turns. To install another cable, we recommend making a device from a metal tube about 300 mm long and a hole with a diameter of 15–16 mm. At one end of the tube we drill a hole and cut a thread in it for a screw (M4–M6).
Device for installing cable. We secure the cable in the holders on the body and the rear suspension beam mounting bracket.
We put the tube on the rear end of the cable and fix the cable sheath on the end with a screw.
Using a rod (you can use a wrench from a set of socket heads) we press on the tip of the cable, compressing its spring. In this case, the front end of the cable will come out of the sheath and can be inserted into the equalizer. We carry out further installation of the cable in the reverse order. After replacing the cables, we adjust the parking brake. To remove the parking brake lever, unscrew the locknut and the adjusting nut from the parking brake lever rod (see “Adjusting the parking brake”). Remove the cable equalizer from the parking brake lever rod (see above). Inside the car...
Read more: Vibration damper for the field reviews
... use a Phillips screwdriver to unscrew the three screws...
...and remove the parking brake lever trim.
Disconnect the wiring harness from the parking brake warning switch.
Use a Phillips screwdriver to unscrew the self-tapping screw...
...and remove the switch.
Using a 13mm socket, unscrew the two bolts securing the parking brake lever bracket to the floor tunnel.
Remove the parking brake warning switch bracket.
Remove the parking brake lever with bracket and rod assembly, pulling the rod through the rubber sealing boot.
Use a screwdriver to pry up the fixing bracket of the thrust axis... ...and remove it.
Remove the axle and rod from the parking brake lever. Install the parking brake lever in reverse order. Adjusting the parking brake (see “Adjusting the parking brake”)
The hand brake cables are replaced if it is impossible to adjust the rear brake pads. As a rule, the main malfunction of the handbrake cable is its jamming in the braid. As a result, the cable remains motionless and it is not possible to adjust the position of the rear pads with its help. It is also worth mentioning that the design of the hand brake is completely similar to the designs used on previous VAZ models (starting from 2108). Install the cable with an assistant: the lever pull is short, therefore, to install the equalizer, you need to pull the cable tightly.
Replace the cable if the following malfunctions occur: – the cable ends are loose; – the cable threads began to break; – the cable moves heavily in the sheath even after it is lubricated.
Reasons why the handbrake does not work
Often the reasons are trivial, and the work itself only takes 10 minutes (more on that a little later), but now I’ll list the main points:
- Wear of rear brake pads . Usually accompanied by a grinding noise when braking. Here, tighten, don’t tighten the cable, nothing will work. First you need to replace the pads, preferably on both wheels at once, because they wear out evenly.
- Incorrectly adjusted parking brake . This also happens, the adjusting bolt is simply loose - you need to tighten it.
- Cable wedge in sheath . This often happens over time, and often appears on 5 year old or older cars. The fact is that moisture gets between the sheath and the cable itself, after which the rust and the cable get stuck in the sheath. There are two ways here, either lubricate it and develop it so that it runs normally. Or you should replace the cables with new ones.
- Broken cable . Sometimes the cable breaks, both from the handle itself and under the car, it needs to be replaced.
- Ice or salt, reagents on the surface of the pads . It happens rarely, but it does happen, especially after driving through deep puddles. It is worth cleaning the pads with gentle pressure when driving short distances. All plaque should be cleared.
- Oil or brake fluid getting on the pads . For example, the working cylinder is leaking, or the rear axle seal may be leaking. Here you first need to remove the cause of the leak, then clean the pads. Of course, they will clean themselves after several braking cycles. If the “oiling” is strong, then you need to replace the pads with new ones, because the surface of the linings can be completely saturated with oil.
I know from experience that these are mainly the first four reasons. For example, on our VAZs, very often the cable in the sheath rusts from time to time, or it breaks, and you need to tighten it in time.
How to tighten the handbrake on a Lada Granta with your own hands: adjustment + photos and videos
Incorrect operation of the handbrake can cause an accident or some other serious incident.
Introduction
For example, even with the simplest job of replacing a broken tire, you must put the car on the handbrake, otherwise you risk “putting” the car on the bumper as a result of the car “driving” forward. And this is not the worst thing that can happen! You may cause yourself serious physical harm.
Toyota BB was dropped on the asphaltClassic fell from a jack
Necessary tool for tightening the handbrake
8 socket for ratchet Partner (preferably the coolest car mechanic)
- Two keys for 13. It is advisable that one of them be a socket.
- Head 8.
- A partner, but you can do without him. The truth is it’s more difficult without him.
The principle of adjusting the handbrake
- Fully lower the handbrake lever in the cabin. Lower the handbrake handle
- Place the car on a pit or lift it on a lift. Some car owners manage to adjust the handbrake “from the curb” - but this is inconvenient and dangerous.
- Find the resonator from the bottom of the car and remove it from the rubber brackets. Remove the muffler from its mounting to the body
- Using a ratchet, unscrew the 4 bolts securing the protection of the handbrake adjustment mechanism (protective screen). Remove and set aside the protective screen
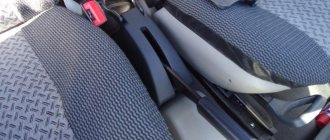
- Next, you can either remove the protective screen, but, as it seems to me, it’s easier to move it forward behind the muffler, which will free up space that is enough for free work. The mechanism looks like this
- Loosen the first nut with a 13mm wrench. Weaken
- By tightening the adjusting nut, tighten the handbrake cable that comes out of the passenger compartment.
- Ask a partner to check the stroke of the lever handle, or check it yourself.
- As soon as the handbrake moves 3-4 clicks, tighten the lock nut.
- Before the final stage of work, it is necessary to check the functionality of the brake mechanism. To do this, hang the rear wheels and watch how they rotate with the hand brake off. They also check how the wheels grip when the handbrake is raised.
- Next, return the protective screen to its place, screw it onto the seats and put rubber fasteners on the resonator.
Why does it need to be tightened frequently?
This is the peculiarity of the mechanism, which is why you often have to tighten the handbrake. Plus low-quality spare parts from the beginning, and a design that has not changed since the time of Tsar Pea!
How a properly configured handbrake should work
The handbrake movement in a Lada Granta car should be no more than 6 clicks from the moment it is raised. It is possible to increase the handbrake stroke to 8 clicks, but it is not recommended.
It shouldn’t be like this (the brakes don’t grab the rear wheels)
Ideally, of course, 3-4 clicks. With this setting of the handbrake, you will have a reserve of movement when the cable weakens and the wheels begin to grip later.
If you experience a situation where the handbrake is “pulled out” to its fullest extent, but the wheels do not grab, then the following reasons are possible:
- rear brake pads are worn out;
- the handbrake cable is broken or stretched/
Useful tips
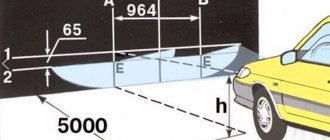
You can fully check the correct operation of the handbrake on a hill at 23 degrees. With the handbrake lever fully raised, the car should stand still in a disengaged gear.
Precautionary measures
Several rules will help you avoid the problem of the parking brake freezing. In winter, try not to leave the car on the handbrake for a long time. If the car is in “automatic”, put it in “P” (parking), in “manual” - first or second gear. If you need to leave the car on a slope, place a reliable support (stone, brick) under the wheel.
Simple precautions will help you avoid serious problems.
If you really need to use the parking brake, then dry it before using it. Make a few quick stops. The brake pads will heat up and the moisture in them will evaporate. Do not tighten the handbrake all the way. If the brake freezes, it will be somewhat easier to dislodge the ice.
Try not to leave your car on the handbrake for long periods of time in winter.
Pull up the handbrake
But if you really know how to tighten the handbrake on a Lada Granta standard, this procedure will not take you much time and effort. The only thing that is required for its implementation is a jack or an inspection hole, because access to adjustable components and assemblies occurs from below and you will have to work under the car. To tighten (adjust) the handbrake you will need 3 tools:
- two open-end wrenches for 13, one of them is preferably a socket one;
- one key head for 8;
- a faithful assistant (although in desperate situations you can get by alone).
The process of directly adjusting the manual braking system of a Lada Granta car is carried out in nine main stages:
- We lower the handbrake lever inside the car.
- We climb under the car, unscrew the rubber cushions (brackets) from the resonator, and remove the muffler from its attachment to the body.
- We remove the protective screen of the parking brake adjustment mechanism. To do this, use a socket wrench to unscrew the 4 nuts from the fastening bolts.
- We remove the protective screen or move it to the side behind the muffler - in this case, the necessary space for work is also quite enough. In this case, the muffler can be pulled back with something, for example, by pushing a block of wood under it.
- We take two 13mm wrenches - the first one is to slightly loosen the locknut, holding the adjusting nut. Then vice versa - hold it, and secondly turn (also loosening) the adjusting nut.
- Actually, we adjust the hand brake as follows: tighten the handbrake cable, for which we tighten the adjusting nut (move the key clockwise).
- Next, you should check the travel of the handbrake lever - this is why you need a partner, or you will have to do it yourself. The lock nut can be tightened when the handbrake stroke is 2-4 clicks (see above).
- Then we test the operation of the parking brake mechanism as a whole. To do this, lift the rear wheels and check how freely they rotate when the handbrake is lowered and how completely they lock when fully raised (in this case they should not rotate at all!).
- If the handbrake is working properly, tighten the locknut and replace the protective screen and muffler. The handbrake adjustment is complete!
As the mileage and life of the vehicle increases, the handbrake becomes less and less adjustable. It happens that even after adjustment, the manual braking system does not work properly and does not “hold” the car. This indicates that the wear on the brake pads is too high or the cable stretch is irreversible.
Sources
- https://ladaservice.info/lada-granta/raznoe-lada-granta/zamena-i-regulirovka-trosika-ruchnika-lada-granta/
- https://vgrante.ru/?cat=40&pcat=6
- https://car-fact.ru/marki-i-modeli/otechestvennye/lada-granta/granta-kalina-ruchnik.html
- https://Remladavaz.ru/zamena-trosov-privoda-stoyanochnogo-tormoza-lada-granta
- https://carfrance.ru/podtyagivaem-ruchnik-na-lada-granta-regulirovka-i-podtyazhka-trosa/
- https://new-granta.ru/regulirovka-ruchnika-na-lada-granta/
- https://24techno-guide.ru/regulirovka-ruchnogo-tormoza-lada-granta.php
- https://ubs-rus.com/rukovodstva-po-remontu/granta/granta-zamena-trosov-privoda-stoyanochnogo-tormoza/
- https://ladaautos.ru/lada-granta/kak-pravilno-podtyanut-ruchnik-na-lade-granta.html
Crib
Instead of a conclusion, let's summarize :
- Carry out work on a lift, pit or overpass;
- Tools: open-end wrench 13, ratchet with heads 10 and 13 (preferably long);
- It is not necessary to remove the heat shield - just move it forward as the vehicle moves;
- The ideal stroke is 3-4 clicks of the handle until the rear wheels come to a complete stop.
If you've already started adjusting the brakes, maybe change the rear pads too? Detailed instructions with description and photos are here.
Have something to add to the article, share your opinion or recommend? Write in the comments!
The parking (hand) brake in a car is one of the important parts of the safety system. In extreme situations or during traffic accidents, the handbrake can save the health and even the life of the driver, passengers or pedestrians. This is why the handbrake system must always be maintained in perfect condition and ensure that the parking brake is always in full working order.
To do this, you should regularly tighten it, or, more precisely, adjust it, because there are cases when, for the purpose of adjustment, sometimes it is necessary not only to tighten, but also to loosen the handbrake. It is necessary to test the parking brake of the Lada Grant (VAZ-2190) for proper and uninterrupted operation when there are even the slightest complaints about its functioning.
Dismantling and replacement
It is difficult to confuse the cable from the handbrake with anything else under the bottom of your VAZ 2114, which greatly simplifies the repair and replacement procedure.
Dismantling works
We provide detailed instructions for replacement, and additionally recommend watching the video.
- We advise you to get the car in order in terms of cleanliness in advance. This will make it easier for you to find all the nuts and fasteners.
- Additionally, treat the nuts with the almighty WD40. This will make it much easier for you to unscrew the sometimes sticking and rusting nuts.
- Place the handbrake lever all the way down.
- Start with the adjusting nut and locknut that you used recently to try to tighten a loose cable. In this situation, you should loosen the nuts and remove them from the handbrake rod.
- Remove the washers and cable equalizer. Although this can be done after you jack up the car. But be sure to do it before removing the wheels.
- Raise the rear of the car with a jack, unscrew the wheel bolts and remove them.
- Tap the brake drum locking pins. This will allow them to be removed from the brake pads.
- Remove the block.
- You now need to disconnect the ends of the two cables from the equalizer. The fasteners can be removed from their places with the simplest pliers, so don’t bother.
- The shifted spacer lever has hooks from which the cable loop can be removed.
- The cable sheath must be removed from the entire suspension of the rear of the car. To do this, the mounting bolts are first unscrewed.
- Pull the cable out of the holes through the brake flaps.
- We got rid of the old cable, so all that remains is to replace the old one with a new element. The procedure is performed exactly in reverse order.
- Thread the new cables through the washers and hook the loops. You can additionally make bosses - this is a special clamp that allows you to fix the cable even more tightly.
- Reassemble the entire disassembled wheel structure.
- Route the cable along the suspension through the sheath and secure the bolts.
- Pull the handbrake in the cabin.
- Check the correct tension and operation of the new hand brake, or rather the cable.
It is not uncommon for the parking brake to cause an unpleasant squeaking noise from the rear. By changing the cable, you can get rid of this problem at the same time. To do this, rubber seals are installed under the cable fasteners on the body frames.
Functionality check
After replacing the cable, check its operation.
- Place the car on a hill and turn on the handbrake. If the car starts to roll, the new cable needs adjustment.
- Loosen the parking brake lock nut in the handbrake, tighten the adjusting nut, and then pull the cable using the lever.
- The optimal lever stroke should include 2-4 strokes. If this happens, tighten the locknut and check it again.
- We drive up a hill and turn on the handbrake. Now the car should definitely stand still. Unless the cable turned out to be fake or an error was made during the assembly stage.
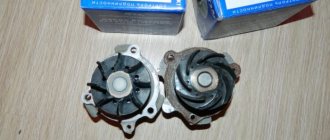
Disassembled handbrake
Before frost, it is recommended to lubricate the parking cable, which will significantly extend its service life. Under the influence of negative temperatures, the cable breaks down faster. The tips, axle and rod of the equalizer should be lubricated.
Tightening and replacing the handbrake cable is not a difficult task. Even if you don't have a lot of experience working on cars, you will be able to do this job.
But if you are not confident in your own abilities or simply do not have time to do such things on your own, contact a service station. A lift will cost about 500-700 rubles, but for a replacement they will ask for at least 1,500 rubles.
In order to remove the handbrake lever we need an overpass or pit. You can, of course, get by with a jack.
When to tighten and when to change?
During operation of the machine, the steel cable gradually stretches and begins to sag. Then part of the lever stroke is used to remove this slack (the first 2-3 clicks), and only then the force is transferred to the brake pads of the rear wheels. As a result, they are weakly pressed against the surface of the discs or drums and the car does not brake reliably.
The first sign of a malfunction is that the handbrake stops working on the first two clicks of the handle and is raised by hand without any effort. In this case, it is definitely necessary to tighten the hand brake, or rather the cable drive.
But the operation of the mechanism also depends on other factors:
Abrasion of the linings does not have much effect on the operation of the main system, since the stroke of the hydraulic pistons is quite large. But the effect of the mechanical “handbrake” gradually weakens. To return it to working condition, it is necessary to compensate for the wear of the elements by tensioning the drive. If the cable itself is in satisfactory condition, the extension of the tension pin will be enough to ensure the operation of the parking brake at any degree of wear on the linings.
The cable is replaced in the following situations:
- The element has stretched to such an extent that at maximum tension the pads do not grip the discs and the car rolls away on any slope.
- Due to the constant ingress of water under the cable casing, it rusted and became tightly jammed. This happens when a motorist rarely uses the handbrake.
Cable jamming also occurs in winter, when water trapped under the casing freezes inside. In this situation, do not rush to change it; first warm up the car in the garage, and then drive out the moisture using WD-40 aerosol lubricant.
Adjusting the parking brake (handbrake).LADA Granta – Fun – watch video
4 years ago
In the video I will show you how to change the front pads, brake discs and calipers yourself.
2 weeks ago
The dealer sold the damaged car as if it were new Prices for the Lada Kalina Cross on Avto.ru – https://goo.gl/BRZ31U – My website – https://avtokriminalist.ru/ – Offer a car for review – The Lada Kalina car was purchased a year ago from an official dealer.
A year later, the owner decided to sell the car and found out that under the guise of a new car, a car dealership had sold him a damaged and repaired car. Comprehensive vehicle inspection and diagnostics. Checking the body, engine and mileage.
Autocriminalist Maxim Shelkov – Car diagnostics before purchase – Checking the car with a visit to the car – Selection of a car to order – Examination of license plates: VIN, body, frame, engine – Checking car documents
4 weeks ago
All details about the car for subscribers: https://www.youtube.com/watch?v=wMgCGHoCqLM Win a car with tuning - https://l.tinkoff.ru/academegcar Management competition “Leaders of Russia”: https://leaders of Russia .rf Many thanks to Boryan and Fedya from LOW CARS MEET, an insider from this filming will soon be released on their channel: https://www.youtube.
com/channel/UCDcdwoIrn2M1mwfEz0NCODg Music: Clams Casino – All I Need What So Not – Touched GooMar – Moscow DROELOE – BACKBONE (feat. Nevve) Hucci – Vision (feat. Dom Sebastian) iBenji & Moon-Sun – Horny devianprod. – drowninginthissea For advertising and cooperation issues: My stream channel: https://www.
youtube.com/c/AcademeGDailyStream Instagram: https://instagram.com/academeg Vkontakte: https://vk.com/AcademeG AcademeG true original groups: https://vk.com/academeg_reviews Ftaroy channel: https:// www.youtube.com/user/AcademeG2ndCH Souvenirs Academeg Store: https://vk.cc/5UNsQJ Auto chemical goods A-PROVED: https://a-proved.
ru #ZIL600SIL #porsche
9 months ago
How to make the car interior quieter https://www.youtube.com/watch?v=wbmNTwACDE8 Oil additive tests https://www.youtube.com/watch?v=fVCxsP71BII My 2nd channel https://www.youtube. com/channel/UC6rJlbPrc07AnG4BYlciPoA Excellent DVR https://ali.pub/204pb1 Continuation of this video https://www.youtube.com/watch?v=Uu1YUAAxRsY
2 years ago
Adjusting the handbrake cable on a VAZ 2114-2115 Since the rear drums and pads tend to wear out, over time the effectiveness of the handbrake decreases and you have to tighten it more and more.
Ultimately, even with the lever at maximum tension, the rear wheels do not lock to the required moment, and you need to resort to adjusting the mechanism. To perform this work on a VAZ 2114-2115 you will need only two 13mm wrenches, one can be a regular one, and the second is convenient to use a ratchet, since there is quite a bit of space for turning the nut.
So, it is most convenient to perform this work in a pit, or with the rear of the car strongly raised with a jack. The first step is to find the adjustment mechanism itself. It is located under the bottom of the car closer to its rear: Now, while holding one nut with a wrench, the second must be tightened until the handbrake efficiency becomes normal.
Some owners check the operation while driving by lifting the lever and making sure that the wheels are completely locked.
3 years ago
Video for those who are planning to buy a Grant with low (or high) mileage and what it looks like after 2 years of operation and 33,000 km. Due to numerous requests and questions about the learnable flip key and temperature indicator - I took it here https://rd-lab.shop
1 month ago
AUTOLIFE HACKS. tips for motorists Download
Procedure
As practice shows, repairing the parking brake comes down to replacing the handbrake cable, but in most cases, the operation of the unit can be restored with the help of a tensioner. If you follow clear instructions, then no problems with adjustment should arise.
Tools
To adjust the handbrake, you need to prepare the following tools:
- flat screwdriver;
- a set of keys, including a cylinder key;
- wrench with nozzle 18;
- wheel chock or other wheel supports;
- jack;
- work gloves.
Minimum required set of tools
To adjust the cable, it is advisable to use a telescopic jack to raise the car to a greater height. But if this is not the case, then a different type of jack will do, for example, a rack and pinion jack. After all the tools are prepared, you can begin to work.
Instructions
There are several requirements that must be met before making adjustments. First of all, the brake system must be fully operational and free of air. The driver must also make sure that all holders, cables and the lever itself are in good condition. Now you can get started. Below are step-by-step instructions that allow you to make adjustments in the shortest possible period of time.
Other section materials
| ADJUSTING THE PARKING BRAKE |
| ADJUSTING THE DIRECTION OF HEADLIGHT BEAMS |
| FRONT WHEEL ANGLES |
| Malfunctions of the engine and its systems |
| The engine runs rough or stalls at idle |
| Kalina. The engine does not develop full power |
| Kalina. Insufficient oil pressure |
| Kalina. The engine gets very hot |
| Kalina. The electric fan of the engine cooling system is constantly running |
| Kalina. Drop in coolant level in the expansion tank |
| Kalina. Strong engine vibration |
| Kalina. Increased content of harmful substances in exhaust gases |
| COMPRESSION MEASUREMENT |
| CHECKING THE STARTER CIRCUIT |
| CHECKING THE IGNITION COIL AND ITS CIRCUITS |
| CHECKING HIGH VOLTAGE WIRES |
| CHECKING ENGINE CONTROL SYSTEM SENSORS |
| CHECKING THE CRANKSHAFT POSITION SENSOR AND ITS CIRCUITS |
| CHECKING THE THROTTLE POSITION SENSOR AND ITS CIRCUIT |
| CHECKING THE PHASE SENSOR, SPEED SENSOR AND THEIR CIRCUITS |
| CHECKING THE COOLANT TEMPERATURE SENSOR AND ITS CIRCUIT |
| CHECKING THE KNOCK SENSOR AND ITS CIRCUITS |
| CHECKING MASS AIRFLOW SENSOR CIRCUITS |
| CHECKING PRESSURE IN THE ENGINE SUPPLY SYSTEM |
| The clutch is slipping |
| Clutch leads |
| Jerking when starting off |
| Rattling, knocking or noise when engaging the clutch |
| Increased noise when disengaging the clutch |
| Noise in the gearbox (the noise decreases or disappears if the clutch is depressed) |
| Transmissions turn off spontaneously |
| Noise, crackling, squealing of gears when the gear is engaged |
| Final drive noise |
| Reverse gear does not engage |
| Oil leak |
| Knock when starting |
| Noise when driving on a smooth highway |
| Knocking noise when driving over small bumps. |
| Knocks, squeaks when the suspension is operating (off-road driving) |
| Traces of shock absorber fluid are visible on the telescopic strut. |
| Traces of grease are visible on the joint cover or wheel drive shaft |
| Knocking, clicking noises when turning the car |
| Vibration when driving |
| Steering the vehicle away from straight-line motion (on a flat road) |
| Rapid tire tread wear |
| Uneven tire tread wear |
| Increased free play of the steering wheel |
| Steering wheel turns hard |
| Creaking, squealing when braking |
| Vibration when braking |