Since ancient times, some Taz drivers used first gear to prevent the car from rolling away, even with a handbrake, my dad always taught me to set the speed. But this can end badly if you don’t turn off the speed and start the car. Over time, the parking brake, due to constant use, stretches the cable, you can tighten it a limited number of times, then you have to remove it, because tightening it is already useless.
He stops holding the car and is not fixed. You can tighten the handbrake on the Priora with just two 8 keys in the hole. This is usually done in your garage. Replacing the drive and handbrake cable on a Priora will require additional keys. Of all the brake systems of the Priora car, the parking one stands out separately. It saves you from unpleasant surprises - while it is working, the car will not roll away in the parking lot. When the handbrake doesn't hold, you should start repairing it right away, maybe you just need to tighten it. Lada Priora received the part as early as 2108 - it has not been changed since then.
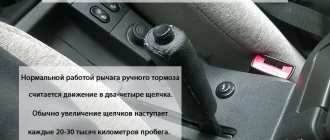
When the driver raises the handbrake handle higher and higher to hold the car in place, this indicates that the parking brake system is not working. Most often this can be solved by tightening it, just tighten the cable and the handbrake will hold. There may be several malfunctions in the parking brake system of a Priora car; read the article to the end and find out about them.
Handbrake (parking brake) on Priora - article number and price
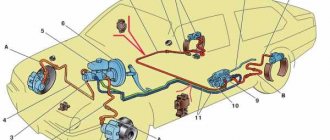
The assembled parking brake system of the Priora car has the catalog name “Handbrake drive” - number C170. Main components:
- cable bracket: 2108-03508214-20, 30 rubles;
- handbrake cable: 2110-03508180-01, price - 400 rubles;
- parking traction axis: 2110-03508073-00, price - 500 rubles;
- laying of parking rod 2110-03508089-00;
- parking drive rod: 2108-03508089-00, price - 250 rubles;
- parking brake lever (assembled): 2110-03508012-00, price - 600 rubles. Button – 2110-03508039-00;
- lever assembly with rod: 2110-03508010-00, price - 1300 rubles;
- traction protective cover: 2108-03508046-00, price – 40 rubles;
- cable equalizer: 2108-03508075-10, price – 50 rubles.
Basic faults
According to the law, a malfunction of the handbrake is accepted in two cases:
- If, at a 16% slope, the handbrake does not hold the equipped car (without cargo and passengers, but with a full tank of gasoline, the driver’s weight is taken to be 75 kg).
- If, on a 23% incline, the handbrake does not hold the vehicle at full load (the maximum permissible vehicle weight has been reached).
In reality, more often than not, a malfunction of this brake mechanism of the Lada Priora is noticed not by measuring the steepness of the slope, but by clicks. When another click of the handbrake is added to the usual “set of sounds” when leaving the car, every car enthusiast understands that it’s time to tighten the cable.
But the problems don't end there. For the parking brake system they can be as follows:
- The cable has stretched too far. Over time, it undergoes deformation. It can be tightened, but to a certain extent.
- The cable broke. When the “limit” is reached, the mechanical device will have to be replaced.
- The handbrake indicator on the dashboard does not light up or go off. This is due to the sensors.
- The lever button is stuck.
How to change the handbrake on a Priora - step-by-step guide
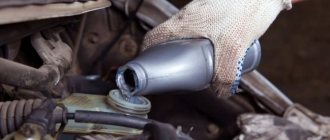
Replacing the handbrake cable is needed when a regular tightening is no longer an option; you will have to change the cable or drive. In order to replace the cable on a Priora car, prepare a Phillips screwdriver and a set of keys.
Replacing the cable is carried out as follows:
- Place the car in the pit, lower the handbrake, and engage the gear.
- Jack up the rear of the car, put supports on it, and remove the wheels. Further actions will be described on one side, they will need to be repeated on the other side.
- Loosen the main muffler and hang it up. Do the same with the resonator.
- Slightly loosen the handbrake rod locknut. Remove the cable equalizer.
- Remove the cable end by pulling it through the special bracket.
- Remove the brackets that hold the cable in place.
- Using a screwdriver, press down on the actuator lever to move it further away from the brake pad. The lever should move to the forward position. After this, you can disconnect the cable tip from the brake lever.
- Loosen the nut on the rear beam that holds the cable, and then pull it towards you.
- Pull the cable through the bracket that is attached to the body, then through the brake shield.
- Check the parking brake and make adjustments. If necessary, tighten the nut more.
In order to change the Priora handbrake lever, you will need a set of keys, pliers, and a Phillips screwdriver.
Removing elements of the parking brake system
We replace the parking brake cables when they are broken, pulled out, or stuck inside the sheaths, when adjusting the parking brake fails to keep the car stationary on a slope - up to 25% inclusive. We remove the parking brake lever to replace it or to replace the lever rod. The cables should be replaced simultaneously - left and right. We show the replacement of the left cable. Move the parking brake lever to its lowest position. We unscrew the locknut and the adjusting nut from the parking brake lever rod (see “Adjusting the parking brake”).
How to remove the handbrake lever. General leadership
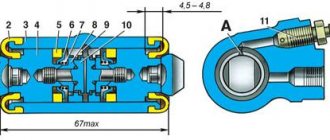
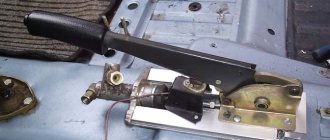
1). Parking Brake Components.
2) . Remove the top panel of the console . Using a screwdriver, release the 4 latches and remove the top panel of the console. Remove the rear end panel of the console. Remove the glove box on the console. Remove the cover.
3) . Glove box mounting bolts . Remove the 4 bolts and remove the glove box.
4) . Remove the parking brake lever . Unscrew the locknut and the adjusting nut. Remove the 2 bolts and remove the parking brake lever. Raise the lock. Disconnect the parking brake cable from the lever. We unscrew the screw and remove the parking brake sensor assembly.
How to remove the hand brake lever on a VAZ 2114
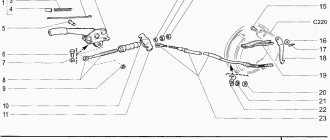
1). Set the lever (1) to its lowest position.
2). Disconnect the cable ends (10) from the levers (13) of the manual drive of the shoes and from the equalizer (6). To do this, unscrew the lock nut (9) and the adjusting nut (8) from the rod (5).
3). Then remove the washer (7) and equalizer (6).
4). Having taken out the cotter pin and axle (12), remove the washer (14), lever (13) and release bar (15) of the pads.
practical guide
The need to replace the parking brake cables arises if the cables, as a result of corrosion, have lost the ability to move in the sheath, have become very stretched, or have broken threads.
If it is necessary to replace one of the cables, we also change the other cable.
Removing the parking brake cables:
1. We prepare the car for work.
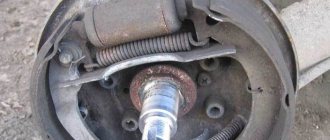
2. Remove the brake drums.
3. Remove the protective screen.
4. Remove the rear protective screen.
5. Loosen the locknut of the parking brake lever stroke adjusting nut and unscrew the locknut.
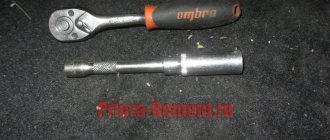
6. Using a socket wrench with a 13 mm deep head and a cardan joint, unscrew the adjusting nut and remove it from the rod.
7. Remove the adjusting rod cable equalizer.
8. Disconnect the cable ends from the equalizer.
9. At the brake mechanism of the left rear wheel, use a large slotted screwdriver to move the spacer lever forward and remove the cable eyelet from the hook of the spacer lever.
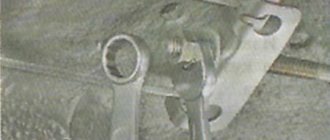
10. Using a 10 mm spanner, unscrew the nut of the bracket securing the cable to the left arm of the rear suspension.
11. Remove the front cable end from the hole in the body bracket.
12. Remove the cable from the two brackets securing it to the underbody.
13. Remove the cable from the rear suspension beam bracket.
14. We take the cable out of the hole in the support shield of the rear brake mechanism and remove it.
How to remove the handbrake lever on a VAZ 2109
1). From the bottom of the car, unscrew the locknut and the equalizer adjusting nut.
2). Remove the equalizer from the lever rod.
3). Remove the protective cover.
4). Remove the protective cover of the gear shift lever from the floor tunnel lining.
5). Remove the floor tunnel lining.
6). Remove the floor tunnel lining by sliding it back.
7). Unscrew the four mounting bolts and remove the lever.
 . Remove the retaining ring, remove the axle and disconnect the rod from the lever.
9). Unscrew the button and remove the pawl spring. You just need to do this carefully, since the force of the compressed spring acts on the button.
10). Reinstall the lever in the reverse order of removal.
Removing the floor tunnel lining of a Lada Priora car
We carry out the work by removing the cigarette lighter, parking brake lever and trunk lock control button. We tilt both front seats back (see “Removing the front seat”). For clarity, the work is shown with the driver's seat removed.
Using a 10mm socket, unscrew the nut securing the air duct to the legs of the passengers in the rear seat...
...and remove it. Similarly, remove the air duct on the right side.
Raising the armrest, we pry up the decorative trim of the armrest hinge...
...and remove it. We pry up, overcoming the resistance of the latches, a container for storing small items...
...and take it out of the tunnel lining.
Using a 10mm socket, unscrew the two bolts securing the armrest hinge and remove the armrest.
Using a Phillips screwdriver, unscrew the four screws securing the floor tunnel lining.
Through the opening in the lining, pressing the lock with your hand, remove the wiring block from the trunk lock control button.
Using a high 10mm head, unscrew the two nuts securing the tunnel lining. We install both front seats in their places and move them as far forward as possible along the slide.
Using a Phillips screwdriver, unscrew the self-tapping screw securing the tunnel lining to the base on the left and similarly on the right.
Use a slotted screwdriver to remove the plastic plug at the bottom of the cup holder.
Using a Phillips screwdriver, unscrew the screw fastening the tunnel lining.
Using a Phillips screwdriver, unscrew the two self-tapping screws securing the floor tunnel lining on the left and similarly on the right.
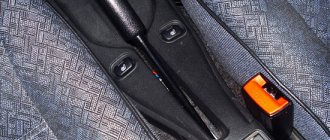
Use a slotted screwdriver to pry up and remove the plug in the niche of the parking brake drive lever.
Use a Phillips screwdriver to unscrew the screw fastening the side panel of the tunnel lining...
...and remove it. We remove the right shield in the same way.
Using a Phillips screwdriver, unscrew the self-tapping screw securing the front part of the tunnel lining. Similarly, unscrew the self-tapping screw on the right side.
Overcoming the resistance of the clamps, we remove the frame for fastening the gear lever cover... ...and leave the frame with the cover on the lever.
Using a Phillips screwdriver, unscrew the two screws securing the tunnel lining to the instrument panel console.
We lift up the tunnel lining...
...and by pressing the latch, disconnect the wiring block from the cigarette lighter. Remove the floor tunnel lining. We install the tunnel lining in the reverse order.
How to remove the hand brake lever on a VAZ 2110
How to remove the hand brake lever on a Lada Kalina?
1). Remove the floor tunnel lining.
2). From the bottom of the car, unscrew the lock nut and the parking brake adjusting nut and remove the equalizer from the rod.
3). From inside the cabin, unscrew the screw of the front fastening of the parking brake lamp switch bracket.
4). Remove the 4 bolts securing the parking brake lever.
5). Remove the parking brake lever by removing the rod from the hole in the floor.
6). To replace the rod, remove the cotter pin (1) and the washer (2).
7). Remove the rod from the axle.
. Replace the worn or cracked plastic bushing.
Removing the instrument panel console trim
We remove the instrument panel console trim for replacement, as well as when dismantling the control unit and central deflectors of the heating and ventilation system, and the hazard warning switch. Disconnect the wire terminal from the negative terminal of the battery. We take out the container from the niche for the head unit of sound reproduction...
...and disconnect the two wiring harness blocks from its connectors. In the niche of the console lining under the container, use a Phillips screwdriver to unscrew...
...two self-tapping screws (the self-tapping screw on the other side is not visible in the photo) for the upper fastening of the console trim. Having opened the cover of the compartment for small items, use a Phillips screwdriver to unscrew...
...two self-tapping screws for the middle fastening of the console trim. Open the front ashtray.
Using a slotted screwdriver, press the ashtray out and remove its axis from the hole in the trim... ...and remove the ashtray.
Using a Phillips screwdriver, unscrew the two screws of the lower fastening of the console trim.
We move the cover away from the console, overcoming the resistance of two clamps.
By pressing the latch, disconnect the wiring harness block from the hazard warning switch. Disconnect the wiring harness connectors from the clock and from the heated rear window switch and outside rear view mirrors.
We disconnect the two wiring harness connectors from the heating and ventilation control unit... ... and remove the instrument panel console trim assembly. We remove the clock, the hazard warning switch, the heated switch for the rear window and exterior rear-view mirrors, and the heating and ventilation system control unit from the trim (see “Removing the heating and ventilation control unit”). If necessary, carefully pry the plastic latches of the central deflectors with a slotted screwdriver and remove the deflectors from the lining socket. We assemble and install the instrument panel console trim in the reverse order.
Instrument panel console trim and elements located in it
: 1 — console trim; 2 — central deflectors; 3 — switch for heating the rear window and exterior rear-view mirrors; 4 — heating and ventilation system control unit; 5 — alarm switch; 6 - hours
Sometimes vehicle parts require replacement, most often due to breakdown or wear. The question of how to remove the center console on a Priora worries those motorists who want to replace a part hidden by the console. For example, without removing the panel it is impossible to get to the clock block, heating control device or deflector.
I am glad that the process of dismantling the console panel is quite simple and you will need a minimum of tools, which can be found in the trunk of every motorist. If you need to replace one of the above parts, learn how to remove and reinstall the console.
How to remove the hand brake lever on a Niva Chevrolet?
1). Disconnect the rear cable from the guide from the tip of the front cable.
2). Remove the floor tunnel lining.
3). We unscrew the 2 bolts securing the lever bracket to the floor and remove the lever.
4). Remove the locking ring of the lever axle.
5). We take out the lever axis.
6). We pull the cable inside the cabin.
7). Install the new cable and lever in the reverse order of removal.
Removal and installation of the instrument panel Lada Priora, VAZ 2170, VAZ 2171, VAZ 2172
Useful tips When installing the instrument panel, you may need clamps to secure the wiring harnesses, since in some cases it is easier to cut them when dismantling the panel. Depending on the vehicle configuration, a different number of pads with wires may be used. Therefore, when separating the pads, mark them relative to each other. This will make the job easier when installing the instrument panel. Mark the free pads separately.
You will need: 8" and 10" socket wrenches, flat and Phillips blade screwdrivers.
1. Disconnect the wire from the negative terminal of the battery. 2. Remove the steering wheel (see “Removing and installing the steering wheel”). 3. Remove the steering column trim (see “Removing and installing steering column trim covers”). 4. Remove the VAZ 2172 steering column switches (see “Checking and replacing steering column switches”). 5. Remove the floor tunnel linings (see “Removing and installing the floor tunnel linings”). 6. Remove the lada priora instrument cluster (see “Removing and installing the instrument cluster”).
7. Remove the right and left screws securing the center console of the Lada Priora instrument panel.
8. Using a screwdriver...
9. ...remove the side window heating nozzles on the right and left.
10. Using a 10mm socket wrench, unscrew the two nuts of the upper fastening of the Lada Priora instrument panel on the left and right.
11. Turn the three latches and remove the fuse and relay box cover.
12. Remove the four screws securing the instrument panel amplifier of the Lada Priora...
13. ...and remove the amplifier.
14. Turn inside out from the bottom left...
15. ...and on the bottom right there are two screws securing the Lada Priora instrument panel.
16. Remove the screw securing the instrument panel to the left of the steering column...
17. ...and the fastening screw located on the right under the instrument panel.
18. Using a size 8 wrench, remove the bolt securing the ground wires of the instrument panel to the body bracket.
19. Move the clamps of the VAZ 2171 instrument panel wiring harness blocks to the right...
20. ...and disconnect the three harness pads from the pads installed on the bracket.
21. Disconnect the wiring harness block of the Lada Priora ignition switch (lock).
22. Disconnect the wiring harness connectors from the electric power steering.
23. Using a 10mm wrench, unscrew the nut securing the ground wire of the instrument panel harness from the bracket for the electronic units.
24. Slide the pad lock...
25. ...and disconnect the instrument panel harness from the ignition system harness.
26. Disconnect the instrument panel harness connector from the electrical accessories control unit.
27. Slide the lock...
28. ...and disconnect the instrument panel harness connector from the airbag control unit.
29. Remove the instrument panel and remove it from the interior of the Lada Priora.
Note Since the instrument panel is quite bulky and heavy, this operation should be performed with an assistant.
30. Install the VAZ 2170 instrument panel in the reverse order of removal.