The braking system is one of the most important in a car, because it ensures safety while driving and guarantees timely stopping of the vehicle. In today's article we will talk about how the VAZ 2114 brakes are designed, what main components they include and how to set them up correctly.
Brake system VAZ 2114
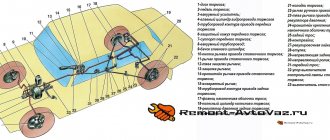
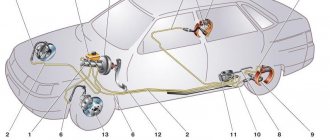
VAZ 2114 brake system diagram
The design of the VAZ 2114 brake system is very simple and understandable. The system is dual-circuit, equipped with a hydraulic drive. When you press the pedal, pressure is generated which activates the cylinders. Dual-circuit structure - this means that when you press the pedal, the force is transmitted to each pair of wheels along its own contour. Its distribution occurs diagonally. In this case, the right rear wheel works together with the left front, and the left rear - with the right front. This principle ensures effective braking of the machine, even if one of the circuits fails. The diagram of the brake system on the VAZ 2114 looks like this:
- Main brake cylinder VAZ 2114 (GTC).
- Metal pipes of the 1st circuit.
- Flexible hose for front mechanisms.
- Liquid reservoir.
- Vacuum brake booster.
- Metal pipes of the 2nd circuit.
- Rear wheel cylinders.
- Brake pressure regulator drive lever.
- Flexible hose for rear mechanisms.
- Pressure regulator.
- Pressure regulator bracket.
- Pedal.
The GTZ is responsible for creating pressure in the entire system. It is distributed along the contours and transmitted through them to the wheel brake mechanisms of the car.
Useful : TOP 7 reasons why the steering wheel on a VAZ 2114 shakes
The vacuum booster makes braking simple and effective. Thanks to its operation, less effort is required from the driver to brake in a timely manner when danger arises. The pressure regulator provides the necessary braking force, taking into account the load on the rear of the machine. This gives the car greater stability and prevents the rear wheels from slowing down too early or late.
HOW TO ADJUST HYDRAULICS PRESSURE
As you know, hydraulic drives use fluids and pressure in the system instead of conventional mechanics, where any force is applied either directly or through transmission mechanisms. The key to clear hydraulic responsiveness is the presence of the required amount of brake fluid in the system and, of course, correctly adjusted pressure.
To properly adjust the pressure in the drive, you need to find an assistant. Doing this work alone is extremely inconvenient, and for the final test you will need an outside perspective.
The VAZ 2114 brake pressure regulator allows you to adjust the operation of the brakes to the required level. To do this you just need to do certain things:
- First you need to drive the car into the pit and rock its rear end. This will bring the suspension to the middle position, and this is exactly what needs to be achieved;
- Then slightly unscrew the front bolt on the VAZ brake pressure regulator mount;
- Using a screwdriver, make a small gap (2 mm) between the lever and the spring. For convenience, insert wire or whatever is at hand. A special protrusion on the lever allows you to move it to achieve the desired clearance;
- Tighten the previously loose bolt.
Now you need to check whether everything was done correctly. Accelerate to 35-40 km/h and brake. If the car does not drive away, then everything is done perfectly. In addition, you need to check the wheel locking sequence. Here you need a second person who will see how smoothly the brakes of the VAZ 2114 work. The whole point is that when working correctly, the front wheels should lock a little earlier than the rear ones. If this happens, then the system is set up with a bang.
If the front wheels lock later, the clearance must be increased. It is also possible that the rear wheels will be very late, in this case we reduce the gap. After completing all the work, securely tighten the regulator mount.
It is important to consider that all tests should not be carried out with flat tires. The result depends on this, and accordingly the brake system can be adjusted incorrectly. The tire pressure of the VAZ 2114 must meet the requirements specified in the vehicle documentation.
Operation diagram of the VAZ 2114 brake system
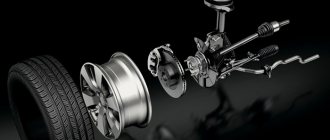
Front brake device for VAZ 2114
The front brakes of the “four” consist of the following parts and mechanisms:
- Brake disk. It is connected to the wheel hub and rotates with the car wheel.
- The pad guide is a holder for the pads and a base for the guide pins.
- Caliper. Responsible for uniform transmission of force from the pads to the disc.
- Brake pads. When you press the pedal, the disc is compressed on both sides. This results in slower movement.
- Cylinder. A sealed cavity in which the piston moves.
- Piston. Hydraulic fluid pressure presses the pads against the disc during braking.
- Seal ring. Serves to seal the system.
- Cover to protect the guide pin from dirt.
- Guide finger. Ensures uniform movement and adhesion of the pads to the disc with the entire plane.
- Protective cover. Protects the disc from contamination.
The front brakes of the VAZ 2114 are disc. They provide automatic adjustment of the gap between the pads and the disc.
Operating principle
The brake in the VAZ 2114 will work on the hydraulic principle: when pressed, the liquid pressure will increase and the brake mechanisms will operate. As a result, the wheels begin to rotate more slowly and force appears at the point of contact of the tire with the road surface. And the harder the pedal is pressed, the faster the process will go. The forced-up pressure in this case will reach from 10 to 15 MPa. It will also increase in the drive itself: this will move the pads to the wheel rims.
Rear brake device for VAZ 2114
The design of the rear brake system of the VAZ 2114 is as follows:
- Hub nut
- Hub flange. The brake drum is attached to it
- Lower tension spring
- Left pad
- Thrust spring
- Cylinder
- Upper tension spring
- Guide bar
- Eccentric
- Right pad
- Pad cover
The car has drum brakes at the rear. This design has been time-tested and is considered very effective. In addition to the above elements, it also includes a parking brake. It ensures reliable fixation of the car even on an inclined surface while stopping or parking. The handbrake on the VAZ 2114 has the following structure:
The braking system of cars of this model is quite reliable and durable. But it also needs regular maintenance. To ensure effective braking, it is necessary to change pads and discs, as well as drums and other elements in a timely manner. System parts require regular inspection to identify external damage and defects. When they are identified, broken elements are replaced, even if their scheduled replacement period has not yet arrived. Particular attention should be paid to the serviceability of the handbrake; you need to monitor the condition of the cable. If the handbrake does not provide reliable fixation of the car on an inclined surface, then the cable needs to be tightened or replaced. It is wrong to leave a car in a parking lot in gear. The parking brake is used for this. Driving with a faulty brake system is illegal and very dangerous. Sudden brake failure can cause a serious accident with unpredictable consequences. Therefore, the system requires regular inspection, maintenance and repair when faults are identified. You can usually check and repair your brakes yourself. Contacting a car service is required in difficult cases and when the owner is unsure of his own abilities.
DEVICE OF BRAKE MECHANISMS
Many people wonder what is the difference between the brake mechanisms of the front wheels and the rear ones. The fact is that when braking, they are subject to different loads, and they do not operate synchronously. But this is not the main reason for the differences.
The front mechanisms consist of:
- Brake disc of classic design;
- Direction pads;
- Calipers;
- Directly the pads themselves;
- Cylinder;
- Piston;
- Seal rings;
- Protection casing;
- Direction finger;
- And its cover, which performs a protective function.
The design of the front brakes is a little simpler than the rear, however, this does not mean that they play a lesser role in braking. After all, these are the mechanisms that work first.
- Nuts that secure the hub;
- Actually, the hub itself;
- Tension springs (lower and upper);
- Brake pads;
- Directional springs;
- Wheel cylinder;
- Expansion bar;
- Handbrake lever finger;
- Handbrake lever;
- Mechanism casing.
As we can see, this difference in design is caused by the presence of parking brake elements in the rear mechanism. Therefore, the part itself looks much more massive. The operating principle of the hydraulic part is the same as in the front. The only difference between the rear brakes is this.
A simple diagram of the VAZ 2114 brake system allows you to easily carry out any repairs yourself. Spare parts for domestic cars are inexpensive and quite common, which greatly simplifies operation and repair work. This is why VAZ cars are in such demand and provide good competition to foreign cars.
Why do pads wear out quickly?
There may be several reasons why brake pads wear out quickly, but all of them, as a rule, can be quickly resolved with the exception of a few.
Reasons for rapid pad wear:
- Poor workmanship of the part;
- Caliper jamming;
- Intense riding;
- Overheated (crooked) brake disc;
All these reasons greatly affect the condition of the brake pads.
Low-quality pads have cheap materials, which leads to rapid wear, and using cheap pads can damage the brake disc.
A jammed caliper leads to constant friction of the pad against the brake disc and, as a result, to rapid wear and damage to the brake disc.
Intense and fast driving of a car leads to frequent braking and strong friction of the pads on the disc.
Overheating of the disc deforms it and then the brake pad may wear unevenly, which will lead to bending of the caliper guides and to its failure.
How to tighten the handbrake
- We park the car on an overpass or inspection hole. (You can also place the rear of the car on a curb or use a jack).
- We put the car in 1st gear.
- We put the car on the handbrake and count the number of clicks. If there are less than 2 clicks, then you need to lengthen the drive, if there are more than 6, then reduce it accordingly.
- Lower the handbrake all the way.
- Take 2 keys to “13”.
- We climb under the car.
- We remove the rubber holders of the muffler and manifold for convenience.
- We find the cable equalizer (number 11 in the diagram).
- Use one key to unscrew the lock nut, and use the other to secure the nut from turning.
- We adjust the stroke of the lever: when screwing it in, the stroke decreases, when unscrewing it increases. (remember that the lever stroke should be from 2 to 6 clicks).
- We hang the rear wheels of the car on a jack and check the rotation of the wheels. The brake pads should not interfere with the rotation of the wheels, and when the handbrake is raised, the wheels should stop firmly.
- Tighten the nut with a counter nut.
You will have to tighten the handbrake quite often due to the design of the handbrake. You will also have to adjust the handbrake when replacing the cable, repairing the handbrake, replacing brake pads (How to replace rear brake pads?) and replacing the rear brake cylinder.
It should be noted that the parking brake must be held on an uphill slope of at least 23%.
Brake bleeding sequence
Bleeding the brake system usually starts with the longest pipe. As a rule, this is the rear right one (that is, to the working cylinder of the rear right wheel). Next - “in descending order”: rear left, front right, front left. As a rule, the procedure is duplicated “to be sure.” Do not forget to remove the cap from the brake fluid reservoir - you will have to add fluid as it decreases. The steps are simple:
- With all the fittings closed, the partner (the one in the cabin) “works” hard on the brake pedal. If after several presses the pedal remains “soft”, he, holding it in the squeezed position, gives a signal to another partner to open the fitting - there is simply too much air in the tube and it needs to be vented.
- The partner (the one at the wheel) closes the fitting and gives a signal to “pump” again.
- The procedure is repeated until air stops coming out of the fitting.
It is best to put a tube placed in a container onto the fitting - air bubbles will be visible and the brake fluid will not spill onto the floor. During leveling, it is important to coordinate the actions of your partners. That is, at the moment when the bleeder fitting is not yet closed, under no circumstances should you release the depressed pedal - otherwise air will be “sucked” into the cylinder again. After the rear brakes have been bled, you need to move on to the front cylinders. The front brakes are bled in the same way as the rear brakes.
We recommend: DIY car window tinting
However, in emergency cases - when, for example, it was necessary to urgently change a burst front brake hose, it is allowed to bleed only the front brakes - as a temporary measure. They are the ones that most influence braking efficiency - due to load distribution. But during the repair process, anything can happen - for example, a fitting breaks off. How to bleed the brakes if the bleeder fitting is broken? In such cases - if it is not possible to quickly purchase a new cylinder - it is pumped through a tube supplying liquid to the cylinder.
That is, they act in a similar way - they loosen the nut in order to release the air. In general, even the most “soured” fittings can often be successfully unscrewed. Tap the cylinder from different sides with a small hammer and try to turn it in one direction or the other. Sometimes, however, this procedure takes a lot of time and effort, but in most cases it leads to success.
How to replace the parking brake cable
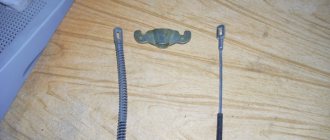
Handbrake cable
During the operation of the vehicle, the handbrake cable may rust, break or become very stretched. In this case, we will need to replace the handbrake (parking brake) cable. If you need to replace only one parking brake cable (2 parking brake cables, each of which goes to the rear wheel), still change both cables in order to avoid uneven wear and, soon, encountering the same problem.
Before you learn how to change the handbrake cable, read the article How to tighten the handbrake? to avoid unnecessary questions.
How to tighten the handbrake correctly
The handbrake, or in common parlance “handbrake”, is a “permanent brake” and is used when parking a car, parking on a slope, and is also used by masters to perform complex tricks.
The parking brake blocks any spontaneous movement of the vehicle. The handbrake is activated using the handbrake lever, which is mounted on the dashboard along with the gearbox. The handbrake is an important and irreplaceable thing, but still not all drivers use it. The fact is that the car can be put in gear, and then it will not roll away anywhere. But if the slope is very steep, then the gearbox is no longer able to help, and in general, many novice drivers cannot imagine normal driving without a handbrake.
Advice from professionals
- Before completely assembling all the parts into one whole, it is important to treat them with isopropyl alcohol, blow them off and wipe them with a rag.
- Do not allow parts to come into contact with kerosene, gasoline or other oils, as they can damage the integrity of the seals.
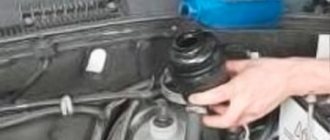
- Before replacing the main brake cylinder on a VAZ 2114, it is necessary to restore the working body of the unit in proper condition, remove oxidation, plaque and other contaminants.
- It is important to monitor the sealing of the mechanism and change the O-rings in a timely manner, even if they are still in good condition.
- All units must be lubricated with brake emulsion during assembly.
- It is imperative to change the sealing gaskets that are located under the screws.
- After replacing the main brake cylinder on a VAZ 2114, it is necessary to bleed the hydraulic brake drive to remove air from the system.
- When dismantling blocks with wires, it is necessary to close all openings in the main mechanism and pipeline to prevent dirt and dust from getting inside, or to protect yourself from liquid leakage.
- When disassembling the unit, it is first better to remove the barrel of the master cylinder, and then unscrew the locking screws, which will allow you to effectively and easily access all other components of the system.
- The most common cause of master cylinder failure is leakage of brake fluid, which indicates a faulty cuff of the unit. To see oil stains, you need to open the hood and look at the joint of the unit.
Where are the brake pads located and when to change them?
Front brake mechanism: 1 – brake disc; 2 – pad guide; 3 – caliper; 4 – brake pads; 5 – cylinder; 6 – piston; 7 – sealing ring; 8 – protective cover of the guide pin; 9 – guide pin; 10 – protective casing.
The brake pads are located in the caliper on the inside of the wheel. Inspection of pad wear is carried out through the inspection window in the caliper during seasonal tire changes; friction linings with a thickness of 1.5 mm or less must be replaced.
pads 1.5 mm or less must be replaced
How to install the handbrake lever?
We install the lever step by step, reverse the disassembly process. Do not forget to apply grease to the threads of the adjusting rod. Litol will do. After this, install the equalizer, the adjusting nut and the control nut. Adjusting the handbrake: How to tighten the handbrake?
Sources
- vaz-2114-lada.ru/2012/08/kak-snyat-rychag-stoyanochnogo-tormoza/
- vaz-2114-lada.ru/2012/08/kak-podtyanut-ruchnojj-tormoz/
- vaz-2114-lada.ru/2012/08/kak-zamenit-tros-stoyanochnogo-tormoza/
- autodont.ru/brake-system/tormoznaya-sistema-na-vaz-2114
- drive2.ru/l/454855042223047995/
- autovaz-2114.ru/brake-system/tormoznaya-sistema-vaz-2114/
- nadomkrat.ru/ustroistvo-avtomobiley/tormoznaya-sistema/tormoznaya-sistema-vaz-2114
Tool preparation and removal
- brake fluid;
- keys “10”, “13” and “17”;
- equipment for unscrewing fittings;
- pliers;
- metal brush to remove oxidation of contacts;
- dry cloth;
- device for tensioning springs;
- new brake cylinder for VAZ 2114.
Before starting work, you need to prepare a place where you can easily lay out all the dismantled parts. Be sure to record their location in the vehicle system.
Where do we start repairing the master cylinder? We remove the negative terminal from the battery, then open the hood and remove the remaining brake fluid with a syringe. We unscrew the brake pipes with an open-end wrench (you need to be careful so as not to leak fluid onto other parts of the car).
How to remove the handbrake handle?
- Before you start removing the parking brake handle, be sure to put the car in gear.
- We remove the cable equalizer from the adjusting rod (How to remove the equalizer, see here: How to replace the parking brake cable?
- Remove the rubber protective cover from the adjusting rod. A slotted screwdriver will help us with this.
- Then remove the decorative trim of the floor tunnel.
- Take a Phillips screwdriver and unscrew the self-tapping screw of the front mounting of the parking brake switch bracket.
- Using a 10mm socket wrench, unscrew the last 2 bolts securing the bracket.
- We take out the lever along with the bracket and the adjusting rod.
What brake hoses should I buy and what spare parts should I buy to replace the brake hoses?
Brake hoses have proven themselves well , they are of good quality and a little expensive. If you want to save a little, you can buy brake hoses produced by DAAZ , which are also of good quality.
You should also buy copper washers 1.5 mm thick, brake fluid, which is necessary for bleeding the brake system. I recommend buying brake fluid DOT 4 400 grams.
Differences in the operation of rear and front mechanisms
The rear brakes in Lada Samara models have a drum operating principle. The system is equipped with special pads that differ from the front mechanism in their semicircular shape. Due to their static location, they move apart to the sides, thereby slowing down the wheel. In simple words, the elements are pressed against the disk and cause the VAZ 2114 to slow down when the corresponding pedal is pressed. The rear brakes are equipped with a ventilated mechanism, but its operation cannot be called effective. At high speeds, you can even visually notice how the rear wheel disks heat up.
The front wheels of the VAZ 2114 are equipped with disc mechanisms, which include calipers and pads. Their operating principle is the same as that of disk ones, but in these mechanisms the calipers also take on the load. The wheels are slowed down by increasing the pressure of the working fluid. Ventilation is also provided here. A disk system works an order of magnitude more efficiently than a drum system. In order to save money, the rear wheels are equipped with primitive mechanisms.
How to remove the parking brake cable?
- Removing the wheels
- Removing the brake drums
- Remove the rubber cushions (holders) of the muffler and manifold.
- Loosen the locknut of the handbrake adjusting nut on the cable equalizer.
- Using keys “13”, unscrew both nuts and remove them.
- We remove the equalizer and disconnect the cable ends from it.
Cable eyelet on the hook of the spacer lever
- From the rear wheels, use a large slotted screwdriver to move the spacer lever forward and remove the cable eyelet from the hook of the spacer lever.
- Using a “10” wrench, unscrew the nut securing the cable to the rear suspension arms.
- Remove the cable end from the hole in the body bracket.
- Next, having removed the additional holding mechanisms, we take the cable out of the hole in the support shield of the rear brake mechanism and remove it.
Features of pedal settings
The driver controls this entire complex assembly using a single pedal. That is why it is very important to monitor the condition of these mechanisms and correct errors in a timely manner. It is necessary to pay attention to the following features:
- Each owner of this vehicle must remember that when the engine is not running, the pedal must have free play. The adjustment can be made with the vehicle turned off. This can be done by moving the brake light switch and lowering its nuts.
- When the switch at the brake light is very close to the pedal itself, this risks the fact that it will not return to its original state. But even here there is a possibility of only partial release of the wheels when the pedal is released.
- When it was not possible to correct errors using a brake light and eliminate incomplete release of the brakes, you can simply disconnect the master cylinder at the brake drive and double-check that the adjusting bolt is not too far from the plane to which the flange of this cylinder is attached (the difference can be from 0.2 to 0.25 mm). This size will be optimal for adjusting the pedal.