The relative simplicity of the Lada Granta’s design, including the liftback, allows for a number of preventive and repair work to be carried out outside the service center.
The rear lights include brake and side light bulbs (double-filament P21/5W), turn signal lamps (PY21W orange light), fog light (P21W) in the left lamp, and reverse light (P21W) in the right lamp.
The work is shown on the right lantern. We change the lamps in the left lamp in the same way
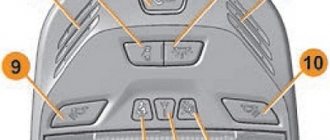
Location of lamps in the rear lights: 1 — fog light; 2 — direction indicator; 3 — brake signal and side light; 4 — reverse. Location of lamps in the rear lights: 1 — fog light; 2 — direction indicator; 3 — brake signal and side light; 4 - reverse
How to remove a tail light: Granta
The process is extremely simple. To work, you will need a 10 mm socket wrench or a ratchet with a corresponding long head.
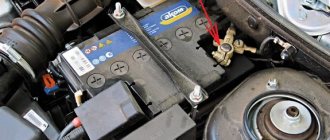
Step 1 . We remove the terminal from the battery (any one) - you will need the same key for ten.
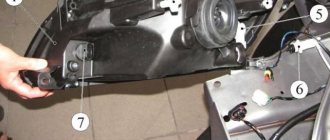
Step 2 . We open the trunk, from the inside to the left and right of the opening we find “pockets” in the felt lining. They are closed with Velcro. Let's open it.
We find a pocket that blocks access to the flashlight. Let's open it.
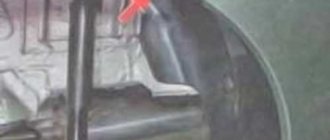
Step 3 . We disconnect the wiring - all the light bulbs along with the sockets connected to the optics. Turn the cartridge counterclockwise to remove it.
To disconnect the cartridge, turn it counterclockwise with force.
Step 4 . We find three screws securing the lamp. Using a ten-point socket, unscrew all three.
Access to the screws is not the most convenient. Can't fit into the trunk? Try unscrewing it blindly.
Step 5 . We pull the lantern towards ourselves. Disconnected from the wires and body, it will come out of the groove without any problems.
Pushing the lantern from the inside, we pull it towards ourselves.
Reassemble in reverse order. Don't forget to reconnect the battery terminal.
Replacing the dimensions of the Lada Granta
Hello dear subscribers!
Today I made a video about how to replace the side light bulbs on a Lada Granta. By the way, they are also Daytime Running Lights! (In stores, when I was looking for a light bulb, everyone almost went crazy... when I told them: “Hello, do you have LED light bulbs for daytime running lights on the Lada Granta?” They didn’t bring me different light bulbs, it even made me laugh... which ones they didn’t carry it :))))) But the fact is that if you tell the seller that you need bulbs for daytime running lights (DRLs), then for a long time they will not be able to believe that the Grants simply have them! :)) You need to say: “Hello, please give me LED bulbs in DIMENSIONS for the Lada Granta! ) And so closer to the point... Here is a video of how they change! I even bought a tripod for my camera today, so that the video would turn out not with trembling hands, but in a normal way :)) and here is the tripod...
So this video is really very thoughtful on my part, I made a lot of attempts to film it myself, asked my beloved Nephew Nastyushka, but the tripod saved the day and this is what happened!
Special lamps allow you to ensure the safety of the car and passengers at night. They enable other road users to see the outlines of vehicles or estimate the distance between cars.
In addition, these illuminators allow you to stand out in conditions of heavy rainfall and fog. For the modern Granta Lada, the dimensions are installed in the body at the front and rear, which guarantees clear visibility of the car among a stream of other cars or on a deserted highway.
Features of choice
For reasons of safety of drivers, passengers and pedestrians, the Traffic Rules and the Technical Regulations on the Safety of Wheeled Vehicles prohibit the operation of vehicles whose external lighting devices do not meet the design requirements of the vehicle.
Standard brake light bulbs for Lada Granta P21 5W. But, many modify and install their LED analogues 48LED SMD 3014 1157 BAY15d (BAZ15d). When purchasing LED brake warning lamps, many people wonder which is better to buy: white or red? Some generally argue that white LEDs cannot be installed in the stacks of headlights with a red filter.
In terms of contrast, the white LED, of course, is inferior to the red one, but everything is readable well without any other light overlays or shades.
But here it is worth noting that the fears associated with the operation of white LEDs paired with a red filter are not unfounded, especially with regard to some old flashlights with their red filters, as well as LED lamps, the color temperature of which can exceed 6000K, varying in shade into the obvious blue.
Quality dimensions Grants: features of lights
It is not customary to install DRLs on the Lada, so ordinary side lights can be considered a worthy replacement. They are not intended to illuminate the road area directly in front of the car. For this reason, for the Lada Granta, the dimensions should not be very bright.
LED analogues with a power of 4/5 W (they differ for the front and rear) are perfect for solving the replacement problem.
The rear lamps are combined in one block with the brake lights. But there are no difficulties when updating them. The most important thing that the owner must remember is that Granta dimensions can be either with or without a plinth, depending on the installation location.
It is also necessary to take into account the voltage when choosing elements, otherwise they will not only not work correctly, but can also lead to damage to the fasteners. When purchasing, you must be guided by the data on the standard lights specified in the documents for the car.
Check list
- Turn off the engine, squeeze the parking brake lever;
- Open the liftback cover;
- Remove the plastic protection / sound insulation layer. The choice depends on the model year. More details are described at the beginning of the article;
- Unscrew the lamps, three nuts;
- Replacement of Grant liftback taillight lamps, carry out related preventive maintenance;
- Reassemble the structure in reverse order.
Conclusion based on the results of the replacement The design and fixation of optical devices is not at all complicated. Every car owner can do the replacement; there is no need to contact a service center. Only as a last resort, when a global breakdown is identified or surgical intervention by a specialist is required. After reading the instructions provided, the owner knows exactly how to change the Granta liftback taillight with minimal time.
How to choose and replace the dimensions of the Grant sedan?
Lamps must be purchased according to the standard markings for the model. To replace the front marker, you will need a baseless W5W lighting element with a power of 21/5 W.
Products marked P21 are installed at the rear, although their power should be 4 W. To choose sedan dimensions for Grant, you can contact any car store. At the same time, the buyer will be able to purchase both standard types and brighter LED analogues.
IMPORTANT: Sometimes, a young car enthusiast may decide that he needs to install brighter lamps so that he can be better seen on the road, and that’s just cool. There is no need to do this, for one simple reason. A brighter (and therefore more powerful) lamp will generate more heat.
As a result, the reflector will begin to melt (and turn from shiny to black), the lamp socket itself will melt, and the protective “glass” of the headlight will melt if it is plastic. So yes, it will be cool the first time?
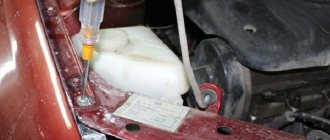
The procedure for installing the front markers is quite easy, but you need to take into account both the accuracy of the replacement and the correct installation. The front lamp of Grant's dimensions is located in the headlight unit and is easiest to get to from under the hood. First you need to remove the terminals from the battery.
Such a precaution will avoid shorting contacts and will also protect the performer himself. Next, work on replacing the front dimensions is carried out according to the following scheme:
What lamps are installed in the rear lights of Granta Liftback
- Brake light bulb P21W 12V
- Turn signal lamp PY21W 12V
- Tail light - R10W
- Reversing lamp W16W
To replace lamps, we do not need any special knowledge or skills, just “direct hands” and free time.
Instead of conventional lamps, you can install LED ones, but you need to check the functionality of the lamps in the lanterns to see if they will short out due to polarity.
2279-18-13-03 (Copy)_cr
...and remove the lamp from the socket.
...and remove the lamp from the socket.
...and remove the lamp from the socket.
The combined brake and side light lamp has two protrusions located at different levels.
When installing a new P21/5W brake and side light bulb, its protrusions must fit into the corresponding grooves in the socket.
We change the reverse lamp P21W and the turn signal lamp PY21W in the same way. The turn signal lamp has two protrusions located asymmetrically relative to the axis of the lamp. When installing a new lamp, its protrusions must fit into the corresponding grooves of the socket.
The type of lamp is indicated on the flashlight body next to the socket of each socket.
In order not to confuse the installation locations of the cartridges in the flashlight body, the fixing protrusions on the cartridges and the cutouts in the flashlight body have different shapes.
[14 Lada Granta maintenance operations that will help you save]
[How to save money on scheduled maintenance of Lada Granta] [Maintenance of Lada Granta at 2.5 thousand km] [Maintenance of Lada Granta at 15,000 and 105,000 km] [Maintenance of Lada Granta at 30,000 and 60,000 km ] [Maintenance of Lada Granta at 45 thousand km] [Maintenance of Lada Granta at 75 thousand km] [Maintenance of Lada Granta at 90 thousand km] [Carrying out maintenance yourself - general recommendations] [Safety rules for doing it yourself carrying out maintenance] [Tools required for maintenance of Lada Granta] [Lamps used in the Lada Granta car]
How to replace lamps in the rear lights of Lada Granta
Replacing lamps in the rear light of a Lada Granta liftback
We open the trunk and see these hatches as in the photo
Carefully pry up the hatch with one hand and with the other put your finger into the hole in the lid and carefully remove it. Be careful not to press too hard; the latches on the lid may break.
Next, take out the lamps that need to be replaced. If this is a brake light lamp, then take the socket and turn it counterclockwise and pull out the lamp. We do the same with other lamps.
Typical signs of a lighting system malfunction
- lack of indication on the dashboard when the turn signals, high/low beam lever, and brake light are activated;
- frequent indication of the above indicators;
- the high/low beam lever does not activate the lamps;
- insufficient brightness of lamps and flashlight reflector.
The above signs indicate damage, deformation, or a break in the electrical circuit of the lighting system. To troubleshoot problems, you will need comprehensive diagnostics, identification of the breakdown, and subsequent replacement of elements. You can do this either independently or by contacting a service center for help from specialists.
LED lamps in the rear light
Instead of conventional incandescent lamps, you can also install LED lamps. Their advantages:
- longer service life (subject to the purchase of high-quality lamps)
- brighter light and better visibility in bad weather conditions
- Less current consumption, therefore less load on the generator
Instead of the usual P21W rear brake light, you can install:
P21W Philips X-tremeVision LED lamps or their Chinese equivalents
Instead of the R10W rear marker lamp, you can install this lamp
For reverse, it is better to choose brighter lamps, since the W16W has a socket like the W5W but its power is 16W
Is it worth replacing a working running light bulb?
But such lamps have more than enough disadvantages!
- Including dim light with a yellow tint, which does not have the best effect on visibility in front of the car.
All this forces people to change the running light bulbs in their cars almost immediately after purchase.
LED DRL lamp is more practical and brighter
In principle, replacement may also apply to new incandescent lamps if the old ones fail. But, nothing prevents you from using LED lamps. Pay attention only to the base, which must correspond to the connector that is supposed to be in the car.
DRL lamp replacement process
It is necessary to remove (move aside) the air filter housing
- To gain the necessary access to the left headlight unit , you need to move to the side the housing, inside of which the engine air filter is located. For this purpose, we dismantle all housing fastenings, wiring harnesses and sensor. After this, you can slide the filter housing up.
- But to gain access to the right headlight unit , you will need to remove the power unit cover. To do this, you need to unscrew the oil filler cap, and then carefully snap off the cap. This is done with a confident upward movement. The main thing is not to forget to screw the lid back into place in order to prevent the possibility of solid objects falling into the neck, including dirt, which can be quite a lot under the hood.
As for the headlight lamp connector, it is located closer to the lower corner of the headlight. So, you will need to remove the cartridge. This is done by turning the cartridge counterclockwise. Now you will have access to a lamp, which is very easy to replace.
Installing a new lamp occurs in the reverse order. The main thing is to get the cartridge into the corresponding groove on the headlight, but turn it clockwise.
Disadvantages of LED lamps
Another example of a diode fluorescent lamp
If you decide to install LED lamps, then be prepared for some problems with their operation.
Basically, we are talking about the fact that the sensor on the instrument panel will constantly indicate problems with operation. The reason for this is the reduced electricity consumption of such lamps. This is noticed by a monitoring relay, which constantly monitors the normal operation of the lamps. So, seeing a reduced current supply, the driver will be shown a corresponding message that the lamp has become unusable.
The indicator will be constantly lit on the instrument panel, or the on-board system will sound an audible alarm. However, the sound signal will only be heard in a situation where the instrument panel is replaced with a similar one, but of a European version.
Bright, but not legal! The traffic police will be against it!
In addition, if you replace a yellow LED without chromaticity with a white one, it can additionally include various shades, ranging from blue to purple. This may cause a natural reaction from government officials. So, it can be very difficult for you to prove that LEDs meet legal and safety regulations.
Installation Requirements
The key disadvantage of daytime running lights is that they are not fixed in legislation as a standard lighting device. So, many conflicts may arise between vehicle owners and government officials.
Special types of lighting fixtures must be manufactured in strict accordance with state standards. Therefore, if an independent replacement was carried out, then the new lamps, in terms of their technical characteristics, must comply with the established standards.
For example, for a Lada Granta car, daytime running lights must be located in the front part at a height of at least twenty-five centimeters from ground level.
How to change lamps
The lighting system of the Lada Granta is simple and practical. To change headlight bulbs, you don't need any special tools. Just read our instructions and follow the recommendations.
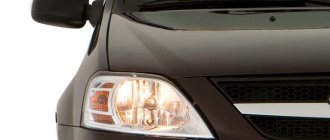
Front optics
Lada Granta is equipped with H4 low and high beam lamps. To change the lamp you will need gloves, a long straight screwdriver and a flashlight.
When replacing a lamp, do not hold it by the cylinder. During operation, it becomes very hot and cools through the glass. If there are particles of fat from the fingers on the cylinder, the heat transfer of the lamp will be disrupted. It will burn out quickly.
First, remove the cover that covers the headlight. It is located behind the headlight under the hood. To remove it, you need to press your finger on the plastic pawl, which is located on top, and use a screwdriver to press the cover off the two guides.
After you have removed the cover, disconnect the connector block. Simply pull it away from the headlight. Next, remove the rubber sealing ring.
The lamp is secured with fixing brackets. You need to press them towards the headlight, remove them from the clamps and move them to the side. The lamp can be removed.
We reassemble in the reverse order: install the light bulb, snap the latches, install the O-ring, attach the connector block and close the lid.
When installing a new lamp, you need to align the guide beams on the lamp base with the grooves at the mounting location. It is impossible to install the lamp in any other position.
When assembling, check that the fixing brackets securely secure the lamp and both fit into the grooves. Install the O-ring carefully. It is important that dust does not get into the headlight, otherwise it will have to be changed after some time. Be careful when removing and installing the cover. The plastic pawl may break if you press too hard on it.
IMPORTANT: Wear gloves when changing lamps. If particles of fat from your fingers remain on the cylinder, this will greatly reduce their service life.
IMPORTANT: Changing turn signals is even easier. You need to find the socket, turn it counterclockwise and remove the light bulb. The new light bulb must be inserted into the grooves of the socket, pressed slightly and turned clockwise. All that remains is to install the socket with the light bulb in its regular place.
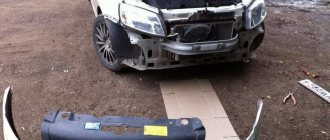
The fog light bulb is a little more difficult to replace. To gain access to it, you need to turn the steering wheel and unscrew the two screws that connect the bumper and the fender liner. After this, unclip the bumper from its mountings.
Bend the bumper 15-20 centimeters so that you can reach the headlight, and unscrew the lamp counterclockwise a quarter turn. Install everything in reverse order.
Rear optics
With the rear lights everything is elementary. Access to them from the trunk. There are plastic inserts with holes on the right and left. To gain access to all the bulbs, you need to remove these inserts. Place your finger into the hole, press the plastic latch and remove the insert. This gives you access to all the bulbs that are located in the rear lights. All that remains is to remove the required lamp and replace it with a new one. After replacement, replace the plastic insert.
Adviсe
If you notice that your running light bulbs burn out too often, the reason may be due to errors during replacement. The fact is that you cannot touch the bulbs of halogen lamps with bare hands. It is best to work in new cotton gloves that are free from dirt and other defects. The fact is that greasy marks that will remain on the lamp bulb can reduce the overall service life by up to several times. And to remove dirt, you just need to wipe the flask with a cloth previously moistened in an alcohol solution.
And, of course, do not forget that after replacing the lamps you may need to adjust the headlights.
Reasons for the burnout of the brake light lamp on Grant
There can be many reasons for the frequent burnout of brake light bulbs on the Lada Granta, here are the most common ones:
- Limited resource. Light bulbs from many manufacturers do not withstand constant use. Replacing standard lamps with cheap Chinese analogues makes itself felt.
- Moisture getting inside the headlights. This occurs due to cracked or poorly fitting rubber seals. They are located between the body and the glass. This problem is easy to diagnose: the headlight regularly fogs up from the inside. This can also be verified by inspection.
- Incorrect installation. Halogen headlights suffer if basic installation rules are not followed. For example, inexperienced car owners begin to install lamps with their bare hands, which is prohibited: the presence of greasy marks reduces their service life.
- Incorrectly selected power. It is not recommended to install 100-watt lamps. You need to take less power, but increased brightness. This will significantly improve visibility and extend the life of the device.
- Defective light bulbs. The low beam lamp often burns out when there are significant flaws made during assembly.
- The flask tilts, the spiral moves off its axis. All this negatively affects performance.
- Battery low. This happens when the unit gets old and begins to discharge quickly. Charging requires high currents, so the vehicle's on-board network suffers from overvoltage. This situation requires diagnosis by an experienced auto electrician.
- Wiring problems. It can be damaged as a result of the carelessness of the car owner himself. You need to check the wiring if the car has a new owner. Understanding electrical wiring on your own is quite difficult.
- Any malfunction of the on-board electrical network can cause failure of not only the light bulb, but also other electrical appliances.
- Poor quality lamp. There are many unscrupulous manufacturers offering headlight bulbs with minimal working life.
If your rear brake lights stop working, you should not rush to extremes and run to an auto electrician; in most cases, the problem is solved by replacing the lamps.