Required tool for replacement
As in all cases, to remove a car part you will need tools. To remove the rear bumper from a Lada Largus, you need a minimum kit, which many owners probably have. So, let's look at what is needed: the 10th head, T20 and T30 nozzles, and, as in the case of the front bumper, a flat-head screwdriver or a special tool for removing clips.
Rear bumper removal process
The process of dismantling the rear bumper is not complicated and will take from 30 minutes to 1 hour, depending on the abilities of the person who will carry out this operation.
But before you start work, you need to prepare your workplace. To remove the buffer, access from below is required. Of course, you can do without lifting the car, but it is better to perform operations on a pit or a lift.
So, let's look at the step-by-step process of removing the part:
- First of all, you need to disconnect the fender liners from the bumper. To do this, using a 10mm socket, unscrew the screws securing the rear part of the fender liner on the right side and on the left (2 pieces each, 4 in total).
The bolts in the diagram are indicated by a red arrow
- There are screws under the fender liner that secure the bumper to the body. They need to be removed.
Screws under the flap - The next difficult step is dismantling the lights. Without this, it becomes impossible to remove the bumper.
- We unscrew the screws that secure the bumper to the amplifier.
- Between the sealing rubber of the trunk and the bumper there are 4 screws that need to be removed; they secure the buffer to the rear panel.
- Carefully, using a plastic screwdriver, remove the side parts of the bumper from the clamps.
- Press the edges of the front part of the rear bumper away from the fender.
- With a slight downward and backward movement, we dismantle the buffer.
- Assembly, as always, is carried out in reverse order.
Now the bumper is removed, and you can carry out the remaining manipulations.
Replacement
The car received a proven and recognizable body. The Largus bumper is a high-tech solution, but it can also get damaged and break. Dismantling is necessary to carry out repair work on the body element itself or the parts that are hidden behind it. Removing the part is not as difficult as it might seem.
Removing the rear bumper
To work on a car you always need some tools. It is not difficult to remove the bumper, but for this you need at least a minimum set (usually every car enthusiast has one in the garage). We will need:
- Head 10;
- Nozzles type T20 and T30;
- For rear bumper: flat head screwdriver (clip removal tool).
It is not at all difficult to remove the rear bumper of the Lada Largus.
First you need to prepare a workplace and all the tools. Next, provide free access to the bottom of the car. Drive the vehicle into the pit or lift the body with a jack (you can do without lifting, but in this case it will take more time and effort to dismantle).
The process of removing the Largus rear bumper:
The first step is to detach the fender liners from the base. Take a 10mm socket and unscrew the fixing screws on the back (2 pieces on the right and left of the fender liner). Under the fender liner there are screws connecting the part and the rest of the body. Unscrew them. The next step is more difficult. You have to remove the lights
The part cannot be dismantled together with them. Unscrew the screws that connect the bumper and amplifier. There are 4 screws between the seal on the trunk and the part; they need to be removed (they secure the buffer on the rear panel). Carefully, using a flathead screwdriver, remove the fasteners from the side. We disconnect the edges of the front side from the wings. With a smooth movement down and back, remove the buffer.
You can install the part in reverse order.
Removing the front bumper
Usually the front bumper of the Lada Largus is removed if it is necessary to carry out body repairs, replace an element, or gain access to parts. Also, the part is dismantled when removing the radiator grille, which is built into it. Its cladding is designed as one piece with the bumper.
- Mounting blade;
- Flat screwdriver;
- Key with 10mm head;
- T30 nozzles.
The process of removing the Largus front bumper:
- Unscrew the three screws securing the front lower part of the side motor splash guard (they need to be pulled out).
- Take the tool, pull out the core from the retainer of the rear securing part of the mudguard and remove the retainer itself.
- Remove the piston by removing it from the mudguard mounts with a tool.
- Disconnect the two parts of the mudguard (upper and lower) and remove the upper one.
- Remove the fender liner.
- In the same way, release and remove the lower mudguard and the right fender liner of the car.
- On the left side there are wires stretched to the fog lights; disconnect the block.
- Remove the screws securing the bottom of the lip to the subframe at the front of the car.
- Near the wheels (on both sides in the arches), unscrew one fastening of the side parts of the bumper, which are connected to the wings (they need to be separated).
- Release the top by unscrewing the 4 screws along the edge connected to the radiator frame.
- The rear corners need to be pulled downwards to take the stops from the holes that secure the bumper along the lower edge.
- Point the sides forward and dismantle the part.
- The wire feeding the fog lights can be removed if it is in the way.
- Unscrew all the screws securing the headlights (4 pieces each) and remove them.
- By pulling out certain plastic fasteners (located on the inside of the body), you can remove the radiator grille, headlight trim, air guide shields, and lower grille.
After the work has been completed, the bumper is installed on the car in the reverse order.
Removing the bumper is not difficult; any driver can do all the work independently, without the help of a service center. However, for this you must have at least basic knowledge of working with a car.
Lada Largus. Removing the rear bumper
We carry out work when repairing and replacing the rear bumper.
We carry out the work with an assistant. Remove the rear wheel arch liners (see “Removing the rear wheel wheel arch liners”, p. 239).
Remove the rear lights (see “Removing the rear light, replacing lamps,” p. 214). Below the car...
Location of the lower bumper mounting screws.
Pulling down the edge of the left side panel
bumper, remove the installation
pin from a hole in the body.
We remove the fixing tabs of the plastic holder from the three grooves
in the bumper.
...and remove the reflective element from the bumper.
Video on the topic “Lada Largus. Removing the rear bumper"
Removing the rear bumper Lada Largus - LARGUS HOW TO REMOVE THE REAR BUMPER
Removing the bumper on the Lada Largus detailed instructions
Repair Lada Largus
How to remove the rear bumper of a Lacetti hatchback
If you don’t know how to remove the rear bumper of a Lacetti hatchback, then this photo article will help you do it quickly and without problems with a minimum set of tools.
There are many reasons to remove the rear bumper. But let’s not dwell on this, but let’s get straight to the point.
I’ll say right away that despite a lot of body movements, removing the rear bumper of the Lacetti hatchback is not at all difficult.
To begin dismantling the bumper, you need to remove the trunk trim. This is done quickly, and the entire short process is outlined in the article How to remove the trunk trim of a Lacetti
After removing the trunk trim, we will need the following tools:
- 10 mm wrench (socket or socket)
- 7mm wrench
- crosshead screwdriver
- 14 mm wrench (may not be needed)
- possibly a jack and a wheel wrench
- Movil and rust converter (optional, to make you proud of the work done)
So, let's begin this important process.
How to remove the rear bumper of a Chevrolet Lacetti hatchback
First you need to remove the fender liners, if they are installed on your car.
For these purposes it is convenient to remove the wheel, which is what I did. I don’t unscrew the mudguards, because I don’t see the point in suffering in an awkward position, but I remove them along with the bumper. Then, if necessary, they can be unscrewed in convenient conditions.
- After the fender liner is removed, a 7 mm wrench bolt will appear. It must also be unscrewed
- We carry out the same procedure on the other side of the car.
- Then use a screwdriver to unscrew the plastic holders from the bottom of the bumper
- Now use a Phillips screwdriver to unscrew the four screws along the upper perimeter of the bumper
This completes the dirty exterior work. We move to the trunk.
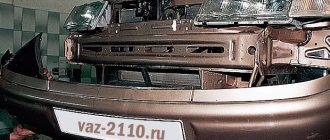
Here you need to unscrew two nuts and one bolt on each side. To make their location more clear, I will first show their places on the removed bumper.
- The red arrows show the location of the nuts, the yellow arrow shows the bolt, and the green arrow shows the bolt, which we have already unscrewed with a 7 mm wrench
- Here are two 10mm wrench nuts on the right
- And a bolt with the same key. It is more inconvenient to unscrew it on the right side than on the left
- All this fastener is on the left side
- All that remains is to unscrew the two bolts securing the bumper amplifier, located on the trunk floor on the right and left
But! Not on all Lacettis the bumper is removed along with the amplifier. For some it’s like this after an accident, and for some it’s like this from the factory... Therefore, you may not need to unscrew these two bolts if the bumper is already in your hands
If you removed the bumper to repair it, then read the article Repairing and gluing the bumper
That’s all, as it were, but since such work has been done, it would be a sin not to give the body a little anti-corrosion maintenance.
How to protect your car from corrosion
I washed everything well - both in the trunk, and in the outside bumper area, and under the wings. While everything was drying, I went to the store and bought Movil, as well as a rust converter.
- Here's the Movil
First, I brushed over all the joints and abrasions in the trunk and outside
I paid special attention to the edges of the wings, where the fender liners are screwed. Since I recently applied mastic under the wings, everything was OK there and without the slightest hint of corrosion. But I still missed the corners and joints
I also dipped all the screws in Movil when installing the fender liner
But I still missed the corners and joints. I also dipped all the screws in Movil when installing the fender liner.
The spare wheel niche should also be well treated. Where the spare wheel lock is screwed in, I actually filled it completely with Movilya from a syringe.
I also removed all sorts of rubber plugs and sprayed Movilya into all the cavities.
- Then I removed the trunk door seal and coated it underneath. Almost everywhere there is double metal, so such processing is needed
- So as not to forget later how the seal was installed and not to be tricky with its installation, I advise you not to remove it all, remove half of it first, process it, put it back on, and then do the same with the other half
Particular attention must be paid below, in the area of the lock latch. All moisture flows down and collects under the seal. This is the area most susceptible to corrosion.
This is the area most susceptible to corrosion.
The official LADA AutoHERMES service center services Largus Cross models of all generations:
| Generation | Options | Year of release |
| I | 1.6: 1.6 MT5 Luxe | 2020 |
| II | 1.6: 1.6 MT5 Luxe/Prestige, 1.6 MT5 Comfort/Multimedia/Winter, 1.6 MT5 Comfort, 1.6 MT5 Comfort/Multimedia, 1.6 MT5 Luxe | 2021 |
Service center: Mon.-Sun. 7:00-21:00
st. Krasnaya Sosna, 5, p. 1
m. VDNKh, st. Rostokino
Ryazansky Prospekt, 2, s. 27
metro station Nizhegorodskaya, metro station Stakhanovskaya, metro station Ryazansky prospekt, metro station Okskaya
Western communal zone, sh. Entuziastov, 12A
metro Novogireevo, metro Vykhino, metro Partizanskaya
Fuel filter Lada Largus
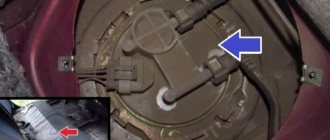
Like most Lada cars, Lada Largus uses two types of fuel filters: fine and coarse. Both of them are built into the fuel module of the fuel pump, both on Largus with 16-valve engines and with 8-valve ones. Separate replacement is not regulated by the manufacturer, only completely assembled.
The fine filter on Largus is installed in the module in the same way as on Renault Logan. These models have a common platform and the same complex design solution for the fuel purification system. But the service life of fine filters in Europe is longer due to higher quality gasoline. And if for the main filter you can only change the module, then the filter mesh of the fuel pump can at least be cleaned (rinsed) or you can choose an analogue that is suitable for mounting. This procedure will extend the life of both the fuel pump and the fine fuel filter. Therefore, let’s look at which fuel module and mesh filter (the so-called diaper) you can buy.
Where is the Lada Largus fuel filter located?
It is not difficult to determine where the Lada Largus fuel filter is located. The basic configuration of the Lada Largus involves the use of a single fuel module to purify fuel for a 1.6 MT engine. It is mounted in the fuel tank and has access from the passenger compartment under the rear seat.
In the AvtoVAZ catalog, the fuel module of the electric fuel pump for Lada Largus has the original number: 172024388R. The filter element itself is a special paper; it is not sold separately and does not have its own number.
Fuel filter for Lada Lagrus - article number and dimensions
The entire electric fuel pump module is sold assembled with a fine and coarse fuel filter and it is originally expensive, as for a domestically produced car. Technical parameters are shown in the table below.
| Dimensions of fine fuel filter Lada Largus | |||||
| External diameter, mm | Length, mm | Current strength up to, A | Voltage, W | Pressure, psi | Pressure, bar |
| 134 | 198 | 4,4 | 12 | 50,75 | 3,5 |
There are analogs from cheaper manufacturers on the market.
| Manufacturer | vendor code | price, rub. |
| Henko | MV-PFA18 | 2515 |
| Ween | 192-0001 | 3851 |
Coarse filter (mesh)
The coarse fuel filter is a mesh made of polymer material in the electric fuel pump module installed in the fuel tank of the car.
The Lada Largus coarse fuel filter is also sold assembled with an electric fuel pump module and does not have its original number.
But such meshes are available for sale from different manufacturers, for example, the manufacturer Francecar offers such a mesh under the number: FCR210141. This is what Largus owners most often purchase.
When should you change?
The automaker states that on Largus the fine fuel filter is designed for the entire service life of the car’s fuel pump, and the service life of the Lada Largus itself, again according to AvtoVAZ, is 160 thousand kilometers.
FakeHeader
Comments 25
There is nothing like it! Everything is fine, nothing is falling apart!
Good day, I had the same problem on my cross-country bike, the car was a couple of weeks old, it started to go bad, who wants to fix this problem, remove the trim, it is held on by two clips and two side clips, then remove the two clips altogether and clean the old clip and stick a new 3m one and put it on it’s tight and you’ll have it without any gap at all. I’ve had it for a month now and it turned out to be a bomb, with these factory clips you can’t get it to fit tightly, they seem to be pulling on it, so they diverge.
EH. I should have made a video of how you fixed everything, it would have been useful!
Next time I’ll take it off from one side for now, you can put it on clips, but when I put it in it didn’t work out a little tightly and I took them off anyway!
Good day, I had the same problem on my cross-country bike, the car was a couple of weeks old, it started to go bad, who wants to fix this problem, remove the trim, it is held on by two clips and two side clips, then remove the two clips altogether and clean the old clip and stick a new 3m one and put it on it’s tight and you’ll have it without any gap at all. I’ve had it for a month now and it turned out to be a bomb, with these factory clips you can’t get it to fit tightly, they seem to be pulling on it, so they diverge.
Why dismantle
There may not be many reasons for a driver to remove the bumper on his car. It is not at all necessary to contact a service center for this, where you will have to pay a considerable amount for repairs. Everything can be done with your own hands. Why the driver may need to remove the bumper:
- Breakdown – this happens as a result of a traffic accident or improper parking. It happens that the part itself is intact, but the back panel requires repair.
- Painting – requires dismantling for better painting of the body.
- Body improvements - installation of a new bumper, etc.
- Installation of additional accessories, for example, parking sensors, etc.
- Installation of overlays, etc.
Possible reasons for withdrawal
There are not so many reasons for removing the front bumper on Largus, but they all contribute to learning how to dismantle such parts with your own hands. Let's consider what pushes the owner to perform this simple operation:
- Part damage . This can happen due to an accident or deformation when driving backwards.
- Another reason may be that the bumper itself was not damaged when damaged, but the rear panel was either deformed and requires restoration .
- Body painting , when carried out comprehensively, also requires removing the buffer.
- Tuning or upgrading the rear bumper will also require dismantling the part.
- Installation of accessories such as parking sensors will force the owner to remove the buffer.
- Partial removal to install bumper cover.
Installing the rear bumper trim - Other reasons.
There are not many reasons for removing the bumper; this is usually done after road accidents that caused damage to the part.
Why do you remove the bumper?
This action is prompted by a not so wide range of reasons. If there is a need for dismantling, then for this purpose it is not at all necessary to go to a service center. An ordinary Lada Largus driver is quite capable of handling this procedure on his own and, in addition, saving a considerable financial resource.
So, let's take a closer look at cases when it is necessary to dismantle an element.
Breaking
This can happen in an accident or during careless parking. The latter case in most cases assumes the integrity of the body element itself, and its paintwork is damaged. Need for painting
This event involves removal, which will ensure better quality of painting work compared to a similar procedure without dismantling the element. Body modernization. Some owners seek to update the exterior of their “horse” and are inclined to replace the standard product with a tuning element. Plus there is a cover on the rear bumper. The need to install additional tools. Such accessories can be parking sensors, a camera, etc. When installing linings.
Front bumper
Required : Torx T20 and Torx T30 wrench.
Procedure:
- Unscrew screws No. 2 of the upper bumper mounting;
- Unscrew bolts No. 1 of the lower fastening of the bumper to the subframe.
- Remove the mudguard from the bottom of the bumper (piston No. 3 and 4, three fastening screws No. 1);
- Unscrew the screws securing the plastic fender liner (locker) No. 1. And then, under the protective cover of the wheel arch, unscrew bolts No. 2 of the side fastening of the bumper.
Remove the front bumper of Largus by pulling it towards you, disengaging it. If there are fog lights, disconnect the block with wires. Installing the bumper is done in reverse order.
The process is also shown in the video:
Possible reasons for removing the bumper
The reasons for dismantling can be very different, but the main one remains physical damage. Many people have come across this concept. So, let's look at the cases in which you will have to remove the front bumper on Largus:
Road accident. The most common reason why a part needs to be dismantled. In 75% of cases this happens due to the fault of the Largus driver. A simple failure to maintain distance can lead to deformation and damage not only to the bumper, but also to the elements underneath it.
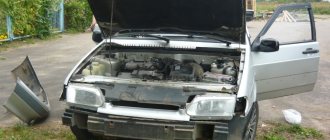
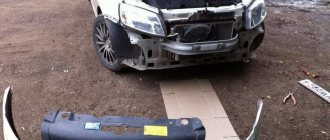
Front bumper on Largus after an accident
Clearance at the front bumper point
All these and other reasons may be a reason to remove the bumper on Largus.
List of VAZ colors
Click on the photo of Lada Largus rear bumper replacement to enlarge the image.
Catalog number:
Manufacturer:
Standard price:
1500.00 rub.
Your price
Price For registered:
1500.00 rub.
The rear bumper on the Lada Largus is primarily susceptible to deformation, chips and tears upon impact. In our service, the car owner will be able to buy and immediately replace the Largus rear bumper on the spot. We have a full range of shades in stock, including textures. Removal and installation takes only 30 minutes. Moreover, when replacing the Lada Largus bumper, hidden defects may appear, which are promptly eliminated.
© Copyright by REMKUZOV.ru
All publicationsAbout the company
How to remove the front buffer
To remove the front bumper on a Lada Largus, you need:
1. open the hood, 2. use a T30 key to unscrew the four fastening screws,
3. using a T20 wrench, unscrew two screws each at the right and left fender liner, 4. unscrew 3 more fastening screws located on the lower left side of the car bumper, 5. repeat the previous step on the other side of the car, 6. remove 3 more in the same way screws located in the middle, 7. after bending the right fender liner (locker) and gaining access to the next fastening (the screw connecting the bumper to the car fender), unscrew that too, 8. repeat on the left side, bending the corresponding fender liner, 9. unscrew with the tenth key bolts located under the wheel arch using a special extension, 10. pull the unscrewed bumper towards you.
If you have fog lights, you will also need to disconnect the right front headlight power harness and then the left front power harness. If desired, you can tune the standard Lada Largus by installing a mesh to protect the radiator.
How to remove the stern bumper?
Many will find useful information on how to remove the bumper. To perform the indicated procedure, that is, remove the rear bumper, you will need a certain set of tools. Their composition is as follows:
- a head having a size of “10”;
- nozzles “T20” and “T30”;
- a screwdriver with a flat profile for removing clips.
Regarding the time costs, we note that the entire list of actions when you need to remove the rear bumper will take no more than one hour. Some craftsmen manage to carry out dismantling in less time, which is facilitated by accumulated experience.
After preparing the tools, you will need to provide access to the bottom of the car. We install our Lada Largus over a pit or hang it using jacks. Some experienced owners are able to complete the dismantling procedure without lifting the car, but this is guaranteed to entail additional time costs.
How to remove the rear bumper.
- We disconnect the fender liners from the base.
- Now, using a socket set to “10”, we unscrew a pair of fixing screws on each side of the car.
- We move inside the fender liner and find the screws that secure the part itself to the body panel. We also unscrew them.
- Next you will need to remove the lights. Alternatively, the bumper can be dismantled together with these devices.
- We proceed to unscrewing the fasteners that connect the bumper to the amplifier.
- On the top of the bumper, near the luggage compartment seal, there are 4 screws that will also need to be unscrewed.
- We take a screwdriver and carefully remove the side sections of the bumper from the brackets (we work from both sides).
- Now you can remove the Lada Largus Cross bumper itself by applying a pulling force first downwards and then towards yourself (backwards).
We install this body component in the reverse order.
Replacement
Lada Largus Logbook DRL from standard Largus lamps The car received a proven and recognizable body. The Largus bumper is a high-tech solution, but it can also get damaged and break. Dismantling is necessary to carry out repair work on the body element itself or the parts that are hidden behind it. Removing the part is not as difficult as it might seem.
Removing the rear bumper
To work on a car you always need some tools. It is not difficult to remove the bumper, but for this you need at least a minimum set (usually every car enthusiast has one in the garage). We will need:
- Head 10;
- Nozzles type T20 and T30;
- For rear bumper: flat head screwdriver (clip removal tool).
It is not at all difficult to remove the rear bumper of the Lada Largus.
Attention! The whole process will take no more than an hour (you can complete it in half an hour, everything will depend on the skills of the master). First you need to prepare a workplace and all the tools. Next, provide free access to the bottom of the car.
Drive the vehicle into the pit or lift the body with a jack (you can do without lifting, but in this case it will take more time and effort to dismantle)
Next, provide free access to the bottom of the car. Drive the vehicle into the pit or lift the body with a jack (you can do without lifting, but in this case it will take more time and effort to dismantle)
First you need to prepare a workplace and all the tools. Next, provide free access to the bottom of the car. Drive the vehicle into the pit or lift the body with a jack (you can do without lifting, but in this case it will take more time and effort to dismantle).
The process of removing the Largus rear bumper:
The first step is to detach the fender liners from the base. Take a 10mm socket and unscrew the fixing screws on the back (2 pieces on the right and left of the fender liner). Under the fender liner there are screws connecting the part and the rest of the body. Unscrew them. The next step is more difficult. You have to remove the lights. The part cannot be dismantled together with them. Unscrew the screws that connect the bumper and amplifier. There are 4 screws between the seal on the trunk and the part; they need to be removed (they secure the buffer on the rear panel)
Carefully, using a flathead screwdriver, remove the fasteners from the side. We disconnect the edges of the front side from the wings
With a smooth movement down and back, remove the buffer
With a smooth movement down and back, remove the buffer.
You can install the part in reverse order.
Removing the front bumper
Usually the front bumper of the Lada Largus is removed if it is necessary to carry out body repairs, replace an element, or gain access to parts. Also, the part is dismantled when removing the radiator grille, which is built into it. Its cladding is designed as one piece with the bumper.
Tools:
- Mounting blade;
- Flat screwdriver;
- Key with 10mm head;
- T30 nozzles.
The process of removing the Largus front bumper:
- Unscrew the three screws securing the front lower part of the side motor splash guard (they need to be pulled out).
- Take the tool, pull out the core from the retainer of the rear securing part of the mudguard and remove the retainer itself.
- Remove the piston by removing it from the mudguard mounts with a tool.
- Disconnect the two parts of the mudguard (upper and lower) and remove the upper one.
- Remove the fender liner.
- In the same way, release and remove the lower mudguard and the right fender liner of the car.
- On the left side there are wires stretched to the fog lights; disconnect the block.
- Remove the screws securing the bottom of the lip to the subframe at the front of the car.
- Near the wheels (on both sides in the arches), unscrew one fastening of the side parts of the bumper, which are connected to the wings (they need to be separated).
- Release the top by unscrewing the 4 screws along the edge connected to the radiator frame.
- The rear corners need to be pulled downwards to take the stops from the holes that secure the bumper along the lower edge.
- Point the sides forward and dismantle the part.
- The wire feeding the fog lights can be removed if it is in the way.
- Unscrew all the screws securing the headlights (4 pieces each) and remove them.
- By pulling out certain plastic fasteners (located on the inside of the body), you can remove the radiator grille, headlight trim, air guide shields, and lower grille.
After the work has been completed, the bumper is installed on the car in the reverse order.
Removing the bumper is not difficult; any driver can do all the work independently, without the help of a service center. However, for this you must have at least basic knowledge of working with a car.
- How to change wheels on Largus
- Fuel filter Chevrolet Lanos
- Peugeot Boxer fuel filter
- How to change filters in Mitsubishi ASX: cabin, air, fuel
Body repair Lada Largus Lada Largus in St. Petersburg
Lada Largus Sound box Logbook Fuel consumption
Lada body repair in SKR is a high-quality and inexpensive repair. At the Body Repair Station, Lada cars are constantly dealt with. We have extensive experience working with this brand, which allows us to easily carry out all repair work on the body and more. Lada body repair is not particularly difficult for us. We are used to working with spare parts for this car. And we will tell the car owner which Lada body parts are best to purchase. And if you want to achieve the highest quality results in repairing Lada cars, leave all the hassle of selecting spare parts to us. Our craftsmen personally inspect spare parts and select the most accurate stamping possible. This allows you to achieve a good final result in the repair. If you are interested in the cost and timing of Lada body repairs, call tel.
The owner of a Lada Largus car came to our car service center to assess the cost of damage. Our master examined the car and assessed the external damage to the body, naming the price. The client was satisfied with the price, and he left the car in our car service center.
Lada Largus has features that do not allow internal damage to be assessed. The bumper with radiator grille tightly covers the entire internal structure. But based on the nature of the impact and external damage, we assumed that the bumper reinforcement remained intact. When removing the bumper, it turned out that the amplifier was damaged, the bumper was a plastic element and after the impact it simply snapped back into place. The amplifier on Largus is not a separate element, but part of the structure, it became clear that the cost of repairs would change. We invited the client to a car service center in order to show the internal damage and agree on further actions. They quoted the full amount of repairs, taking into account all hidden damage, and the client agreed to continue the repairs.
Body repair of Largus consisted of the following work:
- Hood repair and painting
- Replacing and painting the front right fender
- Replacing the right headlight
- Front bumper - replacement and painting
- Front bumper reinforcement - replacement and painting
Repairing the Largus bumper did not make sense, since the price of a new bumper is much lower. There is an option to buy a bumper directly in color, but such elements may have an error in tone and will stand out against the background of the factory-painted body.
The renovation of Largus was carried out efficiently. All elements were painted to exactly match the tone of the body. Further operation of the Lada Largus is possible immediately after completion of the work.
Largus spare parts are not expensive, for this reason it is sometimes more profitable to replace even something that can be repaired. We easily found all the necessary elements and delivered them to the car service center. The client did not have to waste time on the process of purchasing spare parts.
The Lada repair was completed on time, all work is guaranteed. Service of Lada Largus is also possible in our car service center, about which the client was informed.
You can find out how much any repair costs by calling or sending your question through the form on our website:
You can estimate the cost of the work by sending us a photo by email.
In SKR there is an opportunity to purchase spare parts for your car. All spare parts are ordered to our customers at purchase prices. The price for any repair in our car service does not exceed the price for a similar repair in any other car service. There are a lot of car repair shops offering Lada car repair services in a city like St. Petersburg. But high-quality repairs, combined with a wide range of repair services, are practically non-existent.
SKR is a high quality Lada repair in any area of car repair!
Contacts:
The SKR body repair station is located in St. Petersburg, on the street. Novorossiyskaya, 53 Lit.B, on the border of the Vyborg and Kalinin districts. The nearest metro station is Ploshchad Muzhestva.
Address: St. Petersburg, st. Novorossiyskaya, 53 Lit.B
Telephone:
Every third owner of Lada Largus was faced with the need to dismantle the front bumper. Not every car enthusiast is able to do this, because he is not an expert in this field or simply does not have the necessary knowledge.
Video about removing the front bumper on a Lada Largus and installing a radiator mesh:
Dismantling process
So, let's look at the step-by-step process of dismantling the front bumper:
- Before you start this simple task, you need to prepare. It is best to place the car on a lift, but at worst, you can use a pit.
- Now let's move on to the dismantling process itself. Remove the lower plastic protective mudguard. To do this, unscrew the fasteners that are located in front. The back and middle parts are attached to plugs that can be removed using a special tool or screwdriver.
- Now, you need to unscrew the front fender liners from the bumper.
- Next, you should find the wire connector that is responsible for the fog lights and disconnect it. It is located in the left arch of the body mudguard.
- We unscrew the screws that secure the bumper to the subframe from below.
- You should also unscrew the screws securing the bumper to the fender on both sides.
- Next, unscrew the upper mounts of the buffer to the radiator frame.
- We lower the edges of the bumper where it was attached to the wing and, pulling it forward, remove the buffer.
- If necessary, remove the wiring harnesses from the grooves that are laid along the bumper.
- We unscrew the fog lights and dismantle them.
- Having released the fasteners, remove the radiator grille.
- We also pull out the lower bumper grille.
- Installation is carried out in reverse order.
Now the front bumper has been removed from the car, and the necessary manipulations can be carried out.
The reasons for dismantling can be very different, but the main one remains physical damage. Many people have come across this concept. So, let's look at the cases in which you will have to remove the front bumper on Largus:
- Road accident. The most common reason why a part needs to be dismantled. In 75% of cases this happens due to the fault of the Largus driver. A simple failure to maintain distance can lead to deformation and damage not only to the bumper, but also to the elements underneath it.
- Colliding with an obstacle (even though the Largus has quite high ground clearance), which resulted in deformation of the lower part of the radiator frame. To eliminate damage to the body element, you will have to dismantle the bumper.
- Replacing the radiator grille will also require removing the buffer. This is so because the frame is an integral part of the security element.
- A banal but worthwhile reason is tuning. To upgrade or install a body kit, you will have to remove the bumper.
- Touch-up paint or other reasons will also be a reason to remove the front bumper.
- In some cases, the bumper will have to be removed if the radiator needs to be replaced.
- Installing DRLs (daytime running lights) in the bumper.
All these and other reasons may be a reason to remove the bumper on Largus.
Search
Quite often, after a minor accident, the Lada Largus bumper needs to be replaced. To make repair work easier, it is better to raise the car to a small height. The rear bumper changes as follows. To remove it, you must first release the liner, which is supported by four bolts. Then the Lada Largus bumper is detached from the arches. It is necessary to unscrew one bolt on each side of the arch. The rear lighting is then removed.
Then you need to release the amplifier. Loosen the four screws at the bottom and bottom. In the wheel arches the bumper is also removed from the body. To remove the bumper on a Largus car, you need to open the clamps and release the fangs. To do this, lower it and pull it towards you. If the disassembled part has minor damage, such as a small crack, then virtually any driver can repair the Largus car bumper.
This requires the following tools and materials:
- sandpaper;
- mounting knife;
- soft spatula;
- sanding block;
- auto putty;
- primer;
- car color paint.
The surface around the crack is cleaned of dirt and grease. In addition, the edges of the divided part are melted by a gas burner. Then all bulges are smoothed out with sanding cloth. The treated surface is thoroughly cleaned and leveled. After this, a small groove is cut between the edges with a construction knife, where the putty is applied in the required amount. The putty is applied to the Largus car bumper using soft putty. The layer should be smooth and even.
Replacement of the rear bumper for Renault Logan. eliminating sagging.
Once the protective layer has hardened one hundred percent, all existing tubers are completely smoothed with a sanding washer and the additional putty pad is removed. When grinding the Largus rear or front bumper, the treated surface is better moistened with water. This will significantly reduce the amount of dust emitted containing harmful components.
Front and rear bumpers on Chevrolet Lacetti
To remove the front bumper on the Lacetti we will need:
- Phillips screwdriver
- Slotted screwdriver (flat head screwdriver)
- Ratchet with extension and 10 mm socket.
- Pliers (pliers)
Front bumper removal process
Remove the radiator grille. It is mounted on top with 4 screws using a Phillips screwdriver. We unscrew it and then you need to disconnect the 2 latches. There are 2 special slots made in the radiator grill for these purposes. Using a long slotted screwdriver, you need to reach the latch and push in its locking tabs. A little skill and everything will work out.
Now there is a view of the plastic clips. They are made for a Phillips screwdriver. As practice shows, they rarely just get out, so you need to help them). When unscrewing the screws, lift them by the head using a slotted screwdriver and things will go more smoothly. After unscrewing the screw, you need to remove the latch itself.
You just hook it by the cap and pull it out. It looks like a hat with paws. There are a total of 4 such fasteners along the contour of the bumper. There are also 4 similar fasteners at the bottom of the bumper. We also remove them following the example of the upper fasteners.
Then unscrew the fender liners from the bumper. They are secured with pistons.
For ease of unscrewing, turn the Lacetti wheels first in one direction and then in the other (if you unscrew from the left side, then turn the wheels to the right, if you unscrew the screws from the right, then turn the wheels to the left). In total, you need to remove 8 pistons, 4 on each side. It is most convenient to use a short Phillips and flathead screwdriver.
Screw mounting locations are indicated as number 4
Next, access to attach the bumper to the wings opens. Bend the locker to the side, use a ratchet with an extension to approach the bolt and unscrew it. The bolt is located on the corner of the bumper. There are 2 of them: one on each side. And then unscrew 2 more bolts, as shown in the image.
After this, the bumper can be removed.
What could go wrong?
There should not be any problems with removing the front bumper. When removing the bumper, there may be missing mounting clips or screws.
When removing the bumper, do not pull it with great force; you may have simply missed one of the fasteners.
Pistons, clips and other fasteners
- Lacetti radiator grille clamp - GM article number 94530326
- Piston for fender liners - GM article 94535928
- Upper bumper clamp - GM article 94530623
- Latch for fastening plastic protection to the front bumper - GM article 94530624