Fuel pump - is responsible for supplying fuel from the tank to the car engine; if it fails, fuel stops being supplied to the engine and therefore the car will not start, or over time it may simply start to work worse and in this case the car will twitch when driving and its dynamics will disappear.
In such a situation, the fuel pump will still pump fuel into the engine, but it will do so very much, besides this, the fuel pump no longer serves anything, although if you think about it, firstly it goes together with the Fuel Level Sensor, and secondly there is a grid on it There is still one that cleans gasoline from dirt. Therefore, we can say that thanks to the gas pump, we also find out how much fuel is left in the tank and even before this fuel goes into the engine, it is cleared of small particles of dirt.
If you do not want to change the fuel pump very often, then try not to bring the gasoline in the tank to the very minimum and especially do not drive the car until it runs out of gas (Only do this in rare cases or because of the situation), otherwise such trains will not lead to anything good and soon the fuel pump (this is its second name) will become unusable.
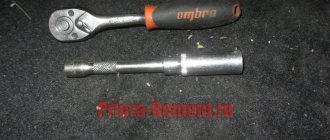
Note! To replace this pump on a car, you will need a set of tools in which: Screwdrivers will be lying around, a hammer and a drift, but in principle, the help of screwdrivers will be enough (But this is only if you don’t have a hammer with a drift, if you do, be sure to take them)!
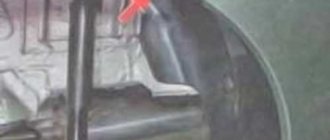
Where is the fuel pump located? It is installed inside the tank and through fuel pipes it pumps fuel from the tank to the car's engine, but not all people know where the tank is located on front-wheel drive cars, let's explain briefly, on classics many people even saw it when the trunk was opened (It's just that on classics it's in installed in the most visible place and if the trunk is not covered with a trim, as for example on a VAZ 2101 car this is done, there is no trim unlike the same 2107, for example, then the gas tank can be easily seen), but with regards to front-wheel drive, the gas tank is located under the bottom , and the fuel pump is inserted into it from above, so in order to get to the pump it will be enough to remove the rear seat cushion and then, by folding back the standard carpet and unscrewing the fuel pump flap (Indicated by a red arrow), you will immediately see the pump itself, for clarity it is indicated by a blue arrow in the photo below:
When should you change the fuel pump? As soon as the car begins to drive poorly (twitches, does not accelerate at all at high speeds, etc.), then you need to think about the pump, besides, by the way, it will also make a lot of noise (you will understand this right away), so if you lose power and If there is an extraneous sound, then you should think about replacing the fuel pump with a new one, but before you change any part, you can check it for functionality, to learn more about how to understand that the fuel pump has failed, read the article: “Checking the pressure in the power system on a VAZ” and be sure to also watch the video in this article that says everything.
What is a fuel pump
The gasoline pump is a key component of the power system; its job is to ensure an uninterrupted, timely supply of fuel to the system.
In each model, the design and location of the fuel pump is unique; for the Lada Kalina, this device is located on the opposite side of the power unit.
On the one hand, this arrangement allows you to benefit from the technical capabilities of the machine, but on the other hand, the device requires more powerful operation than models in which the fuel pump is located closer to the engine.
In order for Kalina’s fuel pump to cope with its job, it is presented in an electric version. Its advantages are:
- simplicity of design;
- good fuel supply;
- safety.
But, as one might expect, Kalina’s electrics are not yet a strong point; they often break down, which is the main disadvantage.
In addition, the disadvantages of the Lada Kalina gas pump include increased noise levels, sensitivity to the quality of gasoline, and the fact that it requires cooling.
The issue of high-quality gasoline in our country, unfortunately, still remains unresolved; this is one of the reasons why the fuel system of the Lada Kalina fails.
Filters become clogged, which disrupts the operation of the entire mechanism and ultimately leads to pump failure.
This is why filters, or meshes as they are also called, need to be changed regularly.
We’ll talk about this, but first, let’s figure out what malfunctions happen with the Kalina fuel pump?
Types of faults:
- One of the most common pump malfunctions is a rapid decrease in pressure after the engine starts. This fact indicates serious violations that can be caused either by a valve defect or a breakdown of the pressure level regulator; it is quite possible that the injectors are also clogged. A sharp drop in pressure leads to problems in starting the engine , which, if the breakdown is not corrected, can even lead to engine failure.
- It also happens that the engine loses power, or the engine does not start at all, even when cold or hot. All this happens when a membrane or spring breaks, a rod wears out, or filters become clogged, and the latter happens more often than anything else.
- In any case, having discovered that there is something wrong with the fuel system, you should first check the condition of the filters, because, due to low-quality gasoline, they become clogged quite quickly, and it is better to change them in a timely manner, without waiting for problems. Now let’s talk about how to change the mesh from the pump yourself.
We recommend: The best inexpensive winter studded tires
Repair parts
It is worth carrying out independent equipment repairs if you are completely sure that the malfunction lies precisely in it. A large number of plastic elements make the pump very fragile. For this reason, care must be taken when disassembling.
- Using a screwdriver, you need to pry up and remove the drain module of the part.
- The ground wire will be disconnected from the equipment.
- The intermediate wire connector is disconnected (from the inside).
- The pressure regulator is removed.
- The gasoline element module is removed by pressing the plastic retainer.
- The filter mesh is removed from the housing. If it is dirty, it can be cleaned. But it is more advisable to install a new mesh.
Damaged elements must be repaired or replaced with new parts. At the same time, it is advisable to replace the fine fuel filter. It is located near the jack cup in the right rear wheel arch. The equipment is assembled in the reverse order.
If Kalina's fuel pump does not work, the reasons often lie in a malfunction of the part itself. This equipment is inexpensive. It is quite possible to remove the unit and replace it with a working one yourself. It is better to purchase original spare parts.
Replacing the fuel pump
To access the Lada Kalina fuel pump, you need to fold back the rear seat, remove the insulation (if any), and then begin dismantling the device.
Tool for the job
- Screwdriver with flat and Phillips blade.
- Hammer.
- Pliers.
Step-by-step work order
- Disconnect the negative terminal from the battery.
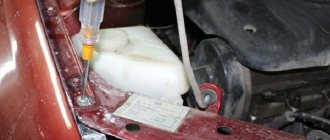
- We open access to the protective cover.
Raise the rear airbag up
- Then unscrew the four bolts from the black metal cover located under the rear seat.
To avoid losing, we put the bolts in one place.
- When the bolts are unscrewed, remove the cover to the side.
Under the decorative cover you can see the fuel pump and DUST!
- When the cover is removed, you will see a picture where the upper part of the fuel pump is visible, as well as the fittings that are connected to it.
- Now you can begin the dismantling itself, and first of all, disconnect the power wires. To do this, remove the plastic clamp on the block and pull it to the side.
- The next step is to disconnect the fittings; in order to remove them, you need to press on the metal clamp with one hand, and use the other hand to pull the fittings to the side using pliers.
The block is marked with a red arrow, and the fittings with a green arrow.
- When dismantling the second tip, note that its retainer is made of green plastic, and in order for the fitting to leave the place of fixation, you need to press on it, and then pull the tip itself to the side with your other hand.
- Before you begin removing the fuel pump, you should thoroughly clean everything of dust and dirt to prevent any debris from getting into the fuel.
- When everything is clean, you can begin to dismantle the retaining ring that secures the fuel pump to the housing. To perform these manipulations, you can use a special puller, or using a flat screwdriver and a hammer, knock it counterclockwise from the mounting points.
- Use a hammer and screwdriver carefully so as not to damage the ring or fuel pump housing.
Strikes should only be made on the ring.
- Then, when the ring clip has popped out of its seat, you can take it out.
- Now is the time to start removing the fuel pump itself; to do this, you need to grab it by the top part and pull it up. In this case, you should be extremely careful so as not to bend the structure. Please note that the fuel pump is equipped with a special float indicating the amount of fuel in the gas tank, and in order not to knock it down, the fuel pump should be removed so as not to touch the body of the fuel tank.
- Here is a photo example of when the fuel pump has been successfully dismantled.
Successfully dismantled fuel pump.
- All installation work should be carried out in strict reverse order, similar to the removal procedure.
Replacing the fuel pump mesh
Fuel pump mesh close up
When the fuel pump is removed, you can inspect the filter mesh. This is the so-called coarse filter. To do this, you need to disassemble the fuel pump and replace the filter element.
On the left is the new one, on the right is the old fuel pump mesh.
Location of Kalina fuel filters
To replace filter elements on VAZ 1117-1119 series cars, you need to know where they are installed. The location of the parts is as follows:
- mesh bag - a trap for large particles is attached to the suction pipe of the gasoline pump, immersed in a tank of fuel;
A screen for catching large particles is located in the fuel tank along with the pump.
The fine cleaning element is hidden in a niche to the right of the tank
The location of the filter elements is the same for all modifications of Kalina and does not depend on the body type. That is, on the “station wagon” and “hatchback” you will find parts in the same places as on the “sedan”.
Why might the mesh need to be replaced?
Two grids - dirty and clean
First of all, because of bad gasoline. If you regularly refuel at dubious gas stations, then it’s only a matter of time before the fuel pump fails . Purification of gasoline from impurities in the gasoline pump occurs in several stages, and the mesh of the gasoline pump is the first line of defense, so to speak. It is the first to absorb all large particles of impurities and dirt. After passing through the mesh, gasoline enters the fine fuel filter, then passes through another mesh (which is located near the fuel pressure regulator), and finally goes through the third mesh (located directly in front of the injectors). If problems arise in any of these areas, you won’t be able to go far. The car engine simply will not start. Or it will start, but will work unevenly and jerkily.
recommends changing fine filters every 30,000 kilometers . But he doesn’t give any recommendations about the fuel pump mesh. Therefore, many car owners forget to change this grid, and remember about it only when the engine begins to behave strangely.
The general rule is: if the car has traveled 60,000 kilometers, the mesh should either be cleaned or replaced. It is advisable to clean it only if there is no serious mechanical damage to it. But if the machine has traveled the distance indicated above, then the mesh in the pump is often worn out to such an extent that it is easier to throw it away than to clean it.
Selecting new filter elements
To purchase fuel purification system parts for VAZ 1117-19 models, you need to know what they look like:
- The coarse filter is a flat mesh bag made of chemically resistant plastic that captures large particles of 80-100 microns. In the center of the element there is a plastic fitting that fits onto the counterpart of the gasoline pump.
The mesh element is equipped with a pipe that fits onto the fuel pump fitting
The element is equipped with clamps for fastening fuel line connections
All modifications of the Lada Kalina, including the second generation, are equipped with absolutely identical filter elements - a “barrel” and a mesh catcher. The dimensions of the spare parts are also identical.
There are no tricks in choosing a coarse mesh - the parts are made according to a single sample and cost from 30 to 45 rubles. The only caution: in order not to purchase a low-quality product or a fake, contact well-established stores. Although the fuel pump mesh costs a penny, it plays an important role in the fuel system: it catches large debris that can quickly clog the filter paper of the next cleaning element.
In operation, the plastic case is not inferior to the metal one in terms of reliability.
The material from which secondary filters are made does not play a big role. What is important is the contents of the “barrel”, which cannot be seen or touched. Therefore, there are only 3 selection criteria:
- correspondence between the body dimensions and the diameter of the fittings;
- the presence of plastic clamps;
- brand (manufacturer).
The mounting clamp on the Kalina is designed for a case diameter of 56 mm
In order for the spare part to fit the mounting clamp, the case diameter must be 56 mm. The internal size of the gasoline pipes put on the fittings is 8 mm.
There are many different fuel filters sold in stores, and not all of them are equipped with clamps (in other cars, the hoses can be secured with clamps). The part for “Kalina” must have latches, otherwise the tubes cannot be secured.
A plastic latch secures the hose to the filter fitting
In the countries of the former USSR, the following manufacturers of gasoline filters have proven themselves best:
At the moment, second-generation Kalina machines are equipped with fine filters made of polyamide. But users are not very complimentary about the factory spare parts: after disassembly, it was discovered that the paper “accordion” was poorly glued to the body. As a result, half of the fuel passed through the gas pipeline without filtering. At the same time, based on the practice of isolated cases, it cannot be unequivocally stated that metal filters are better than plastic ones.
Inside the filter element there is porous paper that traps small particles
Table: cost of VAZ 1118 filters
| Brand name | BOSCH | FRAM | FILTRON | SCT Germany | UFI | MANN |
| Price in rubles as of autumn 2022 | 390 | 340 | 335 | 230 | 280 | 410 |
Video: comparison of cleaning elements from different brands
How to replace the fuel pump on a VAZ 1117-VAZ 1119?
Note! The fuel pump can be changed either separately from all other parts, or it can be completely replaced with a module; replacing the entire module with the entire module will be more expensive because the new module will have a Fuel Level Sensor, a pressure regulator and many other parts (Just why would you change them if they you are already in normal condition, most likely, if your sensor has become unusable and the regulator is still acting up, then change everything together), and separately, if you replace the fuel pump, then this is only one new part, and all the others will remain in place, if If you decide to replace the fuel pump separately, then in this case, after removing the pump itself, read the article entitled: “Repairing the fuel pump” in which everything is described!
Removal: 1) At the very beginning of the operation, fold back the rear seat cushion so that it does not interfere, this is done very simply, by hand pull out the hinges from under the inside of the seat (see photo 1) and then by pulling these loops, the rear seat cushion reclines like this shown in the figure under number 2, this gives you access to the fuel pump hatch and to the pump itself. As soon as access opens, fold the standard carpet to the side (it will be cut there specifically for the fuel pump, see photo 3 for more details) and remove the four screws which secure the hatch that closes the pump itself (see photo 4) and then remove it.
2) Now disconnect the block of wires from the pump itself, this is done by hand, that is, the latch that holds the block is pressed by hand and then the block is disconnected (see small photo below), then disconnect the two fuel pipes, to do this, press the latch with one screwdriver fastening one of the tubes, and with the other, slide the tube along the fitting and thereby disconnect it (see large photo), carry out exactly the same operation with the other tube and most importantly, after disconnecting them, do not confuse the tubes with each other, because they must be connected strictly in their places and if you connect them the other way around, the car simply won’t start, by the way, on some models (Depending on the year of manufacture of the car), the fuel pipes are secured not using plastic clamps on which you need to press and remove the tubes, but using metal spring clamps, So, if you have metal clamps, then you will need to wring them out and then disconnect all the tubes.
Note! Before disconnecting the pipes, do not forget to relieve the fuel pressure, this can be done in several ways, one of them is to remove the fuse that goes to the fuel pump (This fuse is not located in the mounting block where all the others are located, but under the cover which is located next to the gearshift knob, you can lift this cover with a screwdriver and the pump fuse is located in the very middle) and start the car and let it run until it stalls, the second method is described in detail in the article entitled: “Bleeding the pressure in the fuel rail on a VAZ”, well the last third method (Actually there are a little more of them, but these are the most basic of them) is very simple, disconnect the wire block as shown in the small photo above and start the car in the same way and wait until it stalls, when it stalls you can again just in case, start it up and the pressure in the power system after these procedures will be 100%!bled (The time you spend on bleeding off the pressure is a little more than one minute, but not everyone does this, but in vain, it’s safety first thing, just if you don’t bleed off the pressure in system, when the fuel pipes are disconnected, a little gasoline will flow out of them and your car will get dirty due to this, in addition, if a spark gets on the gasoline, then this will already ignite, which will not lead to anything good)!
3) Then, using two screwdrivers, rotate the plate that holds the fuel pump in one place counterclockwise until its cutouts align with the protrusions on the flange (see small photo below), once aligned, remove the plate and put it aside, and then After that, remove the fuel pump itself from the tank, but only remove it carefully without damaging the Fuel Level Sensor (The sensor just has a float, so you will have to carefully remove this float from the tank), by the way, as soon as the fuel pump is removed from the tank, look in that place where it was attached with a plate, a sealing rubber ring, if it is damaged in any way (compressed, everything is in cracks, for example, or even torn in some place), then in this case replace the ring with a new one because this ring is responsible for the tightness and if it will be damaged, then when driving over strong bumps, gasoline will flow out little by little (drop by drop) through this ring to the outside.
Installation: The new fuel pump is installed in its place in the reverse order of removal, the plate that secures the fuel pump during installation will need to be tightened a little more with light blows of a hammer through a drift and something else, there is an arrow on the fuel pump (you will see it right away), so install the new pump on its place so that this arrow points clearly to the rear of the car.
Additional video: You can briefly see the process of replacing the fuel pump with a new one in the video below, everything is shown there in pictures and in descriptions.
Note! If you want a live video clip, and not pictures, then in this case watch another video in which the fuel pump is removed using the example of a VAZ 2110 car (On Kalina it is removed a little differently and it is not secured by a plate but by nuts , but you have to look at everything so that you at least know approximately how to replace the fuel pump on a car)!
In order to get to the location of the fuel pump on the Lada Kalina, you must first recline the rear seats and remove the insulating trim on the floor.
We find the lace between the rear seat belt buckles and pull it up, raising both seats. Below I will tell you what tools may be needed for this repair:
- Phillips and flathead screwdrivers
- Hammer
- Pliers
General diagram of electrical equipment of VAZ 1118
1 — block headlight; 2 — windshield wiper gear motor; 3 - generator; 4 - battery; 5 - starter; 6 — sound signal; 7 — hood open sensor; 8 — power window switch for the right front door; 9 — motor-reducer for window lifter of the right front door; 10 — electric pump for windshield washer; 11 — connecting blocks of wires for connecting the right (front) speaker of the audio system; 12 — electric drive for locking the lock of the right front door with an open door sensor; 13 — ambient air temperature sensor; 14 — connecting block of the wiring harness for connection to the engine control system harness; 15 — electric drive for locking the left front door lock (with an open door sensor and a central locking switch); 16 — sensor of insufficient brake fluid level; 17 — connecting blocks of wires for connecting the left (front) speaker of the audio system; 18 — right front door power window switch (installed on the driver’s door); 19 — left front door power window switch; 20 — central locking switch; 21 — motor-reducer for window lifter of the right front door; 22 — remote control unit; 23 — immobilizer control unit (APS-6); 24 — mounting block; 25 — instrument panel; 26 — right side turn signal; 27 — glove box lighting lamp; 28 — switch for the glove compartment lighting lamp; 29 — brake signal switch; 30 — ignition switch (lock); 31 — lighting control unit; 32 — steering column switches; 33 — left side direction indicator; 34 — connecting blocks of wires for connecting the left (rear) speaker of the audio system; 35 — electric drive for locking the left (rear) door with an open door sensor; 36 — electric heater fan; 37 — additional heater resistor; 38 — heater switch; 39 — alarm switch; 40 — reverse lock solenoid switch; 41 — rear window heating switch; 42 — connecting blocks of wires for connecting the right (rear) speaker of the audio system; 43 — electric drive for locking the right rear door lock (with a door open sensor); 44 — fuel module of the engine control system; 45 — reverse light switch; 46 — parking brake warning lamp switch; 47 — cigarette lighter; 48 — reverse lock solenoid; 49 — connecting blocks of wires for connecting the head unit of the audio system; 50 — backlight lamps on the trim of the center console of the instrument panel; 51 — electric power steering control unit; 52 — interior lamp; 53 — rear light; 54 — block for connecting the electric drive for locking the trunk lid lock*; 55 — luggage compartment lid open sensor; 56 — license plate lights; 57 — additional brake light; 58 — rear window heating element; 59 — luggage compartment lighting lamp.
Changing the mesh with your own hands
So, the mesh located in the fuel pump is forced to constantly come into contact with dust and dirt, because the pump itself is located between the seats, and dust constantly settles on its body.
That is why experienced motorists are not lazy to wipe the pump body with a damp cloth from time to time to avoid untimely clogging of the system.
To replace the mesh you need to go through several steps:
- The very first thing we do is buy a new filter.
- Raise the rear seats to provide access to the pump.
- We unscrew the four fasteners on the hatch cover to the pump and put it aside.
- Carefully remove the hoses. They are dismantled in the following way: press on the latch (you can use a screwdriver) and pry up the hose itself (with another screwdriver) in the direction of the arrow. We judiciously balance our strength so as not to break fragile parts and remove the hose. Unfasten the connector.
- We thoroughly wipe the pump from dust and continue to disassemble the structure. Remove the retaining ring. Let us warn you right away that the ring is difficult to remove, you will have to work hard here or even use a hammer, but again, do not overdo it.
- We remove the pump (in order not to flood the interior with gasoline, lay some unnecessary cloth).
The first part of the work is completed. Let's proceed to the most important part, disassembling the pump:
- There is a sensor and wires attached to the pump; you need to disconnect them.
- Next, we remove the intake tube and bend the clamps (there are 4 of them) in order to be able to remove the glass.
- We check the glass for dirt, if there is any, clean it.
- And now we’re doing what we did such a large-scale job for – we’re removing the mesh. She usually looks creepy. But don’t be scared, just replace it with a new one and assemble the system in reverse order.
Lada Kalina dashboard diagram
1,2,3,4 — blocks of the instrument panel wiring harness to the blocks of the rear wiring harness; 5,6 — blocks of the instrument panel wiring harness to the blocks of the front wiring harness; 7 — block of the instrument panel wiring harness to the block of the wiring harness 8 — block of the instrument panel wiring harness to the block of the front wiring harness; 9 — lighting control module; 10 — ignition switch; 11 — on-board computer mode switch; 12 — windshield wiper switch; 13 — sound signal switch; 14 — light signaling switch; 15 — instrument cluster; 16 — evaporator temperature sensor; 17 — interior air temperature sensor; 18 — air conditioner switch; 19 — controller of the automatic climate control system; 20 — heater damper gearmotor; 21 — rear window heating switch; 22 — alarm switch; 23 — brake signal switch; 24 — cigarette lighter; 25 — electric amplifier control unit; 26,27 — blocks of the instrument panel wiring harness to the radio; 28 — backlight lamp for the heater control panel; 29 — illuminator; 30 — mounting block: 31 — heater electric motor switch; 32 — heater electric motor; 33 — additional resistance of the heater electric motor; 34 — glove box lighting; 35 — glove box lighting switch; 36 — control unit of the APS-6 automobile anti-theft system; 37 — driver airbag module; 38 — passenger airbag module; 39.40 — blocks of the instrument panel wiring harness to the blocks of the ignition system wiring harness.
KZ - additional starter relay; K4 - additional relay; K5 - relay-interrupter for direction indicators and hazard warning lights; K6 - windshield wiper relay; K7 - headlight high beam relay; K8 - sound signal relay; K9 - relay for turning on fog lights; K10 — relay for turning on the heated rear window; K11 — electric seat heating relay; K12 - air conditioning compressor clutch activation relay;
Instrument panel wiring harness - 11186-3724030-20.
Important points
The procedure outlined above seems quite simple, but, nevertheless, there are a couple of nuances that should be mentioned.
Firstly, gasoline. When the gas lines are unscrewed, it begins to flow directly onto the cap (this happens especially often if the car owner forgot to relieve the pressure in the gas line using the breather, as mentioned above). Yes, a little gasoline leaks out, but the smell of gasoline in the cabin is not what a car owner needs, right? Therefore, before removing the fuel lines, you should put a cloth on the pump cover and carefully insert it with a screwdriver into all the cracks. The rag will absorb the leaked gasoline, then you can throw it away, which will help get rid of the smell in the cabin.
Secondly, the fuel pump retaining plate. As practice shows, this is a fragile thing, and breaking it by carelessly prying it with a screwdriver is not just easy, but very easy. But it’s difficult to find this part on sale; it is only sold complete with a complete fuel pump, and this is a waste of money. The matter is further complicated by the fact that it is not always possible to move this plate out of place with just a flat screwdriver (especially if the car owner is trying to disassemble the pump for the first time), so sometimes you have to resort to using a hammer and chisel, and this, in turn, increases the risk many times over plate breakage.
As you can see, there are no difficulties with independently replacing the pump grid on the Lada Kalina, and if you strictly follow the above instructions, even those who are doing it for the first time will not have any problems. The main thing is to be patient and follow safety precautions. It is imperative to remove the terminal from the battery! Otherwise, a banal mesh replacement can turn into a fire.
Signs of trouble
There are several signs by which you can determine that the Kalina fuel pump is not working:
Similar symptoms are also observed when the fuel filter is clogged. Therefore, before removing the fuel pump on the viburnum, first replace the filter element. If the “symptoms” do not disappear, repair or replace the fuel module.
Common fuel pump malfunctions on Kalina:
- interruptions in the power supply to the unit: the fuel pump relay may fail. In this case, a diagnostic icon will be displayed on the instrument panel. Also, a power failure may be due to a loose connection in the fuse box;
- Fuel system blockage: most often occurs due to poor quality fuel containing small debris and impurities. Excessive contamination of coarse and fine filters leads to fuel pump failure;
- contamination of the fuel injector: leads to the fact that the car spontaneously turns off at idle.
The types of malfunctions described above require replacement of the fuel pump. The only type of work available to the car owner is cleaning the filter mesh.
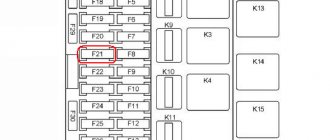
Fuses and relays of the Lada Kalina engine management system
The engine control system circuits are protected by three fuses located under a cover in the floor tunnel lining.
To gain access you need to pry it with a screwdriver and remove the cover from the center console.
Decoding
| Designation on the image | Current strength, A | Protected Circuits |
| F1 | 15 | Main relay circuits (winding of the cooling system electric fan relay, canister purge valve, air flow sensor, speed sensor, oxygen concentration sensor, ignition coil) |
| F2 | 15 | Fuel pump, viburnum fuel pump fuse. |
| F3 | 15 | Electronic control unit (constant power circuits) |
The system relays are assembled into a block and installed under the center console. The block additionally has a built-in fuse for the electric fan of the engine cooling system.
Additional relays and a fuse are located on the right side at the bottom of the instrument panel.
To gain access, you must remove the right trim panel of the instrument panel console.
How to check the fuel pressure regulator?
There are several simple ways to determine the causes of problems and defective components:
- Visual method. A simple inspection without the use of any fancy tools is fine for carburetor engines. Pinch or disconnect the valve and observe the flow of fuel. The intensity of the fuel flow will help identify the malfunction. This method of verification is effective in its own way, but one cannot count on absolute accuracy.
- Method using a pressure gauge. Place a pressure gauge between the fuel hose and the fitting. To do this, temporarily disconnect the vacuum hose. The pressure level should change from 0.3 to 0.7 Bar. If the pressure indicator has not changed, repeat the operation with another hose.
- Hose clamping method. The pressure regulator is checked by pinching the return hose. A pressure gauge connected to the fuel system should give an immediate response. If the motor does not develop normal speed, you can determine the inoperability of the RTD without the device. Start the engine and clamp the return hose. Then track the RPM and listen to the engine. If the engine starts to run smoothly, then the problem lies in a faulty control valve that needs to be replaced.
FakeHeader
Comments 17
Congratulations! You bought an excellent original UTES module (an old model, it says “UTES” in big letters, I had exactly the same one in my car from the factory, only 21101-1139009, manufactured in 2008), with an ORIGINAL Bosch pump 0 580 454 035 ( Now there are a lot of fakes)! Today I had a hard time finding and buying the original “UTES” module 21101-1139009 in Kharkov
There is the same one for Kalina:
I looked for it all over Ukraine, in Kyiv I went around the entire car market, called all the companies, then I started calling different offices in Kharkov, Dnepr and Zaporozhye - there is no original UTOS anywhere at the moment. Complete fakes under the guise of UTYOS or Chinese bullshit. The best thing that can be found now under the guise of UTOS is ATK (Avtotekhprom), but I was looking for the original UTOS in original packaging.
I accidentally came across the Losk104 website and there I bought exactly what I was persistently looking for!
Regarding DUT, Kalina is equipped with DUT-K, DUT-17 and DUT-10.
I can’t tell you which one for which tank. Like DUT-K of the “universal” type. I have a VAZ 21093 (2009) with a 1.6 Kalino engine, my module 21101-1139009 has a DUT-K2 sensor, it is completely interchangeable with DUT-11, there is no difference.
Dnepr auto dealers are still the same. They are purchased from Ukravtovaz (they recently opened their online store) shop.ladaukraine.com/ Now the fuel pump modules come from the DCK assembly line (the same was in my car)
Yes, in DneprAuto the prices are great, I just gave their links as an example, it’s easy to search on their website, it’s easy to look at the photo.
PS In UkrAvtoVAZ I see that the prices are also crap... A module like ours, only with a metal cover (for 1.5 engines) costs 2050 hryvnia shop.ladaukraine.com/prod...enzonasos/21101113900900/
You can buy it in Kharkov. where I bought mine for 1235 hryvnia
PS In DSK the inserts seem to be not Bosch ones, but Czech “Aisans” 3J, they seem to be worse than Bosch ones
You need to find out the price there, it differs. For example, Kalinovsky steering tips are indicated on the website for 430 UAH, but I paid 413 in fact
Yes, in DneprAuto the prices are great, I just gave their links as an example, it’s easy to search on their website, it’s easy to look at the photo.
PS In UkrAvtoVAZ I see that the prices are also crap... A module like ours, only with a metal cover (for 1.5 engines) costs 2050 hryvnia shop.ladaukraine.com/prod...enzonasos/21101113900900/
You can buy it in Kharkov. where I bought mine for 1235 hryvnia
PS In DSK the inserts seem to be not Bosch ones, but Czech “Aisans” 3J, they seem to be worse than Bosch ones
In my factory there was a 1 in 1 Bosch, the same as in Utes, but after so many years they could have changed the supplier.
Well, from the factory, our cars should be equipped with such Utes, with Bosch inserts and precisely with the number 0 580 454 035, or SEPO modules (they also come inside with the same Bosch ones and some other inserts from another manufacturer, like Aisan) or same DSK. Having deeply delved into this topic, studying forums and topics for a long time, I realized that there is nothing better than the UTOS module inside with the original Bosch.
Causes of gasoline pump malfunction
If Kalina’s fuel pump does not pump, then the reasons will be in the equipment itself or in other parts of the system. First, you should make sure that there is fuel in the tank, a spark in the spark plugs, the battery is charged, and the starter is working. If everything is in order, then you need to continue checking. If the cause of the malfunction is identified, for questions regarding the purchase of auto parts to eliminate it, you can contact the specialized online store automechanika38.rf.
Electromechanical equipment may not function correctly or stop working due to a malfunction in either the mechanical or electrical components of the system.
- The fuel pump fuse has blown - you should remove the element from the fuse box (located in the engine compartment). If the contact has visible damage, the part needs to be replaced.
- The equipment relay is faulty - check the electrical wiring, contacts between the unit and the diagnostic block, as well as the relay. Using a test lamp or multimeter, check the presence of voltage at the pump chip. A correctly operating relay makes clicks when the ignition is turned on, after the required pressure has been reached in the fuel line.
- There is no contact of the equipment with “ground” - it is necessary to apply ground to the part chip. The wire is located under the instrument panel and runs through the interior of the car. It is worth checking it, cleaning the contacts, and fixing them securely on the pump.
- The electronic control unit is faulty - the ECU needs to be repaired or replaced.
- A breakdown in the car alarm, poor installation of the security system - electrical wires may be mixed up, errors may have been made when connecting the alarm.
- Insufficient pressure in the fuel line may be the result of contamination of the gasoline filter or the filter mesh of the pump itself.
Many car owners prefer to drive with a half-empty fuel tank. However, the fuel pump in this case often overheats, which will ultimately lead to equipment malfunction. The reasons why the fuel pump on Kalina does not turn on may be the breakdown of individual parts of the unit. To determine the problem, it is necessary to remove the equipment and diagnose it.