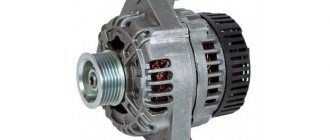
The generator and battery on the VAZ 2109 are sources of electrical energy. The battery helps start the engine and also supplies electrical energy consumers when the engine is not running. The main voltage initiator in a car is the generator. It powers all devices while the engine is running and at the same time charges the battery.
Therefore, in most cases, if the VAZ 2109 battery is not charging, it means the operation of the generator-battery tandem is broken. You need to look for the cause of the discharge either in the design of the generator itself, or on the path from it to the battery. Sometimes the reason is also poor contact or excessive wear of the battery itself. This problem needs to be corrected urgently, since the battery can only operate the car for a few hours (depending on the capacity). It is necessary to identify the fault in the power source link and eliminate it.
The principle of operation of the device and its diagram
The electric generator acts as an autonomous source of energy in any car; it is designed to evenly recharge the battery.
If the generator fails or wears out, the battery stops receiving the required amount of energy and cannot ensure stable operation of the technical component of the machine. As soon as its charge runs out, the vehicle stalls. Starting a car after something like this is not the easiest task. To get a visual representation of the operation of the electric generator, you will need its diagram. The VAZ 2108 generator diagram is shown in the figure
All elements that are important in the operation of the device are numbered on it.
- Electric generator.
- Negative diode.
- Spare diode.
- Positive diode.
- Battery discharge control lamp.
- Instrument block.
- Voltmeter.
- Mounting block.
- 100 ohm backup resistors.
- Ignition relay.
- Ignition power.
- Battery battery.
- Capacitor.
- Rotor winding.
- Voltage controller (available only in car models produced before 1988).
VAZ 2108 generator diagram. 1 - generator; 2 - negative diode; 3 - additional diode; 4 - positive diode; 5—battery discharge warning lamp; 6 — instrument cluster; 7 - voltmeter; 8 — mounting block; 9 — additional resistors of 100 Ohm, 2 W; 10 - ignition relay; 11 — ignition switch; 12 — battery; 13 - capacitor; 14 — rotor winding; 15 - voltage regulator
The electric generator on the VAZ 2108 is located under the hood of the car; it operates using a special belt. The main reasons for equipment failure are:
- brush wear;
- charging relay failure;
- diode bridge malfunction;
- rotor shaft bearing stopper.
Checking an Individual Regulator
Checking the voltage regulator of the G-222 generator: 1 - battery; 2 - voltage regulator; 3 - control lamp.
As a rule, separate voltage regulators were installed on old cars, including domestic VAZs. But some manufacturers continue to do this to this day. The verification process is similar. To do this, you need to have a power supply with a voltage regulator, a 12 V light bulb, a multimeter and a directly tested regulator.
To check, you need to assemble the circuit shown in the figure. The process itself is similar to the one above. In normal condition (at a voltage of 12 V), the light bulb lights up. When the voltage value increases to 14.5 V, it goes out, and when it decreases, it lights up again. If during the process the lamp lights up or goes out at other values, it means that the regulator has failed.
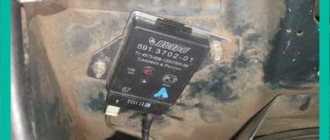
Checking relay type 591.3702-01
Relay test diagram type 591.3702-01
You can also still find a voltage regulator of type 591.3702-01, which was installed on rear-wheel drive VAZs (from VAZ 2101 to VAZ 2107), GAZ and Moskvich. The device is mounted separately and installed on the body. In general, the test is similar to that described above, but the differences are in the contacts used.
In particular, it has two main contacts - “67” and “15”. The first of them is a minus, and the second is a plus. Accordingly, to check it is necessary to assemble the circuit shown in the figure. The verification principle remains the same. In normal condition, at a voltage of 12 V, the light bulb lights up, and when the corresponding value increases to 14.5 V, it goes out. When the value returns to its original value, the light comes on again.
A classic regulator of this type is a device of the PP-380 brand, installed on VAZ 2101 and VAZ 2102 cars. We provide reference data regarding this regulator.
| Adjustable voltage at regulator and ambient temperature (50±3)° C, V: | |
| at the first stage | no more than 0.7 |
| on the second stage | 14,2 ± 0,3 |
| Resistance between plug “15” and ground, Ohm | 17,7 ± 2 |
| Resistance between plug “15” and plug “67” with open contacts, Ohm | 5,65 ± 0,3 |
| Air gap between armature and core, mm | 1,4 ± 0,07 |
| Distance between second stage contacts, mm | 0,45 ± 0,1 |
Testing a three-level relay
Regulated power supply
Some car owners install on their cars, instead of standard “chocolate bars,” three-level relays, which are technologically more advanced. Their difference is the presence of three voltage levels at which the battery power is cut off (for example, 13.7 V, 14.2 V and 14.7 V). The appropriate level can be set manually using a special regulator.
Such relays are more reliable and allow flexible adjustment of the cutoff voltage level. As for checking such a regulator, it is completely similar to the procedures described above. Just do not forget about the value that is set on the relay, and accordingly, check it with a multimeter.
Generator check
There is one method by which you can check the performance of a car generator equipped with a regulator relay 591.3702-01 with diagnostic elements. It is as follows:
- disconnect the wires that went to pins 67 and 15 of the voltage regulator;
- connect a light bulb to it (excluding the regulator from the circuit);
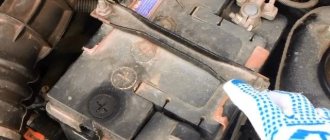
- Remove the wire from the positive terminal of the battery.
If, as a result of these actions, the engine does not stall, then we can say that the car’s generator is in order. Otherwise, it is faulty and needs to be checked and replaced.
Malfunctions of the VAZ 2108, 2109, 21099 generator
Its malfunction leads either to a cessation of electric current production (charging) or to an excessive increase in voltage (battery overcharging). On VAZ 2108, 2109, 21099 cars, the easiest way to identify the causes of a generator malfunction is by external signs.
Signs of a malfunction of the generator of VAZ 2108, 2109, 21099 cars
The generator does not produce the required charging current. Simultaneously with the light on, the voltmeter readings tend to zero. The battery is constantly not recharged. Using a voltmeter (multimeter), we check the voltage at the battery terminals (the engine is idling). The voltmeter readings should be as follows: generator 37.3701 - 13.6 V, generator 9402.3701 - 13.2 V.
The “folk” method of checking a generator by removing the terminal from the battery while the engine is running is only suitable for carburetor engines. If the engine stalls after removing the terminal, it means the generator has stopped producing electric current.
- Why does the battery light on the instrument panel light up?
If it is less, then the problem is not in the faulty wiring going to the control lamp and voltmeter, but in the generator. Next, sequentially, from simple to complex, from the most probable to the least probable, we look for the cause of the malfunction.
— The generator drive belt tension is loose
The belt slips on the pulley, and the generator rotor stops rotating at the required frequency. In this case, a “whistle” from the generator drive is possible. We check and adjust the belt tension if necessary.
— The generator voltage regulator is faulty
There may be a short circuit between its terminals “B” (“D+”), “W” (“DF”) or “stuck” (the brushes of the brush assembly have worn out). The easiest way to check the voltage regulator is to install a known good one. We replace the faulty regulator with a new one. Read more: “Checking the generator voltage regulator for VAZ 2108, 2109, 21099 cars.”
— The diode bridge (rectifier unit) of the generator is faulty
Most likely there is a “break” in its valves or a short circuit in the negative valves. The power diodes of the excitation winding may also be damaged. The diode bridge can be checked using an ohmmeter (multimeter in ohmmeter mode) both directly on the car and on a removed generator.
Connection diagram for generator 37.3701 for VAZ 2108, 2109, 21099 cars
— The generator stator is faulty
“Open” or short circuit in the stator winding. We check the stator with an ohmmeter, and if there is a malfunction, replace it with a new one.
— The generator rotor is faulty
Perhaps the leads of the excitation winding located on the rotor have become detached from the contact rings to which the brushes are pressed. We check the rotor and replace it with a new one if necessary.
The battery is recharged and “boils”
The generator produces too much charging current, higher: generator 37.3701 - 14.6 V, generator 9402.3701 - 14.7 V, which is checked with a voltmeter at the battery terminals. The needle on the standard voltmeter is in the red zone at the end of the scale.
— The voltage regulator is faulty
Most likely there is a short circuit between its terminal “Ш” (“DF”) and “ground”. Replace the voltage regulator with a new one or a known good one.
We independently check the generator on the “ten” at home
The generator makes noise or “howls” when operating
The nut securing the generator pulley has come loose, the generator bearings are worn out, there is an interturn short circuit or a short circuit to ground in the stator winding (the generator “howls”), a short circuit in one of the generator valves.
Notes and additions
— The causes of such malfunctions as: the warning lamp does not light up after turning the key in the ignition switch and starting the engine (the standard voltmeter shows normal voltage) or the lamp does not light up and the voltmeter does not work (or the control devices do not work completely) are not a malfunction of the generator, but a burnout of the control panel lamp, a break in its power supply circuit, a blown fuse No. 5 (F16) in the mounting block (responsible for supplying current to the excitation winding of the generator), a break in the power supply circuit of the instrument cluster (orange and orange-blue wires), a malfunction of the ignition switch.
— If the discharge warning lamp lights up at idle, and goes out when you press the gas pedal and while driving, you must first check the tension of the generator drive belt, and if that doesn’t help, then the problem is most likely in the additional resistors located in the relay mounting block and fuses. If they fail, the generator is not excited at low speeds, and therefore does not charge. It is necessary to either completely change the mounting block, or unsolder additional resistors and replace them with new ones.
More articles on generators for VAZ 2108, 2109, 21099 cars
Typical malfunctions and methods for their elimination
To prevent unit failure, it is necessary to ensure its high-quality and timely maintenance. As you can see from the photo of the diagram, the unit consists of many different components, so the likelihood of it breaking due to improper maintenance is quite high.
So, in what cases is a VAZ generator repaired:
- The indicator light on the dashboard does not turn on, although the unit and all equipment are working normally. Most likely, the problem is an open circuit or burnout of the indicator itself. In some cases, the reason is poor contact of the diode with the wiring; in this case, you only need to clean the contacts of the connection connector.
- The indicator on the tidy, as well as the instruments themselves on the control panel do not work. Apparently, the reason for this is the failure of the safety element, which will need to be replaced. Also, the reason may be a break or unsoldering of the wiring.
- The warning light comes on after the engine starts, but it disappears after the driver presses the gas. The essence of the problem lies in the fact that the generator unit is not excited at low engine speeds; in most cases, this is due to the desoldering of the resistor elements in the block. Conduct their diagnostics and, if necessary, solder them again.
- Another malfunction is that the indicator continues to light when the engine is turned on, while the voltmeter needle on the dashboard is in the red zone. In this case, there may be several reasons for the problem. First of all, it could be the strap slipping - you need to check it and, if necessary, tighten it. Also, the reason may be a short circuit or breakdown in the diode elements of the winding; much less often, a malfunction occurs when the voltage regulator fails.
- Another sign is that the indicator does not light up when the engine is running, but the voltmeter needle on the dashboard is in the red zone. In this case, you first need to diagnose the presence of contact between the regulator connector and the brushes. If the contact is normal, then check the brushes (they may freeze), as well as the slip rings; for the latter, the problem of oxidation is relevant. In addition, the cause of the problem may lie in the failure of the voltage regulator; usually we are talking about a break in the wiring between the contact and ground. The same symptoms appear in the event of a short circuit on the positive valves of the rectifier element.
- When the engine is running, the voltmeter needle is located in the red zone - this symptom indicates damage to the voltage regulator. In particular, we are talking about a short circuit that can occur between ground and also contact Ш. The problem can only be solved by replacing the regulator.
- If the unit is significantly louder than usual, there may be several reasons for this. First, you should check the functionality of the bearing elements, as well as the tightness of the pulley nut. In some cases, the loud operation of the unit is due to the creaking of the brushes. The brushes themselves may be of poor quality, but it is possible that the problem is dust getting on the slip rings.
Price issue
The price in this case depends on the manufacturer.
1. KATEK device (price - about 5 thousand rubles)
2. LKD unit (price - approximately 4500 rubles)
3. Startvolt generator (market price - about 7200 rubles)
ABOUT REPLACING THE GENERATOR SET ON A CAR
It so happened that replacing the VAZ generator is necessary. The necessary spare part has been purchased. By the way, some car enthusiasts replace serviceable components with more powerful units. The reasons for this can be very different. Basically, this is the installation of new, additional electricity consumers. Powerful audio systems, good headlights, illumination of body kits and other similar “things” require an increase in the power of the generator set.
In such cases, a generator from Priora or Kalina is usually purchased and installed. Its generated current is approximately 115 A, while the standard device produces 80 A. Its mounting is similar to the standard one, only the drive belt pulley needs to be replaced. The matter is not very difficult; even inexperienced drivers can cope with it.
Required tools for replacing generators:
- Wrenches for “10”, “13”;
- Open-end wrench 17x19;
- Screwdriver Set;
- Mount.
If the work is carried out in a garage with an inspection hole, then the following procedure can be recommended:
- Disconnect the engine protection. You can release it only in the area of the generator set and leave it hanging;
- Using a “10” wrench, tighten the nut on the protruding contact bolt of the generator and remove the wires from it. Also disconnect the connector from the brush assembly;
- Unscrew the tensioner bolt, the bolt securing it to the cylinder block and remove it from the engine;
- Now the nut of the bracket axle is unscrewed to mount the generator. This action is performed with a key set to “19”, remove the nut with the spacer washer and knock the axle out of the bracket.
The generator can be removed from the engine compartment and a new one installed in its place. Installation is carried out in reverse order. Connect the previously disconnected wires and connectors, and replace the drive belt. After this, you can try it out at work. Before starting the engine for testing, a few words about how to properly tension the alternator belt. This process is slightly different for different engine displacements. With a volume of 1.5 liters, the belt is tensioned by moving the generator housing away from the engine block with a pry bar. With a volume of 1.6 liters, tighten the belt using the tensioner screw.
Removing the generator on a VAZ 2113-2114-2115 without any hassle.
Take care of your car!
Reason #4. The battery does not have enough time to fully charge
The reason is typical for situations where the car is used for short trips, not exceeding tens of kilometers per day. For example, we went to the store, and that’s it – to the garage.
- Firstly, while the car was standing for a long time, the battery was fairly discharged by leakage currents.
- Secondly, you wasted energy from the battery when you started the engine to drive out, and when you left the store (at a minimum).
In total, a certain number of ampere-hours were taken from the battery, which the generator simply did not have time to return during a very short trip.
We repair the voltage regulator and relay
Removing the voltage regulator in a VAZ 2109 car is not difficult. The technical features of this car model allow this work to be performed without removing the generator. The only tools you will need are standard screwdrivers and wrenches.
To replace the voltage regulator in a VAZ 2109, the first thing you need to do is purchase a new element. Nowadays, this will not be difficult, because it is sold in any auto store. Recently, the use and application of three-level regulators has become widespread. However, VAZ cars are still produced with standard regulators.
The main difference between the three-level regulator and the standard one is the new relay. The three-level regulator relay is much better in performance and quality than the standard one. This type of regulator makes the voltage more stable and of higher quality and protects the entire electrical system of the car from significant fluctuations in the network. Before performing any type of replacement work, it is recommended to charge the battery. After completion, install everything in the reverse order and take new measurements with a tester at the battery terminals.
What causes weak battery charging?
First of all, the fact that the battery is running low is indicated by a light on the instrument panel. This is also indicated by:
- readings of a voltmeter (if available) installed in the same place;
- too dim lighting in the cabin;
- slow rotation of the crankshaft;
- “fading” sound of the radio, etc.
Checking the battery condition is easy - just turn the ignition key once. At the same time, all the lights on the panel light up (including the one with the battery icon). Normally, the latter should shine as brightly as all the others.
If it lights dimly, then this is the first sign of problems with the battery. When starting the engine, if the latter is operational and charged, its indicator goes out. But when it does not stop glowing, the battery is definitely not receiving voltage from the generator.
Source
➤
Low voltage on the generator.
Another common malfunction is when the warning light goes out while the engine is running, but over time signs of a dead battery appear. There may be several reasons for this. The first reason is the breakdown of the main diode of the rectifier bridge. It is detected by measuring the voltage at terminal 30 of the generator with the high beam headlights on and off. If the voltage is normal or close to normal when the headlights are off, but begins to drop when the headlights are on, then the diode bridge needs to be replaced. If a KATE generator is installed, this can be done without removing the generator from the engine
But before changing the diode bridge, pay attention to the belt tension and the condition of the generator pulley. If the bottom of the pulley shines, this indicates belt slippage due to pulley wear, which is the second reason for poor charging
In this case, the belt must be replaced, and if the new belt falls into the pulley groove, then the pulley must be replaced. In this case, it makes no sense to pull the belt through the belt. In addition, it can lead to damage to the armature bearings.
Also, weak charging may be in poor contact at terminal 30 of the generator, in the battery terminals, or in the connection of the negative terminal to engine ground. A bad contact at pin 30 can be detected by touch. Just be careful when doing this. The terminal may become very hot. If the terminal does not heat up, then use a voltmeter to check the voltage across all connections with the high beam headlights on. A voltage drop of 0.5 V indicates poor contact.
All the problems described above when the VAZ 2109 battery is not charging can be eliminated independently and in a short time. In addition to those described above, there are many more faults, but detecting and eliminating them requires more in-depth knowledge and much more time. There is no point in dwelling on them here.
admin 10/17/2014
“If you notice an error in the text, please highlight this place with the mouse and press CTRL+ENTER” “If the article was useful to you, share the link to it on social networks”
How do you know if the battery is not charging?
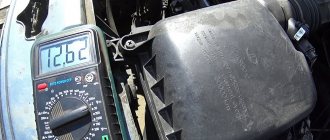
The battery is not charged from the generator. The first signal that the battery is not charging is a lit red battery light! And to make sure of this, you can check the battery voltage. There should be 12.5... 12.7 V at the battery terminals. When the engine is started, the voltage will rise to 13.5... 14.5 V. With consumers turned on and the engine running, the voltmeter readings, as a rule, jump from 13.8 to 14.3V. No changes on the voltmeter display or when the indicator goes beyond 14.6V indicates a generator malfunction.
When the generator runs but does not charge the battery, the cause may lie in the battery itself. Apparently it was completely discharged, which is called “zero”, then the voltage is less than 11V. A zero charge may occur due to sulfation of the plates. If the sulfation is insignificant, you can try to eliminate it. And try charging using a jump charger.
How to understand that the battery is not charging from the charger? When a battery is connected to a charger, evidence that it is fully charging is a constantly changing voltage at the terminals and jumping voltage or current readings on the device dial. If there is no charge, there will be no change. When the battery is not being charged from an Orion type charger (which has only indicators), you can very often observe a buzzing and rare blinking of the “current” light.
Why is the battery not charging?
Before writing about the main reasons why the battery may not charge on VAZ 2109-2108 cars, I would like to warn all readers that the list I have given is not complete and is compiled only based on personal operating experience. So, during my short 10 years of driving experience, I had to operate a lot of cars and there were quite a lot of problems with charging the battery, and I will try to write about the main ones here.
It's no secret that the main device that is responsible for the normal operation of electrical appliances in a car is the generator. It is precisely because of the failure of some of its parts that charging may disappear completely or become weak. The main malfunctions of the generator, which entail a decrease in the charge current to the battery:
- Wear of generator brushes. This is a very common and most common reason. If they are worn down to the minimum permissible height, then the charge may disappear gradually, and then disappear altogether. To solve this problem, you just need to replace the brushes with new ones and that’s it.
- Failure of the diode bridge. The most reliable diode bridges are usually installed on VAZ 2109-2108 cars from the factory. And they are the ones who travel the most kilometers! This has already been tested not only by me, and any experienced auto electrician will confirm this. If one of the diodes or the entire rectifier unit burns out, then it also needs to be replaced. The procedure is not very fast and pleasant, but it will not cause much difficulty. Just below I’ll put a link to a page that describes the entire generator repair process.
- A more complex generator breakdown, such as a break in the rotor or stator winding. Of course, this is rare, but it still happens sometimes. The cost of these spare parts is quite low, so it is better to buy new ones and install the burned ones together than to buy a new generator.
- Poor charging may be due to slipping of the alternator belt. This becomes especially noticeable in damp or rainy weather, or when water gets on the belt. It begins to whistle, causing it to slip on the pulley, thereby preventing the generator from gaining sufficient speed to optimally charge the battery.
If you have problems with your car that are described above, then you can read all the maintenance procedures here: Repairing a generator on a VAZ 2109-2108 with your own hands. Everything is described there in quite detail and even for beginners the information will be very useful, and understanding it will not be difficult.
Why is the battery not charging?
The generator stops charging the battery if the brushes, diode bridge, rotor or stator winding, as well as the belt connecting the rotor to the crankshaft fail.
| What's wrong | What to do |
| Worn graphite brushes are the most common generator malfunction. | They have their own resource and wear out over time. Thus, the contact of the brushes and rings on the rotor weakens, and the VAZ 2109 does not charge. There is only one solution to the problem: replacing the brushes with new ones. They are inexpensive and are sold at any auto store. |
| Due to poor connection of the output contact, diode bridge and stator winding, the bridge heats up, melts and fails. | But it was precisely on the VAZ 2109 and VAZ 2108 models that the most reliable diode rectifiers were installed from the factory. Tested by time. Therefore, the bridge on the “nine” rarely fails. Well, in the event of a breakdown, the entire bridge will have to be replaced. |
| Another common case is a broken, slipping or insufficient tension of the generator drive belt. | To check whether the belt is tensioned, press in the middle part and check the downward deflection. The permissible deviation standards are specified in the VAZ operating manual. The pulleys can also wear out, causing the belt to slip. Well, if the belt breaks, we simply replace it with a new one. |
How should a good generator work?
To understand why the battery is not charging, you need to have a clear idea of how the generator operates in normal mode. First, let's understand that the generator is much more important than the battery. The second performs only two functions in the car: starting the ignition system and powering electrical consumers when the engine is not running.
Therefore, the battery of the VAZ 2109 carburetor and VAZ 2109 injector functions more as an auxiliary current source. It consists of lead plates combined into sections. These elements interact with the electrolyte (water + sulfuric acid). In this way, the battery converts chemical energy into electrical energy.
The generator consists of the following basic elements.
- Stator (a stationary element made of round steel sheets).
- Stator winding (coils placed in its slots).
- Rotor (a movable element rotating inside the stator; consisting of a shaft with a core on which many layers of copper wire are wound - an electromagnet, and 2 six-pole cores are installed on top).
- Back and front covers.
- Brush holder with graphite brushes; Since 1993, the brush holder for the VAZ 2109 has been equipped with a voltage regulator.
- Contact rings.
- Voltage output contact.
- Diode bridge.
Why can't the generator start the engine on its own? Because of the principle of its operation.
In order for this current source to begin generating electricity, the rotor must be transferred to rotational motion from the crankshaft. The crankshaft and rotor pulleys are connected by a V-belt. The crankshaft begins to rotate, transmits torque to the rotor shaft, the electromagnet creates induction, and voltage appears. The circuit between the battery and the generator is closed and the battery is no longer needed
Then the generator itself supplies energy to all devices and, most importantly, charges the battery
THE WIRE FROM THE BATTERY THROUGH THE IGNITION SWITCH IS CONNECTED TO THE BRUSH HOLDER ON THE REAR COVER. GRAPHITE BRUSHES WITH THE HELP OF SPRINGS ARE CONSTANTLY PRESSED TO THE GENERATOR SLIP RINGS AND PROVIDE GOOD CONTACT. ON THE SAME COVER THE OUTPUT CONTACT IS MADE FOR DELIVERY OF VOLTAGE WHICH IS PRODUCED BY THE GENERATOR.
But the current produced by the generator is supplied from the stator winding to the output contact not directly, but through a diode bridge. The bridge plays the role of a rectifier. It converts the alternating current of the stator winding into direct current, which is necessary for all Nine electrical appliances. The brush holder also has a voltage regulator that prevents high voltage from reaching consumers. Due to a breakdown of the main components of the generator, the battery may not be charged.
Causes
By providing voltage, the generator exhausts its resource. Its individual elements wear out over time, resulting in the following malfunctions:
The reason that the generator does not charge the battery well also often lies in a simple break in the wiring or poor contact at the connection points.
If the machine has been in use for a long time, then the graphite brushes should be inspected first. They are always the first to fail. As wear occurs, contact with the rotor rings is lost and the generator ceases to perform its functions. In this case, it is necessary to replace the damaged element with a new one. The price of the brushes is low, and they are sold in virtually any specialized retail establishment.
Bridge failure quite often occurs due to incomplete loss of contact with the stator winding. As a result, the resistance increases, the conductors heat up and the diodes burn out. The entire unit is replaced.
Poor operation of the generator is also caused by a break or excessive stretching of the drive belt. Over time, it loses its elasticity and sags. A new one is installed to replace the damaged one. It is not difficult to check the degree of tension - just press on it with your hand in the central part.
The design of the generator allows, if necessary, to replace any of its main elements. Therefore, if there is a break in the rotor or stator windings, they are replaced with new ones.
Reasons why the battery charging light is on
In fact, there are many reasons why the battery light comes on and does not go out. These include:
- Loosening of the belt tension on the generator, its wear or damage; fuse blown or deterioration of contact quality in the connectors of the mounting block;
- breakdown of the relay regulator, diode bridge, additional diodes;
- the appearance of a break in the generator excitation circuit;
- decreased quality of contact at the battery terminals or generator output;
- generator brush wear;
- lack of high-quality contact of the ground wire.
What to do if the battery charging light is on?
First of all, get out of the car and, with the engine running, measure the voltage at the battery terminals (do not remove the clamps under any circumstances).
If charging is in progress, the voltage should be at 13.6-14.2 Volts. In the absence of charge, the voltage level will be much lower - about 12 Volts.
To fix the problem, prepare the following tools:
- twelve volt indicator light,
- two screwdrivers (flat and Phillips),
- multimeter,
- pliers,
- knife,
- Use sandpaper to clean contacts.
The readings of the on-board voltmeter indicate the presence of a charge, the charge signal lamp on the dashboard does not light up, there are about 12 volts at the battery terminals, and the battery itself is almost discharged.
In such a situation, clean the wire connections on the power source itself. If these measures are useless, measure the voltage level at terminal “30” of the generator itself.
Place one multimeter probe on this terminal, and the other on ground. If the voltage here is much higher than at the battery, then strip the thirtieth terminal. If necessary, replace the wire from the generator to the battery.
The voltmeter on the dashboard and the lamp show the presence of a charge, but the battery is discharged.
The voltage on the battery is normal (about 14 Volts). Turning on a load (for example, headlights) causes the charge arrow to shift to the extreme left position.
The main reason is weak belt tension on the generator pulley (tighten the belt, and if it is damaged, replace it).
This problem can also be caused by a breakdown of one of the diodes, as well as a break in the stator phase winding. Turn off the ignition and check the diodes with a multimeter. In case of breakdown, replace them.
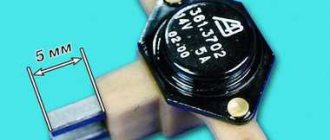
Check the generator brushes. To do this, take them out and measure the length. If it is less than five millimeters, then it is better to replace the brushes.
When you turn the key in the ignition, the charge warning lamp does not light up, the charge sensor does not work, and there is no charge on the battery. The reason is a blown fuse.
Its designation is F10, rating is 10 Amperes. If installing a new fuse does not produce results, then the reason must be sought in the ignition relay or the lock itself.
After turning on the ignition, there is no charge, all devices work, the warning light does not light up.
The check is simple - remove the wiring from terminal “sixty-one” of the generator and connect it directly to the “minus” (car body). If the light comes on, then the cause of the problem is the generator field winding.
The second option is bad contact in the connector. If after cleaning there is no result, then there is a risk of the lamp itself burning out.
When you turn the key in the ignition, the charge lamp lights up, and after starting it continues to light up. In this case, there is no charging or appears periodically. The reason is insufficient contact of the wire at the connector with the dashboard (it may oxidize).
Finally, check the relay regulator. To do this, apply voltage from the battery to its contacts. If there is 12 volts on the brushes, then the relay is working properly. If not, the device must be replaced.
If you have problems charging the battery (the warning light does not go out or does not light up at all), then check all versions.
But, as a rule, the problem is always on the surface, and the cause is poor contact, a burnt out light bulb or a faulty relay regulator. Good luck on the roads and of course no breakdowns.
If you find an error, please select a piece of text and press Ctrl+Enter.
VAZ 2105 battery light is on
In the battery charging circuit of the VAZ 2105, as on most cars, a battery charging warning lamp is installed.
The charging indicator lamp performs several functions at once. If the lamp lights up when you turn on the ignition, this indicates that the charging circuit is working. After starting the engine, the lamp goes out, which “indicates” that the battery is charging. When the battery light on a VAZ 2105 car lights up after starting the engine, this indicates that there is a fault in the circuit and the battery is not being charged. There is also an option when the control lamp is fully lit. In this case, either the charge disappears or there is no charge at all. This situation in most cases is associated with poor contact of the connecting block pin to the instrument panel. The pin is often subject to oxidation as it is attached to a rivet. The malfunction is eliminated by soldering the contact to the track on the board.
When the VAZ 2105 battery light comes on after starting the engine, there may be several reasons, starting with a blown fuse, a faulty circuit, and ending with a faulty generator.
In any case, troubleshooting should begin by checking the integrity of the fuse in the mounting block.
| Image of the mounting block of a VAZ 2105 car with the cover removed. The numbers indicate: 8 - fuse; 7 — relay for low beam headlights (P6); 6 — relay for turning on the high beam headlights (P5); 5 - spare fuse; 4 — relay for switching on the electric motor of the engine cooling system fan (P4); 3 - relay for turning on sound signals (P3); 2 — relay for turning on the headlight cleaners and washer (P2); 1 — relay for turning on the heated rear window (P1). |
After checking the fuse and making sure that it is intact and has reliable contact, it is worth checking the tension of the generator drive belt. If the check shows that the belt is in good condition and its tension is normal (the belt deflection should be 10-15 mm when pressed by hand), but the VAZ 2105 battery light is still on, then you need to proceed to checking the integrity of the wiring and devices in the circuit charge. In general, when the battery light is on on a VAZ 2105, faults can be combined:
- The fuse is burnt out or has poor contact in the sockets
- The belt tension is not normal, the belt is extremely worn or torn
- Extreme wear of the brushes or their jamming in the wells of the brush holder
- The relay regulator is faulty
- There is an open circuit in the generator armature excitation circuit
- Interturn short circuit, break or breakdown of the stator winding
- The diodes of the rectifier unit have failed
- Breakdown or short circuit of one of the additional diodes
- The terminals on the battery are oxidized or have poor contact.
- There is unreliable contact at terminal “30” of the generator
- The wire connecting terminal “30” of the generator to the battery is faulty
- There is no reliable contact between the generator ground wire and the body, or there is no ground at all
Also read other reviews
- Battery for VAZ 2107 The article provides tips that should guide you when choosing a battery for a VAZ 2107 car. ...
- The VAZ 2107 battery runs out and runs out. From the article you will learn what a car owner should do if the battery of a VAZ 2107 car suddenly starts to run out. ...
- Battery for VAZ 2109 Choosing the most optimal battery for the VAZ 2109 car. ...
No charging VAZ 2109
>When driving a car, you should always pay attention to whether the battery is charging. The VAZ 2109 battery is needed only to start the engine
While the engine is running, all electrical appliances of the VAZ 2109 operate from. Naturally, if the generator stops working, the battery doesn’t last long. How can you tell if the battery has stopped charging? There is a standard voltmeter on the instrument panel. According to its readings, it is very clear whether the generator is working or not. When the VAZ 2109 engine is running, the voltmeter should show a voltage of about 13.5 - 14 V. If you notice that the arrow is always tilted to the right, that is, the on-board voltage is less than 12V, then there is no charging from the generator. It is also very convenient to monitor the voltage of the on-board network of the VAZ 2109 using a digital tachometer. It measures the voltage from the generator with an accuracy of tenths of a volt.
Generator VAZ 2109
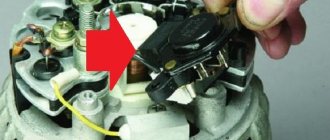
I recently had the following situation: I was driving and I saw that the voltage on the instrument panel voltmeter was about 11 Volts. Clearly, there's something wrong with the generator. Well, as usual, there is no time to repair it, it’s dark and cold outside, there is no garage. Well, as always, you need to drive a car every day, you can’t do without it. Therefore, at night every day I put the battery on charge, and in the morning I put the fully charged battery in the car and drove. If you drive only during daylight hours, that is, without headlights, then the battery may last for several days. If, as I did, you have to drive to work in the dark in the morning, then in the evening the battery will run out completely. Of course, it all depends on how often you turn off and start the engine. A lot of battery energy is wasted just for rotating the starter, you can also try to drive without it, then the battery is needed only for the operation of the ignition system and light signaling (stops, turns). Until recently, I believed that no matter how dead the battery was, the VAZ 2109 could always be started from the pushrod. It turned out that this was not true. There is a certain degree of discharge when the starter no longer has enough strength to turn the crankshaft, but it is enough. I pushed it, put it in gear, started up and everything was fine. However, if the battery is completely dead, it does not even have enough power to form a spark. , don’t push, the VAZ 2109 won’t start until you recharge the battery. But still, what to do if the VAZ 2109 battery has lost charging? Of course, not every one of us is an electrician and can check the generator with all its diodes, stabilizers and collectors. The very first thing to do if the VAZ 2109 generator stops working is to check the generator brushes. It’s easy to understand that the VAZ 2109’s brushes are faulty or worn out. Turn on the ignition and look at the instrument panel.
Checking the serviceability of the VAZ 2109 generator brushes
If the brushes are faulty, then the battery charging lamp will not light up when the engine is not running. Or it will glow very dimly. After you start the engine, the light will continue to glow dimly. The dim glow is visible only in the dark; it cannot be seen during daylight hours. If the brushes are in good working order, then when the engine is not running, the battery charging lamp lights up brightly; if it is started, it immediately goes out. It should be noted right away that the VAZ 2109 produced before 1993 has old-style brushes. On the new VAZ 2109, brushes of a new type are installed, immediately with a voltage stabilizer. However, there are both new and old samples of VAZ 2109 brushes on sale. The cost of VAZ 2109 generator brushes is about $3-5. Replacing the VAZ 2109 generator brushes is very simple, the sequence is as follows: 1. Remove the ground from the battery
Removing the mass of the VAZ 2109
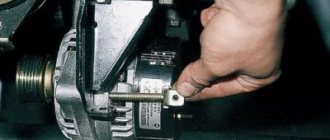
2. Disconnect the chip from the generator brush housing and remove the wires from the central stud of the generator.
Disconnect the wires from the VAZ 2109 generator
Wires pulled back
3. Now unscrew the two bolts securing the brushes to the VAZ 2109 generator housing. And slowly remove the brushes from the generator housing.
We unscrew the bolts securing the generator brushes of the VAZ 2109
4. If you want the new brushes to last a long time, you need to clean the generator commutator. To do this, loosen the nut on the generator mounting bracket, loosen the belt and remove it. We take fine sandpaper, press it against the commutator, and we ourselves rotate the generator using the drive wheel. In this way, graphite deposits from previous brushes are removed from the commutator. And the wear of the new brushes will be long. 5. Now we insert new brushes into the housing of the VAZ 2109 generator and clamp them.
Generator brushes VAZ 2109
6. We put back all the chips and wires of the VAZ 2109 generator.
VAZ 2109 generator brushes replaced
We check the functionality of the generator as indicated above.
Messages 1 to 20 of 35
1 Topic from golovash_87 2011-09-29 17:16:05 (2011-09-29 17:25:02 edited by golovash_87)
- golovash_87
- User
- Offline
- Registered: 2011-06-21
- Messages: 31
- Reputation: [ 0 | 0 ]
Topic: Lost Charging
Today I was driving and suddenly the battery on the instrument panel caught fire and began to discharge. I thought it was the voltage regulator. I changed it, but the problem remained. Luckily I had a new battery, at least I got home. what could it be?
2 Reply from Cityman 2011-09-29 18:18:44
- Cityman
- User
- Offline
- Registered: 2009-01-19
- Messages: 954
- Reputation: [ 1 | 0 ]
Re: No charger
Taking into account the sudden appearance of the defect, I think that one of the diodes in the bridge has broken.
And this. Is the belt in place? You might say: “an idiotic question,” but sometimes they came to me with a light on and a complete absence of a belt on the pulleys.
3 Reply from Sir YareG 2011-09-29 18:40:13 (2011-09-29 18:41:06 edited by Sir YareG)
- Sir YareG
- User
- Offline
- Registered: 2008-11-08
- Messages: 3,047
- Reputation: [ 0 | 0 ]
Re: No charger
Or the irritant has slipped off. There have been cases. /white terminal with a positive wire at the bottom of the gene usually/
4 Reply from Evgen52 2011-09-30 02:28:15
- Evgen52
- User
- Offline
- Registered: 2011-05-24
- Messages: 137
- Reputation: [ 0 | 0 ]
Re: No charger
Does the terminal of the wire going to the battery not touch the housing?
5 Reply from golovash_87 2011-09-30 06:14:05
- golovash_87
- User
- Offline
- Registered: 2011-06-21
- Messages: 31
- Reputation: [ 0 | 0 ]
Re: No charger
the irritant is in place, the belt is tense. Today I started it, revved it up and at high speeds, about 3500, the light starts to go out
6 Reply from Cityman 2011-09-30 08:41:42
- Cityman
- User
- Offline
- Registered: 2009-01-19
- Messages: 954
- Reputation: [ 1 | 0 ]
Re: No charger
Does the terminal of the wire going to the battery not touch the housing?
If he touches, it will be much worse. Up to the point of fire.
7 Reply from golovash_87 2011-09-30 09:27:02
- golovash_87
- User
- Offline
- Registered: 2011-06-21
- Messages: 31
- Reputation: [ 0 | 0 ]
Re: No charger
If he touches, it will be much worse. Up to the point of fire.
There is no such thing, the wires are intact. I removed the wire that goes from the generator to the battery and rang the bell. it is intact and does not come into contact with the body anywhere. When I remove the + terminal from the battery with the car running, the car immediately stalls. Has the generator died?
8 Reply from Evil 2011-09-30 14:08:22
- Evil
- User
- Offline
- Registered: 2008-11-08
- Messages: 2,120
- Reputation: [ 6 | 0 ]
Re: No charger
Maybe the excitement is there, maybe not. You can’t remove the terminal from the battery, as has already been discussed, otherwise not only the gene will have to be changed.
Well, what else? As they wrote, a bridge, probably.
9 Reply from Cityman 2011-09-30 14:56:42
- Cityman
- User
- Offline
- Registered: 2009-01-19
- Messages: 954
- Reputation: [ 1 | 0 ]
Re: No charger
If there is a break in the excitation circuit, the lamp will not light up initially.
10 Reply from Evil 2011-09-30 15:03:57
- Evil
- User
- Offline
- Registered: 2008-11-08
- Messages: 2,120
- Reputation: [ 6 | 0 ]
Re: No charger
Strange, I remember on one generator, it had to be started by connecting +12 to the excitation terminal. The lamp was always on. When I measured it on the wire, the voltage was either normal or showed something like 2.
11 Reply from VaSil 2011-09-30 19:51:28
- Vasil
- User
- Offline
- Registered: 2011-06-11
- Messages: 231
- Reputation: [ 0 | 0 ]
Re: No charger
If you change, then it’s better to engineer. generator with pulley and belt.
12 Reply from Cityman 2011-09-30 20:05:00
- Cityman
- User
- Offline
- Registered: 2009-01-19
- Messages: 954
- Reputation: [ 1 | 0 ]
Re: No charger
If you change, then it’s better to engineer. generator with pulley and belt.
Is not a fact. A WORKING generator (regular) provides all reasonable details in energy. The maintainability of the “injection” one is worse in terms of replacing bearings, the shaft is thin and easy to bend, and even if the pulley fastening is loosened, it breaks the fit, because there is no key at all. One of the advantages is the possibility of most repairs without removing the subject (if you do not take into account options with soldered or clamped stator leads.)
I wanted to change the 55A for a 70 in my Ford, I even have one, but since there are no problems with the existing 55, I didn’t bother.
13 Reply from golovash_87 2011-10-02 19:24:21
- golovash_87
- User
- Offline
- Registered: 2011-06-21
- Messages: 31
- Reputation: [ 0 | 0 ]
Re: No charger
The problem was solved by replacing the coil, the old one was torn off where it is screwed to the diode bridge. 2 wires out of 3 were broken
14 Reply from Cityman 2011-10-02 19:28:58
- Cityman
- User
- Offline
- Registered: 2009-01-19
- Messages: 954
- Reputation: [ 1 | 0 ]
Re: No charger
The stator leads themselves cannot break. “Preved” to the collectors.
15 Reply from golovash_87 2011-10-02 19:55:12
- golovash_87
- User
- Offline
- Registered: 2011-06-21
- Messages: 31
- Reputation: [ 0 | 0 ]
Re: No charger
Well, I don’t know whether it was not the conclusions themselves that broke, but after replacing this coil, everything fell into place. and charging goes on and the light does not light up. fortunately there was plenty to choose from. I already have a bucket of generators
16 Reply from vilatik 2011-10-03 03:40:57
- vilatik
- Vasochist
- Offline
- Registered: 2008-11-10
- Messages: 2,461
- Reputation: [ 8 | 0 ]
Re: No charger
I wanted to change the 55A for a 70 in my Ford, I even have one, but since there are no problems with the existing 55, I didn’t bother.
There is a principle - you don’t have to go there, which works well.
17 Reply from Cityman 2011-10-03 18:04:52
- Cityman
- User
- Offline
- Registered: 2009-01-19
- Messages: 954
- Reputation: [ 1 | 0 ]
Re: No charger
There is a principle - you don’t have to go there, which works well.
I thought from the point of view that “the pocket doesn’t have enough reserve,” but considering that there are no problems at all, even in cold weather, even in summer, and also that I might have to change the fastenings a little (the body diameter of the BOSCH N-1 (70A) is larger than for K-1 (55A) I wanted to redo the power output from the connector to the terminals, I decided not to bother.
18 Reply from Cityman 2012-04-25 18:57:58
- Cityman
- User
- Offline
- Registered: 2009-01-19
- Messages: 954
- Reputation: [ 1 | 0 ]
Re: No charger
I changed the diode bridge, charging started! The charging light was still not on. I licked the whole tidy, all the contacts are clean and fit tightly. There is no backlight.
I recently lost my car charger
Checking the battery charge
The easiest way to determine the lack of charging is using the car’s instruments, that is, the charging indicator lamp and the sensor (voltmeter) on the instrument panel. The sensor arrow should be in the green sector, and the battery lamp should not light up when the engine is running. Otherwise there is no charging.
But the best way is to check the voltage on the battery with a multimeter. When there is a charge, the voltage on it lies in the range of 13.6-14.2 V, and when there is no charge, it will only have its own voltage of 12 V (± 0.6 V). Under no circumstances remove the terminals from the battery to check to avoid damage to the RR, ECU and other electronic devices on your car.
To troubleshoot battery charging problems, you must use the following tools:
- control lamp 12 V;
- multimeter with a measuring range of up to 60 V AC and DC voltage;
- flat blade screwdriver;
- shaped screwdriver with a Phillips blade;
- pliers;
- knife;
- emery cloth.
The operating principle of the VAZ 2109 - 2114 generator.
In order to understand why on the VAZ 2109 - 2114 the generator gives little charge or does not charge at all, you need to understand how it works and know the principle of its operation.
The generator consists of five main parts shown in the figure below: armature - 5, stator - 6, relay-regulator paired with brushes - 10, diode bridge - 9, housing - 3.7.
The operating principle is as follows:
- a positive wire goes from the battery to the diode bridge (9) and the diode bridge (9) is connected to ground through the housing (3.7) of the generator
- voltage through the diode bridge (9) is supplied to the stator (6) of the generator and a magnetic field appears in the stator
- when the car starts, the engine, using a belt drive, turns the generator rotor (5)
- in the rotor (5), rotating in the magnetic field of the generator (6), a current appears
- The current is removed from the rotor by brushes (10) and through a relay-controller (10) is supplied to the car battery.
Failure to comply with any of the points leads to a malfunction of the VAZ 2109 - 2114 generator.
Reasons why the VAZ 2109 - 2114 generator does not charge.
To find the reason why the VAZ 2109 2114 generator does not work or does not charge well, you need to check for serviceability each of the points above that describe the operation of the generator.
Point one: the diode bridge does not receive positive voltage from the battery.
The cause of the malfunction in this case may be the wire itself or its connection to the diode bridge or battery. Try cleaning the connection terminals, and if that doesn’t help, test the wire.
Poor contact with the negative wire is not considered, since in this case the engine would not start at all.
Point two: diode bridge and generator stator.
If voltage comes to the diode bridge, but charging does not occur, then it should be checked for functionality. To find out how this is done, read the article “Checking the diode bridge of VAZ 2109 - 2114”.
After checking the diode bridge, if it is working properly, we ring the stator winding. To do this, select the continuity mode on the multimeter and apply the probes to the first and second contacts of the stator, and then to the first and third.
If there are no cliffs anywhere, we move on.
Point three: VAZ 2109 - 2114 alternator belt.
The carburetor version of the VAZ had a thin V-belt, and the injection models have a wide belt with cores, but this does not change the operating principle. Charging may not go well due to belt slippage. This malfunction is manifested by a strong belt whistle. The belt may also start to whistle when you turn on energy consumers such as headlights, heated glass, stove fan, etc. If you hear a belt whistle, try to replace it as soon as possible. This is one of the reasons why the VAZ 2109 -2114 generator does not charge well. The popular Bui casino is here and now.
Point four: generator armature VAZ 2109 -2114.
There should be no breaks in the armature, as well as in the stator. Test it by placing the multimeter probes on the brush tracks.
If the anchor does not ring, it should be replaced.
Point five: brushes with a relay-controller.
The brushes of the VAZ 2109 -2114 generator wear off over time on the armature tracks. If their length is less than 5 millimeters, then they are not able to press tightly against the anchor, thereby not charging the vase battery.
But it happens that the relay-regulator fails before the brushes are worn out. To check it you will need:
- 12 volt light bulb
- car battery
- two 1.5 volt batteries
- several wires
We connect the light bulb and battery to the relay regulator as shown in the figure below. In this case, the lamp should be on.
Now we add two batteries to the circuit, as in the figure below. The light should not be on now.
If the light comes on in both cases - the relay - the regulator needs to be changed.
Fault options.
The most common malfunction is that the charging indicator light does not go out. If the control lamp continues to burn brightly, then the voltage regulator is faulty or the wire from the control lamp to the generator is shorted to ground. If the control lamp continues to light, but not at full intensity, and lights up brighter as the speed increases, then there is a current leak through one of the additional diodes of the rectifier bridge. At the same time, the generator performs its function, charging the battery and powering consumers.
To check, you need to measure the voltage at the battery terminals with the headlights on high beam and rpm 1200 - 1500. If the voltage is more than 13.5V, then the generator is working and if the lamp burning at full intensity does not irritate, then you don’t have to do anything. Otherwise, you will have to change the diode bridge.
If the voltage is below normal, then disconnect the thin wire from the generator with the engine off and the ignition on. If the control lamp does not go out, then it is necessary to find and eliminate the wire short to ground. If the warning light goes out, then with the engine running, connect the free terminal to terminal 30 (a contact bolt with two thick wires). If charging appears, then eliminate the loss of voltage in the contacts from the control lamp to the generator.
If charging still does not appear, turn off the ignition and remove the brush assembly with voltage regulator from the generator, if the design of the generator allows it, or remove the generator completely and remove the regulator. Check the removed regulator using a test lamp and battery. How to do this is described in the article “Checking the voltage regulator.” If the regulator is working, then it is necessary to remove and repair the generator. The most common malfunction in this case is wear of the armature slip rings. It is also possible that the wire from the slip rings may break.
Could there be problems with the injector?
The injector performs a similar function as the generator. The main difference is in the method of fuel delivery: the injector injects liquid under pressure. This could be the problem: the fuel filters are clogged and not functioning.
The engine stopped starting due to a clogged fuel filter of the fuel pump, which may contribute to insufficient fuel supply - burnout of its coil. You need to replace the fuel filters and try charging again.