The on-board network and related electronic components and assemblies in VAZ cars have never been famous for their great reliability and workmanship. Quite often, electrical problems in cars arise due to a faulty alternator.
There are often situations when constant mechanical loads directly affect the mounting of the generator, which subsequently affects the operation of the unit and the condition of the on-board network of the machine. Other malfunctions associated with the generator usually arise due to premature wear of its elements (brushes, diode bridge, etc.), contamination, or due to improper installation and adjustment. In this article we will look in detail at the nuances that arise when installing electric generators on AvtoVAZ family cars and when setting them up.
Why is a generator needed?
It is needed to power the on-board network when the engine is running. When stopped, the entire network is powered by a battery. If you yourself replaced the VAZ-2108 generator or any other car, you saw that it has one power terminal. Several wires are connected to it:
- The thickest one connects the generator to the positive terminal of the battery. It is through this wire that the battery is charged. Please note that there are no fuses on it. Therefore, during any manipulations with the generator, it is necessary to de-energize the on-board network.
- A thin short wire going to the voltage regulator is necessary to power the excitation winding.
- It is rare, but it happens that additional equipment is connected to this output of the generator.
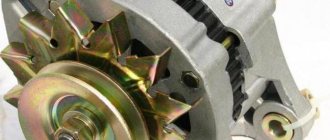
The cars use a rather old but proven design of the VAZ-2108 generator. The carburetor is used in the fuel injection system. On injection cars, fuel injectors and ignition coils are powered from the power output of the generator. All other consumers take power from the positive terminal of the battery.
Technical characteristics of generator 37.3701
— The magnitude of the delivered current (at 6000 rpm-1 and voltage 13 V) – 55 A
— Voltage value – 13.6 – 14.6 V
— The direction of rotation of the rotor is right
— Maximum rotor speed – 13000 rpm-1
— Gear ratio engine/generator 1/2.04
Car generator operation
But there is no magnet in the generator; its functions are performed by the excitation winding. The states can be briefly described as follows:
- When the engine is stopped and the ignition is turned off, all vehicle systems are de-energized and no voltage is supplied to the excitation winding.
- When you turn on the ignition, constant voltage is supplied to the regulator.
- The voltage regulator allows you to stabilize the value at the same level.
- Next, the current is transmitted through the brushes and slip rings to the rotor winding.
- A magnetic field appears, but it is stationary, so no voltage is generated at the power terminal. But it is there, since this terminal is electrically connected to the positive terminal of the battery.
- As soon as you start turning the crankshaft with the starter (or even by pushing the car), the alternator rotor rotates and current is produced.
After starting the engine, the generator takes on the main load of powering electricity consumers, while the battery is charged at this time.
Typical malfunctions and methods for their elimination
To prevent unit failure, it is necessary to ensure its high-quality and timely maintenance. As you can see from the photo of the diagram, the unit consists of many different components, so the likelihood of it breaking due to improper maintenance is quite high.
So, in what cases is a VAZ generator repaired:
- The indicator light on the dashboard does not turn on, although the unit and all equipment are working normally. Most likely, the problem is an open circuit or burnout of the indicator itself. In some cases, the reason is poor contact of the diode with the wiring; in this case, you only need to clean the contacts of the connection connector.
- The indicator on the tidy, as well as the instruments themselves on the control panel do not work. Apparently, the reason for this is the failure of the safety element, which will need to be replaced. Also, the reason may be a break or unsoldering of the wiring.
- The warning light comes on after the engine starts, but it disappears after the driver presses the gas. The essence of the problem lies in the fact that the generator unit is not excited at low engine speeds; in most cases, this is due to the desoldering of the resistor elements in the block. Conduct their diagnostics and, if necessary, solder them again.
- Another malfunction is that the indicator continues to light when the engine is turned on, while the voltmeter needle on the dashboard is in the red zone. In this case, there may be several reasons for the problem. First of all, it could be the strap slipping - you need to check it and, if necessary, tighten it. Also, the reason may be a short circuit or breakdown in the diode elements of the winding; much less often, a malfunction occurs when the voltage regulator fails.
- Another sign is that the indicator does not light up when the engine is running, but the voltmeter needle on the dashboard is in the red zone. In this case, you first need to diagnose the presence of contact between the regulator connector and the brushes. If the contact is normal, then check the brushes (they may freeze), as well as the slip rings; for the latter, the problem of oxidation is relevant. In addition, the cause of the problem may lie in the failure of the voltage regulator; usually we are talking about a break in the wiring between the contact and ground. The same symptoms appear in the event of a short circuit on the positive valves of the rectifier element.
- When the engine is running, the voltmeter needle is located in the red zone - this symptom indicates damage to the voltage regulator. In particular, we are talking about a short circuit that can occur between ground and also contact Ш. The problem can only be solved by replacing the regulator.
- If the unit is significantly louder than usual, there may be several reasons for this. First, you should check the functionality of the bearing elements, as well as the tightness of the pulley nut. In some cases, the loud operation of the unit is due to the creaking of the brushes. The brushes themselves may be of poor quality, but it is possible that the problem is dust getting on the slip rings.
Removing the generator on the “eight”
To dismantle the unit for replacement or repair, you will need “17” keys and a mounting blade. Before starting work, be sure to generously treat all threaded connections to facilitate dismantling. The procedure looks like this:
- Disconnect the negative terminal from the battery.
- Unscrew the top nut securing the generator housing to the bracket.
- Unscrew the nut on the lower mounting bolt.
- Slide the generator housing towards the engine block and remove the belt.
- Unscrew the nut from the power contact and move the wires to the side.
- Remove the lower mounting bolt.
After all these manipulations, you can completely dismantle the unit. This can be done either from below, if protection is not installed on the car, or from above.
Bearing replacement
VAZ 2109 generator bearing front and rear
If the bearing knocks, makes noise or makes any other sounds while the engine is running, it should be replaced. Moreover, such a knock can signal not only faulty bearings. In some cases, the rollers may break. To check this, remove the alternator belt. Turn on the engine. If the knocking noise remains, then the problem is in the rollers, but if it disappears, you need to change the bearings. This is done like this:
Note: If the knocking noise disappears after this, this does not mean that the problem is solved. We need to continue replacing the bearings.
Brand of generator bearings VAZ 2109
Note: the bottom, not the top, since the generator will subsequently be removed through the bottom.
Note: to make further actions easier, you should remove the rotor from the bearing, and then hold the ears of the front cover with your hands. You should hit the nut on the piece of wood.
Brand of generator bearings for VAZ 2109
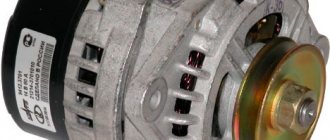
Generator Modifications
On newer VAZ-2109, 21099, 2110 cars, modifications of generators with the designation 94.3701 were installed. Their power is much higher than those used on eights. But the dimensions of the VAZ-2108 generator are the same as those of more modern ones installed on dozens. Therefore, they are interchangeable, but have different characteristics. Here are the differences:
- The current strength of 94.3701 is 80 A, which is 25 A higher than that of the figure-eight unit.
- The voltage adjustment range on the 94.3701 generator is larger.
- The gear ratio between the generator rotor and the engine crankshaft is higher.
Installing a new unit is advisable if a larger capacity battery is used, and in the system of electricity consumers there are a lot of those that have greater power. And if you use standard electric cars, the battery will be discharged and will not have enough current.
Diagnostics
Before you begin replacing the bearing, you should check its operation and other parts of the generator for wear or damage.
Checking the rear bearing
Replacing a bearing in a VAZ 2109 generator
To check if the rear bearing is working correctly, you should:
Note: The bearing should not seize during this time. Otherwise it will have to be replaced.
Checking the front bearing
Replacing bearings for a VAZ 2109 generator
It's done a little differently:
Note: if the bearing or its cover jams, it must be urgently replaced.
Checking the generator cover
Replacing bearings on a VAZ 2109 generator
In order to check the generator cover, you must:
Read also: Ideal equalizer settings in a car Usually the bearing is rolled into the cover. Therefore, replacing it also means replacing the cover itself. However, the cost of the cover is quite high, so some people prefer to remove the bearing and then repair or replace it.
The practical part is removing the generator, disassembling it, repairing it and reinstalling it.
Due to the fact that the generator is located under the hood of the car, it is necessary to turn off the engine, turn the steering wheel to the right all the way and open the hood. The electric generator on VAZ 2108 - 15 cars is installed in front of the engine, in the lower left corner of the engine compartment, between the engine and the cooling radiator.
Before dismantling the generator, it is necessary to disconnect the ground from the battery, i.e. negative contact.
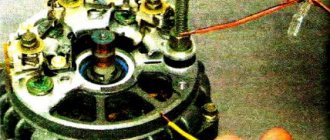
Replacing VAZ generator brushes
Before removing the generator itself, in order not to do unnecessary work, we remove the charging relay from the generator housing and check the production of the generator brushes. The charging relay is installed in the rear of the generator housing, and is attached to it with two bolts. To unscrew them you will need a Phillips screwdriver. When unscrewing the bolts, be careful not to drop them on the crankcase guard, otherwise getting them out of there will be one big problem.
To remove the relay, you need to disconnect the wire, the “female” contact. After removing the charging relay and visually inspecting the brushes, we decide to purchase a new generator voltage regulator relay or reinstall the dismantled one, depending on the wear of the brushes. For their normal operation, a brush length of at least 4 cm is required. Now we proceed directly to removing the electric generator from the engine.
- We disconnect the wires from the generator - as a rule, they are red and consist of two groups of wires, red. One group consists of two wires and is attached with a nut to a bolt on the rear wall of the generator. The other group consists of one wire and is connected to the generator terminal via a male-female contact, also on the rear wall of the generator.
- To remove the generator from the engine, you need to unscrew two nuts and one bolt in the following sequence: unscrew the nut attached to the generator belt tensioner bar (at the top of the generator), unscrew the bolt securing the tensioner bar to the engine block and remove it. The last step is to unscrew the nut from the bolt securing the generator bracket to the engine block.
- The generator mounting bracket is located at the bottom of the engine block, directly below the generator. After unscrewing this nut, you need to remove the generator belt from the generator pulley itself.
- The generator mounting bolt should be pushed to the left, out of the bracket, until it stops against the body shell or the generator’s mud protection.
- On the right wheel side, you need to unscrew the two screws that secure the dust protection of the generator to the car body.
- If the generator mounting bolt still rests against any body parts, you should press on the engine with one hand, and at the same time pull out the bolt with the other hand.
Now your generator is completely disconnected from the engine, and you can begin to disassemble and repair it.
Removing the generator pulley
To do this, we stop it from turning with a screwdriver and unscrew the nut securing it with a 19 mm spanner. The tightening torque is large, so it is better to use a wrench with a long handle.
Removing generator pulley 37.3701 for VAZ 2108, 2109, 21099 cars
Then we remove the following parts: nut, washer, pulley with impeller, segment key.
Separate the halves of the generator housing
First, we mark their relative positions (by placing marks on both parts). Using a 10 mm wrench (it’s more convenient to use a socket or socket wrench), unscrew the four nuts of the coupling bolts (there are engraving washers under the nuts).
Pull out the bolts. Remove the front part of the generator. Remove the rotor from the back of the generator. If it cannot be removed, you can tap it with a soft metal drift through the window under the voltage regulator, or by screwing a nut onto the thread of the shaft and holding it in a vice, with a sharp upward movement, pull the back cover into the shaft. The bearing remains on the rotor shaft. If necessary, we dismantle it with a puller and press on a new one (See “Replacing generator bearings”).
Disconnect the stator
Using an 8 mm wrench (it’s more convenient to use a socket or socket wrench), unscrew the three nuts securing the stator terminals to the diode bridge. We remove it from the back cover of the generator by prying it with a slotted screwdriver or hitting it with a hammer.
When is it time to repair a generator?
1. Any instrument cluster has a battery charge indicator (indicated by a red arrow, using the example of an instrument cluster from a high panel). When the generator stops supplying charge to the battery, this indicator lights up. When the ignition is turned on, it should light up, but when the car starts, it must go out. Otherwise, the generator does not produce current and needs to be inspected. It happens that the battery runs out quickly, and the indicator lamp does not light up at all. In fact, you can’t trust it 100%; sometimes the generator produces a very weak current, insufficient for a light bulb. This situation leads to the fact that literally in 1 week the battery is completely drained and you have to put it on charge. We recommend periodically checking a working battery.
2. You will need a multi-meter with the voltmeter function enabled. Measure the readings given by the generator to the battery (the procedure is demonstrated in detail in the video below). After you start the car, the voltage at the terminal will most likely be about 12-13 Volts and will gradually increase. Don't have a voltmeter? There is an alternative way to check, but it causes damage to the diode bridge (we do not recommend using this method on fuel-injected cars; it is better to stock up on a multi-meter):
- start the engine and let it run for approximately 2 minutes;
- apply gas and pull out the choke so that the engine reaches about 2 thousand revolutions;
- Disconnect the negative terminal from the battery.
If the car works, everything is fine with the generator, put the terminal back. The car stalled - the generator has become unusable and needs to be replaced or repaired. But! It happens that the generator gives a charge, but it is too weak (around 12 Volts), which is why the battery quickly runs out (the car will not stall after removing the terminal from the battery, so this method does not always work).
How to remove the charger
Replacing the generator drive belt 37.3701 for VAZ 2108, 2109, 21099 cars
The generator for the ninth Zhiguli model is designed for alternating current and is three-phase with a built-in rectifier. The device is electronic, rotating clockwise. If you know how to check a current-generating device, you can save on car service costs. You can diagnose the charger using simple electrical measuring instruments (ammeter, voltmeter). A broken VAZ 2109 generator bearing can be identified by the sound it makes or by inspection.
In order to replace or repair damaged parts, the electrical current-generating device must be dismantled.
To do this, the car is driven onto an overpass or pit. Dismantling is carried out according to the following algorithm:
- the car is de-energized by disconnecting the battery terminals;
- then remove the rubber cap, which protects the negative terminal of the mechanism from moisture and dirt particles;
- then unscrew the fastening nut and remove the conductors from the stud;
- then disconnect the block with the wires on it from the generator connector;
- now you need to loosen the tightening of the generator fastening to the bar, which regulates its position relative to the vertical axis;
- it is necessary to lift the device to be dismantled to the highest point and remove the generator belt from the pulley;
- at the penultimate stage of dismantling the part, the bolt is unscrewed, with which the adjusting bar is attached to the cylinders;
- now two bolts are unscrewed from the bottom of the car, with the help of which the lower bracket is attached to the cylinder block;
- the mechanism can then be removed from under the hood.
The number of steps required to remove the generator is small, and dismantling can be done with your own hands. Upon completion of the repair work, you should check the condition of the belt and tighten it onto the generator pulley. The pulley size must exactly match the belt.
Technical characteristics and connection diagram of generators
Main technical characteristics of VAZ-2109 generators:
- the highest output current at 13V is 55 A for the 37.3701 generator and 80 A for the 94.3701,
- maximum adjustable voltage - 13.6-14.6 V and 13.2-14.7 V,
- the engine-generator gear ratio is 1:2.04 and 1:2.4, respectively.
Different generator models also have differences in the size of the slip rings. In modification 94.3701, the rings have a smaller diameter. This allows you to extend the life of the device.
Connecting the VAZ-2109 generator depends on the device model. When you turn the ignition key, voltage is connected through the indicator light on the dashboard and resistors. When the engine is running, voltage is supplied to the field winding from the valves on the rectifier block. The control lamp does not light up because no current passes through it. The main voltage is supplied to the regulator output. Since 1996, changes have been made to the design of the 37.3701 generator: the voltage regulator was placed in a metal case and connected to the brush holder.
The VAZ-2109 94.3701 generator is connected according to a similar scheme. After turning on the ignition, voltage is supplied to the regulator output through the control lamp. If the device is working properly, the lamp lights up when you turn the key, and immediately goes out after the engine starts. If the signal stays on longer than expected, the generator may malfunction.
Attention!
Regardless of the model of the VAZ 2109 generator, you must always remember one important rule: the minus of the battery must always be connected to ground, and the plus to the generator terminal. If connected incorrectly, increased voltage will be caused through the valves and they will be damaged.
It is also prohibited to turn on the generator without a battery, as this will cause a short-term overvoltage at the generator output, which will damage the regulator and, as a consequence, cause malfunctions of electronic devices in the vehicle network.
How to remove the generator on a VAZ 2108 yourself step by step instructions
In order to remove the VAZ 2108 generator with your own hands, you must perform the following procedure:
- In order to easily remove the VAZ 2108 generator, it is necessary to remove the engine protection.
- During the dismantling process, the VAZ generator must be removed together with the bracket, since its fastening bolt will be impossible to pull out due to the position of the body side member.
- Now disconnect all electrical terminals from the generator
- Then you need to loosen the adjusting nut and the generator mounting nut from below.
- Move the generator forward and remove the loose belt
- Unscrew the bolt and remove the adjusting bar
- We find it at the bottom of the engine compartment (shown in the photo) and unscrew the two bolts securing the bracket.
- Then, carefully pushing down, remove the VAZ 2108 generator
- After repairing or purchasing a new generator, we install it in the reverse order, taking into account the fact that the long bolt securing the bracket should be closer to the generator drive.
- After completing the installation of the VAZ 2108 generator, tension the drive belt
How to install and connect a VAZ 2108 generator - step-by-step instructions
Installation of a new generator is carried out in the reverse order. Take a close look at the condition of the bottom bolt. If there is damage to the threads, it is better to replace it.
It will be easier for you to repair the generator later. When installing, pay special attention to belt tension. If it is not tensioned enough, your battery will not charge well. But if you tighten the belt too much, the bearing in the front cover will be destroyed. As a result, you will get an unpleasant whistle when the engine is running. And the reason for this is the appearance of play in the bearing.
The installation of the generator on the VAZ 2108 must be carried out in such a way that even the slightest distortion does not occur.
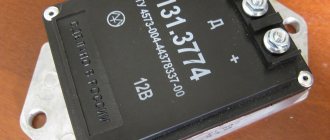
How to check the generator voltage regulator with a multimeter
What kind of generator is installed on a Prior with air conditioning?
In order to ensure the normal operation of light bulbs, power windows, windshield wipers and other electrical equipment, as well as charging the battery, you need to maintain a DC value of 13.5-14.5 volts. If this figure is less, the battery will not charge, and if it exceeds this level, the on-board electrical appliances will fail. High voltage also causes some damage to the battery, shortening its service life due to overcharging.
Therefore, to convert the current generated by the generator, there is a special device - a relay-voltage regulator. With its help, the on-board network is provided with a current that maintains the required parameters, regardless of the crankshaft speed. Situations often arise when it becomes necessary to check the generator voltage with a multimeter.
Modern relays are electronic, and their design is non-separable. If they fail, they cannot be adjusted or repaired, but require complete replacement. This is considered the only drawback of these devices, since otherwise the relays have a lot of advantages: compactness, durability, high accuracy of current parameters.
When can the voltage regulator be considered faulty?
- The headlights change brightness depending on engine speed.
- There is an insufficient charge of the battery or, conversely, its overcharging, accompanied by boiling off of the electrolyte.
- There may be a burning smell inside the car. Failure of the regulator can occur due to moisture, various mechanical damage, short circuit and other non-standard short-term electrical influences.
- Sometimes the regulator is initially of poor quality if it is a dubious product from unknown manufacturers.
There are different methods for checking the generator relay-regulator with a multimeter and establishing its functionality. The easiest way is to check with a multimeter, without dismantling the device. For this purpose, the voltage supplied to the battery to charge it is measured. For such a check, you will need an assistant to regulate engine speed with the accelerator pedal.
The verification procedure takes place in several stages:
- The car engine starts and warms up within 5 minutes.
- Open the hood while the engine is running and connect the multimeter contacts to the battery terminals. The connection must be made with correct polarity, and the switch must be set to 20 V.
- The assessment of the charging voltage coming from the generator is carried out under certain conditions. You need to check how much the generator produces with a multimeter. The low beam should be on, and all other consumers should be off. The crankshaft rotates at a speed of 1.5 to 2.5 thousand rpm. If the voltage is more than 14.8 volts, then the regulator is considered faulty and must be replaced. If the voltage is below 13.5 V, the cause of the malfunction may not be only the relay. The fault may be in the wiring or the generator itself.
- More accurate results are obtained by estimating the intensity of the current supplied by the load. This will require turning on the high beams, heater fan, windshield wiper and other consumers. In such a situation, the charging current should not be below 13.5 volts. If the indicator is still less than this value, then when all electrical equipment is turned on, the battery will not receive normal charging.
A more complete check is performed on the removed relay-regulator. Typically the electronic device sits on top of the generator, covered with a plastic cover. In some cases, the regulator may form a single unit with the brushes. To check, in addition to a multimeter, you need to prepare a 12 V test lamp with a power of no more than 3 watts and an adjustable current source. These methods are also suitable for checking the generator integral with a multimeter, that is, the integral voltage regulator.
Generator set price for VAZ 21099, VAZ 2109, VAZ 2108
| Catalog item | Serial number | Price | |
| A2110-80A (original) | BOSCH (9501.3801) (original) | From 3000 – 3200 | |
| 9501.3801 | FINWHALE 687-04 | 62022 / 180545 | From 3000 – 3200 |
| 9568.3749 | 922.3801 | SKL622RS | From 3000 – 3200 |
| 3701010 (HORT) | 3701024 | Contitech | From 3000 – 3200 |
| 3701971 | 3701953 | Electro 3701747 | From 3000 – 3200 |
| *prices are as of August 2022 |
The principle of operation of the power supply VAZ 21099, VAZ 2109, VAZ 2108
There are 6 coils mounted inside the generator set, the material is copper, the connection is star-shaped. The stator is a stationary structure, and the rotor rotates inside the stator. Magnetic brushes are pressed into the back of the rotor axis, and the excitation winding is wound and sealed.
After the key is turned in the ignition switch, the current from the battery creates a magnetic field, passing through the graphite brushes and copper winding. Alternating current is converted to direct current.
On the front side of the IP there are two power outputs with polarity “+” and “-”. Terminals with the appropriate polarity are connected to the battery.
To turn the generator set you will need a battery. After the battery has accumulated the spent amount of energy, the generator distributes the excess to other power sources. Thus, the size of the on-board network is maintained within an acceptable range.
Removing the electric generator from the car
Before removing, disconnect the ground from the battery, i.e. remove the negative terminal. Then we proceed in order:
- Before removing the entire electric generator, in order to avoid unnecessary work, let's start with the charging relay, remove it from the generator body to visually determine the wear of its brushes
- The charging relay is located at the rear of its housing, and is attached to the unit with two bolts
- To unscrew them we need a Phillips screwdriver.
- Unscrew the bolts carefully so as not to drop them, otherwise they will fall behind the housing protection, then getting them out will be a big problem
- To finally remove the relay, you need to disconnect the wire with the “female” contact.
Reasons for failure of the control unit on VAZ 21099, VAZ 2109, VAZ 2108
- Loose drive belt fixation;
- contamination of contacts;
- damage to rectifiers;
- brush wear;
- brushes sticking;
- short circuit;
- power supply interruption;
- The regulator does not work;
- bearing wear;
- pulley wedge;
- The fan is damaged.
Technical specifications 37.3701
| Maximum output current at 13 V and 5000 min-1, A | 55 |
| Adjustable voltage limits, V | 14,1+0,5 |
| Maximum rotor speed, min-1 | 13000 |
| Engine/generator ratio | 1:2,04 |
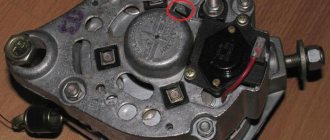
What does generator 37.3701 consist of: 1 – capacitor; 2 – voltage regulator assembled with brush holder; 3 – terminal block for additional diodes; 4 – insulating bushings; 5 – rectifier block; 6 – contact bolt; 7 – stator; 8 – rotor; 9 – spacer sleeve; 10 – inner bearing mounting washer; 11 – drive side cover; 12 – pulley; 13 – outer bearing mounting washer; 14 – coupling bolt; 15 – front rotor ball bearing; 16 – bushing; 17 – cover from the side of the slip rings; 18 – buffer sleeve; 19 – clamping sleeve.
But there are also some differences here. So in the first series, the VAZ 2109 generator device consists of a large number of different components:
- bushings,
- capacitor components,
- stator mechanisms,
- rotor windings,
- pulley,
- rear bearing of the rotor shaft,
- rear cover of the unit,
- fixing bolt,
A more complex design is the second series, which has many more of the above parts:
- bushing,
- brush assembly holder,
- capacitor device,
- shaft,
- coupling bolt,
- cone washer,
- fixing device for positive diode elements of the rectifying mechanism,
- fixing negative diodes and the like.
The range of the first model is often approximately 120 thousand km, but the second one is a little more, and all thanks to the slip rings, which have a smaller diameter. It all depends on the technical characteristics. As well as proper switching on of the electric generator.
Since each brand of this device is different:
Generator 37.3701: 1 – cover on the side of the slip rings; 2 – rectifier block; 3 – rectifier block valve; 4 – screw for fastening the rectifier unit; 5 – contact ring; 6 – rear ball bearing; 7 – capacitor; 8 – rotor shaft; 9 – output “30” of the generator; 10 – output “61” of the generator; 11 – voltage regulator; 12 – terminal “B” of the voltage regulator; 13 – brush; 14 – stud securing the generator to the tension bar; 15 – pulley with fan; 16 – rotor pole piece; 17 – spacer sleeve; 18 – front ball bearing; 19 – drive side cover; 20 – rotor winding; 21 – stator; 22 – stator winding; 23 – rotor pole piece; 24 – buffer sleeve; 25 – bushing; 26 – clamping sleeve.
When using 37.3701 , when turning the ignition key, voltage is connected through a special light bulb on the instrument panel, as well as resistors. When the internal combustion engine is started, the voltage goes to the excitation winding of the motors located on the rectifier block (the main voltage goes to the output of the regulator, the current does not pass through a special light bulb, as a result it does not light up).
Generator 94.3701: 1 – casing; 2 – output “B+” for connecting consumers; 3 – noise suppression capacitor 2.2 μF; 4 – common terminal of additional diodes (connected to the “D+” terminal of the voltage regulator); 5 – holder of positive diodes of the rectifier unit; 6 – holder of negative diodes of the rectifier unit; 7 – stator winding terminals; 8 – voltage regulator; 9 – brush holder; 10 – back cover; 11 – front cover; 12 – stator core; 13 – stator winding; 14 – spacer ring; 15 – washer; 16 – conical washer; 17 – pulley; 18 – nut; 19 – rotor shaft; 20 – front rotor shaft bearing; 21 – beak-shaped pole pieces of the rotor; 22 – rotor winding; 23 – bushing; 24 – tension screw; 25 – rear rotor bearing; 26 – bearing sleeve; 27 – slip rings; 28 – negative diode; 29 – positive diode; 30 – additional diode; 31 – pin “D” (common pin of additional diodes)
When using 94.3701 , approximately the same thing happens (as soon as the ignition is turned on, the voltage goes through a special light bulb to the regulator output).
It is important to constantly pay attention to ensure that everything is working properly. So the light bulb should light up immediately when you turn the key. And as soon as the internal combustion engine is started, it will turn off instantly. But if it does not immediately stop working, then the generator is faulty.
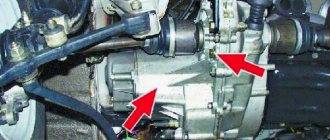
Where is the generator on the VAZ 2109
Many car enthusiasts do not know where the generator is located on the VAZ 2109, so in this section you will find information where the generator is located, see the photo
Where is the generator on the VAZ 2109
Checking for serviceability
Repair of the VAZ 2109 or VAZ 21099 generator is carried out in case of failures in the operation of the unit. There are several ways to determine generator malfunctions. The most optimal of these is diagnostics using a multimeter, but you will also need an assistant to carry it out. We will tell you further about how to check the generator on a VAZ 21099 or 2109 using a tester.
So, to determine generator faults with a multimeter, follow these steps:
- First of all, it is necessary to diagnose the VAZ voltage regulator. As practice shows, if the generator on a VAZ 2109 or VAZ 21099 does not work correctly, the problem may lie in the functionality of the three-level voltage regulator. This is especially facilitated by overvoltage in the electrical circuit. To check, you need to set the voltage measurement mode on the tester. So, start the engine and measure the voltage at the battery terminals or at the terminals of the generator unit itself. If everything is normal, then this parameter will fluctuate around 14-14.2 volts. Then press the gas and check the parameter again - it should increase, but no more than 0.5 volts. If the indicators on a VAZ 2109 carburetor or VAZ 21099 injector are different, this indicates that the element is not functioning correctly. Most likely, the VAZ 2109 voltage relay will have to be replaced.
- Next, the diode bridge of the generator is diagnosed. The bridge itself consists of six elements, three of which are considered positive and the remaining three are considered negative. Some diodes have mass at the anode, and the other part at the cathode. To check the diode bridge of the VAZ generator, the tester is switched to sound mode, that is, when the probe outputs are shorted, you can hear a characteristic sound. You are required to test each diode in different directions, and the sound should be heard in only one of them. If during testing the sound is heard in both directions, this indicates that the diode is broken. The best option would be to replace the diode bridge.
- Before disassembling the unit and repairing it, check the functionality of the stator; it is a steel cylinder, inside of which the winding of the mechanism is located. For diagnostics, you need to disconnect the stator leads from the diode bridge. First, inspect the element visually - there should be no signs of damage or burning. The multimeter is set to resistance measurement mode. First, measure the resistance parameter between the winding terminal and the housing (any terminal can be used). The obtained indicators should be high and tend to infinity. If the readings are 50 kOhm, this indicates the need to replace the generator.
- Using a multimeter, you can also check the performance of the rotor - it is a steel rod with a wound winding. At one end of the rod there are rings through which the brushes of the VAZ generator pass. You need to dismantle the rotor and visually inspect the condition of the generator winding and bearing. The integrity of the winding can be checked using a multimeter, after which the resistance parameter between the rings is measured. The results obtained should be no more than a few ohms. Replacing the VAZ 2109 generator brushes is required if they are worn out.
Node diagnostics with a tester
Let's sum it up
Taking into account the above information, it becomes clear that timely noticed and identified breakdowns can not only avoid problems during vehicle operation, but also often increase the service life of the generator.
It is also important, when identifying problems, to carry out all repair work on the automobile alternator efficiently. At the same time, it is important to implement the correct connection during reassembly, which guarantees the full functionality of the repaired or replaced device.
Sources
- https://les74.ru/connecting-generator-vaz-2108-we-connect-and-repair-the-generator-at-the-eight-in-the-home.html
- https://twokarburators.ru/tehnicheskie-harakteristiki-generatorov-2108-2109/
- https://electro-shema.ru/auto-moto/remont-generatora-vaz-2108-2109-21099.html
- https://twokarburators.ru/polnaya-razborka-generator-37-3701/
- https://Vaz-Russia.com/remont-vaz-2108/remont-generatora-na-vaz-2108-vaz-2109-vaz-21099.html
- https://www.tdbate.ru/podkl-generatora-vaz2109.htm
- https://remont-inomarki.ru/generator-vaz-2108.html
- https://zapchasti.expert/generator/generator-vaz-21099-2109-2108.html
- https://provaz2109.ru/elektrika-i-datchiki/generator-vaz-2109-remont-zamena-ustrojstvo.html
- https://KrutiMotor.ru/generator-vaz-2109-ustrojstvo-neispravnosti-remont/