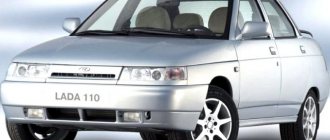
Every modern car is equipped with a cigarette lighter. Most drivers do not use it for its intended purpose, but as a 12-volt outlet for connecting electronic devices. Among the most common:
- inflater;
- fan;
- additional charging for mobile phones or laptops;
- connecting a portable light bulb;
- GPS navigator;
- DVR.
Over time, the cigarette lighter may burn out. One of the most common breakdowns is burnout of the protective element. To properly repair the cigarette lighter, you need to know where the VAZ 2110 mounting block is located and which fuse is responsible for what. Below is basic information on this matter.
Where is the fuse box
A separate section of the chain is protected by a special element.
The current strength is calculated for certain values. Due to a short circuit in the cigarette lighter, this parameter may be outside the acceptable range. To prevent wire melting or fire, a thin metal bridge in the fuse blows. Therefore, replacement with a working element is required. Evidence that the fuse on the VAZ has blown will be the failure of not only the cigarette lighter, but also additional devices. This element is part of the circuit going to the stove, radio and glove compartment lamp. If all these devices fail, you should get to the mounting block and replace them.
The central locking does not work: signs of malfunction and causes of their occurrence
It happens that when the central lock located on the driver's door is closed, no action occurs on the other doors. However, as soon as you move it a little, the doors immediately closed. It is immediately clear that the problem here is the presence of malfunctions in the central locking and several reasons contribute to this.
Among all the possible causes of malfunctions, all the most basic ones can be identified.
No contact in the drive
With such a malfunction, the contacts inside the control drive do not close the necessary contacts in time. This happens for several reasons:
- The adjustment of the rod that connects the lock button and the drive is done incorrectly. This reason contributes to the incorrect position of the rod and lack of contact with the electric drive.
- The button touches part of the casing and does not allow it to lower to the required depth to ensure contact of the traction with the electric drive.
Despite the fact that the driver's door closes, no signal comes to the other doors. Check the condition of the metal rod.
When such problems occur in the operation of the central locking, first of all you need to make sure that the button is lowered to the very end. If for some reason this does not happen, first inspect the casing for burrs, and then inspect the rod for its even and accurate position.
Fuse blown
If manipulations with the central locking rod do not bring any results, and they do not react in any way to either opening or locking, then first of all you need to check its electrical circuit, and specifically the fuse. Because on the central lock it can fail not only if a short circuit occurs in the circuit, but also if the slightest overload occurs.
The central locking fuse is indicated by a marker.
Overload occurs most often from insufficient position of the rods, as well as lubrication in them during winter operation of the car.
The central locking wires are broken
Broken wires are not the main reason, but one of the reasons for the failure of the central locking system. The main reason for this is the break in the wires in those places where they bear the greatest load. Such a place is definitely the passage of the corrugation from the side of the pillar and the driver's door. And since it is the driver’s door that is most often opened in any car, it receives most of the load.
- It is quite easy to identify such a malfunction; you just need to release one of the ends of the corrugation through which the wires pass into the door and pull one of the five central locking wires. As a rule, they are connected into one bundle, or go next to each other.
- After carrying out such manipulations, a wire that is torn or broken will easily give in among the general heap.
- If you are absolutely sure that a particular circuit is faulty, replacing it will not be difficult by inserting the required wire and further insulating it with electrical tape.
- When the wires are broken or torn in other places, the fault can only be found by testing the circuit with a multimeter.
Block burned out
Another reason why the central lock may fail is a burnout of the central locking unit. And in order to diagnose it, you need to use the above-mentioned multimeter and determine the presence of voltage at the contacts of the block.
This is what the immobilizer and central locking unit look like behind the instrument panel.
Please note that during diagnostics it is necessary to operate the lock in the driver's door so that impulses are sent from it to the main unit.
The central locking activator is faulty
And the last reason why the central locking refuses to work is the failure of the activator on the central drive. It can fail both for mechanical reasons, due to wear of rubbing parts, and due to the influence of external factors of moisture and corrosion.
If the activator itself breaks down, it is necessary to replace the electric drive with a new one and replace it. Pay attention to the fact that the drive must have five wires of different colors.
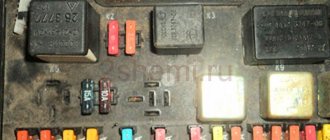
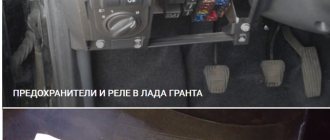
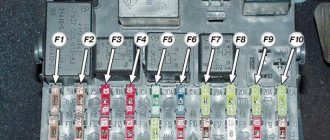
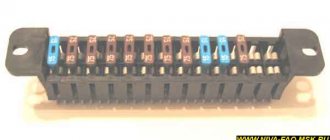
Location of fuses on the diagram for VAZ 2110, 2112
The mounting block is installed in the front panel, to the left of the steering wheel. It’s easy to get there – just press the corresponding button (see photo). On the back cover there is a diagram of the location of the fuses. Each of them protects a separate device or section of the circuit.
| Number, F | Current indicator, ampere | Purpose |
| 1 | 5 | Illumination of license plate, tidy, trunk and dimensions lamps |
| 2 | 7,5 | Low beam left headlight |
| 3 | 10 | High beam left |
| 4 | 10 | Right fog light |
| 5 | 30 | Electric window drive |
| 6 | 15 | portable lamp |
| 7 | 20 | Cooling fan motors, horn |
| 8 | 20 | Rear window heating elements |
| 9 | 20 | Recirculation valve, windshield and headlight washer |
| 10 | 20 | Backup fuse |
| 11 | 5 | Right clearance |
| 12 | 10 | Low beam right headlight |
| 13 | 10 | High beam right headlight |
| 14 | 10 | Left fog light |
| 15 | 20 | Electrically heated front passenger and driver seats |
| 16 | 10 | Right-left turn signals, emergency lights |
| 17 | 7,5 | Interior lamp, brake lights, button illumination and trip computer |
| 18 | 25 | Fuse for illumination of the glove box, radio, interior heater and cigarette lighter of VAZ 2112 |
| 19 | 10 | Locking door locks, panel warning lamps indicating faulty brake lights or parking lights |
| 20 | 7,5 | Taillight fog lights |
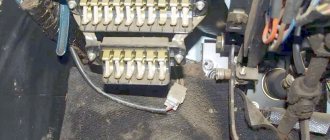
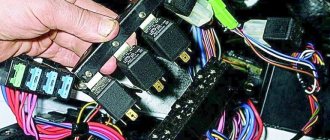
There is an additional block with the main relays. Its location is in line with the injector, behind the right decorative panel, near the passenger’s feet. To get to it, you need to unscrew the three fastening screws. There are six fuses located here (see photo), each of which performs its own function.
- Operation of the ignition system software controller.
- Regulator for air flow meter, speedometer drive.
- Fuel injectors.
- Radiator cooling fan.
- Gasoline pump.
- Ignition system.
Engine Control Relay Box
Below the main and additional fuse blocks there is a relay block for the engine management system, which consists of five relays and one fuse:
| №1 | Ignition relay |
| №2 | Main relay |
| №3 | Right cooling fan relay |
| №4 | Left cooling fan relay |
| №5 | Fuel pump relay (fuel) |
| №6 | Fuel pump fuse F5, 15A |
On some vehicle versions, a starter relay may be located under the additional unit next to the ignition relay.
Cigarette lighter connection diagram for VAZ 2110
The device on the VAZ consists of two parts: a connector for connection and a metal part. Inside the last one in the cigarette lighter there is a thin spiral. After pressing the button, the circuit closes and begins to pass current, and then the spiral heats up. When the maximum temperature is reached, a relay is activated, which gives the command to snap the cigarette lighter into its original position.
When operating the device, you must follow the following rules:
- do not connect several powerful devices at the same time (via a splitter), otherwise the fuse may burn out;
- do not install a protective element designed for a higher current strength than that recommended by the manufacturer;
- Do not allow the socket to become loose or make poor contact with the cartridge - this may lead to a short circuit.
There are three wires to the cigarette lighter of VAZ 2110, 2112.
- Main plus (red). Comes to the battery through a fuse. The element responsible for heating the internal coil.
- Constant plus (yellow). Connected to a light filter. Responsible for the correct operation of the backlight.
- Constant minus (black). A mass with one end coming to the body of the device, and the other to the body of the car.
There are also several cables coming out. Among them:
- wire to the instrument panel light control;
- wire to the glove box lamp.
Engine control system fuses
It is located on the left side of the body, under the instrument panel, next to the diagnostic block. Consists of four fuses:
| F1 (30A) | Right electric fan relay contacts |
| F2 (30A) | Left electric fan relay contacts |
| F3 (15A) | Relay windings of the right and left electric fans, controller, injectors, ignition coil |
| F4 (15A) | Heating elements for control and diagnostic oxygen concentration sensors, phase sensor, mass air flow sensor, canister purge valve |
Fuse blown
Sometimes the device does not need to be replaced. It is enough to change the fuse located inside the device itself. The procedure is carried out as follows.
- Open the hood and remove the negative terminal from the battery. You can also remove the fuse from the mounting block that is responsible for the cigarette lighter of the VAZ 2110.
- We unscrew the four fasteners of the tunnel covering and remove both parts of the lining.
- Disconnect the three-pin plug going to the cigarette lighter.
- Remove the lining under the handbrake lever.
- Remove the gearshift lever cover.
- We move the seats back, and then unscrew the three fastenings of the upper part of the tunnel and remove it.
- Pull out the cartridge.
- Use a flat-head screwdriver to pry the cigarette lighter latch so that it comes out of the seat.
- We remove the nest from the cladding for subsequent repairs.
Inside the cigarette lighter is a miniature mica plate. It is a semiconductor that sometimes breaks and melts. It needs to be removed. After this, it is worth assembling the unit and then checking the functionality of the device.
Location
The relay and fuse mounting block is located on the left side of the steering column in the instrument panel.
Types of mounting blocks
Block 2110-3722010
Block 2110-3722010-01
Block 2110-3722010-08
Replacing the fuse
One of the most common causes of breakdown is failure of the protective element. A clue that the fuse for the cigarette lighter has blown will be a non-working VAZ 2110 stove or a faulty glove compartment illumination lamp. To carry out repairs, it is necessary to replace the blown fuse in the mounting block.
To get to the box, press the button in the front panel to the left of the steering wheel. The fuse to be checked is number F18, rated for a current of 25 amperes. It is convenient to use tweezers for replacement.
A fuse of the recommended rating should be installed. Otherwise, there is a high risk of insulation melting, short circuit, and fire. After repair, you cannot connect powerful devices to the cigarette lighter socket. The maximum power is 300 watts. Calculated using the formula P=I*A, where I is the network voltage (12 volts), and A is the amperage (25 amperes).
Mounting blocks for Lada 4×4 2022
Turn signal relay
(part number 8450082700, 9-pin), as well as the windshield wiper relay, are located under the trim in the driver’s feet, to the left of the fuse mounting block. Also, the turn signal relay can be located behind the instrument cluster, or under the center console closer to the left side.
Attention!
The relay and fuse diagram may differ depending on the configuration and production date of the vehicle. Current diagrams of the mounting block are presented in the operating manual for the date of manufacture of the car (download from the official website for 3-door or 5-door).
Why does a fuse or light relay or any other constantly blow out? Before replacing it with a similar one, you must first find and eliminate the cause of its burnout. This could be a short circuit, incorrectly selected rated current, etc. Use electrical circuit diagrams to troubleshoot problems. Questions on this topic can be asked on the forum.
Keywords: 4x4 mounting block | dashboard 4x4
1 0 1 0 0 0
Share on social networks:
Inspection of cigarette lighter wiring
If after replacement the protective element burns out again, you should look for the cause elsewhere.
It lies not in the VAZ cigarette lighter fuse, but in faulty wiring. If the car is old or due to improper manipulation of the electrical system, the wires may shorten and burn out, or an open circuit may occur in the circuit itself, causing the cigarette lighter fuse to trip. It is advisable to inspect the cables for kinks or abrasions. This failure should be diagnosed using a multitester. The wires coming to the cigarette lighter are tested for resistance. If there is no power, then one of the cables is broken.
To repair the cigarette lighter on a VAZ, you will need a soldering iron with rosin and tin, working cables and insulating tape.
Checking and replacing the VAZ 2107 relay
A very important role in the proper operation of the system is played by relays, which periodically perform operations to turn on or off the necessary functions in the car.
An electromagnetic relay consists of a coil, which is supplied with power through a circuit and making contacts.
To check the functionality of the relay or to replace it, you must perform a number of sequential operations:
- The ground wire in the car is disconnected from the battery.
- The relay can be easily pulled out by hand.
- A visual inspection of the relay contacts is carried out, the contacts are cleaned of oxidation, and the reliability of the pin fastenings of the contacts is checked.
- Checking the functionality of the relay is carried out by supplying 12V power to the relay winding using two pieces of wire.
- When power is supplied, the coil should operate and the contacts should close, which can be checked using a multimeter in vertebrae or resistance measurement mode.
- If the relay or its contacts do not work, the relay should be replaced with a new one. Since their repair is not provided.
The performance and technical condition of the car, electrical systems, comfort and safety depend on the proper operation of the fuse and relay box of the VAZ 2107 car.
That's all! If you didn't find what you were looking for, please leave your question in the comments. Thank you!
Video with reasons for fuse failure
There are additional faults that can cause the device to break down. These include.
- Bad contacts. Over time or heavy use, the connection inside the cigarette lighter may become loose. Incorrect connection of devices leads to loose sockets and poor contact. This can be treated by bending the metal tendrils on the cartridge or by resoldering.
- With age, oxides or rust appear on the cigarette lighter, which has a bad effect on its operation. The situation can be corrected by treating the contact areas with a needle file. It is necessary to clean them and remove all traces of corrosion on the cigarette lighter. Another malfunction of the cigarette lighter on a VAZ is a burnt-out nichrome spiral. It is recommended to replace the device here.
Due to these factors, the protective element can also burn out. The video below will help you figure out where the fuse is located and how to repair the VAZ 2110 cigarette lighter.
Finding the fuel pump relay and troubleshooting
As you know, in order to start any process, be it mechanical or electrical, you need a source of energy. And the relay thus represents a kind of trigger mechanism, because its work is to connect the contacts located inside, which close when exposed to electric current.
If we personally consider the VAZ-2112 fuel pump relay, then there are certain specifics in its operation. It also happens that many car enthusiasts simply do not know where exactly this relay is located, and how to correct the malfunction when it fails.
Principle of operation
Almost all relays that are mounted on Russian cars are identical. For the most part, they differ in the number of contacts with five versus four, and the latter, as a rule, does not have a central input.
The current strength, measured in Amperes, is also almost the same and is about 30 - 40A.
The relay is connected to the network using a plastic block (plug - approx.), and when the electric current reaches the coil inside the relay and the magnetization process begins, it then closes and the circuit is connected.
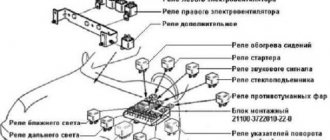
Relay in additional fuse box
Location of the additional relay unit inside the car
The fuel pump relay is located on the left side of the front passenger's feet, where three relays and three fuses are located next to each other.
After dismantling, we put it aside
The fuel pump relay is located exactly in the middle under the number “ 5 ”. Nearby, there is also a fuse numbered “ 3 ”.
Functionality check
In order to check the fuel pump fuse, you just need to inspect it and, if necessary, replace it with a known working one.
There are several methods to check the fuel pump relay:
- The easiest way is to replace the old relay with a known good one .
- If you don’t have one at hand, you can use a regular multimeter .
What is the fuse in the radio?
As a standard, this is a 20 ampere blade fuse marked with the English letter F and the number 4 (F4). According to the rules, each individual device is protected by an individual fuse, but this already applies to their, so to speak, personal protection (secondary).
Where is the fuse for the radio?
Where is the fuse for the radio?
The fuse responsible for the radio is located in the power circuit. If the head unit is connected through the cigarette lighter cables, then the safety insert of the blade type or cylindrical configuration is located in the installation box inside the instrument panel.
What fuse should be installed on the radio?
There is no need for a fuse in front of the radio, there is one in the radio - two fuses will perform one function (overload, or something else will happen in the radio itself), but next to the battery you need it (at least 15A) it will protect mainly from short circuits.
Where is the fuse for the radio on the VAZ 2114?
This fuse is located in the wiring box, which is located in a special block under the hood of the car. To access it, you need to remove the cover and find the desired part among many others. On most VAZ models it is located third from the bottom (in the left row) and is marked F7.
Where is the fuse located in the Pioneer radio?
The fuse is actually located on the back of the PCB not far from the RCA outputs.
How to remove a fuse in a car?
Classic “finger” fuses are installed between two elastic legs. To replace the “finger” fuse, you just need to pull it out from the space between the tabs, slightly pressing the movable tab (the second, as a rule, is rigidly fixed in the block). The new fuse is inserted in the same way.
Which fuse on the VAZ 2110 is responsible for the radio?
The VAZ radio fuse with a current of 20 A and marked F4 is located in the compartment on the right side of the steering mechanism. This element is responsible not only for the car radio, but also for the right fog lamp.
What wire is needed to power the radio?
It's easier, but not better. The positive wire must be copper, stranded and with a sufficiently large cross-section (from 4 mm2). Its length should be as short as possible. At a distance of at least 40 cm from the positive terminal of the battery, it is necessary to install an additional fuse with a rating of 10 to 20 A and good insulation.
How to connect the radio correctly so as not to drain the battery?
To avoid draining the battery, the radio is connected via the ignition switch. When the ignition is turned off, it is impossible to use the head unit. For switching, a supply wire protected with red insulation is used. An additional yellow cable leads directly to the battery terminal.
How to check the radio from the battery?
You need to find the wire that powers the contact group of the ignition switch and screw (solder) the red wire from the radio to it. The yellow wire is connected to the positive terminal of the battery (so that the settings are always stored in memory). The black wire is to ground, as usual.
Which fuse is responsible for the radio on the VAZ 2114?
This is where you need to look for the cause first. The fuse box socket – F4 – is responsible for the radio and cigarette lighter. The fuse marking in it should be 20A.
Where is the fuse for the starter on a VAZ 2114?
This block is located in the lower left part under the glove compartment on the center console. This block may differ in different modifications of the car. The location of the fuel pump fuse for VAZ 2114 and VAZ 2115 may also differ.
Where is the VAZ 2114 mounting block located?
Now regarding the location of the device. The unit itself in the VAZ 2114 injector is located in the engine compartment, opposite the instrument panel. To get to it, you don’t have to remove the instrument panel; just open the hood and look under the windshield on the driver’s side.
How to check the outputs on the radio?
If there is no sound, check the speakers, check the output, set the multimeter to 20 volts and check the voltage (there should be several volts and it should change constantly). but most likely the day off ims fucked up.
What is the fuse for in the radio?
Functions The radio fuse, located in the power circuit, is designed to protect the electronic components of the equipment from the consequences of short circuits. The device is a thin thread of low-melting metal, designed to carry a certain current value.
Main unit
The main block with fuses and relays is located in the cabin, on the left side, under the control panel. To access, press the latch switch.
Photo - diagram Option 1
Scheme Option 2
Scheme Option 3
Description of fuses
p, blockquote 15,0,0,0,0 —>
| F1 | 5A Lamps for license plate lights. Instrument lighting lamps. Side light indicator lamp. Trunk light. Left side marker lamps |
| F2 | 7.5A Left headlight (low beam) |
| F3 | 10A Left headlight (high beam) |
| F4 | 10A Right fog lamp |
| F5 | 30A Electric motors for glass door lifts |
| F6 | 15A Portable lamp |
| F7 | 20A Electric motor of the engine cooling system fan. Sound signal |
| F8 | 20A Rear window heating element. Relay (contacts) for turning on the heated rear window |
| F9 | 20A Recirculation valve. Windshield, rear window and headlight cleaners and washers. Relay (coil) for turning on the rear window heating |
| F10 | 20A Reserve |
| F11 | 5A Starboard side marker lamps |
| F12 | 7.5A Right headlight (low beam) |
| F13 | 10A Right headlight (high beam). High beam warning lamp |
| F14 | 10A Left fog lamp |
| F15 | 20A Electric seat heating. Trunk lock lock |
| F16 | 10A Relay - turn signal and hazard warning light switch (in hazard warning mode). Hazard warning lamp |
| F17 | 7.5A Interior lighting lamp. Individual backlight lamp. Ignition switch illumination lamp. Stop lamps. Clock (or trip computer) |
| F18 | 25A Glove box lighting lamp. Heater controller. Cigarette lighter. |
| F19 | 10A Door locking. Relay for monitoring the health of brake light lamps and side lights. Direction indicators with warning lamps. Reversing lamps. Generator excitation winding. On-board control system display unit. Instrument cluster. Clock (or trip computer) |
| F20 | 7.5A Rear fog lamps |
Fuse number 18 at 25A is responsible for the operation of the cigarette lighter.
The fog lamp fuse is installed separately in the instrument panel niche behind the main unit.
Relay purpose
p, blockquote 19,0,0,0,0 —>
- K1 - lamp health monitoring relay
- K2 - windshield wiper relay
- KZ - relay-breaker for direction indicators and hazard warning lights
- K4 - relay for low beam headlights
- K5 - headlight high beam relay
- K6 - additional relay
- K7 - rear window heating relay
- K8 - rear fog lamp relay