Today, every car, regardless of type, is equipped with special protection for all electrical systems. This protection is called a fuse. They are installed so that in the event of a short circuit or malfunction, the system can turn off via a fuse, thereby protecting itself from breakdown. Fuses are used for every electrical circuit, from a small light bulb to an engine's ignition system. More important engine systems are equipped with special relays, they protect various pumps, electric motors and other powerful sources of electricity consumption.
The fuse is a small structure consisting of a plastic casing with a fusible element inside. If a short circuit occurs, the thin contact melts under the influence of current, which interrupts the electric current. The simplest electrical fuse is a thin copper wire inserted into a circuit. If the upper limit of the supplied current increases, the contact begins to melt and interrupts the flow of electricity. Here there is a description of all fuses and relays for VAZ 2113, 2114, 2115 models of injection and carburetor types, old and new models.
Interpretation of fuses and relays of injection models
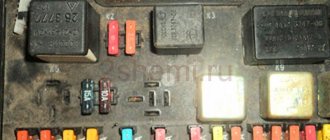
The main electrical fuse module 2114-3722010-60 is located under the front engine compartment. This arrangement allows for quick access to all electrical systems of the car.
Block location
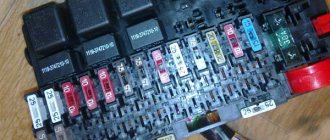
Please note that the location of the electrical fuse module may depend on the type of equipment and year of manufacture of the vehicle. As a rule, this is the upper right part of the engine compartment, under the front windshield. The mounting block is made of plastic in the form of a rectangular box. To protect against accidental opening, the box is equipped with special latches. To open the module, you need to snap off the two protective brackets and lift the top plastic protection. Under the cover are all the main control relays and electrical fuses of the vehicle.
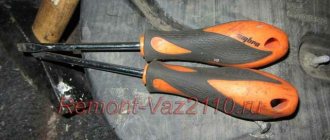
To quickly remove the fuse, special plastic pliers are located on the plastic protection cover. With their help, you can very easily get any element. You need to grab the top edge of the plastic case with pliers and carefully lift the element.
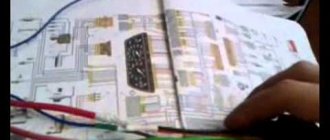
For the convenience of the user, on the top plastic cover there is a complete diagram, made in the form of a schematic image, which shows all the electrical fuses and relays indicating the current strength (A).
Fuse and relay diagram for injection models
Table 1. Explanation of fuses and relays 2114-3722010-60
| № | Current, A | Explanation of fuses |
| F1 | 10 | Rear fog lights, rear fog light indicator lamp |
| F2 | 10 | Turn signals and turn signal breaker relay. Alarm system. Hazard warning lamp |
| F3 | 7,5 | Interior and luggage compartment lighting systems (interior lamp, luggage compartment lamp, ignition key illumination). Brake brake lamp, on-board computer backlight lamp. Engine control lamp |
| F4 | 20 | Rear window heating control. Portable lamp connection socket |
| F5 | 20 | Relay for monitoring and turning on the sound signal. Cooling system engine switch fuse and relay |
| F6 | 30 | Control and relay switching on electric windows |
| F7 | 30 | Electric motor control - heating system, interior heater, windshield washers, headlight cleaners. Interior cigarette lighter, glove box lamp. Turn on the heated rear window. |
| F8 | 7,5 | Turning on the right fog lamp |
| F9 | 7,5 | Turning on the left fog light |
| F10 | 7,5 | Side light for the left side body, indicator light for turning on the side lights (on the display), lamps for illuminating the license plate and engine compartment, illumination lamp for switches, cigarette lighter, heater control levers. Instrument lighting switch. |
| F11 | 7,5 | Right side body marker light |
| F12 | 7,5 | Front right low beam headlight |
| F13 | 7,5 | Front left low beam headlight |
| F14 | 7,5 | Front left high beam headlight. Light indicator lamp. |
| F15 | 7,5 | Front right high beam lamp. |
| F16 | 15 | Body turn signals, relay-breaker for turn signals and hazard warning lights. Control relay and reverse lamps, indicator lamps for the on-board instrument control system, lamps for oil pressure, handbrake activation, brake fluid level, battery charge. On-board computer, engine generator winding. |
| F17-F20 | Spares | |
| № | Relay circuit | |
| K1 | Headlight cleaners | |
| K2 | Turn signals and hazard warning lights | |
| K3 | Windshield wiper | |
| K4 | Monitoring the serviceability of brake light lamps and side lamps | |
| K5 | Window lifters | |
| K6 | Sound signal | |
| K7 | Heated rear window | |
| K8 | High beam headlights | |
| K9 | Low beam headlights | |
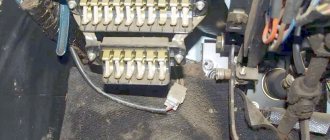
Connection diagram of the VAZ 2110 mounting block
The order of conventional numbering of plugs in the connecting blocks of the mounting block and the wires connected to them
Decoding fuses and relays of block 2114-3722010-18
VAZ-2114, 2115, 2113 cars of the first models with a carburetor have certain differences in the fuse module.
Old style block fuse and relay diagram
Table 2. Decoding of fuses and relays of block 2114-3722010-18
| № | Current, A | Explanation of fuses |
| F9 | 7,5 | Right rear fog lamp |
| F8 | 7,5 | Left rear fog lamp |
| F1 | 10 | Front headlight cleaners at the moment of switching on, wiper contacts, headlight washer switch valve, headlight wiper switch relay contacts |
| F7 | 30 | Front headlight wipers during operation, winding of the relay for turning on the wipers, fuse for the interior heater, windshield washer, gearbox and timing controller for the rear window wiper, valves for turning on the front and rear washer, relay (winding) for turning on the engine cooling system, relay for turning on the rear window heating, glove box lighting, rear window heating control lamp |
| F16 | 15 | Turn signal indicators and activation of hazard warning lights in turn mode, indicator control lamp, reversing lights, gearbox and relay for activation of windshield washers, generator winding (at startup), control lamps for brake fluid, oil pressure, carburetor flap, hand brake. "STOP" display lamp, voltmeter and coolant temperature indicator |
| F3 | 10 | Interior lighting and rear brake light |
| F6 | 30 | Power windows, power windows on/off relay |
| F10 | 7,5 | License plate lights, engine compartment lamp, warning light on the dashboard (exterior lighting), instrument panel lights, cigarette lighter light, heating lever lights |
| F5 | 20 | Relay for turning on the cooling system fan (electric motor), sound signal. |
| F10 | 7,5 | Left front marker light Left rear marker light |
| F11 | 7,5 | Right front headlight, right rear |
| F2 | 10 | Hazard warning lamp, turn signals and hazard warning relay. |
| F4 | 20 | Rear heated glass, heating on, portable socket, cigarette lighter in the cabin |
| F15 | 7,5 | Front right high beam |
| F14 | 7,5 | Front left high beam Light switch |
| F13 | 7,5 | Left low beam |
| F12 | 7,5 | Right low beam |
| № | Relay circuit | |
| K1 | Headlight washers | |
| K2 | Hazard and turn signals | |
| K3 | Windshield wipers | |
| K4 | Monitoring the health of lamps | |
| K5 | Windows | |
| K6 | Sound signal | |
| K7 | Heated rear window | |
| K8 | High beam headlights | |
| K9 | Low beam headlights | |
Standard version of the brake light operating diagram
Power is supplied to fuse F17 from the battery, then the current goes to limit switch contact 11, and then, if the limit switch is closed, a circuit is formed with the filament of lamps 7. But note: part of the circuit is relay K1, more precisely, its contacts 5 and 4.
Basic network diagram
A complete electrical diagram with explanations of the VAZ-2112 car is here.
If the brake lights do not light up, on the VAZ-2112, as on all Tens, check one fuse. It is called F17 and is located in the mounting block to the left of the driver.
Main mounting block
It is important to know: voltage is always present at one of the fuse terminals. Check it out!
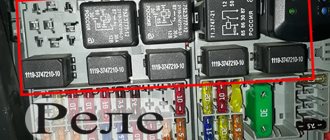
A few words about the “serviceability relay”
The lamp health relay is called K1, and it is the largest in the mounting block. If you remove this relay, then when you press the pedal you can dial the voltage at terminal 5 (but not 4). Look at the diagram again, and it will become clear what we are talking about.
The largest relay in the block
All relay contacts are numbered. Check the voltage at the block terminals:
- 6 – “mass” potential;
- 2 – voltage “+12”, but only after turning on the ignition;
- 5 – “+12” by pressing the pedal;
- 4 – the terminal rings like a ground tap.
If the potential “0” is not generated at terminal “4,” it means that the lamp filaments are burnt out or there is a break in the wiring. Now consider something else: the ground potential has been detected, but the lamps do not light. This is where suspicions of a short circuit arise.
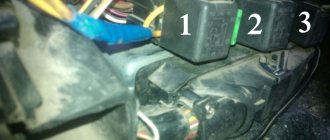
Starter, ignition, rear fog lamp relay
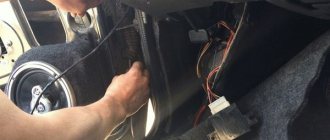
In order to carry out quick checks and repairs, the ignition system relay is installed under the front dashboard of the car, behind the hood release handle. It is located just below the central dashboard. The module is closed with a plastic plug, which must be opened slightly to test for functionality.
Starter, ignition, rear fog lamp relay
Next to the indicated relay, there is a similar one for the rear fog lights and the starter.
The main task of the relay when igniting is to reduce the applied load to the contacts. When the engine starts, the relay turns off some electrical circuits in the vehicle system. The system is used not only in injection, but also in carburetor engines.
In the event of a malfunction or malfunction in the ignition system, it is necessary to monitor the operation of the relay. For this purpose, open the box and carefully remove the desired element. It is attached using contacts to special grooves. The first thing to do is look at the oxidation of the contacts, if necessary, clean them with a soft cloth or treat them with a special liquid.
To check functionality, you need to use a regular multimeter. We connect to incoming connections and check the numbers. If there is no short circuit when current is applied, it means the element is not working. Replacement is carried out in a similar manner. It is necessary to use a standard element with the number of amperes indicated on the housing.
Reasons for premature failure of fuses
- A natural factor is the duration of operation without intermediate prevention,
- Moisture ingress, condensation formation, terminal oxidation, insulating layer drying out, electrical supply circuit breakage,
- Mechanical damage, accident, shock, collision,
- Damage to the car fender, windshield, which contributed to damage to the mounting block,
- Short circuit in the electrical supply circuit,
- Exposure to ultraviolet rays.
If after replacing the modules the equipment does not work, then the power supply circuit line is most likely damaged. In the worst case scenario, part failure. Carefully inspect the wiring sections from the battery, generator, starter to the relay switch.
The operating instructions for the technical means indicate the interval before replacing the modules of the mounting block is 40,000 km. In practice, the resource is 5 – 7 thousand km longer.
To prevent premature wear of modules, systematically check the condition of the wiring insulation, the quality of fixation of the terminals, and remove oxidation with fine sandpaper.
As consumables, purchase original domestically produced parts. Check the catalog numbers with the data specified in the instruction manual. Imported analogues are comparable in quality to the Russian manufacturer, but the price is twice as expensive
Front fog lamp relay
Front fog lights are not standard equipment on the model and are equipped depending on the configuration. The relay itself (if there are fog lights) is located in the engine compartment on the left mudguard.
Front fog lamp relay
Important! To access the relay, you must remove the battery! Without performing this manipulation, it will be difficult to remove and check its functionality.
Replacing a faulty element is very simple. You need to take a Phillips screwdriver (with a short handle), unscrew the bolt securing the relay to the car body, and check the element for malfunction. If it fails, we buy a new one and put everything in the reverse order.
Where are the fuses on the Priora?
- The main mounting block of the Priora is closed with a lid and located at the driver’s left foot. To open it, you need to turn three latches 90° and unclip the lid.
- The fuse box is under the hood, which is located near the expansion tank.
- Another mounting block, which is located near the left foot of the front passenger. To gain access to the fuses and relays, unscrew several screws with a Phillips screwdriver.
Below is a description of each fuse and relay block in order.
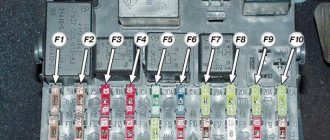
How to properly replace a burnt out element
Removing the fuse box
You need to pull the fuses out of the corresponding sockets using special plastic tweezers, which can be found here, in the upper right corner of the VAZ 2114 mounting block. You cannot pry fuses on non-energized circuits with any metal objects due to the risk of a short circuit. It should be taken into account that the electrical circuits of the sound signal, alarm, etc. are always energized. To ensure safety when repairing the circuits, the circuit must be de-energized - you just need to disconnect the wire from the “negative” terminal.
It is not always possible to visually accurately determine the performance of fuses. It will be possible to make a clear decision only after the “ringing”. To do this, you will need a regular tester, which will need to be set in advance to the “dialing” mode. After this, it will be enough to simply attach two terminals of the tester to the terminals of the suspicious fuses. If a characteristic sound is heard, the fuse is good - the cause of the malfunction of the car’s equipment is not in it, but probably somewhere further in the wiring or in the device itself.
Lastly, never use copper “inserts” or fuses that are not rated for amperage. Using an inadequate replacement designed for a higher current, there is a risk of damage to the “track” of the unit’s printed circuit board and even failure of the electrical appliance. Insufficiently powerful fuses will not be able to ensure long-term and uninterrupted operation of the current consumer in the vehicle's electrical network.
Problems in the fuel system
Car won't start? The starter cranks at full power, but the engine still won't start? Then the problem should be looked for in the fuel supply. Modern cars often use electronic fuel delivery. The problem is that it will be difficult to diagnose on your own. Diagnostic equipment is expensive, and you need to go to a car service center. But there are signs by which you can understand what kind of malfunction is in the fuel system, thereby saving you money on diagnostics.
The very first thing you should do is check all the electrical wires under the hood. It will take a lot of time, but it's better than paying a lot of money for diagnostics. Each injector that supplies fuel to the system has its own separate wire. Check all wires with a tester, and also pay attention to the insulation.
Car won't start? The causes of malfunction when starting the engine may be in the operation of the fuel pump. Its performance can only be checked using special equipment, which not every driver has. You can try to find out the cause by checking the voltage on the positive wire of the fuel pump. It may be missing due to a faulty fuse. If the fuse is good and there is no voltage in the wire, then this problem can be solved by replacing the fuel pump motor relay.
A working fuel pump does not mean that the fuel system is fine. The filter may become clogged and not supply fuel. To prevent this from happening, it should be changed every 20,000 km. You can replace all these parts yourself. Why doesn't the car start if the entire fuel system is in good condition? We don’t despair and look for the problem further.
What to do if they cannot determine the reason why the car does not start?
Attention. We advise you, fellow motorists, to initially, for electronic diagnostics of your car, immediately contact specialized dealership auto centers that service only your or your particular brand of car (office dealer and others). Only they can guarantee you a professional approach to diagnostics and classified repairs of your vehicle.
Typically, such car services have a full range of electronic equipment and expensive software for car diagnostics. Indeed, in ordinary services and in the same garages, despite the high classification of some certain specialists, there is often no highly specialized expensive equipment and software that is necessary for quick troubleshooting.
For example, the cost of some specific software intended for diagnostic equipment can cost several hundred thousand US dollars. (!) Unfortunately, most car services (especially garage technicians) cannot afford to purchase such “autosoftware” for themselves. It is too expensive.
Source
The engine does not start in cold weather
Starting a car in severe frost is difficult, but not hopeless. If the outside temperature is -15 °C or lower, then any battery loses 50% of its power, this is another problem why the car is a bad car, you need to turn on the high beam for 10-15 seconds. This will allow the electrolyte in the battery to warm up to produce additional energy.
Attention! Never turn the starter for more than 5 seconds. Otherwise, there is a chance that the battery will die completely or the spark plugs will flood, which is unacceptable at low temperatures. If the car is in good condition, then on the 2-3rd try everything will work out and your car will start.
It happens that the battery is completely dead. This can be understood if the car stalls and does not start. In this case, you will need a cigarette lighter. If the car has an injection engine, it will be more difficult to “light” due to the large number of electronics. You can “light” from another car even when its engine is running. The main thing is not to confuse polarity and order. However, if you made a mistake and mixed up the signs, run quickly to get a new battery.
After connecting to the “donor machine” you need to wait 10-15 minutes for your battery to charge. Afterwards, we disconnect from the car and try to start. If the engine starts, give it a couple of minutes, otherwise it will stall.
Remember that starting the engine at sub-zero temperatures is equal to 500 km. Take care of your car.
No compression
Does the car start and stall or not start at all? This may happen if the engine lacks compression. Compression in an engine is the ability to maintain the pressure that is created in the combustion chamber when the piston rises to its highest dead center. Compression is measured with a special device - a compression meter. Whether you need such a diagnosis can be determined by external signs. Blue smoke from the exhaust pipe, unstable engine operation or idle speed does not stand still - these are all reasons for weak compression. Such an engine will consume more oil and fuel. If you put your hand on the exhaust pipe and small drops of oil remain on your hand, then this is another symptom of engine failure. It is best to contact specialists. After all, the cause could be a burnt-out piston.
Voltage problems
A common problem when starting an engine is low voltage or no voltage at all. First of all, you need to check the fuses. Not every car depends on the safety system to start the engine, but it is still worth doing.
Over time, any wiring connections to the battery can become oxidized or dirty. This will result in no current flowing. It is necessary to clean the battery terminals and wire connections with a dry cloth or sandpaper. After that, try to start the car again.
If the terminals and wires are in order, then you should check the battery. A dead battery is a common problem. You can check the battery charge with a tester or by external signs. To check the performance of the battery, insert the key into the ignition and try to start the engine. A “weak” starter is a clear sign that the battery is discharged.
There are several ways to fix the problem with a dead battery. Light a cigarette from another car or try to start the car from a tow. The second method is only suitable for cars with a manual transmission. If the car does not start, you will have to remove the battery and charge it. Do not forget that the battery life is no more than 5 years.
Other reasons why the car won't start.
Having thus checked all the main car systems that could affect the car’s engine starting, you, dear motorists, should know that there are still a number of specific tips that you can resort to and perform them yourself to find out why your car does not start. If you have patience and time to do this kind of troubleshooting, you can do the following yourself:
— Loose starter mounts: Sometimes the starter mounts become loose, which can cause a lack of ignition.
— Bad injectors: A malfunctioning injector affects the entire fuel system, which can cause the engine to fail to start. Especially when starting when the engine is still warm.
— Faulty starting valve: If this part of the car is in a faulty condition, then when starting the engine (especially in cold weather), a malfunction may occur and the car simply will not start. This faulty valve can also cause uneven operation of the engine after it warms up.
— Chips on the flywheel: The starter not only ignites the car, but also transmits torque to the flywheel, which is connected to the transmission. If the flywheel teeth are chipped or damaged, when the starter rotates, you can hear a characteristic sound (squealing, creaking) produced by the flywheel itself which has a defect. It is noteworthy that a similar problem can also be the reason for the engine failure to start.
— Immobilizer or Engine Control Unit (ECU) malfunction: If your vehicle's main computer malfunctions, it can significantly affect the performance of the ignition system itself and fuel injection. Including, if any electronic system malfunctions, then in many modern cars the engine management system can simply block the engine from starting itself. Also, a common reason for failure to start the engine is a specific malfunction in the electronic anti-theft system (immobilizer).
When it breaks down, as a rule, this electronic unit simply does not recognize your key, which contains a chip with an electronic code that disables the security system.
Unfortunately for us, you simply cannot check all these electronic systems yourself, since expensive equipment is needed to diagnose the electronics of the machine.
Timing problems
The timing belt is responsible for the operation of the engine in the car. Sometimes a metal chain is installed instead of a belt. Both are responsible for rotating the crankshaft and camshaft.
When using a car, every part wears out over time. The timing belt is no exception. Under constant load, it wears out and can rupture. Such a violation will lead to damage to the engine valves, and subsequently to its breakdown. And then a problem arises: the starter turns, the car does not start. What to do? A complete timing belt repair or valve belt replacement can be quite expensive. Therefore, to prevent such a problem from happening, it is advisable to change the belt every 2 years (this is approximately 60,000 km).
Which fuses are responsible for starting the engine?
Nowadays a car is not a luxury, but a means of transportation. Every driver has encountered a problem when his “iron horse” refuses to go. This is the most unpleasant situation, because of which you can be late for work, miss a vacation with friends or another important event. So what to do if the car won't start? To begin with, don’t panic, many problems can be solved on your own and without visiting a car service center. So, if the car does not start, you need to look for the reasons under the hood.