Signs that your car's heating system radiator requires replacement:
- high consumption of coolant (antifreeze or antifreeze) in the vehicle cooling system (antifreeze or antifreeze);
- The heating of the car interior does not work;
- traces of a coolant leak on the asphalt under the heater radiator or leaks in the hoses supplying fluid to the heater;
- the smell of antifreeze in the cabin;
- greasy deposits on car windows, their fogging.
In these cases, first of all, check the tightness of the system hose clamps. Perhaps they are the cause of the leaks.
And now about how to replace the VAZ-2112 heater radiator with 16 valves of different types
How to replace the radiator of a VAZ-2112 heater with 16 valves of different types
Signs that your car's heating system radiator requires replacement:
- high consumption of coolant (antifreeze or antifreeze) in the vehicle cooling system (antifreeze or antifreeze);
- The heating of the car interior does not work;
- traces of a coolant leak on the asphalt under the heater radiator or leaks in the hoses supplying fluid to the heater;
- the smell of antifreeze in the cabin;
- greasy deposits on car windows, their fogging.
In these cases, first of all, check the tightness of the system hose clamps.
Perhaps they are the cause of the leaks. And now about how to replace the VAZ-2112 heater radiator with 16 valves of different types
Is repair always possible?
It is not always advisable to repair a radiator. In some cases it will be easier and even cheaper to install a new one. But how do you understand that this is exactly the situation before you and not waste time on recovery? We'll help you figure it out.
- Leaks that are located at the junction of the radiator with the plastic pipe cannot be repaired. You can fix the leak, but only for a temporary effect. It is better to use epoxy glue or sealant.
- Nothing can save you from corrosion, which caused the system to depressurize. It is not worth spending any time, money or materials on such a radiator. It must be recycled.
- Structural damage resulting from an accident often cannot be repaired. Even if there is a chance of success, the repair costs will be considerable.
Any leak starts with a small crack, which will be much easier and faster to fix. With timely repairs, the radiator can serve for a long time and properly cope with its duties. Remember, not all defects can be eliminated; in some, especially advanced cases, you will have to replace the part.
New cooling system
The sequence of your actions in this case is as follows:
- First of all, for safety reasons, disconnect the negative terminal of the battery. We drain the cooled antifreeze or antifreeze, first opening the expander cap. To drain the liquid you will need a container with a volume of 4-5 liters.
- Now, after unscrewing the two nuts, remove the wipers from the car.
- Then we dismantle the released protective plastic cover under the windshield, which is secured with 2 nuts and 4 self-tapping screws.
- To access the stove, remove the frill of the car by unscrewing 5 self-tapping screws, 1 screw and 2 nuts located at the bottom, in the middle of the frill, in the area of the steering rack.
- In order to remove the stove, remove the yellow cross brace, if any, as well as the curved bellows of the air filter.
- We pull the chokes off the radiator pipes.
- Then disconnect all electrical wires from the stove terminals.
- At the steering rack, unscrew 2 nuts that secure the heater, 1 nut securing the heater to the body.
- We unscrew the 3 screws connecting the two halves of the stove.
- We take it out by swinging the right side of the stove, first moving it to the right.
- The radiator in the removed half of the stove is secured with 3 screws. We take it out and replace it with a new one, not forgetting to put on the foam seal. We check the operation of the fan and, if necessary, repair it or replace it with a new one.
- Before installing the assembly, it is advisable to rinse the coolant supply hoses with running water.
- Assembly is carried out in reverse order.
We are replacing the speed sensor
If the reason turns out to be the sensor, then you can replace it yourself. This can be done with a little experience with the operation of electrical appliances. Procedure:
- Be sure to wear rubber gloves, since de-energizing the on-board system of the machine can cause unpleasant sensations.
- Then you need to detect the sensor. As a rule, on a “tenth” generation car, the mechanism is located between the drive and the tip of the flexible shaft.
- Having found the device, it is necessary to disconnect the block with the wire by removing all spring clips.
- Next, use a 22 key to unscrew the mechanism from the drive.
- At this point the work is almost finished, but only a little remains. Next, the new device is installed. This is done simply, but the main thing is to get the sensor rod into the center of the drive. Then you need to tighten all the components in the reverse order, secure them and begin checking the new mechanism.
Old style cooling system
Such heaters were installed on early 21120 models. You can determine the modification of the system by its appearance, after first removing the frill of the car.
To replace the radiator you need:
- Carry out steps 1, 4-7 for removing the new type cooling system.
- We dismantle the expansion tank of the cooling system.
- We remove the vacuum booster by unscrewing the 2 nuts (17 mm) and carefully (without damaging the brake system pipes) move the brake master cylinder to the side. Remove the vacuum booster pipe.
- Inside the car, unscrew the 4 nuts from the brake pedal studs and, together with the pedal, remove the car's amplifier.
- Thus, we gained access to the heater core, which is secured with three screws. We replace it and reassemble the entire system in the reverse order.
Radiator grille upgrade
In addition to the bumper grille, the grille can also be beautifully modified. If you equip your car with a mesh, the top grille will not only act as protection, but will also look aesthetically pleasing. The factory grille is constantly “weared out” by time, flies, roads, leaves. As a result, the varnish peels off and peels off in places.
The appearance is not attractive and something needs to be done about it. First you need to remove the grate and scrape out all the animals from it. Then everything needs to be washed well. Afterwards, you can start “cutting” from the mesh. Everything needs to be measured accurately. Next you need to remove the old varnish, degrease and paint all the elements.
The color design can be very different. It is necessary for everything to dry. Next, using a screwdriver and pliers, you should secure everything. The end result will look like in the photo.
How to replace the radiator of a VAZ-2112 heater with 16 valves of different types
Signs that your car's heating system radiator requires replacement:
- high consumption of coolant (antifreeze or antifreeze) in the vehicle cooling system (antifreeze or antifreeze);
- The heating of the car interior does not work;
- traces of a coolant leak on the asphalt under the heater radiator or leaks in the hoses supplying fluid to the heater;
- the smell of antifreeze in the cabin;
- greasy deposits on car windows, their fogging.
In these cases, first of all, check the tightness of the system hose clamps. Perhaps they are the cause of the leaks.
And now about how to replace the VAZ-2112 heater radiator with 16 valves of different types
Maintenance
Regular maintenance of the VAZ 2111 engine ensures fairly long and trouble-free operation
Like all VAZ power units, the VAZ 2111 engine must be periodically inspected (visual inspection), paying special attention to:
- presence of antifreeze and engine oil leaks;
- integrity of high-voltage wires;
- serviceability of spark plugs;
- condition of the air filter element;
- cracks appear on the generator drive belt.
It is also recommended to regularly check the level of engine oil in the crankcase and antifreeze in the expansion tank of the power unit.
The list of mandatory procedures that must be carried out during scheduled vehicle maintenance includes replacement work (no later than):
- engine oil and oil filter - every 15 thousand km. mileage;
- fuel filter and air filter filter element - every 30 thousand km;
- timing belt and tension roller - every 75 thousand km. mileage;
- generator drive belt - every 30 thousand km. mileage;
- coolant - every 75 thousand km. mileage;
- spark plugs - every 60 thousand km.
New cooling system
The sequence of your actions in this case is as follows:
- First of all, for safety reasons, disconnect the negative terminal of the battery. We drain the cooled antifreeze or antifreeze, first opening the expander cap. To drain the liquid you will need a container with a volume of 4-5 liters.
- Now, after unscrewing the two nuts, remove the wipers from the car.
- Then we dismantle the released protective plastic cover under the windshield, which is secured with 2 nuts and 4 self-tapping screws.
- To access the stove, remove the frill of the car by unscrewing 5 self-tapping screws, 1 screw and 2 nuts located at the bottom, in the middle of the frill, in the area of the steering rack.
- In order to remove the stove, remove the yellow cross brace, if any, as well as the curved bellows of the air filter.
- We pull the chokes off the radiator pipes.
- Then disconnect all electrical wires from the stove terminals.
- At the steering rack, unscrew 2 nuts that secure the heater, 1 nut securing the heater to the body.
- We unscrew the 3 screws connecting the two halves of the stove.
- We take it out by swinging the right side of the stove, first moving it to the right.
- The radiator in the removed half of the stove is secured with 3 screws. We take it out and replace it with a new one, not forgetting to put on the foam seal. We check the operation of the fan and, if necessary, repair it or replace it with a new one.
- Before installing the assembly, it is advisable to rinse the coolant supply hoses with running water.
- Assembly is carried out in reverse order.
Design Features
The VAZ 2110 provides for the installation of two types of stoves - a new model and an old one. Regardless of the engine used (injection or carburetor), there are no fundamental differences in the design of the stove.
But what is the difference between new and old stoves? Let's try to figure it out.
- Since September 2003, several micromotor gearboxes have been installed in the furnaces. The difference lies in the shaft position sensors (resistances). Therefore, when repairing, make sure that the devices are truly interchangeable and that you purchased old-fashioned resistors for your old stove, and not a new one. Otherwise, the gear motor will not work.
- Radiator design. This is the main difference between the devices. Therefore, when replacing a radiator from an old one to a new one, be sure to take into account the installation nuances;
- The controller knob on the plates is slightly different. There's a big problem with old-fashioned heaters: They're out of production. They cannot be analogues of 4- and 5-position regulators, which began to be supplied in dozens in the fall of 2003;
Old style cooling system
Such heaters were installed on early 21120 models. You can determine the modification of the system by its appearance, after first removing the frill of the car.
To replace the radiator you need:
- Carry out steps 1, 4-7 for removing the new type cooling system.
- We dismantle the expansion tank of the cooling system.
- We remove the vacuum booster by unscrewing the 2 nuts (17 mm) and carefully (without damaging the brake system pipes) move the brake master cylinder to the side. Remove the vacuum booster pipe.
- Inside the car, unscrew the 4 nuts from the brake pedal studs and, together with the pedal, remove the car's amplifier.
- Thus, we gained access to the heater core, which is secured with three screws. We replace it and reassemble the entire system in the reverse order.
Solving broader problems
Radiator or pipe leaks cannot always be eliminated using simple, accessible methods. In some cases, this will require the use of specialized cold welding.
This is a special substance that, in fact, works like a very reliable glue. Metallic substances are additionally introduced into its composition, which are an excellent binding material.
Today on the market you can find both cold welding, produced in the form of powders, and a ready-made version. Of course, on the road it is better to have an option ready so that you can immediately use it for its intended purpose.
When is it necessary to replace the heater radiator in a VAZ 2112
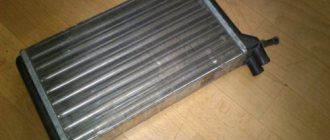
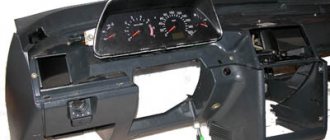
General view of the heater radiator of a VAZ 2112 car
To maintain the desired temperature, a stove or heater is provided in the car interior. The built-in automatic control system controls the required air heating with temperature deviations of no more than two degrees Celsius. The air is heated by a radiator. After air passes through the deflectors of the device, it is distributed in the car depending on the position of the handle that controls its flow. When antifreeze leaks, most often you need to change the heater radiator on a VAZ 2112. This article discusses how to do this work with your own hands.
Trouble-shooting
Checking the cabin air temperature sensor
You can check the serviceability yourself; special skills are not required. Carefully remove the sensor from its original place. We find the contacts on the back side. Using a multimeter, apply a voltage of 1.2V. We set the regulators of the automatic heater control system to the “Min”, “Max” positions. The motor should not be activated.
The second method is to turn off the cabin air sensor. Check fan speed settings. The first speed (“A”) should be inactive.
Video: Heater VAZ 2110, 11, 12. Design and principle of operation.
Checking the proper operation of the automatic control system
The proper operation is checked with a multimeter. The voltage at the terminals of the pink and brown wires is measured, the ignition is activated. Smoothly turn the temperature regulator; the arrow on the multimeter display should show an increase in voltage.
On old-style heaters, at maximum voltage, the controller value remains unchanged. Take this into account so as not to make hasty conclusions about the malfunction of a particular unit.
The cause of controller malfunction may also be deformed dampers. To verify this and eliminate the breakdown, we disassemble the heater.
Prevention of the damper of the heating system of VAZ 2112
To be precise, two dampers are subject to inspection; this is the number of them present in the VAZ 2112. The cold air intake is regulated in the upper part. In the lower part, warm (hot) air is supplied to the car interior. Due to wear on the drive mechanism, the damper opens halfway or partially, the air flow is reduced, and the interior is not heated sufficiently.
Reasons for failure:
- biting, jamming during operation, due to the lack of a sufficient amount of lubricant;
- a lot of debris, moisture, sand, dirt, which contributed to jamming;
- failure of the gear motor damper cable;
- numerous layers, rust, corrosion.
The old and new dampers differ only in the type of sealing ring. In the old ones it is plastic with foam rubber, in the new ones it is a metal seal with rubber. If you can’t hear the movement of the “curtain”, move it, set it in motion, after first removing the deflectors from the central part of the dashboard with a flat-tip screwdriver. Be careful, as the plastic casing of the console is damaged.
Metal ones are better and more practical, but they are afraid of moisture, rust, and deposits. Plastic ones, on the contrary, are deformed from heat and elevated temperatures.
The second way to check the performance of the damper: if the windshield heats hot air, but the sides or legs are warm, there is a malfunction. There is no air flow - the microdetector has failed. This is the drive mechanism.
Defective damper micro-reducer
Diagnostics is permissible if you have a special device - an ohmmeter. It is designed to measure resistance in an electrical circuit. In old-style controllers, the indicators are in the range of 750 - 1250 Ohms, in new ones - 3400 - 5100 Ohms.
Troubleshooting occurs as follows: we start the power unit, set the temperature to o, wait 15 - 20 seconds, turn it off. We disconnect the controllers, measure the resistance with the ignition on between contacts X1.4 and X1.1.
At maximum temperature, the ohmmeter shows up to 5.0 Ohms on the new one or 1.6 Ohms on the old one. The absence of resistance indicates a malfunction: failure of the micro-gear sensor. More often, the tracks wear out, the wiring becomes damaged, and the fuse blows. To replace the micro-reducer, the stove is disassembled.
If the motor rotates only in the first two speed modes, then look for the reason in the resistor. It's faulty. Activation only at the third speed indicates “direct” operation, bypassing resistors. The reason is worn tracks on the switch, temperature controller.
Heating system for VAZ 2112
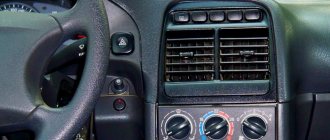
It is impossible to create coziness and comfort inside a car during the cold season without a working heating system, and an indispensable device in it is a stove. In the interior of the VAZ 2112 car there is supply and exhaust ventilation. Air enters it through special holes located in the windshield trims. Air is supplied forcefully, by a heater fan, or spontaneously. There are gaps between the door panels through which air escapes from the passenger compartment. For the same purposes, there are also holes in the ends of the doors. The valves built into them allow air to pass out and prevent its penetration inside. This improves thermal insulation in the cabin. To heat the air, the VAZ 2112 uses a radiator on the stove, which sets the desired air temperature before entering the cabin. Features of the VAZ 2112 car:
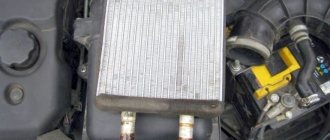
- The heater radiator of the VAZ 2112 car is located in a plastic casing, located horizontally under the dashboard.
- The design consists of two rows of aluminum tubes onto which two plastic tanks are pressed. There are two fittings on the left tank: coolant is drained through one and coolant is supplied to the other.
- To regulate the amount of incoming air, dampers are built into the heating system. Its main part passes by the radiator. When the dampers are positioned in extreme positions, there is no air flow into the cabin.
- There is no valve in the system that would shut off the flow of coolant. Therefore, when the engine is running, the heater radiator is constantly heated, which ensures rapid heating of the interior, and reducing the joints in the system improves its tightness.
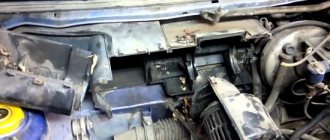
How to replace the heater radiator of an old model VAZ 2112 car
An antifreeze leak in a VAZ 2112 car is the reason why the heater radiator needs to be replaced. It is not possible to determine why antifreeze is leaking without disassembling the engine shield, so it is better to immediately install a new model heater radiator on the VAZ 2112. For cars manufactured before 2003, the interior heaters are of the old type; after September of the same year, new devices are installed in the cars. Replacing the heater radiator of the new VAZ 2112 model is carried out with some differences from the old designs. Before installing a new unit, you need to remove the old-style heater radiator on the VAZ 2112. For this:
- Antifreeze drains. It can be drained from the engine block into a container or through an expansion tank installed under the hood. The cap of the expansion tank is unscrewed, which relieves pressure in the system. Then the drain plug is removed, first you need to unscrew and move the ignition module to the side.
When draining antifreeze through the expansion tank, remove the hose from the stove, then the rubber pipe with an L-shaped profile.
Tip: If the drained antifreeze is clean, you can then pour it back.
- The rubber hood seal located near the frill or the windshield is removed.
- The frill fixing screw located under the brake master cylinder is unscrewed.
- Unscrew the four screws of the upper fastening on the right side of the frill.
- The clamps holding the wires and hoses on the frill are disconnected.
- The negative wire and positive terminal of the fan are disconnected from the body.
- On the left, 2 screws are unscrewed in the frill, the part is moved slightly forward.
Tip: There is no need to remove the frill completely.
- After unscrewing five screws and removing two nuts, the plastic trim for the windshield is removed.
- The antifreeze level sensor terminal, if present, is disconnected and the hose for steam removal is removed from the expansion tank.
- The hose used to wash the windshield is disconnected from the mount.
- Four screws are unscrewed, as shown in the photo.
Causes and solutions to leaks
It is important to monitor the refrigerant level in the system. There are special marks in the expansion tank for this purpose.
If the level constantly drops and you have to add fluid, then the system is leaking. We need to look for the cause and eliminate it quickly. Let's look at the main reasons for leakage and ways to solve the problem:
- If the radiator has a neck, then you need to check the cap. The coolant is heated to 120 degrees Celsius and circulates through the system under high pressure. If the cap is not able to hold pressure, then the antifreeze evaporates from the heat exchanger and the level drops. This problem is solved by replacing the cover with a new one.
One of the reasons for antifreeze leakage is a poor seal of the radiator cap.
- The second reason for antifreeze leakage is wear of the rubber pipes. Check the connections to the radiator. If there are traces of coolant leakage, replace the pipes and clamps.
- The most unpleasant failure is the appearance of a leak in the radiator itself. It occurs as a result of mechanical shock, physical wear, or due to the use of low quality antifreeze.
A large hole in the radiator is noticeable; thick steam flows through it and antifreeze spraysFinding a large hole will not be difficult - hot steam will pour out of it. It is difficult to eliminate such a defect on the road. Get to the nearest service station quickly and have the heat exchanger repaired or replaced. In any case, the old radiator will have to be dismantled and inspected. Some craftsmen know how to weld holes. If the radiator is made of copper or brass, then it can be soldered. Aluminum is repaired using argon welding.
A heat exchanger made of copper or brass can be soldered using a powerful soldering iron. An aluminum radiator is welded using argon welding
Experience shows that such repairs can rarely be carried out efficiently, and after just a few months the car owner is forced to replace the radiator with a new one.
It is more difficult to detect a small leak, but the antifreeze itself will help in the search. Its chemical composition contains a dye that is illuminated under ultraviolet light. Just shine a special lamp on the radiator and you will see where the coolant is leaking.
A defect discovered in a garage is eliminated using cold welding. This is a two-component epoxy resin. The prepared composition is similar to plasticine and is applied to the detected defect. Pre-clean the surface: remove dirt, oil and dust. After 15-30 minutes, the weld hardens and the leak is eliminated.
Two-part epoxy resin helps repair radiator leaks in garage environments
There is an opinion that you can eliminate a small leak using folk methods, for example, using dry mustard. This product is added to the radiator; under the influence of temperature, the particles increase in size, spread throughout the system and, where there is a leak, close the hole. Remember that once the defect is eliminated, foreign substances clog the entire system: engine channels, radiator honeycombs. Do not use traditional methods. Find another option to get to a service station or use radiator sealant.
Approximate prices
A new radiator for a VAZ 2112 in Russia can be purchased for 1200-4500 rubles .
The cost of an auto radiator depending on the material of manufacture:
- Aluminum - from 1200 rubles .
- Copper - about 4400 rubles .
Approximate prices depending on the manufacturer:
- Weber - from 1500 rubles .
- Craft - from 1200 rubles .
- LUZAR – from 1700 rubles .
- HOLA – from 1800 rubles .
- DAAZ - from 1900 rubles .
Model selection
For the VAZ 2110 you can choose either aluminum or copper radiators. To a large extent, the choice depends on what result you need: saving money or durability and reliability.
Their disadvantages and advantages:
- Aluminum. Lightweight, relatively cheap, the price depends on the manufacturer: - Luzar (2110-8101060) - about 1000 rubles; - Pramo (2110-1301012) - retail approximately 1600 rubles. But its thermal conductivity interferes, and it cools the engine worse. In addition, it is subject to fairly rapid corrosion; it takes less time for it to flow; Aluminum radiator cooling
- Copper. It is heavier, significantly more efficient in its cooling characteristics, and lasts longer, since the copper body is less susceptible to corrosion. For it to flow, mechanical action (impact, etc.) is most often required. The disadvantage is that its price is higher, about 5,000 rubles, for a two-row one, with an increased efficiency of 40%. Copper cooling radiator with 40% increased efficiency
Where to buy?
There are several options for where to purchase an auto radiator:
- Car market.
- Online store.
- Parsing point.
- A store that sells auto parts.
It's better to buy a new spare part. It can be purchased at a specialty store. A used part is cheaper, but its quality is lower and its service life is shorter. An old radiator for a VAZ 2112 is sold at the car market, at a disassembly point.
The VAZ-2112 entered mass production in 1999. This five-door hatchback continued the line of cars based on the base “tenth” model of the Volzhsky Automobile Plant.
Along with the positive innovations inherent in the entire range of these models, the VAZ-2112 received from its progenitor “family” disadvantages, which left their mark on the range of spare parts that are in demand among drivers of this car. In early versions of the 16-valve 1.5-liter engine installed in the early years of production, problems with valve bending were observed. This design defect was corrected on a 1.6-liter engine, but early car models often require a rebuild and major engine overhaul.
The VAZ-2112, like all models in this series, is equipped with an on-board computer that works as an advanced diagnostician. A significant number of sensors cover the main vehicle systems and provide operational information about their performance, however, the reliability of such sensors is quite low, which also requires their frequent replacement.
Factors affecting cost
If you want to purchase a working radiator, spending a minimum amount of financial resources, then it is recommended to visit different places that sell auto parts and compare the cost and quality of the part you are interested in. The cost range for the VAZ 2112 auto radiator is wide. This is due to the influence on the price of such factors:
- Type of auto parts.
- Originality.
- Brand.
- State.
- Quality.
- Place of purchase.
- Seller's fame.
All auto radiators can be divided into four types:
- Equipped with oval tubes . They have excellent heat transfer. The prices are reasonable. The disadvantages are the general hardness and the small number of manufacturers.
- With round tubes . Their heat transfer is lower. Special gaskets are required for this to work.
- Monolithic aluminum . Characterized by excellent quality. This part is susceptible to corrosion. Its cost is high.
- Sintered . They are distinguished by quality, reliability, durability, optimal heat transfer. Suitable for powerful engines.
Also, all radiator devices are classified into:
- Liquid (coolant circulates due to the operation of the pump).
- Oil-based (characterized by complex manufacturing work, durability and higher cost).
For gasoline engines, the latter option is usually chosen for auto radiators.
Depending on the material of manufacture, there are radiators from:
Today, aluminum options are more often used due to their low cost and optimal characteristics. Copper parts are considered the most expensive and high quality.
Depending on the condition, car radiators for the VAZ 2112 are classified into:
There are also original and non-original devices. The latter can be of the following brands: