New cooling system
The sequence of your actions in this case is as follows:
- First of all, for safety reasons, disconnect the negative terminal of the battery. We drain the cooled antifreeze or antifreeze, first opening the expander cap. To drain the liquid you will need a container with a volume of 4-5 liters.
- Now, after unscrewing the two nuts, remove the wipers from the car.
- Then we dismantle the released protective plastic cover under the windshield, which is secured with 2 nuts and 4 self-tapping screws.
- To access the stove, remove the frill of the car by unscrewing 5 self-tapping screws, 1 screw and 2 nuts located at the bottom, in the middle of the frill, in the area of the steering rack.
- In order to remove the stove, remove the yellow cross brace, if any, as well as the curved bellows of the air filter.
- We pull the chokes off the radiator pipes.
- Then disconnect all electrical wires from the stove terminals.
- At the steering rack, unscrew 2 nuts that secure the heater, 1 nut securing the heater to the body.
- We unscrew the 3 screws connecting the two halves of the stove.
- We take it out by swinging the right side of the stove, first moving it to the right.
- The radiator in the removed half of the stove is secured with 3 screws. We take it out and replace it with a new one, not forgetting to put on the foam seal. We check the operation of the fan and, if necessary, repair it or replace it with a new one.
- Before installing the assembly, it is advisable to rinse the coolant supply hoses with running water.
- Assembly is carried out in reverse order.
Aluminum VS Copper: which radiator to choose?
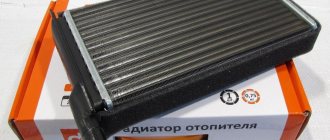
Many years of experience in operating radiators made of various materials on domestic cars (including the VAZ-2112), it was noticed that its performance is not affected by the material from which it is made. Both copper and aluminum devices heat equally well.
The only criterion when choosing a radiator is its originality, since only a serious manufacturer is capable of producing a quality product. Therefore, when purchasing a heater radiator, it is necessary to pay attention to this criterion.
So, where exactly is the radiator of the VAZ-2112 stove? In the design of the interior heating system, the radiator is located inside the heater housing, occupying a horizontal position in relation to the central panel.
How to replace the radiator of a VAZ-2112 heater with 16 valves of different types
Signs that your car's heating system radiator requires replacement:
- high consumption of coolant (antifreeze or antifreeze) in the vehicle cooling system (antifreeze or antifreeze);
- The heating of the car interior does not work;
- traces of a coolant leak on the asphalt under the heater radiator or leaks in the hoses supplying fluid to the heater;
- the smell of antifreeze in the cabin;
- greasy deposits on car windows, their fogging.
In these cases, first of all, check the tightness of the system hose clamps.
Perhaps they are the cause of the leaks. And now about how to replace the VAZ-2112 heater radiator with 16 valves of different types
Removing the heater radiator
Your first priority is to get rid of the antifreeze. It is better to drain the coolant into a clean container if you filled it recently and it is in good condition. This will allow you to refill it later.
- Relieve pressure by opening the expansion tank cap. Just let the car cool down before doing this.
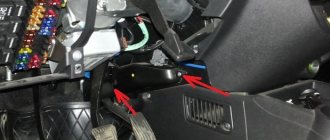
- Next, behind the ignition module, find the plug that needs to be unscrewed.
- You should have about 4 liters of coolant coming out of the hole. Therefore, prepare a container of appropriate size.
- Or you can drain through the expansion tank. Although this option is not particularly convenient.
After draining the coolant, you can begin further dismantling the radiator. But here the procedure depends on what kind of unit we are dealing with - a new or old model.
Let's consider both options separately.
Old stove
The radiator is removed from the engine compartment. This is done as follows:
- Remove the rubber frill seal;
- Under the brake master cylinder, locate the fasteners that hold the frill in place. Unscrew it;
- Now remove the screws that hold the right side of the frill in place. There should be four of them in total;
- Disconnect the two small clamps on the frill. They hold wires and hoses;
- The positive terminal and negative wire are disconnected from the fan;
- Move the left side of the frill forward a little, but you don’t need to remove it completely. All you need to do is unscrew a couple of fasteners;
- Remove the wind cover;
- If there is a coolant level sensor terminal, disconnect it;
- Remove the steam exhaust hose from the expansion tank.
Removing thermal insulation
Next, you need to remove some elements one by one. Proceed strictly in the specified sequence.
- Windshield washer hose.
- Wipers.
- Windshield trim. Heater housing clamps.
- Front part of the heater with fan.
- Cabin filter.
- The second part of the case is the fan.
- All hoses (steam outlet, return and supply).
- Radiator housing.
If your existing radiator is made of copper, the presence of a leak does not indicate a mandatory replacement. It can be soldered. Only this question is better to entrust to a specialist. Even if you pay more money, the decision will be competent and correct
So we figured out how to remove the heater radiator on an old-style VAZ 2110. When installing a new unit or a repaired old one, make sure that the pedal of the plastic housing from the fan fits into the groove. If this is not done, the gearbox will not be able to change the position of the damper. Consequently, there will be no heat inside the cabin.
In addition, it is better to replace this plastic pedal with an aluminum one. Not expensive, easy, but reliable and durable.
New stove
If you are dealing with a new type of stove, there are some nuances regarding fixing the heater to the body.
To remove the unit, you will need to dismantle several elements. Namely:
- There are screws at the bottom of the windshield, the middle one can be unscrewed;
- Also unscrewed is a pair of nuts that you will find slightly above the intake manifold;
- The nut located to the left of the filter must be removed;
- If there is a reservoir with washer fluid for the rear window, then it and the air filter are removed.
We recommend: Why do car brakes squeak and what can you do about it?
The new generation heater is distinguished by the fact that the design is detachable. This is quite easy to do to be able to replace the heater radiator.
Main aspects of the operation of the heating system of the VAZ 2112 16 valves: how to change the heater radiator?
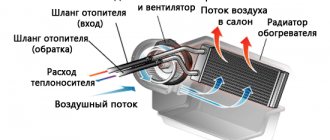
As you know, the purpose of the heating system is to provide more comfortable driving. In cold weather, operating a car with a faulty heater will be virtually impossible, since the heater simply will not be able to warm up the interior. What is the heating system of the VAZ 2112 16 valves, what malfunctions are typical for it and how to replace the radiator - detailed instructions are presented below.
In VAZ 2112 cars, supply and exhaust ventilation is used. In this case, the air flow enters through special holes located in the windshield trims.
The air itself can be supplied either forcefully, under the influence of the heater fan, or arbitrarily. The air flow exits from the passenger compartment through the gaps that exist between the door panels, as well as at their ends.
Special valves are built into these openings that allow air flow to the outside and also delay its entry inside, which improves thermal insulation in the cabin.
- A radiator device is used to heat the air flow; this unit sets the required temperature, as a result of which the air is heated.
- Main elements of the heating system:
- The radiator itself. It is installed in a plastic casing and is located horizontally under the control panel.
- The design itself includes two rows of aluminum hoses, on which two plastic tanks are installed. There are two fittings on the left tank - through one, drainage is carried out, and through the second, antifreeze enters the system.
- Dampers are used to regulate the volume of incoming air. If these elements are installed in extreme positions, then air flow will not flow into the cabin.
- Another feature is that, unlike other VAZ models, the 2112 does not have a heater valve designed to shut off the flow of antifreeze. Accordingly, when the engines are running, the radiator unit is constantly heated, which facilitates prompt heating of the interior. Thanks to a significant reduction in joints, the tightness of the system is greatly improved.
Possible heater malfunctions and ways to eliminate them
What symptoms can you use to identify a malfunctioning heating system:
- antifreeze consumption has increased, the volume of liquid in the expansion tank is constantly reduced;
- the interior of the vehicle practically does not warm up;
- traces of antifreeze leakage began to appear under the bottom of the car, in the area where the radiator assembly was installed or the location of the pipes, and traces of refrigerant may also appear in the passenger compartment;
- greasy marks began to appear on the inner sides of the glass, the glass itself began to sweat a lot;
- the smell of refrigerant in the car interior (the author of the video is the channel In Sandro’s Garage).
For what reasons does the VAZ 2112 stove not work:
- One of the most common problems is the failure of the radiator; there are two ways to solve the problem - either repairing the radiator device or replacing it. Repair is relevant if the damage to the device is not serious and its case can be soldered. But often the repair does not produce results, so the unit has to be replaced.
- Failure of the gearmotor, that is, the stove itself. As for fixing the problem, here you need to act in accordance with the malfunction. If possible, then, of course, you should try to repair the motor itself, but usually it is replaced.
- Antifreeze has run out. This problem is usually caused by a leak. A leak can occur through the radiator assembly, thermostat, or damaged pipes. If the radiator and thermostat are intact, then you need to check the condition of the hoses and especially their connections. If the pipes are cracked and show signs of damage, they must be replaced.
- Thermostat failure. For this reason, although the liquid will partially circulate through the system, the stove will not be able to heat the interior. If the thermostat is not working, the device is usually replaced.
- The heater control unit does not work, in particular, we are talking about the module located on the center console. If the control model refuses to work, the stove simply will not be able to receive signals about activation, shutdown and mode switching. If the problem lies in the unit, then it will need to be replaced, but often such malfunctions are caused by damage to the electrical circuit or poor contact of the device with the system.
Criteria for choosing a stove radiator
As for the choice, before purchasing you should find out exactly what type of stove is installed in your car - old or new. Depending on this, the choice of radiator device is made (the author of the video is the MegaMeyhem channel).
Instructions for replacing the stove radiator
Due to the fact that the “two-piece” can be equipped with an old or new model radiator unit, the procedure for replacing the device may differ. We will consider each option separately.
So, how to replace the stove radiator in new-style systems:
- First you will need to turn off the ignition and disconnect the battery. Open the expansion tank cap, then place a reservoir with a capacity of about 4-5 liters under the drain hole and drain the coolant. If there is sediment in the antifreeze, then it would be better to change the consumables.
- Next, unscrew the nuts and remove the wiper blades.
- Having done this, you need to remove the plastic trim, which is located under the windshield; it is fixed with two nuts, as well as four self-tapping screws.
- To gain access to the heating device, it is necessary to dismantle the frill, unscrew five self-tapping screws, two nuts and another screw, which are located below, in the area of the steering rack, and also in the middle of the frill.
- To dismantle the heater, you will need to remove the cross brace, if installed. Of course, there may be no spacer. You should also remove the air filter bellows and throttles from the hoses of the radiator assembly.
- Next, the wiring should be disconnected from the heater terminals.
- After this, you should unscrew two nuts from the steering rack, which secure the heater, as well as one nut that secures the device to the body.
- Having done this, you should unscrew three more screws, with the help of which the two halves of the heater are connected. After this, you can remove and, by rocking, disconnect the right part of the heater from the left.
- The radiator assembly itself is located in the dismantled half; it is fixed with three bolts. We remove this device and install a new one in its place; of course, a foam rubber seal should also be installed. Then the operation of the fan is checked; if necessary, the device should also be changed. Before assembly, you need to flush the pipes through which the refrigerant flows. Assembly is carried out in reverse order.
How to remove the stove
Removing the stove on new VAZ-2110 models
First of all, drain the old antifreeze. To do this, the pressure in the system is released by opening the expansion cap. Next, we find the ignition control unit: the drain plug is hidden behind it; Unscrew it and wait for the liquid to be completely removed from the device.
The radiator is held on by 4 fasteners - a screw under the front glass, two bolts on the side of the intake manifold. There is also a nut next to the cabin air filter - it also needs to be removed. The driver has the opportunity to remove the radiator almost freely. But it will be so easy only for owners of restyled tens (VAZ-21103).
We also recommend reading our expert’s article, which talks about the features of tuning the VAZ-2110.
Removing the stove on old VAZ-2110 models
With the “old ladies” 1996-2001. everything is more complicated. The driver will have to remove the wipers, as well as the washer fluid supply line. Also superfluous will be a decorative trim under the forehead, a heater housing, a cabin air filter, a fan, and flexible heat supply hoses. AvtoVAZ engineers clearly did not want anyone to repair the stove themselves. Only by removing all the described parts will the car owner gain access to the interior heater radiator.
Fast way
The angry “vazovods” turned out to be no slouch and figured out how to remove the stove on a pre-restyling VAZ-2110. You will also have to work hard, but still less than with the standard algorithm.
Let us explain how to remove the stove on a VAZ-2110 in the simplest way:
- After draining the antifreeze and disconnecting all the pipes, we dismantle the expansion tank.
- The frill overlay will also get in the way, so we remove it.
- And now the highlight of the program: remove the brake pedal along with the vacuum booster.
- The repairman has a wonderful view of the radiator, and now nothing will prevent him from removing it after removing the fasteners.
Use this “life hack” if you don’t want to spend several hours with repairs.
When to change/remove the heater radiator
If you have a couple of days free, then you can shoot quite often if it brings moral satisfaction. If we change or remove the radiator, then there must be objective reasons for this. Since we need the stove to heat, we will remove it when it is not heating. But first you need to make sure that the problem is in the radiator. Even the very fact of an antifreeze leak can be caused not by the radiator at all, but by pipes of disgusting quality, which become woody and crack after a couple of years of operation. The difficulty is that the stove reliably hides its structure and is perfectly protected from industrial espionage, so that not a single part of it is accessible to enemies without disassembly.
Therefore, if antifreeze quickly leaks into the cabin or under the hood near the stove, you should at least try to determine the cause of the leak. A leak is fine, but with a groundless failure of the heater it’s more difficult. There can be many reasons:
- air lock in the heating circuit;
- clogged heater radiator;
- clogged cabin filter, if there is one at all;
- clogged air ducts;
- problems with the electric motor of the stove - it does not rotate, does not create pressure, creates insufficient pressure;
- electrical malfunctions - electronic climate control unit, violation of air recirculation operating modes, typical malfunctions of switches and regulators.
If there is still a need to replace the radiator, we will replace it, but first you need to select it.
Manufacturers and costs of radiators
Today there are quite a lot of manufacturers, but among them there are the most popular ones, the radiators of which can be easily found in stores.
- LUZAR
- FENOX
- OberKRAFT
- BAUTLER
- DZA LLC
- Radiator Iran Co.
- Orenburg radiators
As you can see, there are a lot of manufacturers, and each of them has its own pros and cons. If you decide to buy a high-quality radiator that will serve, it is better to choose a radiator from DZA LLC. It is the radiators of this company that are installed on the conveyor. Its cost varies between 700-1000 rubles depending on the region.
Replacing the heater radiator on a Priora without and with air conditioning. This is AvtoVAZ
- The heat exchange device is represented by a radiator, through which the external air entering the cabin is heated;
- A fan driven by an electric motor promotes air circulation in the cabin;
- Damper that regulates the flow of incoming cold air;
- Dampers that regulate and distribute the flow of incoming warm air into the cabin.
- Disconnect the vehicle from the battery;
- Now you can start removing the windshield trim;
- The windshield wiper arms will interfere with operation, so they need to be removed;
- You also need to remove the plastic fluid supply tubes to the injectors;
- To remove the decorative trim of the windshield, you need to unscrew the seven screws that secure it;
- After this, you can remove the hood seal;
- There is a screw installed in the middle of the lining that tightens both halves of the lining;
- Next, use a screwdriver to pry off the plugs that cover the screws, unscrew them and remove the trim from the body;
- After this, you should begin to remove the sound insulation of the engine compartment; to do this, you should unscrew the screws that secure it, and then remove the left and right linings;
- Now let's move on to the pipes going to the heater radiator. You should loosen the clamps and remove the pipes. Place a container under them, as antifreeze may spill. The removed pipes should be plugged in an accessible way;
- Next, you should disconnect all connectors with wires that go to the heater;
- After this you will need wrenches. Using a socket wrench set to “10” you should unscrew three nuts, and one nut will be used for a wrench “8”;
- The wiring harness interferes with removing the heater. You need to remove the holder and take it to the side along with the wires;
- Now the work will continue inside the car. You will need a “13” socket wrench to remove the bracket with the brake pedal, which then needs to be moved to the side;
- The heater is accessible and can be removed for repair and maintenance;
- To remove the radiator, you need to use a Phillips screwdriver to use three screws, after which it can be easily removed. In many cases, it is dirty, so it should be cleaned with a brush and blown with compressed air.
- Installation is carried out in reverse order.
- Remove the rubber seal from the windshield lining;
- After this, they begin soundproofing the engine compartment. Some screws are not easy to get to, be patient, be careful and everything will work out;
- Now you can begin to remove the foam gasket on the pipes;
- After this, you can remove the plastic radiator cap; to do this, you need to unscrew three screws;
- Once access to the pipes is available, you can begin to remove them. You should not completely drain the antifreeze from the system; you can substitute a small container and drain it from the heater radiator and expansion tank, and then plug the pipes.
Auto repair school - Do-it-yourself car repair
Jun 21, 2022 VAZ 2108, VAZ 2109, VAZ 2110, VAZ 1117 Kalina, VAZ 2170 Priora by admin
The main reasons for replacing the heater radiator are : a leak in the heater core and a decrease (or complete absence) of heat transfer from the radiator. With the first reason everything is clear and understandable. The loss of antifreeze from the expansion tank and traces of its (antifreeze) appearance under the car are difficult to miss. Plus, on top of that, the smell of antifreeze will appear in the car interior. And the diagnosis suggests itself - the heater radiator is leaking. But with the second reason, everything is not so quick and clear. Since a decrease in the temperature of the air entering the car interior through the heater can occur for several reasons - insufficient coolant level in the car system, a faulty thermostat, an air lock in the cooling system, a problem with the regulator or heater flap control motor and, finally, a clogged radiator stoves _ Therefore, before “blaming” the heater radiator for poor interior heating, you must first check and make sure that the entire cooling/heating system is working (check the antifreeze level in the tank, check the thermostat, make sure the heater damper control unit and motor are working properly).
Only after this will it be possible to sign the final “verdict” on the stove radiator. But, before that, it wouldn’t hurt to carry out one simple check: warm up the engine to operating temperature, check the upper and lower heater pipes with your hand in the engine compartment (they should be the same temperature), turn the “heat-cold” knob all the way to the right, turn it on heater fan. If, in the first 10-20 seconds, the air flow was hot or comfortably warm, and after that its temperature began to noticeably decrease to “room temperature,” then you can safely prepare to work on replacing the stove radiator. And this photo report describing the fastest way to replace a new model heater radiator on VAZ 2110-2112 cars will be useful for you. At the very least, I hope so))).
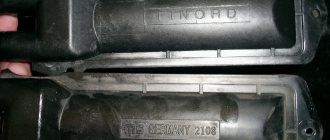
Spare parts. For VAZ 2110-2112 cars, heater radiators are sold in two versions - old and new . Until the fall of 2003, dozens of them had old-style heater radiators installed. After 2003 - new. These radiators are not interchangeable. Therefore, before going to the car market, you must first decide which of the two options you should buy. The catalog number of the new stove radiator is 21110-8101060-00 . The catalog number of the old-style stove radiator is 2110-8101050 .
Then they answer the question, “Which manufacturer of the heater radiator is better to buy/install on a VAZ 2110? ". The correct choice of heater radiator (heater) for VAZ-2110, VAZ-2111, VAZ-2112 is a radiator manufactured by DAAZ ! And this is not advertising, but friendly advice. Excellent quality and excellent heat dissipation - time-tested. All other options will definitely lose. Either they will flow quickly, or they will heat poorly. Therefore, I recommend not to play roulette and not to try to save money, but to buy a DAAZ stove radiator.
List of tools that will be necessary to successfully replace the heater radiator (heater) of a new model on VAZ-2110, VAZ-2111, VAZ-2112 cars manufactured after 2003 : a container for collecting coolant, a Phillips screwdriver, a high 10-mm socket + a ratchet wrench , socket wrench for 17 and 13 (the presence of a universal joint, extension and ratchet wrench is welcome, as their presence greatly facilitates and speeds up the work).
Photo report describing a quick way to replace a new model heater radiator (after 2003) on VAZ-2110, VAZ-2111, VAZ-2112 cars:
First of all, you need to drain the coolant. We find the drain plug on the engine block (photo 1). We place a container under the engine to collect antifreeze and unscrew the plug (key 13). Then unscrew the cap of the expansion tank. While the liquid is draining, we begin disassembly.
If you have made a decision or there is a need to replace the coolant along with the heater radiator, then you will have to drain the antifreeze from the cooling radiator (photo 2)
Unscrew the clamps and disconnect the pipes from the expansion tank. Unfasten the fastening belt and remove the expansion tank (photo 3).
Remove the hood seal (photo 4).
We find and unscrew all the fastening screws of the left and right parts of the soundproofing lining of the engine compartment (photo 5, 6, 7, 8).
We disconnect the plastic clamps from the casing (photo 9).
At the bottom, the casing is attached to the car body with two nuts. We find them and, using a high 10 socket and a ratchet wrench, unscrew them (photos 10 and 11).
After which, you can pull out the trim from the engine compartment.
We disconnect the chip from the brake cylinder reservoir cap (photo 12).
Disconnect the hose together with the fitting from the vacuum booster (photo 13).
Using a 17 wrench, unscrew the two GTZ mounting nuts to the vacuum brake booster (photos 14 and 15). In order not to air the brake system, we do not unscrew the pipes from the main brake cylinder. It is enough to move the GTZ forward (in the direction of travel of the car) as far as the brake pipes will allow.
We climb into the car interior. Disconnect the wires from the brake light switch (photo 16).
Using a 13mm socket wrench, unscrew the four fastening nuts of the brake pedal bracket to the body (photos 17 and 18).
After which, you can return to the engine compartment and begin to pull out the vacuum brake booster along with the bracket and pedal. This is not an easy matter and it is unlikely to be done quickly. You will have to twist and turn the vacuum booster a little before you can pull it out. But, I can assure you that it is quite possible to remove the vacuum booster with the bracket without removing the plastic cover of the windshield (photo 19).
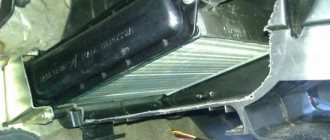
Now access to the new model heating radiator (stove) is open. Where the heater radiator is located on a VAZ 2110-2112 can be seen in photo 20.
All that remains is to unscrew the worm clamps of the two main and one steam outlet pipes (photo 21). Disconnect the connector from the damper control micromotor (photo 22).
And unscrew the three fastening screws of the radiator to the stove body (photo 23).
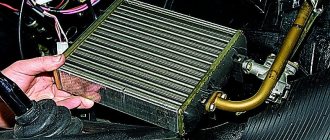
We take out the old radiator (photo 24).
We clear the niche of leaves and debris. And we install a new stove radiator (photo 25).
Just as fun as we pulled it out, we return the vacuum brake booster with the pedal bracket to its place (photo 26).
After which we carry out the assembly in the reverse order.
That's it! Replacement of the new type heater radiator on VAZ-2110, VAZ-2111, VAZ-2112 cars has been completed.
When using an article or photographs, an active direct hyperlink to the website www.avtorem.info is required!
Did you like the article? Share it on your page!
How to remove and replace the heater radiator on a VAZ-2112 (old model)?
A leak of cooling fluid in the cabin is a direct prerequisite for the need to change the heating radiator, since it is already out of order.
Note that models older than 2003 have an old-style stove installed. However, towards the end of this year, the cars were already equipped with a new heater. Accordingly, they have some structural differences, and therefore are removed and installed differently.
Replacing the radiator on the VAZ-2112 stove:
- We free the system from antifreeze by draining it through the hole in the power unit block or through the expansion tank. If you choose the second option, you must remove the ignition module. Next, remove the lid from the tank, and then uncork the drain plug. If there is no sediment in the coolant, that is, it is in a clean state, it can be reused.
- It is necessary to remove the hood seal, which is located next to the frill.
- The screw fixing the frill should be unscrewed, and then the screws securing its upper part should be unscrewed.
- Loosen the clamps and remove all wires and hoses from the frill.
- Disconnect the vehicle's power supply by removing the terminals from the power source.
- On the left side of the frill there are two screws that must be unscrewed to remove the element. There is no need to remove it.
- Remove the front cover.
- You will need to remove the terminal (if any) from the liquid level control sensor in the system, as well as the steam removal hose from the expansion tank.
- Remove the hose from the front windshield washer.
- After unscrewing the four screws, you need to remove the windshield wipers with the windshield trim.
- The stove fan is dismantled, as well as the mounting brackets for its housing.
- The mounting screws are removed from the protective casings of the air filter and fan.
- It is necessary to remove the front heater blower housing and the cabin filter housing.
- The rear part of the fan shroud is removed.
- The steam outlet line and the antifreeze supply hose must be disconnected, having first loosened their fastenings.
- The heater core can now be removed.
Before installing a new radiator, it is necessary to clean its seat in the stove body. When assembling the heater in reverse order, it is very important to control the tightness of all connections and the correct location of the parts. Otherwise, the heater may simply not function, and then the entire described sequence of work will have to be done again.
New cooling system
The sequence of your actions in this case is as follows:
- First of all, for safety reasons, disconnect the negative terminal of the battery. We drain the cooled antifreeze or antifreeze, first opening the expander cap. To drain the liquid you will need a container with a volume of 4-5 liters.
- Now, after unscrewing the two nuts, remove the wipers from the car.
- Then we dismantle the released protective plastic cover under the windshield, which is secured with 2 nuts and 4 self-tapping screws.
- To access the stove, remove the frill of the car by unscrewing 5 self-tapping screws, 1 screw and 2 nuts located at the bottom, in the middle of the frill, in the area of the steering rack.
- In order to remove the stove, remove the yellow cross brace, if any, as well as the curved bellows of the air filter.
- We pull the chokes off the radiator pipes.
- Then disconnect all electrical wires from the stove terminals.
- At the steering rack, unscrew 2 nuts that secure the heater, 1 nut securing the heater to the body.
- We unscrew the 3 screws connecting the two halves of the stove.
- We take it out by swinging the right side of the stove, first moving it to the right.
- The radiator in the removed half of the stove is secured with 3 screws. We take it out and replace it with a new one, not forgetting to put on the foam seal. We check the operation of the fan and, if necessary, repair it or replace it with a new one.
- Before installing the assembly, it is advisable to rinse the coolant supply hoses with running water.
- Assembly is carried out in reverse order.
What to install?
Brand Pekar
Heating radiators used for the VAZ 2110 are usually divided into two types:
- Old style;
- New sample.
Until the fall of 2003, old radiators were installed on the “tenth” model, and then cars with new units began to be offered. There is practically no difference between them, but the repair differs in approach and complexity.
In addition to the standard aluminum radiator, a copper analogue is perfect for the VAZ 2110. This unit has fewer fins, but is characterized by more efficient heat transfer. This will make the stove work much better. The only drawback of a copper radiator is its cost. Ideal for installation on a VAZ 2110, a double-row copper radiator marked 2110-8101060 will cost you up to 2,000 rubles.
If you don’t want to spend that kind of money, but want to get an effective device with high quality indicators, then choose the DAAZ model. This radiator is made of aluminum, works well, and the price does not exceed 1000 rubles.
When and what kind of heater radiator was installed on the VAZ-2110
- Until mid-2003, the entire tenth VAZ family was equipped with DAAZ aluminum radiators with catalog number 2110-8101050.
- After 2003, radiators of an improved design began to be installed on the 2110. Its article number is 2110-81010160-00.
Old style radiator.
New sample radiator.
Prices
The price of a native DAAZ radiator should not exceed a thousand rubles. Radiators will sell for about the same money:
- Luzar;
- Kraft;
- Pramo LRZ;
- Bautler;
- Finord and a number of other manufacturers.
These are all aluminum heat exchangers, so their prices are not too high.
Aluminum or copper?
A copper radiator will cost more, but it's worth it.
A good copper radiator will cost approximately twice as much, but it is worth it : firstly, the heat transfer of copper is higher, secondly, a copper radiator has high thermal inertia (it takes a long time to heat up, but cools down slowly), thirdly, in case of damage, a copper radiator you can easily restore, clean, replace damaged elements and it will be much cheaper than replacing the entire stove radiator with a new one.
And copper is practically not subject to corrosion , if we talk about the life of the car. If we have made a choice, we assemble the tool, diagnose the heating system and replace the radiator on the VAZ-2110.
What do you need for work?
First of all, you will need a new heater radiator. The choice is presented in a fairly wide range, so decide for yourself here.
As for tools and materials, be sure to check the condition of the system pipes. It is possible that they are also damaged, so they will have to be replaced.
Buy a set of clamps. In general, you will need three of them, but it is better to take a reserve just in case. Moreover, this “just in case” happens to every second person who changes a stove radiator with their own hands.
Tools include a short Phillips screwdriver and tweezers . The latter will help you install the latches.
Design features
The VAZ-2110 heater radiator is fully compatible with other models of this family (2111, 2112). This is a single-section heat exchanger with two connection pipes. The device allows you to maintain a comfortable temperature in the cabin by supplying filtered hot flow from the engine. Also, the presence of a heating radiator eliminates fogging of the interior windows.
Be sure to read the article by our specialist, which describes in detail the technical characteristics of the VAZ-2110.
Standard dimensions: 160×50×290 mm. Made from aluminum. Curb weight is less than one kilogram. Currently, spare parts of the described type are produced by several enterprises. The most famous are DAAZ heating radiators, which were originally used on VAZ. Also, compatible parts are produced under the Luzar brand. If you do not want to frequently change heater components, pay attention to copper products, which are much stronger and have less heat transfer.
Replacing the radiator of the VAZ-2110 stove with copper analogues is carried out according to the same algorithm as the installation of standard heating equipment.
Important subtleties
- When installing a plastic flap, sometimes you have to grind and adjust the flap into place so that it moves freely. It is also allowed to do a little extra work near the aluminum damper.
- After installing the damper, you should set it by hand to the cold air supply position. In this position, the heater radiator will be covered with a damper.
- Move the temperature sensor to the MIN position and turn on the ignition. The sensor will begin to rotate and take the correct position. This will make it easier for you to insert it into place, since the damper and gearbox will be in the MIN position.
- Buy a double for the washer hose, as this will simplify the installation and removal of the wind cover in the future.
As you can see, there is nothing difficult in removing the heater core if you know what to do.
Video:
Video:
VAZ 2110 heater replacement technology
Replacing the radiator of a VAZ 2110 stove is quite quick if you remove it not as the instructions say, but remove it without disassembling the entire body, and even more so, without disassembling the interior.
The radiator can be easily and simply removed towards the vacuum brake booster. To do this, you just need to remove the brake pedal along with the booster, and you don’t even need to touch the master cylinder and bleed the brakes. Simply remove the cylinder from the vacuum booster, unscrew the two 17mm bolts from the interior that secure the pedal and the vacuum chamber, remove or cut off the old hoses and first drain some antifreeze to the level of the radiator. it's about a liter.
Naturally, you will have to change all the clamps and install new pipes so as not to risk the old ones, but this would have to be done according to the standard replacement procedure. The entire work of replacing the stove radiator will take an hour at most, the only drawback in this method is that we will not be able to really look through the stove body from the inside without dismantling it, and there may be a lot of interesting things there. Be bold, and the warm interior of the dozen will be a reward for your dedicated work. Happy travels to everyone!
Radiator replacement tool
Replacing some parts in a car yourself requires a certain skill. In the case of a VAZ car, you can replace the radiator without experience. Following the replacement instructions step by step will allow you to complete all the work without any problems. The main thing to consider before starting work is the availability of tools.
In order to deal with this problem as quickly as possible and carry out repairs with minimal labor costs, it is advisable to have the following list of tools on hand:
- Ratchet handles large and small.
- The head is 13 deep and 10 similar.
- Extension.
- A regular length screwdriver with a Phillips blade.
- Short screwdrivers: flat and Phillips.
- Magnetic handle.