Nothing is eternal and perfect. Even when it comes to the almost domestic classic represented by the GAZ 31105 Volga.
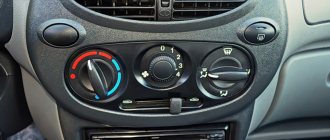
Owners of the old Volga 3110 are in many ways jealous of the owners of version 31105 because of their stove and control unit. Here it is electronic, and not based on conventional levers. But even with such a block problems arise.
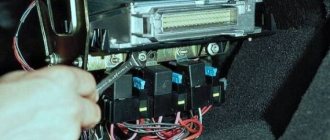
If a component of the control unit responsible for the heater on the Volga 31105 fails, it will need to be dismantled. But do not forget to first check the fuses, the condition of the battery, and the electric fan.
After all, the unit itself is not always to blame for a stove failure. If all other possible causes have been eliminated, and the problem is in the heater controls, it will have to be removed and repaired. Or change it completely, which depends on the specific circumstances and malfunctions that have arisen.
Adjusting the GAZ-31105 heater: Cold-hot
Adjusting the GAZ-31105 heater: Cold-hot
We, apparently, will not arrive soon at such a system, when the owner gives the car for repair and, having paid money, soon receives it in working order.
If “give” and “pay”, as a rule, there are no problems, then with the latter - actually repairing the car, difficulties very often arise. Even during the warranty period. This time the “doctor” had to “heal himself” - the editorial Volga with an American engine needed help. After several visits to the warranty service center, it became clear that we couldn’t expect much help from him. Just as water flowed through the windshield seal, it continues to flow. The bridge howled and howled. But these are all-season problems, and when it’s winter, the biggest concern is the operation of the heater. At the first moment the “stove” was turned on, hot air came out of it, but after a few seconds it was replaced by cold air. And so - with each turn of the temperature regulator.
On the Volga and Chrysler, the heater is not simple: the temperature in the cabin is monitored by electronics. No longer hoping for service, we decided to look for the electronic “bug” ourselves.
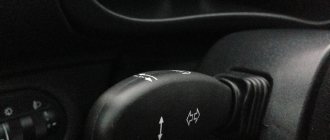
The climate control algorithm is quite unique: to switch from “cold” to “warm” or vice versa, the left “twist” needs to be turned all the way to the desired position, and then returned to the desired number. The temperature in the cabin is monitored by a sensor on the control unit panel. It commands the air damper actuator, which directs flow through or around the heater core, and opens the radiator valve. If the tap and dampers work (this can be heard when the engine is turned off), then the sensor is faulty.
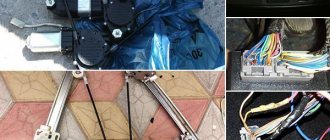
We remove the handles of the control unit, take out the unit itself and, squeezing out the “whiskers” of the cover, disassemble it. There were as many as three “bugs” here, and each one could paralyze the operation of the system. In order not to find out which one was harmful in our case, we get rid of them all at once.
The sensor is covered with a thick coat of dust and soot. This conductive layer could well short-circuit his bare legs. The heads of the board screws overlap the current-carrying traces of the printed wiring and can also short them - another possible option.
The tinned wires of the fan that drives air through the sensor are twisted into a bundle. There are gaps between the fan, the sensor and the air supply channel to the sensor: it is not known what kind of air flows around the sensor and, accordingly, whose temperature it measures.
We wash the board and sensor with alcohol, insulate the bare legs, wires and sections of the board - cover them with varnish, and place insulating washers under the screw heads. To ensure that the “necessary” air is sucked through the sensor, we place gaskets made of double-sided tape between the intake, the board and the fan.
Our heater control unit turned out to be serviceable, and after assembly the heater worked as it should. But, apparently, not everyone is lucky: domestic electronics are a capricious thing.
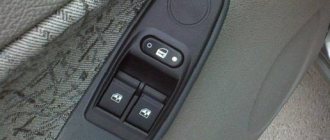
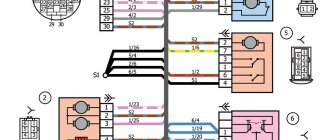
If the unit burns out, but there is no desire to experiment at your own expense, you can solve this problem differently: switch to alternative, “manual” control. You will need two power window buttons and two light bulbs. We connect them according to the diagram and install them in any convenient place.
Now, to open or close the heater tap, press the corresponding side of the key until the lamp filament lights up (it will burn at full intensity).
The air damper control is similar, with the second key, and intermediate positions are achieved by short switching on (the lamp does not light up).
Tags: chaise, does not heat, 406, stove
Comments 55
On the tube under the exhaust manifold, which direction does the flow go to the pump or towards the radiator?
I have gas21 for the winter, I do “perestroika” for the whole day! -Tashkent! (two stoves, tees, clamps, plumbing filters and taps, a bunch of hoses, 3 supplies from an internal combustion engine, 2 intakes per pump, electric pump, a sleeve with a mesh in the pipe, one fan blade, down with the diffuser) the hottest places are 4-3 cylinders
Three Volgas, five radiators changed, you don’t live in Sochi. You must be a pro when it comes to keeping your car warm! Find the cause of the malfunction, and don’t write crap where to put the hose. 1. Temp. engine? 2. Are the hoses to the stove hot? Both? 3. What kind of stove radiator? In which condition? Did you check the partition for serviceability before installation? 4. Is the condition of the stove? Gaps, leaks, air leaks bypassing the radiator? 5. Serviceability of cooling. systems? Air locks? For example, gasket failure. 6. Condition of the pump, serviceability of the temp. thermostat. open, close? 7. Condition of fittings and supply hoses? 8. Is the condition of the heater valve? 9. Coolant condition? If it’s filled with shit, then you’ll soon throw out all of the above. And there could be a bunch of other reasons, including seals on windows and doors. I had 1,3,4,5,6,9.
Bl. with one replacement you’ll be so eager... Blah... On the third, the pump and thermostat are already whispering in your ear how right, how it should be... Blah... +10005000
I started with the coolant, went through everything, three stoves (one new without a partition), an imported thermos, a cylinder head gasket (I drove for half a year with a broken one), a new main radiator, silicone pipes, a pump and everything on one car, it’s 7 years old and 50 thousand There was only a mileage. I think because of the scorched antifreeze, I drained this crap and washed it with running water for half a day with the taps open and running. True, it was always warm in it, except for the broken gasket.
With new radiators it’s also a lottery, I bought myself an aluminum Luzar, Tashkent disappeared, it’s warm, but not like with my native one
Everything is connected correctly! coolant supply from bottom to top, this way there will be no air jams!
I am currently in the process of replacing the interior of the 3110 in the 29th. Plus I’m converting the entire system from 16 hoses to 18 hoses. but you should already have all the 18th. What is the essence of my rant: the 18th radiator which I will install used. I know that it seemed to heat up normally in the donor, but I still decided to unsolder it and clean it. I removed the tank, which has no pipes. It looked clean, but about five tubes were clogged. basically a little. But when I rammed it, I was shocked at how much dirt was washed out. The second point is that I just removed the stove from the 29th. I installed a new radiator a year ago, but it didn’t get any warmer. It struck Staz that this radiator had one and a half times fewer tubes and fewer gills between the tubes. I think so with the 18th, which I rammed, due to the number of tubes and more frequent gills, the heat transfer will be twice as good... it’s also worth looking at all the fittings, otherwise they come with very small holes inside...
You have everything connected correctly, from the block always to the tap and from the tap to the lower pipe, this is so that the heater radiator does not get airy. The problem with all Volga stoves is the partition in the radiator of the stove, change the radiator and you will have Tashkent, and no extras. There is no need for pumps, without them it is hot in the cabin, in my 3110 from 406 at -30 it was so hot that I had to open the windows.
I have already replaced 5 radiators and the changes only made things worse
The radiators were new or used, if new, look at the pump, if everything is used, buy a new one. You didn’t write about the faucet you have, if so, try removing it directly.
There is no faucet, radiators were new, there was an electric pump
Are the inlet and outlet pipes hot?
You have everything connected correctly, from the block always to the tap and from the tap to the lower pipe, this is so that the heater radiator does not get airy. The problem with all Volga stoves is the partition in the radiator of the stove, change the radiator and you will have Tashkent, and no extras. There is no need for pumps, without them it is hot in the cabin, in my 3110 from 406 at -30 it was so hot that I had to open the windows.
Change the metal tube between the pump and the heater; if that doesn’t help, change the radiator. you can check the heater radiator. You remove the panel with the wipers and stick your hand into the heater air intake to check the temperature of the radiator. It’s cold at the bottom and hot at the top, which means it’s clogged and needs to be replaced, if it’s all hot, look at the outlet from the block and the pipe under the exhaust manifold, it’s also very clogged.
at one time the radiator of the 2nd row copper stove leaked, analysis revealed that everything was soldered and re-soldered, I bought the 3rd row from 24-29 (luminium) and hooked it up as shown in the manual! At the same time, I saw a neighbor at 29 installing an electric pump from a gazelle-sable, and installed this gadget for myself. I installed it at the outlet of the heater radiator so as not to create excess pressure in the heater radiator! they grinded something, it would clog or something else and antifreeze would leak into the salt and the analysis was a complete mess, installed it on the right mudguard under the washer barrel, through silicone rubber washers they sell it to plumbers, otherwise it buzzes loudly on the body! there are a couple of problems, the electric pumps are available for a hose for 12 and it seems for 14, look at what you have and in 3-5 years you will have to change the problem of the assembly, they start to leak! If possible, find a Boshevsky transporter from Volkswagen! and hook it through the relay! everything works, the stove heats up, and in the summer it’s like additional cooling for the engines in traffic jams