With the onset of cold weather, the main task of every motorist is to create warm and comfortable living conditions in the car. After all, you will agree that it is much more comfortable to drive in a warm car than to be cold. However, if heat is not supplied, then it is necessary to figure out what could be causing this. In this article I want to talk about repairing the Kalina stove switch.
Main causes of malfunctions
So, what should we do if heat does not flow inside our car and cold air blows. Let's consider the main causes of such malfunctions:
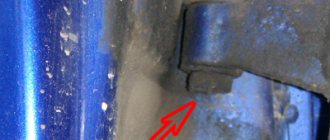
- Failure of the Kalina heater switching control cable. The reason for such a malfunction may be that the latch has fallen off, and the cable stretches normally in one direction, but does not reach the opposite direction.
- On Kalina, the stove only works at speed 4. Associated with a broken thermistor.
- On a Kalina car, the heater switch often breaks when turned on abruptly, which is due to insufficiently strong plastic.
Here is a list of the main breakdowns that may occur. Next, we move directly to the repair itself and replacement of failed parts.
Cabin filter
| Air intake is carried out through an air intake installed under the windshield frame. To clean the air entering the cabin, a filter element made of non-woven synthetic material is installed at the heater air intake. The exhaust is carried out due to the vacuum that occurs near the rear of the body when the car is moving. |
Repair and replacement of faulty parts
Many novice motorists ask questions: how to remove the heater regulator on Kalina, what LED is in the heater switch on Kalina, what should be done when the heater mode switch on Kalina does not work. Answering these questions, I want to say that initially it is necessary to dismantle our entire mechanism, after which we proceed to disassembly according to the following scheme:
- First of all, disconnect the negative terminal from the battery. This is done to de-energize the system so as not to short-circuit any of the sensors during the disassembly process.
- We remove the radio and turn off the power coming from the wiring harness.
- We remove the damper switch lever, then remove the temperature regulator and the air flow distribution regulator.
- At the bottom, remove the plugs behind which there are 2 screws, unscrew the fastening screws and gradually begin to remove the instrument panel console.
- After our panel is removed, it is necessary to disconnect the power supply connectors located on the back.
- After eliminating the malfunction, assembly is carried out in the reverse order.
To carry out this work, we only need a flat and Phillips screwdriver from the tools.
Difficult or impossible switching of the temperature regulator may be due to a breakdown of the switch itself. On a Lada Kalina car, replacing the heater switch is quite easy (provided that work has previously been done to remove the heater control mechanism). On the rear console of the control panel, unscrew the four screws securing the switch block. We remove the cable fastening clamps, then remove the cables from engagement with the drive unit. We replace the broken switch and reassemble it in the reverse order. When performing this work, I give you useful advice: the location of the cables on the lever block must be marked with a marker; this is done in order to install the rods in their original places during assembly.
When the stove temperature regulator does not work on Kalina, the main reasons for the breakdown may be: a disconnected connection wire or a failure of the thermistor. Such malfunctions are treated by soldering the wire and replacing the broken element. It happens that the stove regulator on Kalina does not work due to a breakdown of the temperature sensor, which happens quite rarely. This sensor is located inside the car interior lamp. If it is found to be damaged, it must be replaced with a new one.
Answering the question about what kind of LED is installed in the stove switch in Kalina, I want to say that there are LED lamps with a power of 3 Watts and a voltage of 12 Volts. This lamp is quite enough for illumination, but some motorists install LEDs with a power of 5 Watts. This does not affect the work process, the backlight just becomes a little brighter.
To summarize, it should be noted that it is much more comfortable to drive in a warm car. To ensure that the heater switching mechanisms do not break, it is necessary to switch them smoothly and not jerk sharply. Good luck and may your cars be warm and cozy in winter.
Selection of spare parts
The choice of a stove radiator should be approached carefully, since changing it is quite inconvenient. The majority of motorists choose an original part that is available for sale. But few people know that there are several analogues.
Let's consider the heater radiator options for Kalina, their catalog numbers:
- 1118-8101060 – this is the article number of the original catalog number of the heater radiator for Kalina. It fits perfectly and does not require any modifications. The average cost in the Russian Federation is 1500-1700 rubles.
Original heater radiator and hoses
- There are several analogues that are in no way inferior to the original in terms of quality. Thus, spare parts from the following manufacturers are suitable for Kalina: Pekar (1118-8101060), Fenox (RO0001O7), Luzar (LRH 0118) . The average cost of an analogue is 1200-1500 rubles.
Kraft stove radiator
Reasons for failure
There are not many reasons for the failure of a stove radiator, but you need to know them. Let's consider the main ones:
- Radiator clogged, which led to pressure, resulting in a breakdown of the inner tube.
Antifreeze flows into the cabin due to a breakdown in the heater radiator
- An air lock can also cause a radiator leak.
- Wear . Frequent use of the stove leads to wear on the inner walls of the tubes.
Perhaps these are the main reasons, but others may arise due to the operation of the car.
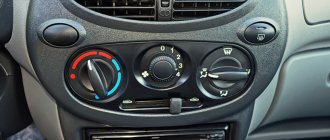
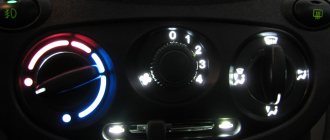
The device of the stove adjustment mechanism
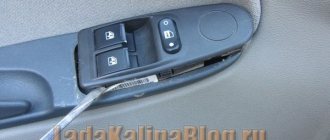
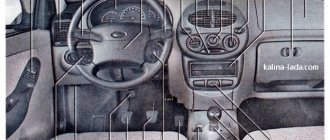
On the Lada Kalina car, the heater switches are located on a panel in the central part of the dashboard. It contains control mechanisms, namely:
- heater temperature regulator;
- fan operating mode regulator;
- air flow distributor control regulator;
- recirculation flap switch lever.
Actually, this is what our mechanism looks like. Now let's move on to possible causes of failure.
Possible heater malfunctions
So, what should we do if heat does not flow inside our car and cold air blows. Let's consider the main causes of such malfunctions:
- Failure of the Kalina heater switching control cable. The reason for such a malfunction may be that the latch has fallen off, and the cable stretches normally in one direction, but does not reach the opposite direction.
- On Kalina, the stove only works at speed 4. Associated with a broken thermistor.
- On a Kalina car, the heater switch often breaks when turned on abruptly, which is due to insufficiently strong plastic.
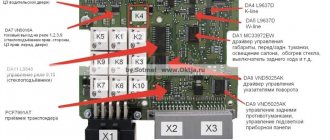
Faulty heater resistor of the Lada Kalina car
Here is a list of the main breakdowns that may occur. Next, we move directly to the repair itself and replacement of failed parts.
How to choose the right heater radiator
Before choosing a stove radiator, you should know that they can be either aluminum or copper-brass. It is difficult to clearly prioritize the choice of one material, but each one has specific features of its work. These features are dictated by the properties of the material. Copper has a slightly lower thermal conductivity than aluminum, and therefore warms up more slowly. This cannot be said to be bad, since the thermal inertia of such a radiator is quite large. This means that it may not cool down for a long time.
An aluminum radiator is the opposite. It warms up quickly, but cools down just as quickly. It has a few more disadvantages. Firstly, the aluminum radiator cannot be repaired. Once it drips, you can throw it away. Copper is soldered quite simply and as many times as necessary. You just need to choose it correctly, because when selling, especially in the car market, you may come across a repaired copy with the partitions removed. It won't leak, but it won't provide heat either. Antifreeze will simply pass through such a radiator as if through a pipe.
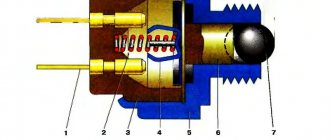
It is also worth paying attention to the presence of plastic liquid swirlers. You can see them if you look into the pipe. These are spiral-shaped plastic plates that increase the efficiency of the radiator by 25%. The price of a heater radiator for Kalina can range from 900 rubles for the original, and little-known companies can offer their radiators for 600-800 rubles. Naturally, it is better to overpay and buy an original new one. Copper or aluminum - at the discretion of the owner.
Repair and replacement of faulty parts
Many novice motorists ask questions: how to remove the heater regulator on Kalina, what LED is in the heater switch on Kalina, what should be done when the heater mode switch on Kalina does not work. Answering these questions, I want to say that initially it is necessary to dismantle our entire mechanism, after which we proceed to disassembly according to the following scheme:
- First of all, disconnect the negative terminal from the battery. This is done to de-energize the system so as not to short-circuit any of the sensors during the disassembly process.
- We remove the radio and turn off the power coming from the wiring harness.
- Remove the damper switch lever, then remove the temperature regulator and air flow distribution regulator.
- At the bottom, remove the plugs behind which there are 2 screws, unscrew the fastening screws and gradually begin to remove the instrument panel console.
- After our panel is removed, it is necessary to disconnect the power supply connectors located on the back.
- After eliminating the malfunction, assembly is carried out in the reverse order.
To carry out this work, we only need a flat and Phillips screwdriver from the tools.
Difficult or impossible switching of the temperature regulator may be due to a breakdown of the switch itself. On a Lada Kalina car, replacing the heater switch is quite easy (provided that work has previously been done to remove the heater control mechanism). On the rear console of the control panel, unscrew the four screws securing the switch block.
We remove the cable fastening clamps, then remove the cables from engagement with the drive unit. We replace the broken switch and reassemble it in the reverse order. When performing this work, I give you useful advice: the location of the cables on the lever block must be marked with a marker; this is done in order to install the rods in their original places during assembly.
The dashboard of a Lada Kalina car disassembled
When the stove temperature regulator does not work on Kalina, the main reasons for the breakdown may be: a disconnected connection wire or a failure of the thermistor. Such malfunctions are treated by soldering the wire and replacing the broken element. It happens that the stove regulator on Kalina does not work due to a breakdown of the temperature sensor, which happens quite rarely. This sensor is located inside the car interior lamp. If it is found to be damaged, it must be replaced with a new one.
Visual instructions for removing the fan resistor
Answering the question about what kind of LED is installed in the stove switch in Kalina, I want to say that there are LED lamps with a power of 3 Watts and a voltage of 12 Volts. This lamp is quite enough for illumination, but some motorists install LEDs with a power of 5 Watts. This does not affect the work process, the backlight just becomes a little brighter.
Every car owner knows how important the operation of the heating system is, especially in winter cold conditions. If the stove fails, it will, at a minimum, cause considerable inconvenience for the driver and passengers, so the performance of this unit must be at the highest level. You can learn more about how to replace the stove on Kalina and in what cases it is required from this material.
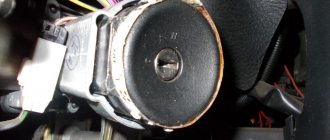
How to remove the dashboard
Before replacing the radiator of the Kalina-2 stove, you need to remove the heater unit. The latter, in turn, is located behind the dashboard. We have already looked at how to remove the center console. But in this case this will not be enough. The unit called “dashboard” needs to be dismantled as an assembly, but there are no other options.
The center tunnel cover will get in the way. It is pre-dismantled:
- Unscrew the three screws securing the handbrake cover and remove the cover;
- Dismantle the manual transmission lever. For a car with an automatic transmission, remove the plastic cover, unscrew the screw securing the handle, and disconnect the contact connector. To bend the rivets, use a flathead screwdriver;
- Unscrew the screw securing the tunnel cover, located near the handbrake bracket;
- Unscrew the side fastening screws (2 on each side). Now, the cover can be easily removed.
If no difficulties arise, dismantle the bracket (the handbrake microphone is attached to it). Simply, unscrew the screw head with a 13 key. Next we show a photo where all the actions are displayed.
We remove and pull out the assembly that covers the heater radiator
Step by step, do everything as indicated. Then, the dashboard can be “pushed” toward you:
- Bolts “2” securing the stand on both sides are unscrewed with a 13mm wrench. Nut “3” securing the ground wire must also be unscrewed;
- There is an air duct mounting nut under the front seats. Using a 10mm wrench, unscrew it to remove the air duct;
- In fact, there is a separate wiring harness that goes to ground. It is held in place by nut “1”, which is unscrewed (see figure below);
- The headlight range control assembly needs to be disconnected. Remove the control knob from the dashboard and unscrew the “black” nut (you need a 21mm );
- The “dashboard” assembly is attached to the pedal block with screws “1”. Unscrew them.
The dashboard has pads on each side. They are removed to unscrew two mounting screws (a 13mm wrench will do). Then, the assembly is pulled out towards itself, having previously disconnected the connectors with the wires.
The last operation can be called “dismantling the dashboard assembly.” And they do it only with an assistant.
Possible heater malfunctions and ways to eliminate them
If the stove blows very weakly or in the current mode it basically refuses to blow air, then there may be several malfunctions, as well as solutions:
- The heating system hoses are worn out. As a rule, if antifreeze leaks or the stove does not heat, this may be due to wear and tear on the pipes. To solve this problem, it is necessary to carry out a thorough diagnosis of each of the pipes. Coolant may escape through cracks or other damage.
- The heater valve has failed. If the stove control valve is broken, this can be indicated by traces of leakage of consumables in the vehicle interior.
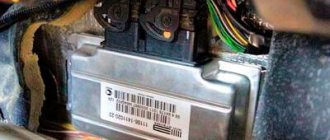
- There are malfunctions in the operation of the control unit. If the problem lies in the unit, then first of all you need to check the quality of its connection to the on-board network. If it is connected correctly, then most likely the problem lies there. It is better to entrust unit repair to specialists.
- Wiring faults. Perhaps the unit does not turn on the heating system due to lack of contact with the on-board network. In this case, the problem is solved by checking the circuit to find the broken section.
- The additional resistor is broken. This device is used to control the heater fan, so if the stove on Kalina does not heat, you also need to check the functionality of this element. If it doesn't work, then it will need to be changed.
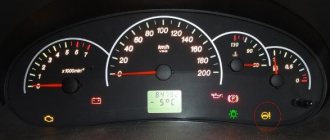
- The Kalina heater regulator, located in the car's interior, does not work. If the heater only blows hot air, but does not react in any way when switching its mode from hot air to cold air, then most likely the regulator installed on the center console has failed.
- The radiator of the heating unit is broken. This problem is considered one of the most common on domestic cars, and it is especially relevant for Kalina. You can try to repair this device or change it yourself. We will tell you more about how to shoot and how to replace the device below (the author is the Interesting Video channel).
Climate control Lada Kalina Lux
The system design is similar to that described above, with the exception of some details. To maintain a given temperature in the cabin, two new elements are used in the design: a temperature sensor in the cabin (built into the ceiling light) and a damper micromotor reducer. Also, the mechanical control unit has been replaced with an electronic one, with degrees of air temperature in the cabin marked on it.
The operation scheme is as follows: the control unit periodically receives a signal from the temperature sensor in the cabin and compares it with the temperature set on the unit. If the difference is too large, the control unit sends a signal to the micromotor gearbox, which already controls the heater dampers (opens or closes hot air from the heater).
Instructions for replacing the stove
Before removing all the necessary parts, cables and other components from Kalina, prepare a new radiator, pipes and clamps. The pipes will be required in case the old ones are worn out or they have never been changed over the years of operation. As practice shows, hoses are most susceptible to wear due to temperature changes, so in any case they need to be changed from time to time.
Instructions on how to change the radiator are presented below:
- We begin the replacement procedure in the engine compartment. First, place a container under the drain hole and drain all consumables from the radiator. If you notice that the coolant is already old and has exhausted its service life, which can be understood by its color and deposits, then it is also better to change the antifreeze.
- You need to ensure the most convenient access to all pipes and hoses of the radiator assembly in the engine compartment. To do this, dismantle the power unit air filter housing, the battery, and its platform. Next, you need to disconnect all the lines from the radiator unit in the engine compartment. Having done this, you can use a wrench to unscrew the nut that secures the metal casing to the engine shield. This nut is located next to the pipes that go into the Kalina's interior.
- Next, we move into the car interior. You need to remove the gas pedal; to do this, unscrew the three nuts. As for the brake pedal, it cannot be removed, so just move it to the side as far as possible.
- Now you have to cut the steel casing as shown in the photo, and then cut off the tubes of the radiator assembly. Having done this, you can dismantle the device from the pedals, but to do this you will also need to unscrew the bolts that secure it.
- Before installing a new radiator device, it will be necessary to carefully sand its tubes. Please note that they should be as even as possible. After all surfaces are ready, a line with a widened end is put on the upper tube, and a line with a narrower end is put on the lower tube. The remaining outputs must be connected in the engine compartment instead of the old ones. Also note that on the side of the Kalina’s interior, it is advisable to treat the place where the lines exit into the engine compartment with sound-insulating material.
Price issue
The range of radiator units for Kalina is not particularly large. On average, prices for radiators are as follows: