Bleeding the brakes is the operation of removing air from the brake system. Since the fluid is not compressed, pressing the brake lever transfers force to the brakes instantly and evenly.
If there is air in the hydraulic system, it is possible:
- Slow response. Delay from the moment the pedal is pressed and the caliper is activated.
- There is a lot of resistance to the foot at the beginning and a sharp sinking of the pedal at the end. Naturally, if there is no force on the pedal, then there is no force on the caliper. The brakes are “failing”
- The wheels will grip unevenly (where there is air, there is less force). If you apply emergency braking on a slippery road, the car will skid.
- Air in the system significantly increases the braking distance.
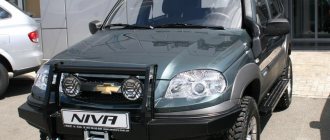
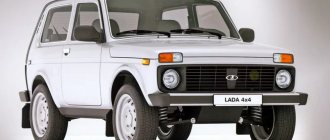
External view of the Niva Chevrolet brake system
When to bleed the brake system
It is necessary to bleed the brakes in the following cases:
- Replacing the brake fluid (water appears in it over time) after a mileage of 50-60 thousand km or once every 2 years.
- Replacement of brake system elements.
- In case of loss of tightness due to mechanical damage to its parts.
- Leakage of brake fluid (BF) and a drop in the level in the expansion tank below the minimum allowed.
- After installing new brake pads to return the cylinder rods to their working position after they were moved apart to remove the pads.
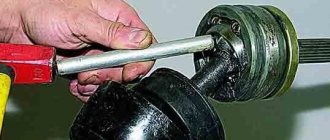
Removing parts
Replacing front brake pads in the field: removing the part
Niva owners can rest assured: the procedure for removing the front pads is the same on all cars, regardless of their brand. There are specific features, but in general the algorithm is identical:
- Setting the car to the manual parking brake;
- Installation of supports/ supports/ rollbacks for all wheels;
- Removing the bolts from the wheel;
- Installing a jack under the front part of the Niva;
- Unscrewing nuts;
- Wheel removal;
- Unscrewing the caliper.
Working with the caliper requires special attention, because unscrewing this part has some features:
- Removing the cotter pin, which acts as a position lock for the clamping brackets;
- Removing staples by knocking them out (a hammer and a punch will help with this).
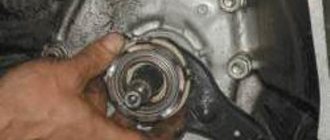
After removing the caliper, the pads are removed. They are visually inspected
Particular attention is paid to their thickness. Detection of reaching the minimum thickness of the front pads indicates their immediate replacement
Step-by-step instruction
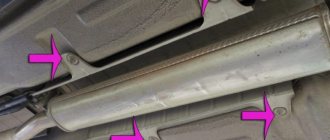
On Chevrolet Niva cars without ABS, you need to load the rear of the car or simulate loading. To do this, simply insert a screwdriver between the pressure plate and the brake force regulator rod.
The work is carried out in an inspection ditch. According to the diagram, you need to start from the rear right wheel. To pump, we perform the following sequence of operations:
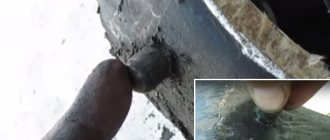
- Remove the dust cap.
Remove the protective cap
- We moisten the fitting with aerosol lubricant so as not to damage the fitting.
- Use a spanner to tighten the bolt. We put the tube on the fitting and lower its end into the prepared container.
Put on the hose
- We give the command to our partner to press the brake 3-4 times. The last time he must hold the pedal in the down position.
- Using an 8 mm wrench, unscrew the fitting half or three quarters of a turn. The coolant will begin to leak through the fitting and air bubbles may appear. During this process, the brake pedal should smoothly lower to the floor.
- Screw the fitting into place and give the command to your partner to release the pedal.
- Let's put on the protective cap.
Let's move on to another wheel (PL) of the first circuit. Next, we move on to servicing the second circuit: rear left and front right.
When pumping, be sure to monitor the level of brake fluid in the expansion tank and add fresh fluid in time.
Reservoir for windshield and brake fluid.
Another filling capacity of the Chevrolet Niva is two glass washer reservoirs, the capacity of which is five and two liters.
This model has two independent braking systems. The working one has a hydraulic drive, the parking one has a mechanical drive. The contours are separated from each other.
The hydraulic drive includes a special tank made for brake fluid.
- DOT-4 brake fluid is suitable for half-liter hydraulic brakes. The product has improved characteristics and has a boiling point of over 235 degrees. Well suited for regions with low ambient temperatures.
- SAEJ1703, FMSS116 are used for the entire hydraulic system and clutch release (0.15 l). The synthetic product provides good lubrication and reduces oxidation at high temperatures.
- The tank lid hatch hinges, door and hood locks require VTV-1 and FIOL-1 greases. Hinges of steering rods and cardan shafts - ShRB-4, Litin 2, Esma.
- The air conditioner also has two tanks. One of them is for oil (0.22 l), the other is for refrigerant (0.650 kg).
Chevrolet Niva reservoirs for refilling liquids and lubricants are quite reliable and convenient when you need to make a replacement.
Various tags and sensors make it possible to carry out control almost immediately, which allows you to avoid an emergency situation.
Leveling up alone
To pump the brakes alone, there is a special device - an aerator.
The simplest one consists of a cap that screws onto the master cylinder reservoir and a hose with a tip for connecting to the wheel.
Aerator for bleeding brakes alone
The air from the inflated tire creates pressure that will simulate pressing the brake pedal.
The sequence of further operations is no different from actions with a partner.
Checking and adjusting the free play of the brake pedal
If the pedal free play is greater than normal, the effectiveness of the brakes decreases due to a decrease in the full pedal travel. If there is excessively little or no free play, spontaneous braking and heating of the brakes may occur.
The free play of the brake pedal when the engine is not running should be 3-5 mm.
You will need: a stop, a ruler, a 19mm wrench.
1. Place a ruler next to the pedal with its end on the floor, oriented in the middle of the pedal pad. Mark on a ruler or remember the position of the pedal.
2. Press the pedal with a stop (you can use the handle of a hammer), moving it until a noticeable increase in the moving force appears. Using a ruler, determine the movement of the pedal, which will be the free play of the pedal.
3. If the free play of the brake pedal is outside the permissible limits, adjust it by loosening the brake light switch mounting nut and
4. by screwing or unscrewing the switch in the bracket (if there is a large free stroke, screw the switch into the bracket towards the pedal; if there is little or no free stroke, turn the switch out of the bracket, moving it away from the pedal).
5. Check the free play of the brake pedal again. Tighten the brake light switch mounting nut.
6. Connect the wires to the switch (if they were disconnected) and check the operation of the brake lights.
Features of bleeding brakes with ABS
On Chevrolet Niva cars with ABS installed, it is not possible to bleed the brakes by turning on the pump. When the ignition is turned on, it does not start. Therefore, the whole process is completely identical to cars without ABS.
In rare cases, you may encounter a situation where, when you press the pedal, brake fluid does not flow out through a loose fitting. This is due to the fact that the valves in the ABS system are in the closed position.
In such a situation, you will need to connect a diagnostic scanner with a specialized program installed. To do this, we recommend contacting a certified Niva Chevrolet service center.
Bleeding the brakes on a Chevrolet Niva is not too difficult if you have an assistant and some skill. There are kits on sale that include everything needed to replace the TJ and make the operation easier.
When working with TJ, remember to follow safety regulations - it is a chemically active substance. Protect your eyes and wash your hands if exposed. While working, lift the wheel you are working with higher than the others. Then the air rushing upward will approach the fitting faster. Some people tap the caliper for the same purpose.
How do you bleed your brakes?
With a partner
65.22%
By oneself
34.78%
Voted: 23
Please write in the comments to the article your comments and tips on pumping the brakes of a Niva Chevrolet.
Front brakes Niva. Modification of the front circuit operation
For a long time I wanted to modify the front brakes for the Niva. Of course, now there is already the installation of rear disc brakes and much more. But I wanted to achieve simplicity and get rid of the well-known headache (sour calipers).
Again, as in other cases, there will be D'Artagnans who will talk about high-speed fields, and what can I hide, I personally made several such cars to order from one office.
But this is not what we are talking about, we will talk about modifying the serial brake system for a car whose cruising speed is 100 mph.
That is, without even a hint of braking by the second circuit. Well, as they say, all's well that ends well. The idea that I implemented does not belong to me. Maxim-MAHoff showed it to me for the first time, explaining to me the essence of the “new” scheme.
In order to check all the assumptions, I went to a hydraulics specialist, who ate not only a dog in this matter, but also an elephant in pursuit. I will try to briefly outline what he tried to explain to me. A significant drawback of the factory system is the connection of the circuits.
Everyone knows very well one of the “generic” shortcomings and diseases of our “favorite” hibiki: souring of the front brake cylinders. And this happens not because of poor quality, as strange as it may seem, but because of the circuit design. When I showed the hydraulic engineer our diagram, he said that it was 40-50% efficient.
Because the pressure in the first and second circuits is DIFFERENT. And if we add here such a miracle of engineering as the brake force distributor (popularly “sorcerer”), then most often, if it has not yet been cut out of the system, like appendicitis, then the second kennel is almost dead.
As a result of different pressures in the circuits, one of the three cylinders leaves the housing later than the others. This happens for about half a year, after which it safely turns sour. As a result, we have a soured piston in the front brakes and ineffective brakes. This drawback was partially eliminated in the ShNiva, but I could not guess for what reason, the brakes on the wheels were connected diagonally.
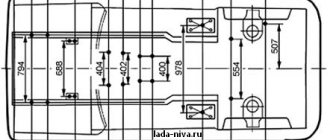
The diagram shows two brake designs, factory and modified.
Scheme of modification of the front brake circuit
1.Front calipers. 2. GTZ. 3. Rear brake cylinders. 4. Sorcerer 5. Tees 6. ShNiv caliper unifiers. Of course, ideally it would be possible to run solid pipes to the rear cylinders, but this would take much longer, especially since the primary task is: the front contour and not souring of the cylinders.
The set is installed on the field. Left front wheel.
The installation recommendation is as follows: mandatory bleeding of the ENTIRE system. But as practice has shown, if everything is assembled correctly, then there is no need to pump the front circuit at all. It all comes down to the release of air under brake pressure by gravity. Of course, don’t expect a strong miracle, BUT after installing this kit, the efficiency of the front circuit increases greatly.
And most importantly, the piston in the front brake cylinder will not sour. For this set, I didn’t skimp, so the tube was taken German or Serbian, made of annealed copper (even if you tie it in a knot, it won’t break). The kit includes 4 copper tubes with fittings, 2 hoses with large nuts, 2 Shnivo combiners (for the front cylinders) and 10 thick copper washers.
The photo does not show the longest tube going to the right front caliper; it is 130 cm long, the short ones are 70 cm each. The length of the tubes is selected in such a way that you can always unscrew the main brake cylinder from the vacuum pump without much effort and move it forward without unscrewing the brake pipes .
Addition from 2014
- In my article I made one “hydraulic” mistake, which was explained to me by hydraulic engineers. In a standard brake setup, the pressure in the front and rear circuits is the SAME. But it follows the contours with a time delay, due to the design of the master brake cylinder. The essence of the improvements does not change.
- On many forums, there is some crazy person who pours everything he can on this modification, from saliva to...... The main argument: the Frenchman does not know what a diagonal brake scheme is. I will answer those people who want to understand the essence of the issue. Any designer's book on braking systems says that a diagonal brake pattern is effective only when the brakes are HOMOGENEOUS. Either all drum or all disc. Otherwise, its use is simply ineffective.
- They ask very often. We made this diagram, installed hoses from Shnivy, but they turned out to be short. I answer: the front hoses are made TO ORDER.
Article on the topic: brake hoses
front brake pads
2 1
Read news about the new Niva
- Properly bleed Chevrolet Niva brakes with abs
- How to change the handbrake cable on a Chevrolet Niva
- Replacing the front brake pads of a Chevrolet Niva
- The procedure for replacing lamps in the headlights of a Chevrolet Niva car
- The modernized Lada Niva Legend (4x4) 2021 was shown on the Internet
- Lada 4×4 Bronto - sales stopped, new details » Lada.Online - all the most interesting and useful about LADA cars
- Description of the instrument panel Lada 4×4 (VAZ 2121, 2131) » Lada.Online - all the most interesting and useful about LADA cars
- Purpose of fuses, relays and their replacement Niva VAZ 21213, 21214, 2131 lada 4×4
The design of the Niva Chevrolet steering linkage and its features
The Chevy Niva steering linkage is a movable structure of interconnected elements. The main components are:
- Bipod;
- Pendulum arm (steering pendulum);
- Medium thrust;
- Lateral thrust (right and left);
- Steering knuckles.
A bipod is nothing more than an all-metal lever that is mounted on the steering shaft. The left tie rod is pivotally attached to the end of the lever. The middle link serves to transfer force to the right wheel.
For it, the second support point is the steering pendulum, movably mounted in a special bracket. This pendulum plays the role of a second lever, transmitting force to the right steering rod. Steering knuckles do not belong to the trapezoid, but are often considered as part of the steering system and allow a more detailed description of the process of driving a car.
Absolutely all Niva Chevrolet trapezoid rods have hinges at the ends. The hinge pins are designed for a conical fit and are tightened with nuts when connected. Hinges allow the trapezoid parts to remain movable relative to each other and relative to the car body. Some car enthusiasts are inclined to believe that the elements of the Shevik steering linkage are suitable for the classic Niva and vice versa.
To describe the operation of the entire vehicle control system, it is enough to indicate the main directions of force transmission from the steering wheel. By means of a worm gear, the rotation of the shaft with a gain in force is converted into rotation of the steering bipod. It is simultaneously connected to the left and middle rods. An analogue of a bipod is a pendulum that can rotate freely in the bracket.
This ratio can be ensured by correct selection of the inclination of the levers, as well as their length. If it is not possible to completely eliminate slipping, then it is necessary to reduce it to a minimum. The wheel alignment angle must be adjusted after any repair work on the trapezoid. It is especially often necessary to change the steering tip, and it is recommended to replace it on both sides at once.
Features of operating a Chevrolet Niva car affect the condition of the trapezium elements, so it is important to periodically carry out diagnostics. In order not to lead to the failure of the linkage joints, it is necessary to check the integrity of the protective covers
During inspection, attention is paid to the presence of cotter pins on the hinge pins, and the absence of deformation or damage to the rods is also checked.
Purpose and operation of the pressure regulator
The pressure regulator (“sorcerer”) is designed to prevent the car from skidding during sudden braking. This is achieved due to the fact that the rear wheels begin to brake after the front ones. The time delay is provided by the regulator lever, which, when the car brakes sharply (the nose drops and the rear rises), pulls the piston in the regulator cylinder and closes the fluid supply channel to the working cylinders of the rear wheels.
In this case, the rear brakes do not work and the wheels spin until the rear of the car drops back. Thus, the “sorcerer” automatically regulates the fluid pressure in the rear cylinder path in inverse proportion to the load on the rear axle. In addition, it increases the braking efficiency of an empty vehicle when the load on the front axle is higher than on the rear.
If the car does not brake effectively, skids or is pulled to the side, then this is a reason to check and adjust the regulator.
This work must be carried out at every maintenance and after repair of the rear suspension.
Replacing pads on the rear axle
To replace the rear pads, you will need to carry out the same preparatory work, after which the first thing you need to do is loosen the handbrake. Subsequence:
- We remove the spring near the lever from which two cables go.
- Using two “13” keys, you need to unscrew the bracket nuts, after which the cables weaken and do not affect the pads.
You can start directly replacing the pads
- You need to remove the drum from the axle shaft using a “12” key by unscrewing two bolts. The drum often sticks, so you need to tap it with a hammer around the entire perimeter.
- The working cylinder must be pushed inward on both sides using a flat screwdriver.
- You need to pry the tension springs by pulling them out.
- The block must be moved to the side opposite to the other block by the lower part, after which the two blocks are removed from the shield.
- After removing the pads, the brake flap and drum must be cleaned and degreased and checked for the presence or absence of cracks.