Lada Granta, like any other modern car, is complemented by car owners with their usual equipment: a recorder, radar detector or navigator. All this electronics is powered from the cigarette lighter connector, but on our cars, unlike most foreign cars, the power to the cigarette lighter is not turned off after stopping the engine, you have to pull out the plug manually, and the occupied niche for the cigarette lighter is not convenient for everyone. To get out of this situation, you can connect the equipment to the car wiring. This can be done in two ways, the simplest one is implemented on a Luxury vehicle, thanks to the presence of the “Comfort Block”, but we will connect the rest of the equipment in a more complex way. I want to warn you in advance: Any tampering with the electrical wiring outside of an accredited service center will void the vehicle's wiring warranty. Before visiting the dealer for warranty wiring repairs, it is recommended
remove installed devices.
Connecting the recorder and radar detector
For those who still decide to install it themselves, the following lines. Since most of the “Norms” and “Standards” are on our roads, let’s start with them. We will power the wiring from the light control module (LCM). Remove the cover of the fuse box, unscrew one screw securing the MCU, and disconnect the block.
We find contacts numbered 10 and 8. Contact 10 is a plus (+), contact 8 is a minus (-). You can connect it either into a wire break or re-crimp it together with the standard wiring. We drag the instrument wires under the roof sheathing, along the roof pillar, connect and return everything to its place. Now the power to the devices will be connected when the ignition is turned on and turned off when the engine is stopped.
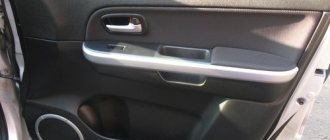
The option for the “Lux” version is simpler. We will connect to the navigation light block. We snap out the lamp board, this can be done with a simple slotted screwdriver and look for white-red and brown wires there. The red and white wire is positive (+), the black wire is negative (-). We connect and return everything to its place. Now power will be supplied to the devices when the vehicle is disarmed and will stop 10 minutes after arming.
This completes the installation.
Do you also want to know how to install the on-board computer STATE X1 in the Lada Granta? Read how. And also see other articles on repair, tuning and maintenance of Grants.
A visual video on connecting the recorder and radar detector to the Lada Granta:
Why might you need to connect a recorder without a cigarette lighter?
Today, a DVR is not a luxury, but a necessary and useful gadget that should be in the cabin of every car. The ability to record on video the situation that occurs while the car is moving or parked, as well as what is happening in the cabin, helps in many controversial situations that arise, for example, during an accident. Also, the video from the recorder is a confirmation of insurance claims for the insurance company.
A special feature of the recorder is that it must be able to work not only while the car is moving, but also in the parking lot, as well as when the engine is not running.
The easiest way to connect such a device is through the cigarette lighter, but there are often situations when this is impossible to do:
- the cigarette lighter is occupied by another device;
- The cigarette lighter socket does not work;
- There is no cigarette lighter in the car.
Connecting a DVR without a cigarette lighter in a car
Some DVRs contain small built-in batteries - they are enough to continuously record images for 10-15 minutes. To fully use the device, you need to connect the device to the vehicle’s on-board network. The standard connection via the cigarette lighter is inconvenient because:
- the cigarette lighter may be busy;
- excess wires hanging from top to bottom;
- In some cars, the power to the cigarette lighter is not turned off; when the ignition is turned off, this can drain the battery.
The owner is wondering how to use the recorder in a car without a cigarette lighter to ensure safety.
How it works
Just three basic steps to connect.
Disconnect the light bulb
Connect the adapter to the lamp harness
Connect the adapter to the lampshade
Basic methods
If the cigarette lighter is faulty or occupied by other devices, use non-standard methods for connecting the DVR. With their help, there will be no need to use extra connectors.
The DVR is connected in the following ways:
- through a lampshade located on the ceiling;
- to ignition;
- directly to the battery;
- to the radio power supply;
- to the inner surface of the cigarette lighter.
The most common methods used are connection through the lampshade and ignition.
Before installing the recorder in the car, you need to decide where to mount the device.
Let's consider two fastening options:
using a suction cup;
It is recommended to use the standard fastening method - with a suction cup, since the suction cup comes complete with the device and can be easily removed from the glass, unlike adhesive tape.
Lamp lighting
If the device is located on top, it is recommended to connect the DVR to the lampshade. This is the closest power supply point. To complete the task you will need the following tools:
- flat screwdriver and Phillips screwdriver;
- a set of cables with which the device will be connected to electricity;
- a set of fastening brackets with Velcro;
- insulating tape;
- soldering iron;
- female cigarette lighter socket (optional).
Wiring Guide:
- The upper lampshade is disassembled using a screwdriver with a Phillips or flat tip - depending on the type of fastener.
- The contacts of the lampshade and the recorder are connected plus to plus, minus to minus. You can connect the ends of the wiring to the lamp plug.
It is impossible to insulate wires; this is stated in all rules for using electrical equipment. A poor connection often causes interference in video recording and distorts the recording. To determine which wire to connect the lamp to the recorder using a multimeter, marking the wires will also help. Red is a plus. Black is a minus.
The standard plug for supplying power to the recorder does not fit - it is disassembled or an additional female cigarette lighter socket is purchased. It is recommended to entrust the analysis to a specialist with technical education or work experience. Safety when connected to the lampshade is ensured by the power module. It is sold in many stores.
To ensure maximum safety when connecting to a lighting device, a power module is used. It must be purchased separately from the set as it is not included in the package.
Example of installation on a Lada Granta
For example, consider installing a recorder through a lampshade on a Lada Grant. On this car, the lamp does not turn off immediately after turning off the ignition, but after 10-15 minutes.
In order not to cut the standard power cable of the recorder, we will buy a female cigarette lighter socket with wires.
Let's disassemble the lampshade. Attaches with two screws and one latch.
Turn off the power supply to the lamp.
Next you need a soldering iron. We solder the “mother” socket with the lampshade. Red wire to red, black to black.
Next, we insert the power supply of the recorder into the socket and put everything back together.
We watch the video montage through the lampshade.
Through the ignition
When connected through the ignition, the DVR will begin to function only after turning the key. Sequence of actions for installing the device:
- Fix the equipment and connect it via an adapter.
- The cables are laid along the bottom or top of the windshield and connected to the ignition system.
- The plus from the ignition is connected to the plus of the recorder, the minus to the minus. The only difficulty here is determining where the plus and minus are. You can look at the car diagram or use a tester and call the contacts.
- Now attach the negative to the negative terminals of the wiring.
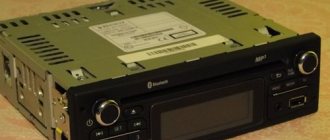
Via power supply to the radio
The connection takes place according to the standard procedure - by connecting wires and insulating the junction point. Some radio models operate at a voltage of 5V, then the switching cables go directly to the plug.
First of all, you need to measure the voltage level at all points. For this purpose, a test device is used. The standard unit or additional transformer is located inside the dashboard. The recorder is mounted on a metal support frame. It is worth making sure that the equipped unit does not interfere with the climate control control mechanisms.
It is not recommended to place the power supply close to air ducts that heat up during operation. If the connection is made to points with a voltage of 5V, then you need to lay the wires to the area where the DVR will be located.
To battery
Such a connection is a complex undertaking, but very reliable. The load on the battery will not be large. But in this case it is necessary to use an adapter or a combination with a starter-charger. Additionally, purchase a 15 A fuse.
The recorder is connected through the engine compartment. This is done in one of two ways - directly using a fuse or through a mounting block in which backup power points are located.
The contact with the plus sign is fed to the battery, and the minus is fed to a free wire of the same polarity. Detailed algorithm:
- The DVR is placed in the selected location.
- Connect the wire through the adapter, observing the polarity. If the user confuses, the device may fail or burn out.
- Now the cable is passed under the casing and sent to the engine compartment. To better protect the circuit, install a fuse.
What is the danger of non-standard connection of the recorder?
Sometimes connecting the DVR using non-standard methods and on your own with imperfect knowledge is considered dangerous. Vehicle manufacturers advise against resorting to such measures, since standard fuses and electrical circuits are intended for short-term use. With constant use, cables are subject to thermal aging.
The fuse does not react to such phenomena - it is created taking into account the possibility of switching off when boundary current indicators occur. If the user begins to connect the recorder to the battery, but you need to buy a special power disconnect button so that you can turn off the power to the recorder. With a direct connection, the device will work continuously, which means the battery will quickly discharge.
All of the above methods will soon cease to be used, because 90% of car radios are equipped with a USB port. These connectors are used for charging gadgets and phones. It’s worth adding to the material and telling you how to hide the wires. There are special boxes on sale that are installed on top of the upholstery. There you can hide the cables.
Another decent option is to swipe it behind the glove compartment. But to do this you need to remove it. When laying wires, make sure that they do not come into contact with moving elements and do not heat up when operating with the heating system pipes.
Another method is to hide the wires under a rug. The upholstery is also removed, and the cable is pulled in the direction of the central tunnel.
It is possible to install a video recorder in a car yourself without using a cigarette lighter, but it is difficult. This work should only be carried out by a person experienced in this field. If the car owner has not installed it before, it is recommended to call a specialist.
A month before traveling to Georgia, I decided to connect the DVR and radar detector directly to the ignition system. I prepared for a long time, thought about all the little things.
I bought: — a socket for a car (150r); — soft fabric with an adhesive side, similar to carpet (150 RUR); — double cable for extending the socket (99r).
And he got to work, didn’t redo anything, and spent about 2 hours from start to finish of the process. First, I removed the ceiling lamp, the driver's sun visor, the trim on the front pillar, the cover of the mounting block, and also removed the terminal from the battery (don't forget about this too;).
I chose the simplest diagram of the entire connection. The radar detector has an additional socket in the power plug:
I learned about which wires to cut and where exactly to connect everything here. I found contacts 10 and 8 on the chip. I don’t know much about prayers, I don’t know how to make the sign of the cross, so I just started cutting the wires. Slowly and carefully. I dragged the wires along the counter to the ICC. We connect plus to 10, minus to 8. Don't get confused!
Good night!) So, I installed a DVR in my car. I connected it to the cigarette lighter, everything seemed fine, except that there was a bunch of wires that worsened the appearance, got in the way, and it’s not serious at all) But if you consider that there is a constant voltage at the cigarette lighter connector and you have to constantly pull the charger back and forth... in general I'm tired of it) I've long wanted to connect the recorder directly - when you start the car, it turns on, when you turn it off, it turns off. There are a lot of connection diagrams on the Internet and on the drive. Everyone chooses what is convenient for themselves. It was convenient for me to have it turn on without my participation during startup and turn off the same way. I didn’t want to spoil or cut the wiring, because... The car is under warranty, there is no point in asking unnecessary questions, so I chose to connect via the MUS block (light control module). First you need to prepare the ASU (car charger): 1. Disassemble the ASU
2. Solder off the old “+” and “-” wires and solder longer wires in their place (10-15 cm is enough). I also removed the fuse, spring and negative half-rings, freeing up space for the wires.
3. Put everything back together in reverse order:
Russian President Vladimir Putin approved amendments to the Code, allowing the use of photographs and video recordings (including from recorders) as mandatory evidence in court. Let's look at several ways to connect a DVR or other devices (radar detector, navigator, etc.) to the Lada Vesta.
FAQ
Using our adapter you connect to the interior lamp. Consequently, power will be supplied and disconnected to the DVR or other device, just like to the lamp. All cars implement this differently. For some it is related to the ignition, for some it is related to the central locking. In some cars, power is constantly supplied to the lamp. But you can check how it will work on your car. To do this, turn on the courtesy light to the constant lighting position and watch its behavior when you turn on the ignition and close/open the car.
Connecting to a lampshade, of course, is not the official way to connect a DVR. Everything you do with your car is done at your own peril and risk. And, theoretically, the official dealer can use the fact of connection to deny you warranty electrical repairs. But a huge advantage of connecting with our adapter compared to other methods (twisting, soldering) is that you can very easily dismantle everything and return it to its original state before going to the OD.
We do not claim that connecting to a lampshade is the most correct and safe way to connect. We are only trying to help those who have chosen this method for themselves to do it easier, faster and perhaps somewhat more correctly, without twisting the solder, etc. In any case, everything you do with your car is done at your own peril and risk. Thousands of people use this method of connecting DVRs, radar detectors and other devices. Practice shows that this is a fairly safe and simple way to connect. But you still need to be careful. We do not recommend connecting more than one consumer in this way. This can cause an increase in load and melting of the vehicle's standard wiring.
You can place an order and pay for it in our online store. Payment is made by card using the Tinkoff payment system. We ship orders within three business days from payment. Delivery throughout Russia and the CIS countries is carried out by Russian Post using first class mail. Shipping costs are calculated automatically when placing an order. After sending your order, a letter with a tracking number will be sent to your email address (Letters sometimes end up in Spam).
To create the proper level of safety for the driver’s life and protect his personal car, devices are installed that perform video recording of ongoing events, processing information and its subsequent storage on a special medium. The DVRs offered on the market are represented by a wide range of models, so every car enthusiast can choose the equipment that suits him, both in price and in terms of functionality. The video recording device is installed in the car in any convenient place. Most often, drivers prefer to mount such a device on the windshield, since this is where the best visibility is provided. There are several ways to connect recording equipment inside a car. The most common is to connect DVRs to lampshades.
Quick installation of the DVR into a USB connector
The advantages of this method of installing a DVR or radar detector:
- Connecting the accessory to the USB connector; we do not interfere with the car’s wiring (we maintain the warranty);
- Minimum time required (about 5-10 minutes);
- The recorder wire does not dangle, it is hidden;
The order of laying the wire (from the windshield) to the USB connector (at the bottom of the panel):
- If you decide to place the device behind the interior mirror (option A), then we hide the wire under the ceiling trim (put our fingers under the edge). If the accessory is fixed to the panel (option B), then we lay the wires under the edge of the dashboard in the area of the windshield;
- Remove the windshield pillar trim (remove the seal, pull the trim away from the door, snapping off the plastic clips, then pull up, removing the hooks at the bottom of the trims from the panel). We fix the wire into standard clamps;
- We lay the wire between the right side of the panel and the body. The gap is formed after dismantling the door seal;
- We lay the wire through the groove and pull it towards the tunnel under the glove compartment;
- We hide the wire between the tunnel and the panel. To ensure it is securely fixed, wrap a little electrical tape around the wire.
The process of connecting the DVR is also shown in the video:
The disadvantage of connecting additional electrical equipment this way is that the USB connector will be busy all the time.
Installation and routing of wires
When installing the accessory behind the interior mirror, wires can be routed to connect:
- to the ceiling light (just under the ceiling trim)
- to the mounting block
If it was decided to run the wires to the fuse box, the order would be as follows:
- From the edge under the headliner to the left windshield pillar.
- Under the rack cover (held by clips).
- In the gap between the dashboard and the body to the mounting block.
If the radar detector or other accessory is located on the panel, then we lay the wires over its edge and pull it to the left edge. Further into the gap between the dashboard and the body to the fuse box.
Connecting a DVR without using USB
This method is suitable for those who want to leave the USB connector free. The following is a list of contacts to which you can connect the DVR. To be completely sure, we recommend rechecking the contacts with a multimeter.
2. To the ISO connector of the radio:
3. To the block with wires for the front seat heating buttons:
How did you install such accessories? Maybe the ignition switch or cigarette lighter was activated when connecting?
Let us remind you that you can buy additional equipment on AliExpress. By the way, to control the power of additional devices in the car, you can use the standard Vesta buttons.
This page presents a selection of car owners and buyers of such online stores as Aliexpress, CSN, M.Video, Eldorado, Yulmart. The selection includes classic models, combos and universal DVRs from different price segments.
Choose the type of car recorder based on your needs: regular dash cams, mirror dash cams, combo dash cams with radar detector functions, GPS, Wi-Fi and a rear view camera included - go to the website of the above stores and buy at a good price with a guarantee and cashback. and bonuses.
Pinout of the lighting lamp
It is removed as follows:
+12 V. Its color is white-pink. This can be either pin 11 or 14. The device will be powered once the main relay is activated. The power is turned off 2-5 minutes after the key is removed from the ignition switch.
Weight. This pin is numbered 15 and can be blue-black or black.
Radio (ISO connector):
+12 V from the battery. Contact number A4.
+12 V during ACC operation. The number of this contact is A7.
Weight. Contact A8.
Wire block for buttons responsible for the operation of heated seats:
+12 V. Contact number 2. Connection is made to the blue and yellow wires. The DVR will start working after turning on the power.
Weight. Pin 6 and black wire.
All information regarding the numbering of contacts can be found in the car's operating instructions.
There are also other ways to connect additional equipment. Some car enthusiasts connect through the cigarette lighter. Sometimes an ignition switch is used for these purposes. In some cases, power management of devices can be done using standard buttons.
Installing a rear view camera
First of all, we collect all the necessary components:
- Rear view camera (Chinese stores offer a wide range, costing from 500 rubles and above);
- mini ISO connector (with blue block and tulip);
- Several meters of wire.
Next, you need to select a location to install the camera. Much will depend on what type of mount the camera itself will have, but on a Grant, the camera is most often installed in the bumper (above the license plate), if it is an old-style sedan, or in the “saber” (also above the license plate), if it is a liftback, 2022 wagon, hatchback or sedan. In all cases, the fastening scheme is identical.
Let's consider installing the camera in the trim above the license plate (saber), since in this case the camera is located quite high, it gets dirty less, gives a better overview, and the installation process is as simple as possible, because you do not need to remove the rear bumper.
1) Remove the trunk trim;
2) Remove the “saber”, it is held on by 6 M8 screws;
3) Mark the most favorable place for the camera and drill a hole;
4) Place the camera in place and secure it with a lock nut;
5) We first lay the cable from the camera to the MMC through the standard corrugation of the trunk door (the extra wire fits there with great difficulty), and then we lead it through the cabin.
There are options here, since the cable can be routed along the floor or over the doors. In the first case, it can be passed past the instrument panel, in the second case through the right front pillar. As a result, the wires should reach the back of the multimedia system. But before connecting, you will need to dismantle the cladding, and then the MMC itself, in order to make connecting the cable as easy as possible.
Connection instructions
To connect the camera to the standard radio, use the connector located on the rear wall of the equipment. Before purchasing an additional device, you should make sure that the installed player supports rear view camera switching. To power the camera, a cable marked Reverse is used, which is connected to the reverse lamp circuit. The RCA plug is installed into the standard video input jack located on the rear of the radio.
Connection to the Pioneer radio has several differences:
- The yellow plug of the camera is installed in the socket marked RC IN;
- The cable harness of the head unit contains a cord with purple-white insulation, which is responsible for providing a signal for activated reverse gear.
It is recommended to lay the commutation lines after installing the camera, since during the installation process unforeseen difficulties may arise that require the use of a different layout solution.
Installation process
Rear view cameras for the radio made by third-party manufacturers have a shape that does not match the license plate light used. To simplify installation, it is possible to trim the housing and then install the product between the backlight lamps. This design improves the viewing area of the lens and simplifies the calculation of the trajectory when maneuvering in reverse. Installation of the device is carried out after installing a 2 DIN standard radio with a liquid crystal screen.
An approximate algorithm for installing a camera on the rear of a car:
- Cut a rectangular hole in the plastic trim or metal casing located above the license plate mounting location on the trunk lid. Metal edges are treated with an anti-corrosion compound. It is recommended to select the installation point in such a way as to avoid trimming the body panel, since it is impossible to provide reliable protection against corrosion in artisanal conditions.
- To trim, you need to dismantle the plastic cover with the backlight lamps, which is secured with clips or screws. The installation method depends on the car model.
- The window is marked by drilling 4 holes with a diameter of 2-3 mm, then cutting out the opening using a file or jigsaw. The edges are smoothed with a file. A test installation of the camera is carried out to check the viewing angle of the selected layout solution.
- Mount the camera body into the mounting socket and secure the parts with 2-component epoxy resin adhesive. It is recommended to first verify that the lens is positioned correctly by connecting the equipment to the radio. Since the epoxy glue hardens within 3-5 minutes, the user has time to adjust the position of the device.
After installing the rear view camera, they begin laying patch cables that are routed through the car interior to the head acoustic unit. The type of connection between the cord and the player depends on the model and manufacturer. Pioneer radios are equipped with a special plug designed to connect a camera. Users confuse it with the yellow “tulip”, which is designed for switching equipment operating in manual control mode.
Connection
The correct connection diagram for the rear view camera ensures that the signal starts broadcasting only after reverse gear is engaged. For switching, a switch located in the speed selection mechanism is used. On some cars there is no such element, so a connection is used to the sensor for turning on the reversing lights or to the lamp sockets located in the rear lamps. The commutation cable is carefully inserted into the plug and held in place by the factory spring contact.
The instructions included with the radios contain recommendations on how to properly connect and adjust the camera. If the user experiences difficulties when switching or installing additional equipment, it is recommended to contact a service center.
Settings
Adjustment of operating parameters is carried out through menu sections. The user activates signal transmission and then adjusts the resolution of the picture on the display. After this, a balance of brightness and contrast is sought under different ambient lighting conditions. On Pioneer head units, a warning message appears on the screen informing the driver of the possibility of mirroring. The text is displayed when the camera is turned off; To disable it, you will need to adjust the polarity of the connected reverse signal cable.
Used when installing several parking cameras, a 2-position toggle switch allows you to display images from the front and rear devices. When the switch is set to receive a signal from the rear camera, the broadcast begins after moving the gearbox lever to the reverse position. To view the situation from the front of the car, you will need to move the lever to a different position. If you try to engage reverse gear, the image will not change.
Connecting the recorder to the lighting lamp and the cost of installation services
To perform independent installation, connection and configuration of a video recording device, certain technical and electromechanical knowledge is required. Not every driver or vehicle owner knows how to work with wiring. To avoid negative consequences, it is best to seek help from special car service stations or services. Any company that provides installation and configuration services for video recording devices must have an appropriate certificate.
Before choosing a suitable service center, you can study reviews from other customers and the company’s experience.
It is impossible to determine the exact cost of providing installation and configuration services, since the price is determined by a number of factors, for example, the type of equipment, the number of video cameras, the make of the car, etc. The average price for installing and connecting a DVR in a car is 1,500 rubles. As practice shows, this price is set for connecting a recording device with one built-in camera, hidden laying of connecting lines (under the casing). When connecting the DVR to the vehicle’s on-board network, as well as installing additional equipment (GPS module, remote video cameras), the price varies from 2,000 to 5,000 rubles.
The video shows the operation of a DVR connected to the lamp.
Installation and connection to a power supply of video recording devices at a professional level costs from 9,000 to 30,000 rubles. The cost of connection and installation includes:
- Installation of individual fixing modules;
- Organization of remote control and viewing of video information;
- Connection of the “black box” complex.
When installing and configuring equipment of this type in cars that are under warranty, the company must provide the appropriate warranty and package of documents. The completed documentation is transferred to official representative offices and dealers of a specific car brand.
How to connect a recording device to a lighting fixture yourself? Before starting installation work, you need to purchase certain equipment:
- Screwdrivers;
- Tester;
- Connecting terminals (if necessary);
- Insulating tape;
- Knife;
- Hexagon;
- Plastic clips.
Power is supplied to the lampshade immediately after opening the lock on the door. The supply of energy stops approximately ten minutes after the car is set to alarm, since all devices are de-energized. The lighting device is considered the preferred method of hidden connection of video recording equipment, since the lampshade is located closest to the windshield. Before starting the connection, install the device on the windshield.
Next, the connecting cable lines are laid. In some car brands, sun visors must be removed to conceal wiring. This will not be difficult, since such actions are performed by pressing the fasteners on both sides, and then carefully pushing the devices down. In some cars, these visors are screwed on with screws, in which case they need to be unscrewed.
Next, remove the protective panel from the lampshade. You can carefully pry up the decorative trim with a screwdriver and, using your hands, remove it from the mount.
Then you need to unscrew the two screws and smoothly remove the housing of the lighting shade. After this, the contact group is turned off and the wires are disconnected from the housing.
The ceiling trim is carefully detached and a connecting cable is pulled under it in the direction from the DVR to the lighting fixture. Next, the contacts from the adapter are displayed. Connecting cables must be stripped on both sides. The wires are then twisted and insulated. When connecting wires, polarity must be observed. To prevent the wires from sagging, they can be secured with special ties or madeleine.
After completing the connecting steps, you should check the operation of the DVR. If the connection is correct, an image will be displayed on the monitor or the indicator lamp will light up. The final step is to install the lampshade into the connector and secure it with bolts. The trim and sun visors are installed in place.
Lada Granta, like any other modern car, is complemented by car owners with their usual equipment: a recorder, radar detector or navigator. All this electronics is powered from the cigarette lighter connector, but on our cars, unlike most foreign cars, the power to the cigarette lighter is not turned off after stopping the engine, you have to pull out the plug manually, and the occupied niche for the cigarette lighter is not convenient for everyone. To get out of this situation, you can connect the equipment to the car wiring. This can be done in two ways, the simplest one is implemented on a Luxury vehicle, thanks to the presence of the “Comfort Block”, but we will connect the rest of the equipment in a more complex way. I would like to warn you in advance: any tampering with the electrical wiring outside of an accredited service center will void the vehicle’s wiring warranty. Before visiting the dealer for warranty wiring repairs, it is recommended
remove installed devices.
Connecting a rear view camera
For Grant, Kalina and Priora cars, the rear view camera connection diagram is as follows:
Explanation. In the trunk:
- Black wire to ground;
- We connect the red wire to the +12V green reversing light.
We connect the miniISO connector to the radio, but we must first connect our “tulip” to it:
- Ground (outer tulip contact) of the connector to pin 16;
- The positive (inner pin) of the connector to pin 19.
If your car was purchased with a standard MMC, then no additional actions will be required at this stage. But for those who independently equipped their car with a multimedia system (it is not available in the “Standard” and “Norma” trim levels), it is necessary to additionally supply +12V from reverse to pin No. 1 of connector A1 of the radio.
Connection to the mounting block
To determine which fuse terminal to solder the power wire (+12 V) of the accessory
follows:
- pull out the fuse;
- turn on the ignition;
- check which of the fuse contacts shows +12 V and which does not (use a test lamp or a multimeter);
- connect the accessory wire to the fuse terminal where there is no voltage.
See mounting block diagram. In practice it has been observed that:
- on F3 - +12 V appears after turning on the ignition;
- on F31 - +12 V is constant.
Disadvantage of the accessory
connect to the screw securing the fuse box.
In order not to interfere with the car's wiring, it is recommended to use a fuse network splitter (fuse adapter), which can be ordered on aliexpress.
How to connect
After the camera is installed on the Lada Liftback, you need to make a connection. This is done like this:
- the black cable in the trunk is connected to ground;
- the red wire is connected to the reversing light;
- a standard ISO connector is connected to the radio (a “tulip” is pre-installed on the connector);
- The outer contact of the connector is connected to pin 16, the inner one to terminal 19.
If the car has a built-in multimedia system, no auxiliary work needs to be performed at the connection stage. If the MMC is not included in the package, you need to additionally connect the wire from reverse to the first contact of the car radio connector.
Fastening the wires
There are two ways to attach the wires that go to the recorder from the power source.
- Hidden installation involves fixing the wires under the dashboard and then under the pillar trim. When using this method, it is important to leave a little free wire near the gadget so that it is convenient to turn the recorder if necessary.
- Open installation involves the use of plastic brackets to secure the wires to the side post and ceiling. Velcro brackets are included in many models. This method is not the most reliable, but easier to implement. As for the questionable reliability, the Velcro will often come off.
Setting up MMS Lada for rear view camera
Standard MMC does not require additional firmware for the reverse camera. It is enough to activate this function using a special CAM on/off program.
1) We write the program to a flash drive using a computer and connect it to the MMC; 2) On the radio screen, hold down the “Settings” button, then click “Exit” and “Desktop”. After this you are taken to the desktop of the WinCE operating system; 3) Go to the “My Device” folder, then “USB disk” and go to the folder with the program; 4) Launch the CamOnOff program file, allow the camera to be used by clicking on the corresponding button; 5) Close the program and desktop;
More details about the process in the video:
6) Engage reverse gear and check the operation of the rear view camera.
Filming
First you need to dismantle it, which is quite simple to do. However, in this situation it is better not to rush, since the lampshade is non-separable, and therefore, if something breaks, it will have to be replaced entirely.
First of all, the “–” terminal from the battery is reset.
Next, using a thin flat screwdriver, you need to insert it from the front into the groove between the plastic frame of the lampshade and the ceiling.
By pressing the screwdriver, you can disengage the latches and remove the frame itself.
After this, you will need to unscrew the 2 screws that secure the lampshade itself to the body.
And only then, using a screwdriver, you need to carefully pry up another fastener and remove the lamp. You need to insert a screwdriver into a special hole at the back of the lampshade.
Lastly, you only need to disconnect the plug.
Settings
The standard multimedia system does not require firmware. It is enough to launch the rear video review function using a special program. If the car owner installed the view camera with his own hands, you will have to perform the following steps:
- The CAM on/off program is downloaded to a USB flash drive by connecting to a computer. The drive is inserted into the USB connector of the radio.
- On the car radio screen, press the “Settings” button, and then go to the desktop. This provides the user with access to the WinCE operating system.
- Going to the “My devices” folder, find the “USB drive” item. By pressing the select button you go to the folder with the program.
- Run the installation file, allowing the use of the camera. The settings menu is closed.
- Engage reverse gear and check that the video system is installed correctly. Using the appropriate controls, adjust the required parameters.
If the machine is under warranty, the installation of the video system should be entrusted to specialists.
Video
Another option for installing a rear view camera in the Lada Granta bumper, with wiring on the floor and through the instrument panel:
Did you find the article useful and interesting? Be sure to share it on social networks and join our groups to be the first to receive even more information.
Other useful articles on Grant are already on our website in a special section.
The article uses photos from the Lada Granta Liftback White Cloud logbook.
Whether or not to install a reversing camera is up to each driver to decide for himself. In this article we will tell you how to connect a rear view camera, and it’s up to you to decide whether you need it or not. Connecting a rear view camera requires some knowledge and skills, so not everyone can do it themselves. But if you still decide that installing a standard rear view camera is necessary for you, then use the tips from this article. With a small set of tools and basic removal skills, you can easily figure out how to connect a rear view camera.
Side mirrors, and even your head turned 180°, will not give the desired effect; you may still not notice some little things, or maybe not little things. And then a showdown with the owner of the scratched car may begin, and this can cost you tens of times more than connecting a reverse camera. Later in the article we will look at which camera you can choose, whether a Chinese manufacturer is right for you, or whether you prefer something more solid. We will also discuss whether it is possible to install a rear view camera yourself, and how to properly connect the device you have chosen.
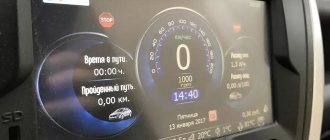
Lada Vesta. Connecting the DVR through the lampshade.
I delayed something in connecting the recorder. The recorder was connected from the interior lamp. Records when the main relay is operating. When the electronics fall asleep, the regulator turns off.
Absolutely everything I did with the car is on my channel:
MIG79rus
Video comments
Class! As always, everything is done competently, beautifully and reliably. Handyman. We are waiting for the next videos. Good luck in everything.
As always, very nice to see, and especially nice to listen to
It’s an interesting idea! And the dealer handed it to me from the cigarette lighter, but fed it not into the cigarette lighter itself, but somewhere in the panel. The regulator also turns on when you unlock the car.
I did the same as your first option, it suited me better, this one is also good, thank you, everything was clear and intelligibly explained.
Thanks for the video, just and simply, how about mixing it up with rear electric lifts. I’m not smart enough to deal with electrical issues. I watched a video with the installation of lifts (grenades).
Well done! You are a handy man and a thinker. Everything is thought out, everything is as it should be and in place. But how did you determine the pin numbers where is positive and where is negative? Tell me for the future.
By the way, can you get power from the rear lamp?
Or maybe someone can tell me. We took the pre-top configuration of St. Cross. I wonder if the rear seats are heated? To connect the keys yourself.
Like for your patience. But with this you will quickly hit your ceiling
How to choose a good camera. Review of prices from different manufacturers
| № | Article/name | Price, rub.) |
| 1. | Kalina, Kalina-2, Granta (liftback), Vesta, Priora |
*prices are current as of September 24, 2018.
Technical characteristics of the rear camera of the Grant Liftback:
- Matrix type: CCD (photosensitive);
- Viewing angle: 170°;
- Resolution 800 x 600 pixels;
- Zoom level: 0.01 Lux;
- Aspect ratio: 4:3;
- Gradation: parking lines on the screen (0.5 / 1.0 / 1.5 meters);
- Moisture and dust protection: present, level IP 67;
- Brightness: 300;
- Recommended voltage for correct operation: 12V;
- Operating temperature range: - 25° - + 35°;
- Connection type: ISO connector, from the back of a 2-DIMM radio or a separate folding monitor.
How and where should it be installed
Later in the article we will look at how to install a rear view camera. There is more than enough space in the car to install a video camera, but we need the most advantageous position. The camera eye must have a good view, which is not limited to any parts of the machine. Any camera will reveal its full potential if it is installed in the most advantageous location.
In our case, such a place is a niche above the rear bumper of the car; the camera should be placed in its upper part above the license plate number of the car. What this gives is viewing angles, your car radio will only show the road and not parts of your car. But it must be positioned so that it is not too recessed, but also does not stick out.
True, there is a minus here - your camera is accessible to dirt and the hands of others. If you place it inside the cabin on the rear window, then half of the screen will be occupied by the trunk, viewing angles will decrease and the image quality will suffer to some extent due to the glass. But it will be clean and inaccessible to strangers.
So you personally will have to calculate all the pros and cons of the external and external location of the camera.
The procedure and diagram for connecting the rear view camera
And now in more detail about how to install and connect a rear view camera to a Pioneer radio. Why go to this model, because it is the most common. If we take into account the unsafety of our video camera, and the best view, then its place should still be above the number, outside.
It should be installed closer to the edge to improve visibility, but not so that it is exposed. The installation of the camera itself is not complicated. The camera has the bracket necessary for installation; you only need to drill a couple of holes for the mounting bolts and one hole for the cable.
Where to install the DVR
Choosing a place to install the DVR is impossible without taking into account the following requirements:
- maintaining visibility of the road surface;
- ensuring optimal shooting angle;
- free access to the gadget at any time to quickly change settings.
The windshield is considered the traditional place to install the device in question, but another option is the torpedo.
Be sure to read our expert's very useful article in which he talks in detail about how to set up a DVR.
Another useful gadget is a memory card for the DVR. How to choose and install it correctly, read our author’s material.
We also recommend that you read an interesting review of the best 3-in-1 DVRs and a description of the principle of their operation.
So, here are the two best options for installing the device.
- The windshield behind the rearview mirror is ideal if the recorder is compact and lightweight. The camera's view is maximum, and nothing interferes with the driver. The disadvantage is the difficulty of quickly deploying the camera if necessary, for example, to film a conversation with a traffic police inspector. The view can be spoiled by a dangling wire, especially when the car performs sharp maneuvers.
- The area on the dashboard is suitable for heavier models of DVRs, which are fixed more securely on a horizontal plane. Among the advantages of this option, it is worth highlighting the ability to take the gadget with you when the car is stationary, as well as its stable fixation. Disadvantages include the fact that the car's hood limits the camera's lower view.