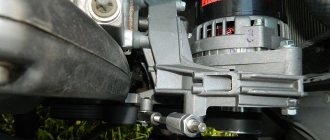
One of the problem areas in the electrical system of the domestic Lada Vesta car is the generator assembly together with the drive belt. The latter is generally a consumable component, the breakage of which causes undercharging of the battery and failure of some electrical appliances. It is quite possible to carry out repair work on your own if you choose original consumables and spare parts.
What generators are installed on the Lada Vesta
The main function of the generator is to provide electricity to all devices when the engine is running and charge the battery, leading to the restoration of its expended capacity. Without this assistant, the battery life is quickly wasted, so you should pay attention to the signals of the warning lamp, which warns of a current or upcoming malfunction.
The automobile plant itself, located in Togliatti, does not manufacture generators for its vehicles, and these functions are assigned to third-party suppliers. Based on this, generators for Lada cars are supplied by manufacturers such as Bosch and Valeo. These products are sold under production article 8450006900. On the domestic market you can find other analogues that are installed by car enthusiasts during operation. The most famous of them is the StarVolt company.
When is it time to change?
On Lada Kalina cars, the manufacturer does not regulate the replacement of this part. However, its failure is a common problem. In particular, we are talking about Lada Kalina cars. This applies to both 16-cl and 8-cl engines.
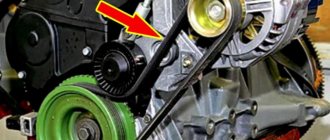
This is what a deformed element of a Kalina generator with an 8-cyl internal combustion engine looks like
Therefore, let’s look at the signs that indicate that the belt may fail in the near future:
- Whistle when moving. As a rule, this whistle appears when the electrical appliances of the vehicle begin to load. For example, if you start the car, and when you press the gas, a loud whistle is heard from the engine compartment, this indicates that the belt is loose. In this case, it must be tightened using a tensioner or replaced.
- Cracks on the strap. If you open the hood, look at the belt and see cracks on it, then you know that it’s time to change the element. Neither tensioning nor adjusting the rollers will help here. The component can be tightened, but this will not be enough for a long time. The only option left is replacement.
- Deformation. As in the previous case, neither tightening the tensioner nor adjusting the rollers will give much effect. You just need to change the element.
- Noise when the engine is running. If the element has already served its service life, this can be understood by the noise that appears when the motor is running. For example, some Lad Kalin car owners report loud knocking and even impacts when the engine is running.
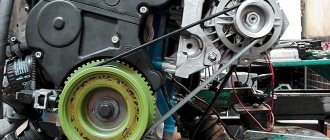
The assembly is disassembled: this is what the strap looks like on the shafts
If the vehicle is equipped with a generator sensor that determines its performance, then it will be easier to identify the malfunction
For example, if you heard a whistle from under the hood, and at this time the indicator on the sensor came on, then you need to pay attention to the strap. This indicates that the belt needs to be tightened, since it may be in a weak state or that its service life has been exhausted.
One way or another, if the slipping and whistling of the strap cannot be eliminated by adjusting the belt or rollers, it needs to be changed.
What belts are installed on the Lada Vesta
The size of alternator straps on Lada Vesta may vary depending on the specific modification. There are different versions for cars equipped with and without air conditioning systems. So, for Vesta with air conditioning, modification 6РК1039 is used, and for those without such an option - 6РК778. Contitech and Gates companies are official suppliers for AvtoVAZ for the installation of alternator drive belts.
The tension and support rollers deserve special attention. They provide the necessary level of tension so that the strap does not fly off, but allows the generator to produce the maximum possible charge for the on-board electrical network. If these parts are made with high quality, then they do not require adjustment for a long time.
Self-replacement of parts
The procedure for replacing the belt drive on Vesta is made difficult by the compact arrangement of the units in the engine compartment. Access to the belts is limited by the closely located side member of the body, so the removal of additional elements is required.
To complete the work you will need:
- lift or inspection hole,
- additional supports to support the power plant.
Carrying out the work requires knowledge of the car's design; if the owner does not have repair skills, it is recommended to transfer the car to a specialized service center.
Required Tools
A set of tools required when replacing timing drive parts on a VAZ Vesta:
- 10, 13, 15 and 17 mm socket wrench;
- 17 mm spanner;
- hex key size 5 mm;
- Torx heads T30, T55 and E12 and a key for installing the nozzle;
- hydraulic or mechanical jack;
- set of flat blade screwdrivers;
- an original key for changing the position of the tension roller (it is permissible to use a tool to remove the retaining rings);
- mounting blade.
Preparing the car
- Open the hood of the car and remove the decorative plastic cover.
- Remove the protective fender liner installed in the arch of the right front fender.
- De-energize the on-board network by removing the terminal from the negative pole of the battery.
- To access the mounting points, you need to jack up the car and then remove the wheel.
- Install a safety support under the body sill to prevent the vehicle from falling if the jack slips or breaks.
- Using a 10 mm socket, unscrew the bolts securing the protective screen located under the engine.
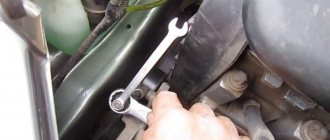
- Loosen the bolt securing the pulley to the engine crankshaft. To perform the operation, you will need the help of a second person who presses the brake pedal.
If there is no assistant, then you need to unscrew the 3 mounting bolts and then remove the starter. To fix the crankshaft, use a screwdriver, which is inserted into the gap between the clutch housing and the ring gear on the flywheel.
- Place a jack under the engine crankcase, having previously installed a wooden spacer, and then remove the cover of the auxiliary drive belt tension roller. To reduce the tension, use a Torx T55 wrench and turn the roller bracket clockwise.
- Unscrew the bolts securing the engine mount; the power unit must be lowered to the ground by 50-70 mm, which will allow you to dismantle the roller and remove the belt from the pulleys. It is recommended to inspect the parts; if worn, a new set (belt and roller) is installed.
Removing the timing belt on VAZ 21129 and 21179 engines
The procedure for removing worn parts on a VAZ-21129 engine:
- To change the belt, you will need to unscrew 5 bolts securing the top plastic cover covering the timing drive.
- Unscrew the bolt and remove the pulley from the engine crankshaft; under the part there is a guide disk, which is also removed from the machine. When removing, it is necessary to control the position of the pulley, which can damage the shaft position sensor.
- Remove the 3 bolts securing the bottom of the protective screen.
- Set the timing marks, turn the engine crankshaft using a bolt with a set of spacer washers screwed into the toe of the crankshaft. It is possible to rotate the shaft by rotating the suspended wheel when 5th gear is engaged. There are marks on the camshaft gears that align with mating parts on the rear of the belt guard. To fix the camshaft gears, devices made of polyurethane bushings with a bolt are used.
- Check the alignment of the mark on the crankshaft gear with the counter rib on the oil pump housing. Loosen the bolt securing the tension roller; the mechanism will rotate automatically under the force of the tensioned drive.
- Pull the belt off the pulleys; if further use of the part is planned, then a mark is first applied to it indicating the direction of movement during operation. If you plan to replace a part, then a set of rollers (tensioner and intermediate) is installed at the same time.
- Check the condition of the pump; if bearing play or antifreeze leakage is detected, the unit must be replaced. Before removing the pump, the coolant is drained from the engine jacket (through a special hole in the block).
How to check the belt
If the alternator belt whistles, then every owner of a Lada Vesta will decide on replacing it as soon as possible. However, it is not at all necessary to reach this point. According to the regulations, you can safely change the strap without checking it after 10-15 thousand kilometers traveled.
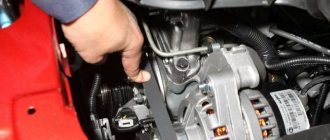
However, if there is a need to check the condition, then first of all we lift the engine screen up to provide access to the unit. With your finger we look for the area in the middle between the generator pulley and the coolant pump. We press on it with a force of approximately 8.0 kgf. The deflection value should be around 12 mm from the original position. If necessary, tighten the belt or replace it with a new one.
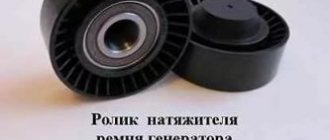
Where can I buy?
You can buy a Lada Vesta generator belt tensioner pulley both in a stationary store and in an online store. Both original and analog parts are available for sale. It is strongly recommended not to skimp on such components - it is better to purchase original spare parts.
The table shows the most popular sites where you can make a purchase.
| Online store | vendor code | Manufacturer | Price, rub.) |
| https://sv-parts.ru/catalog/privod-raspredelitelnogo-vala/rolik-natyazhnoj-remnya-generatora-v-sbore-lada-vesta-xray-ina/ | 8450006996 | INA | 1100 |
| https://lada-vesta-shop.ru/shop/dvigatel/rolik-natjazhnoi-v-sbore-dlja-lada-vesta-pod-zakaz.html | VS-RPGVX | VAZ | 1600 |
| https://lada-vesta-shop.ru/shop/dvigatel/rolik-natjazhnoi-v-sbore-dlja-lada-vesta-pod-zakaz.html | VS-RPGVX | Trialli | 930 |
| https://autostol63.ru/vesta/standartnoe-vesta/rolik-natjazhnoj-remnja-generatora-lada-vesta-xray.html | 8450006996 | VAZ | 1690 |
| https://www.avtoall.ru/rolik_privodnogo_remnya_lada_vesta_natyajnoiy_trialli-476356/ | CM0911 | TRIALLI | 955 |
| https://trialli.ru/catalogue/sistema-grm/roliki-generatora/rolik-generatora-lada-vesta-14-x-ray-15-1-6i-cm-0911/ | CM0911 | TRIALLI | 905 |
Signs of belt and tensioner wear
The drive and electric current generation system in the vehicle can function correctly for a long time, and the driver does not even have to look into the hood compartment. However, the driver should be aware of the approximate symptoms that may indicate a malfunction of the belt or its tensioner.
The following signs may indicate a drive malfunction:
- characteristic whistle when starting the engine. Indicates a faulty or overly worn belt. It is necessary to immediately check its surface for wear criteria. If almost none are identified, it is worth taking measures to check the degree of tension;
- the appearance of transverse or longitudinal cracks on the surface, scuffs and burrs. If there are too many of them, then it’s time to change the belt drive;
- abrasions on the surface of the roller can lead to uneven wear of the strap and, as a result, to its sagging in certain areas.
Self-replacement of parts
The procedure for replacing the belt drive on Vesta is made difficult by the compact arrangement of the units in the engine compartment. Access to the belts is limited by the closely located side member of the body, so the removal of additional elements is required.
To complete the work you will need:
- lift or inspection hole,
- additional supports to support the power plant.
Carrying out the work requires knowledge of the car's design; if the owner does not have repair skills, it is recommended to transfer the car to a specialized service center.
Required Tools
A set of tools required when replacing timing drive parts on a VAZ Vesta:
- 10, 13, 15 and 17 mm socket wrench;
- 17 mm spanner;
- hex key size 5 mm;
- Torx heads T30, T55 and E12 and a key for installing the nozzle;
- hydraulic or mechanical jack;
- set of flat blade screwdrivers;
- an original key for changing the position of the tension roller (it is permissible to use a tool to remove the retaining rings);
- mounting blade.
Preparing the car
- Open the hood of the car and remove the decorative plastic cover.
- Remove the protective fender liner installed in the arch of the right front fender.
- De-energize the on-board network by removing the terminal from the negative pole of the battery.
- To access the mounting points, you need to jack up the car and then remove the wheel.
- Install a safety support under the body sill to prevent the vehicle from falling if the jack slips or breaks.
- Using a 10 mm socket, unscrew the bolts securing the protective screen located under the engine.
- Loosen the bolt securing the pulley to the engine crankshaft. To perform the operation, you will need the help of a second person who presses the brake pedal.
If there is no assistant, then you need to unscrew the 3 mounting bolts and then remove the starter. To fix the crankshaft, use a screwdriver, which is inserted into the gap between the clutch housing and the ring gear on the flywheel.
- Place a jack under the engine crankcase, having previously installed a wooden spacer, and then remove the cover of the auxiliary drive belt tension roller. To reduce the tension, use a Torx T55 wrench and turn the roller bracket clockwise.
- Unscrew the bolts securing the engine mount; the power unit must be lowered to the ground by 50-70 mm, which will allow you to dismantle the roller and remove the belt from the pulleys. It is recommended to inspect the parts; if worn, a new set (belt and roller) is installed.
Removing the timing belt on VAZ 21129 and 21179 engines
The procedure for removing worn parts on a VAZ-21129 engine:
- To change the belt, you will need to unscrew 5 bolts securing the top plastic cover covering the timing drive.
- Unscrew the bolt and remove the pulley from the engine crankshaft; under the part there is a guide disk, which is also removed from the machine. When removing, it is necessary to control the position of the pulley, which can damage the shaft position sensor.
- Remove the 3 bolts securing the bottom of the protective screen.
- Set the timing marks, turn the engine crankshaft using a bolt with a set of spacer washers screwed into the toe of the crankshaft. It is possible to rotate the shaft by rotating the suspended wheel when 5th gear is engaged. There are marks on the camshaft gears that align with mating parts on the rear of the belt guard. To fix the camshaft gears, devices made of polyurethane bushings with a bolt are used.
- Check the alignment of the mark on the crankshaft gear with the counter rib on the oil pump housing. Loosen the bolt securing the tension roller; the mechanism will rotate automatically under the force of the tensioned drive.
- Pull the belt off the pulleys; if further use of the part is planned, then a mark is first applied to it indicating the direction of movement during operation. If you plan to replace a part, then a set of rollers (tensioner and intermediate) is installed at the same time.
- Check the condition of the pump; if bearing play or antifreeze leakage is detected, the unit must be replaced. Before removing the pump, the coolant is drained from the engine jacket (through a special hole in the block).
How to replace the alternator belt on Vesta
To ensure that replacing the alternator belt on Vesta does not take a lot of time, effort and nerves, we will prepare the tools in advance. So, we will need a flat-blade and a Phillips screwdriver, a set of open-end wrenches, a balloon wrench, a 13-socket wrench, and 20-, 30-, and 55-size Torx keys.
If all this is prepared, and the machine itself is already in the pit, you can proceed to the following step-by-step sequence of actions:
- If the car is not in the inspection hole, then use a jack to hang the right front wheel.
- After unscrewing the self-tapping screws, remove the wheel arch liner.
- Now you can remove the metal engine protection.
- If a manual transmission is installed on Vesta, then the hydraulic clutch cylinder is additionally removed, and then its mounting bracket is removed.
- Without touching the electrical wiring, unscrew and hang the starter. This will allow access to the flywheel.
- The crankshaft damper mounting bolt is unscrewed so that it can be disconnected.
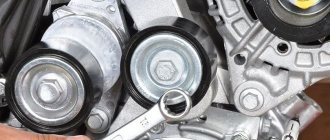
- Remove the plastic plug from the roller using a screwdriver.
- Next, loosen the tension roller nut.
- Taking the Torx 55 key in your hands, rotate the roller until it reaches the top position, counterclockwise.
- You can remove the generator drive belt.
- Reassembly is carried out in the following sequence: first install the damper, then the air conditioning compressor, and then the generator and tension pulley.
- Once this work is completed, all that remains is to tighten the belt and check the degree of tension.
By rotating clockwise, the tension roller moves from the upper position to the lower position. Once this position is reached, the roller will lock into place, providing the required degree of tension. You can tighten the fastening nut.
Second phase
The technology for performing the next stage depends on the type of engine installed in the car.
Complete set with VAZ-21129 unit
The short and simple procedure aims to align the alignment marks. To do this, before replacing the timing belt on the Lada Vesta sedan, you need to make several transitions:
- Place a 17mm wrench onto the damper mounting bolt.
- Rotate the crankshaft until the mark on the crankshaft wheel aligns with the mark on the oil pump.
- All marks on the camshaft pulleys must match the corresponding marks on the rear cover.
- Using the device with index 67.7811-9516, fix the camshaft pulleys.
Complete set with VAZ-21179 unit
The process of aligning the marks on Vesta is similar to the same action when changing the Priora timing belt. Also, using a “17” key, you need to rotate the damper bolt to align the marks on the crankshaft pulley and on the oil pump. But to fix the camshafts, a device with number 67.7811-9704 is used. After this, you need to use a marker to put marks on the pulleys opposite the markings on the back cover.
For all trim levels with VAZ engines
Using a 17mm wrench, loosen the auto tensioner fixing bolt (No. 1) to remove the spacer washer from the crankshaft pulley. After this, use two slotted screwdrivers to remove the belt.
DETAILS: Replacing cabin filter Mercedes W204
How to replace the tension roller
Experts recommend changing both the strap and the roller needed for tension at the same time. Such recommendations are also given by the manufacturer. On a Lada Vesta, you will have to hang the engine to remove it. Therefore, the first thing we must do is dismantle the alternator belt, and then proceed to install a new roller to replace the old one.
So, the step-by-step algorithm of operations will consist of the following actions:
- We remove the lower cross member to make it possible to install a jack.
- We dismantle the upper support of the power unit.
- Using a jack, we will lower it closer to the ground until the pin is below the spar. This will free up the space required to access the video.
- Unscrew the fastening nut and remove the old roller.
- We install a new one and tighten the nut without final tightening.
- Using a jack, we lift the motor up to the reverse position so that it becomes possible to install the upper supports.
- Having removed the jack, we fix the cross member located below.
- We throw on the generator strap and give it tension.
- Tighten the fastening nut from the roller until it stops.
Work on tensioning the belt drive or replacing it can be done on your own, since this does not require special qualifications. But it is best to trust the replacement of the generator to specialized specialists in the technical maintenance service. Anyone who has their own experience of performing such work or has questions after reading the review, please share them in the comments below.
Summary
A timely change of the timing belt drive on a Lada Vesta will save car enthusiasts from large expenses for engine overhauls. AvtoVAZ recommends installing a new drive every 180,000 km, but practice shows that the time frame should be reduced to 70-100 thousand km.
A car service center will require at least 5-6 thousand rubles for work. Anyone who is comfortable with equipment and has all the necessary tools will have no difficulty making repairs on their own.
Technology for replacing the drive of auxiliary units on Lada Kalina
- Specifics of the drive circuit on different modifications of Lada Kalina
- Recommendations for choosing a belt drive
- Regulations for periodic inspection and replacement of the alternator belt on Kalina
- Repair technology for the auxiliary drive system
- Tension adjustment
- Useful video tutorials on the topic
- How to replace the alternator belt on Lada Kalina
- How to tighten a belt
Lada Kalina from AvtoVAZLada Kalina The domestic auto industry continues to progress - AvtoVAZ presented a new generation Lada Kalina
. The model is equipped with a Jatco automatic transmission and an improved ventilation and heating system. Representatives of the plant claim that the new car has gotten rid of the problems associated with the electric power steering of the previous series.
This is all wonderful, but it was thanks to the first generation of the VAZ 1118 that repair techniques were developed that can be very useful to owners of new cars. Let's say the procedure for replacing the alternator serpentine belt on Kalina
absolutely the same for both models.
Specifics of the drive circuit on different modifications of Lada Kalina
The factory design provides for different lengths of standard gears, which depend on the configuration of the machine:
- without air conditioning – 882 mm;
- with air conditioning – 1018 mm.
The first VAZ 1118 models without air conditioning and a tension roller are equipped with a poly-V drive with a length of 823 mm
. Thus, with one belt from the crankshaft pulley, not only the alternator, but also the air conditioning compressor can be activated. The roller circuit allows you to adjust the tension.
Recommendations for choosing a belt drive
Gates
drive as standard.
.
As a replacement on the first models, you can use Dayco 825
.
Here you need to take into account that elastic specimens are marked with the “ Poly-V
” symbol; if it is absent, the product has a rigid structure.
Alternative drives for VAZ 1118 with air conditioning
- Roulunds Rubber 6PK1015;
- Dayco 6PK1005;
- Bosch 6PK1015;
- Gates 6PK1019.
Alternative drives for VAZ 1118 without air conditioning
- Bautler 6PK883;
- Dayko 6PK888;
- Finwhale BP6 883;
- Luzar LB 0118 1118-3701720 6РК 884;
- Roulunds Rubber 6PK884;
- BRT 882 mm (Balakovo plant).
Drive system repair
Regulations for periodic inspection and replacement of the alternator belt on Kalina
Many new owners of vehicles, either from prolonged joy or out of ignorance, remember the presence of a flexible connection under the hood only after the lamp on the dashboard lights up. The technical documentation of the vehicle indicates operational standards, after which the torque transmission elements must be removed and new ones installed:
- tensioner roller after 60,000 km;
- belt after 30,000 km.
Experts strongly recommend monthly scheduled maintenance of the rubber drive, consisting of simple external inspection steps. The part needs to be replaced if the following defects are detected
- cracks;
- abrasions;
- delamination;
- oiling;
- cuts.
A high-frequency whistle that appears when electrical consumers are turned on also indicates the need to replace the generator belt on Kalina or, at a minimum, to adjust its tension.
Repair technology for the auxiliary drive system
Sequencing
is similar for both models with and without air conditioning and consists of the following items:
- Remove the engine protection.
- Remove the right wheel and fender liner.
- Remove the expansion tank.
- Jack up the right side of the engine and unscrew the mount.
- By tightening the tensioner mechanism pin, loosen the belt tension.
- Remove the drive from the roller and then from all pulleys.
- Install the new part and reassemble in reverse order.
- Adjust the tension.
Tension adjustment
After replacing the alternator belt on Kalina, making a rough adjustment and then starting the engine, it is necessary to more accurately adjust the drive tension
. To do this, we perform the following operations:
- loosen the tensioner rod locknut;
- turn the adjusting pin with a wrench to “8” until the result is achieved;
- tighten the locknut.
When gradually tightening the belt, you can use a simple canter scale, which you need to attach to the key at “8” and tighten the pin counterclockwise to a reading of 2 kg. A normal setting is considered when, with a force of 10 kgf, in the area between the generator and crankshaft pulleys, the deflection value will be within 8-10 mm.
Useful video tutorials on the topic
A video with a step-by-step operation will help you analyze in detail all the nuances of replacing and adjusting the tension