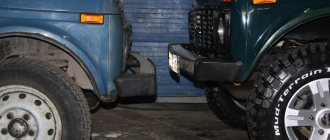
The operating conditions of Niva Chevrolet and the model’s belonging to the SUV category determine the need to protect the chassis and engine of the car. Off-road driving and damage to the underbody accelerate the wear of the main mechanisms. It is advisable for the owner of a Niva Chevrolet to take care of protecting the engine and gearbox before purchasing an SUV.
Standard protection
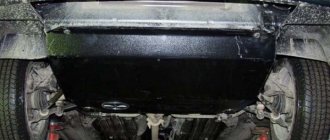
Top-end configurations are equipped with standard crankcase and underbody protection made of sheet steel 2-3 millimeters thick. The ribbed design provides engine cooling, but due to the presence of holes, it leads to rapid contamination of the bottom and the need to regularly dismantle the element for cleaning. The effectiveness of the standard protection is sufficient for measured operation of the car in urban areas.
When operating the Niva Chevrolet as an SUV, it is necessary to install engine protection that is more durable and reliable, since the standard element cannot cope with serious damage to the underbody when driving off-road. Protective plates are divided into several types according to the type of material they are made of.
How to replace crankshaft seals
The crankshaft seal of a Niva car is an element that seals the gaps between parts and prevents oil leaks. Over time, its working surface loses elasticity, breaking the seal. As a result, immediate repairs are required in the form of replacing the oil seal, otherwise serious problems may arise with the car.
Need for replacement
A faulty front oil seal often leads to damage to the timing belt. And through a leaking rear crankshaft seal, lubricant can get onto the clutch disc, negatively affecting its friction properties. This also increases fuel consumption and reduces vehicle performance. It is recommended to change the oil seal on a Niva:
- after 100 thousand km of distance traveled by the car;
- if the car has not been used for a long time and the seal has hardened;
- when purchasing a low-quality oil seal that fails much earlier than expected.
It's easy to change. In any case, timely replacement of the seal will be cheaper and easier than major car repairs.
Let's start replacing the front oil seal
In the field, the need for such a procedure as replacing the front crankshaft oil seal arises when oil is detected flowing through its edge. At the same time, the pulley sprays lubricant, contaminating the engine compartment and the front part of the engine.
Having noticed this symptom, it is worth additionally checking the crankcase ventilation system, since if it is clogged, even replacing the oil seal will not help eliminate the leak.
The main stages of work performed on a lift or ditch are as follows:
- Removing the mudguard of the lower part of the crankcase;
- Engaging 1st gear and braking the car using the parking brake. This allows you to avoid torsion of the shaft when changing the oil seal;
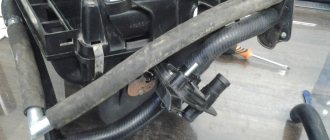
- Loosening the nut that secures the pulley (a 38 wrench is used as a tool for VAZ 21214 and 21212);
4. Loosening the water pump drive belt (using a 13mm head);
5. Displace the generator using a screwdriver attached as shown in the photo;
6. Removing first the sensor and then the crankshaft belt;
7. Unscrewing the nut securing the pulley;
8. Removing the pulley itself.
Now, using a screwdriver, pry up the front oil seal and remove it from the socket. The last stage, pressing in a new cuff, can be performed in two ways: • using a tool head; • using a pulley placed on top, with an old oil seal installed on it. When tightening the fastening nut, the new cuff is pressed in faster and easier.
After pressing is completed, you should ensure that the front seal is securely installed. The repair is completed by returning all parts to their place in the reverse order.
Changing the rear oil seal
The need to repair a car by replacing the rear oil seal is determined by the following signs: • rotation of the flywheel located inside the crankcase leads to splashing of oil, which flows out through the cracks formed between the casing and its cover; • fluid leakage leads to oiling of the clutch disc linings and its slipping.
Just like for the front seal, replacing the Niva crankshaft rear oil seal is carried out only after checking the cleanliness of the ventilation system. After all, when it becomes clogged, the gas pressure increases, and it will leak even if you repair the car by installing a new seal.
The first stage of work to replace the crankshaft oil seal is to install the car on a lift (inspection ditch). Next, remove the gearbox (this makes it more difficult to change the rear seal), remove both clutch discs and perform the following steps step by step: 1. Screw the bolt that secured the gearbox into the hole in the cylinder block; 2. Unscrew all flywheel fastenings using a 17-mm socket, holding the crankshaft from turning with a mounting blade resting on a screwed-in bolt and inserted between the flywheel teeth in the location shown in the photo;
3. Remove the flywheel first, then the plate
4. Unscrew the nuts on the casing cover (use a 10mm socket as a tool) and remove it;
5. Using a screwdriver, remove the oil seal.
Now you need to take a new crankshaft oil seal and lubricate it with oil along the working edge. After this, using the old cuff, the oil seal is pressed into place. And finally, after making sure that it is securely fastened, all the removed parts are installed back.
Types of protection
There are three types of engine protection for the Chevrolet Niva:
- Metal. Standard crankcase protection, installed on top-end configurations or purchased separately at a car store. Cost - from 3 thousand rubles. It is not particularly efficient, but is sufficient for standard vehicle use in urban areas.
- Aluminum (duralumin). Twice as thick as metal engine protection. It is lighter in weight compared to steel. Resistant to moisture and corrosion. Provides reliable crankcase protection and engine cooling. The disadvantage is the high cost.
- Composite. Crankcase protection with high resistance to mechanical damage. It is more durable and provides better engine protection. Exceeds duralumin analogues in weight. The minimum cost is from 8 thousand rubles.
Chevy Niva - let's talk about crankcase, gearbox and gearbox protection
Not long ago they asked me a question - what kind of protection should be installed on the Chevrolet Niva - on the engine, transfer case, RPM (front axle gearbox).
The question is important, because Shevik is not such a tall car, and therefore in specific situations there is a huge chance of sitting on its belly and bridges. Sitting on your belly without protection is very dangerous. That’s why, when doing off-road tuning, many people install special protection that covers all the important components. The crankcase protection - I don’t know, as for me, the standard one copes with its function perfectly, the iron there is thick, I didn’t measure it exactly, but it doesn’t bend with your hands at all. This protection has already saved me a couple of times, when I dived headfirst into a hole, and at the bottom of the hole there was a stump. It was at this point that I jabbed the protection, which withstood the blow (albeit of a small force) and protected the engine. And it didn’t even bend, maybe I got some kind of hardened one))
The only thing that bothers me is the fairly large holes into which dirt is instantly filled, then it hardens there and turns into stone. It becomes very problematic to knock it out from there. Only a Karcher can help out - the jet power is enough. What are these holes for, some may ask? I will answer - for ventilation of the engine, for cooling it, if you want. Therefore, any crankcase protection will have holes; only their size will differ.
Well, you can write a lot and for a long time about protection, because the options are simply endless. I'll try to be brief))
In addition to the material, it is worth paying attention to the possibility of making a “composite” from several parts from one company. Although now most often they take and install one general protection from one company. It turns out both inexpensive and excellent.
Sheriff is the most popular "armor".
Yes, for example, the “Sheriff” protection, which is very good in cost - only 3,000 rubles for the entire set, which includes crankcase protection, as well as all components. It turns out to be quite good protection, the main purpose of which is to protect the engine, gearbox and transfer case from flying stones, from dust, and from light impacts too. It looks like this:
For the transfer case and box:
Under no circumstances should you hope for protection if you sit on your belly, the thickness of the iron is only 2 mm, there are no stiffening ribs, and therefore the protection will wear out a hundred pounds, it’s practically like foil. If you want your armor to be strong, use 10 mm aluminum alloy - then it will be able to withstand the weight of the car and will not bend)) But for the money it turns out quite well.
In general, it is quite possible to make the protection yourself, especially since there are a lot of patterns on the Internet - you can make the thickness of the material yourself, what thickness you need and choose the material itself.
The coolest option, of course, is a thick aluminum sheet from the nose to the trunk, but if you order, prepare money of at least 15k)) If you have the material, you can make it yourself - it will be cheaper))
Many people complain that Sheriff needs to be developed in a normal way. And if you ride more or less seriously on shit, the Sheriff doesn’t help here, it bends very easily, and tons of dirt also gets under the protection.
In fact, if you want something cool and serious, it’s better to make it yourself or to order a thick duralumin protection (thickness of at least 5-6 mm), think through everything - the hole for draining the oil, the ventilation holes are also not very large.
Well, the very fact that the units on the bottom need to be protected is a fact. But once I drove onto a stump, it’s good that I sat on it sideways. Just a little to the side and the car would have sat neatly on the transfer case. Everything would have broken there then.
Alfeco is also an option!
Well, for Chevy Niv owners they also praise Alfeco’s protection. Manufacturer Nizhny Tagil. The reviews seem to be quite good, but they mostly rate Sheriff, and Alfek less often. In principle, the performance characteristics are almost the same, Alfeka’s steel is also 2 mm, and therefore will also bend, like the sheriff’s. Well, Alpha is a little narrower, as people say.
The protection is also comprehensive, protecting the crankcase, transfer case and gearbox. In terms of money - about 3000 rubles. When driving, nothing rumbles, because there are vibration damping seals right there.
At the service, a familiar mechanic confirmed my guesses, saying that the front standard protection is much cooler than any Sheriff or Alfek. But the bottom still needs to be protected, because it is likely that the moment will come when you will sit on a stump with the transfer case. And the protection, even 2 mm, I think will save her. Although a lot depends on the situation, if you sit down right away, only thick duralumin will save you))
Dural + steel frame - that's where the power is!
In general, if you do it really cool and super-reliably, then you need to weld the load-bearing frame onto the front end, and then cover it with aluminum)) And then you can ram whatever you want))
Here is a photo of a good crankcase protection (without frame):
Selecting motor protection
A survey of car owners and monitoring of the main offers make it possible to identify four main brands of engine protection for the Chevrolet Niva: Alfa-Karter, Tekhnomaster, Solid Protective Structures and Sheriff. The last two are the most popular for several reasons:
- They are made from metal sheets three millimeters thick.
- Simple design and shape of elements.
- A well-thought-out fastening system - high-strength steel beams.
- Mortgages with galvanized washers.
- Slight decrease in clearance.
The only drawback is that the front suspension axle nuts do not close due to the small width of the protection. The advantage of this design is engine cooling and ease of cleaning from dirt.
Lockers. Liquid liner.
Lockers. Liquid liner.
Post by Magellan » 04 Jul 2013, 02:04
Just recently I learned about liquid fender liners and how cool they are (if this is true, of course). I quote: it is applied in several layers, the layer thickness is 2-3 mm, it is well resistant to various types of influences, lasts up to 10 years and, most importantly, is better than various mastics, bitumens, etc. endures workdays. If what they say about the “liquid fender liner” is true, I’m thinking of treating the entire underbody.
PS: This topic should not be confused with the topic: Underbody treatment. Here I would like to know specifically about the “liquid fender liner”.
Tell who is in the subject what's what, please.
Re: Liquid fender liner
Post by Tigra » 04 Jul 2013, 19:03
Re: Liquid fender liner
Post by bambr » 04 Jul 2013, 19:10
Re: Liquid fender liner
Post by Tigra » 04 Jul 2013, 19:25
Re: Liquid fender liner
Post by GS_77 » 04 Jul 2013, 19:32
Re: Liquid fender liner
Post by bambr » 04 Jul 2013, 19:49
Re: Liquid fender liner
Post by GS_77 » 09 Jul 2013, 23:32
Bottom treatment
Post by Constructor » 12 Aug 2022, 18:24
Advantages of Sheriff protection
- Reliable protection of the car engine compartment from damage.
- Resistant to moisture and dirt. Metal wings of the structure protect the crankcase from dust.
- The ribbed surface and holes in the protection provide additional engine cooling and maintain a stable temperature in the engine compartment.
- The powder coating method increases the metal's resistance to corrosion and damage.
- Rubber shock absorbers located at the edges of the protection minimize noise and vibration when the SUV moves.
- Reducing operating costs associated with vehicle maintenance and eliminating the need for regular removal of protection due to the presence of holes for draining used engine oil and replacing filters.
- The aerodynamic properties of the design provide better grip of the car on the road.
- When developing engine protection for the Chevrolet Niva Sheriff, the design features of the SUV are taken into account. Installation of the element is carried out using reliable fasteners on standard holes.
- High strength is guaranteed by the use of stamping technology in the manufacture of protection.
Chevrolet Niva | Removing and installing the pallet
Removing and installing the pallet
| When installing, use a new pan gasket or suitable sealant (where applicable). |
1. Disconnect the ground cable from the battery.
If the car radio in your car is coded, make sure you know the code before disconnecting the battery.
2. Drain the engine oil, then install and tighten the drain plug to the torque specified in the Specifications (use a new washer).
3. Jack up the front of the vehicle and place it on axle stands. Where available, remove the lower engine shield.
4. Unscrew the reinforcing rod (where available) between the front suspension domes.
5. On F8Q engines, unscrew the mounting bolts and remove the upper plastic cover of the drive belt/right engine mount. On F9Q engines, unscrew the mounting nuts and remove the engine soundproof cover.
6. Use a winch to support the weight of the engine/transmission.
7. Remove the bolts securing the muffler/converter downpipe to the exhaust manifold. Separate the downpipe and support it.
8. Unscrew the flywheel bracket/cover
Please note that one of the bolts secures the rear support bracket to the transmission, and to remove the bolts securing the bracket to the engine you will need a socket wrench.
9. Unscrew the holders securing the power steering hydraulic pipe to the right side of the subframe.
10
Remove the nut securing the right engine mount upper bracket to the travel stop/rubber engine mount assembly on the body.
11. Raise the engine enough to allow the pan to be removed.
12. Remove the bolts securing the pan to the cylinder block, but leave two diagonally opposite.
13. Separate the pan from the base of the cylinder block. Do not use a screwdriver as it may damage the contact surfaces.
14. Remove the two remaining bolts and lower the pan. Remove the gasket where present.
15. Clean the cylinder block and pan of any remaining gasket or sealant.
1. Check the cleanliness of the mating surfaces of the pan and cylinder block.
2. Where available, position a new gasket on the sump and, if there is no gasket, apply a 1mm wide sealant - Renault recommends Rhodorseal 5661 - to the mating surface of the sump (on the outside of the sump groove).
3
If a gasket is not used, it is important to position the pan so that it no longer has to be moved once the sealant contacts the engine block. Long bolts or pins can be used as guides.
4
To prevent oil from dripping from the oil pump and cylinder block, wipe these areas before installing the pan.
5. Press the pan against the cylinder block, then insert the bolts and gradually tighten them to the force given in the Specifications.
6. Lower the engine, then install and tighten the right engine mount nut.
7. Install the power steering hydraulic tube holders.
8. Install the flywheel/drive disc reinforcing bracket-cover and tighten the fastening bolts.
9. Install the muffler/converter downpipe and tighten the bolts.
10. Remove the winch and install the upper plastic drive belt/right engine mount cover or soundproof cover, where available.
11. Where applicable, install the reinforcing rod between the front suspension domes and tighten the bolts.
12. Connect the battery, then lower the vehicle to the ground.
13. Fill the engine with fresh oil.
Installation of protection
Do-it-yourself work on installing engine protection for the Niva Chevrolet is carried out in an inspection pit. Before installation, the underbody and engine compartment of the SUV are cleaned of dirt and dust, this makes access to the fasteners easier.
Installation is carried out in several stages:
- Preparation. The bottom, engine compartment and standard engine protection of the Chevrolet Niva - if any - are cleaned of dirt. The best option is to use a Karcher sink. For installation you will need a set of keys and a screwdriver.
- Measurements. The protection is fitted to the underbody of the car, and the compliance of the standard fasteners and holes of the element is checked. The design consists of two parts: the main one for the engine, and the additional one for the transmission.
- Installation. The rigidity of the protection is ensured by fastening with six bolts.
- Examination. Diagnostics of the reliability of fastenings is carried out.
Lada 4×4 3D Adventure time ⌚ › Logbook › Installing plastic fender liners (lockers) on the Niva
This past holiday was dedicated to installing fender liners on the car. Back in the spring I bought a set of lockers for 1,500 rubles. A little expensive, but what can you do? The fender liners are good, the plastic is dense and at the same time quite elastic. Cheaper options were completely worthless. Before installation, I washed the car at a car wash, asked to rinse the wheel arches thoroughly, but they still left dirt. I washed it myself. I removed all the dirt from all the cracks with the help of a brush, fingers and such and such a mother. =) I dried and treated the surface of the wheel arches with Movil.
I installed the fender liners and they fit well. The rear left and front right tires are generally, I would say, ideal.
I drilled holes and screwed in screws about 10 cm apart. I did everything sequentially so that there were no wrinkles.
Some people think that plastic fender liners are evil, an unnecessary element, that arches rust and rot from drilled holes and screws. I have a different opinion on this. If the wheels are stock size and you don’t want to periodically treat the wheel arches, then installing fender liners is justified. With the wheel arch liners it’s quieter (I didn’t use a vibrator) and it’s easier to wash off the dirt. In addition, fender liners additionally protect the car body from dirt and sandblasting. On this car without fender liners, there was always a lot of dirt on the body and rear bumper, but with fender liners on the previous car there were no such problems.
Recommendations
The Chevrolet Niva engine protection is classified according to the type of material, fastening method and design features. When choosing a design, they rely primarily on the operating conditions of the SUV. The effectiveness of standard protection is only sufficient for driving in urban areas.
Full protection of the engine compartment and crankcase is provided by an alloy or armored steel structure. Maintenance of the installed element consists of regularly cleaning it from dirt.
When to replace
During the operation of the Chevrolet Niva, a problem often arises associated with the flow of lubricant through the crankshaft. The reason for this may be various malfunctions, including wear of the element itself that performs the gasket function. If during the diagnostic process it is determined that it will not be able to function normally in the future, then it needs to be replaced. After the dismantling process, a new product is installed.
This operation will make it possible to eliminate the lubricant leak. There are some peculiarities in replacing the front and rear oil seals, so motorists who want to do these operations themselves should study all the nuances.
Nuances of choosing protection
- Installation instructions are supplied with the Chevrolet Niva engine protection kit. It is advisable to make sure that the manufacturer fulfills the warranty obligations, since security elements are not subject to mandatory certification; accordingly, the certificate may not be included with the product.
- The thickness, properties, technical characteristics of the material, the number and depth of stiffeners determine the rigidity of the protection.
- Plastic protection fasteners must be equipped with steel bushings. When choosing a design, you need to make sure that it is made of the declared carbon fiber or Kevlar. The test is carried out by erasing the black paint applied to the surface and determining the color of the fibers: white is typical for fiberglass, black for carbon fiber, greenish-golden for Kevlar.
- The Chevrolet Niva engine protection must be installed on the power body elements intended for this purpose. For this purpose, technological holes are used in the suspension transverse beam, side members, subframe and other structures.
- The thickness of the steel legs and protection fastening brackets should be 3-5 millimeters.
- The coating of fastener elements must be galvanic - it provides reliable protection against corrosion. The need for this is due to the regular dismantling of the protection in order to clean it from dirt. Spring washers or nuts with nylon rings prevent the fasteners from unscrewing themselves.
Features of self-removal of the defect that has arisen
When replacing the hydraulic chain tensioner and installing a mechanical tensioner on a Chevrolet, the valve cover must be removed.
Next, after pulling out the pin, you need to use a ratchet wrench to make one full revolution of the crankshaft
It is important to pay attention to whether the slack chain on the Niva has come out of the grooves of the shoe. If this point is ignored and the defect is not eliminated, then the consequences can be sad (but this only applies to a single-row chain)
. If this point is ignored and the defect is not eliminated, then the consequences can be sad (but this only applies to a single-row chain).
And also interesting: How to repair a Chevrolet Niva: features, details, photos, videos || Niva Chevy engine repair
Also, as a result of the first revolution, the primary slack of the chain on the Niva is selected and, as a rule, the rod immediately comes out one or two more clicks, relative to the first shooting. After self-replacement, subsequently no extraneous sounds will be observed during startup on the Chevrolet Niva. The engine will always run smoothly.
When the hydraulic tensioner is replaced, nothing will rattle when you start the engine. Since it is always only the faulty element that rattles. The instructions for replacing this unit yourself prove that the procedure is not at all complicated, and in addition, the price of the issue is no more than 2,000 rubles. But there is one “but” - if the Niva Chevrolet car is relatively new and was under warranty, it will automatically be canceled.
Read news about the new Niva
- Do-it-yourself Niva 4x4 tuning: updating the interior of the Lada VAZ-2121
- Chevrolet Niva engine chip tuning
- How to assemble an internal combustion engine on a Chevrolet Niva
- Niva-Chevrolet with Opel engine: brief description, technical characteristics, owner reviews
- We install the engine on the Niva from a foreign car. It's worth it
- How to properly perform chip tuning of a Niva engine
- How to reduce Niva fuel consumption
- An alternative to the LADA 4×4 car. The most expensive, cheap and average “substitutes”
Operation protection
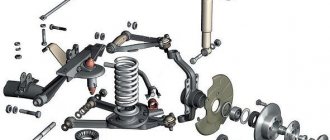
The possibility of damage to the gearbox and engine crankcase is not eliminated by installing protection - it only reduces the risk of bottom deformation. For this reason, your driving style must match the road conditions:
- When leaving the highway onto country and dirt roads in poor lighting conditions, you must reduce your speed.
- Braking before obstacles is carried out in advance.
- Water obstacles, curbs and railway crossings are overcome carefully and at low speed.
- Driving on unmown grass must be done with caution, as it may contain stones, stumps, metal parts, deep furrows and other obstacles. For this reason, it is advisable to walk the proposed route.
- Objects lying on the road must be driven around and not passed between the wheels, since their size is difficult to determine over a long distance when approaching.
The main requirements for crankcase and engine protection are strength and rigidity - the resistance of the structure to shock loads depends on them. The mechanical properties of the elements should be aimed at absorbing the impact force in the event of a collision with an obstacle and maintaining the original shape without deformation. The optimal rigidity of the protection corresponds to the deformation that occurs within the gap between the crankcase and the structure - its value does not exceed 20-30 millimeters. A larger value may lead to a decrease in the Niva Chevrolet ground clearance.
Replacing the pan gasket VAZ 21214
The internal volume of the motor is sealed. The oil pan is a removable part located at the bottom of the power plant. In practice, this is a consumable container for motor oil. If this element leaks, the amount of oil will decrease and the lubrication system will be disrupted. The consequences, as a rule, are very sad - expensive repairs of a worn-out, and cost-saving, jammed engine.
Prerequisites for oil leakage from the pan:
The VAZ 2121 is often used off-road, and it is possible that the bottom of the engine touches the ground. This is an extreme situation that leads to a hole. Also, when the pallet hits the ground, the landing plane is deformed. Due to such damage, the gasket that ensures tightness often breaks. Crankcase deformation due to overheating. If the size of the damage exceeds the thickness of the gasket, oil begins to flow out of the engine. Excessive tightening of the mounting bolts leads to destruction of the gasket. The other side is the missing tightening torque. If a leak is detected, tighten the fastening bolts. Obvious damage from age or poor quality of the factory part. If broaching does not help, an easy replacement process awaits.
How to change the pan gasket without the help of others
The only condition is the presence of a hole in the garage, otherwise known as an overpass. Despite the high ground clearance, replacement near the ground is impossible. Drain the used oil. For this purpose, the car warms up, then you need to wait up to 10 minutes until the liquid collects on the bottom of the pan.
Fundamentally! Take precautions against hot water getting on your body. After unscrewing the drain plug, a powerful jet sprays oil onto our client's sides. To change the gasket, you will have to raise the unit by 15-30 cm. We loosen the fastenings of both rubber motor mounts and unscrew the gearbox from the fastenings of the front axle and the motor.
We install a jack under the engine and raise the height of the bolts of the support cushions.
Read:
We install restrictive spacers into the resulting gap - wooden blocks are suitable.
This is done for safety - the jack may collapse at one moment, and then replacing the gasket will result in injury. Unscrew the bolts securing the pallet. Not alternately in a circle, but crosswise, to evenly relieve stress from the body.
The tray on the NIVA 21214 is quite heavy; before unscrewing the last pair of bolts, hold the body, in other words, ask an assistant for this step.
Using a careful downward and forward motion, remove the part from under the motor seat. You'll like the oil better this day, don't spill it on your clothes
Attention! An oil receiver with a filter network descends from the crankcase cavity. Do not damage this unit during dismantling
Taking this opportunity, we inspect and troubleshoot the internal cavity of the crankcase. Clean visible parts with a lint-free cloth dampened with oil. Scrape off the remnants of the old gasket from the crankcase mating surface. Wash the pan with kerosene and check the geometry of unfamiliar fasteners. For this purpose, we lay the body upside down on a flat surface - for example, glass. If there is deformation, the spare part will have to be replaced. Small chips and damage are sanded. Install a new gasket, first moistening the surface with engine oil. The use of sealants is not necessary; over time, the rags will fall into the crankcase cavity. Carefully place the pan (without damaging the oil receiver) under the crankcase, secure it with 4 bolts crosswise. Tighten the bolts left for our client, observing the tightening torque indicated in the annotation for the car.
Raise the engine again, remove the spacers, and lower it onto the cushions. Tighten the support bolts. Secure the gearbox. At this point, the procedure for replacing the gasket is completed. All that remains is to tighten the drain plug and add fresh oil. Take a test drive and check for any leaks from the crankcase.
https://youtube.com/watch?v=fUYP_RaONH4
Additional holes
An additional window is cut under the drain plug to drain the oil. You can drill holes in any place convenient for you, without bothering with the accuracy of the markings. Car enthusiasts also make technological windows to drain the water formed between the sidewalls of the channel and the dirt that gets there. The protection is enhanced by corners that are attached to the box support and the frontal part of the entire device. This design will protect the transfer case from all kinds of impacts on stumps, ditches and other obstacles that can lead to deformation of the subframe.
And also interesting: Niva sound transfer case || Niva transfer case turns off
What do market authorities say about our questions?
Audatex (not only in the program, but also in reference books) contains information about the admissibility of certain repairs of plastic parts by each automaker. Some do not allow repairs at all, others regulate them by the size and types of damage, others allow any repair if it is economically feasible. It also contains links to repair kits recommended by the automaker, including catalog numbers.
By the way, the impossibility of repairing bumper mounts is another myth of “extremely qualified repairers.”
Guarantee
All products from the Avtoraner online store are subject to the manufacturer's warranty terms. To carry out service, the client must provide the product and a receipt confirming its purchase.
For a long time I was planning to build myself a crankcase protection, and finally I figured something out.
I used this pattern to cut the sheet. I made the pattern out of cardboard, then redrew it, it seemed like the dimensions all matched, and I didn’t have to adjust the protection to the location.
1. At the rear, I attached an angle No. 50 to the longitudinal link mount, through steel plates 4 mm thick:
2. On the corner, from the inside, I welded two M8 nuts.
3. The protection sheet was first cut along the fold lines with a grinder to about half the depth, and after bending it was boiled:
4. The mounting holes were marked in place. Two holes in front with standard thread:
One in the center, fastened with an M8 bolt into a standard bracket on the beam with a flush-mounted hexagon socket bolt:
At the back there are two M8 bolts to the nuts on the corner:
5. Inside, on the frontal part, I welded several stiffening ribs, the main thing is that they are located to the left and right of the pallet, otherwise they may touch!
6. I painted it this way because I had paint and a spray gun.
Recommendations
Comments 20
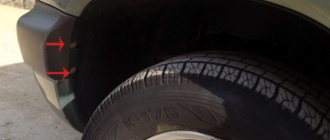
Anything that exceeds the dimensions of a standard bumper is a reason for a financial discussion with the policeman. Kangurins are prohibited.
Poke the pipe from below, it doesn’t even go beyond the dimensions.
Well, if this argument convinces...)))
This is the cops' feeder
Pipes on both bumpers, no questions from the police yet. And on many cars I see there are tubes at the bottom of the bumper. This is not a full-fledged kangaroo.
“it will fall off at the first normal passage of any hole,” “I only need it for beauty))”
I don’t do offroading, but I often go into the forest (during hunting season). This kind of pipe protects the plastic of the bumper when crossing bushes and overgrowth on forest paths. And if, when driving through a super pit, a pipe rips out, then you need a tractor to travel there. But Shniva with its low plastic bumper aprons is not suitable for super pits. If only you do special training, it will be a completely different horse.
Shaking problem
Many drivers who have a VAZ 2121 Niva at their disposal have encountered the fact that the cabin vibrates strongly while driving, especially off-road or at high speed. Vibrations that spread almost throughout the entire cabin cause a lot of inconvenience and constant discomfort. Technically, this was not corrected, so the people’s minds had to independently find a way out of the current situation. And the solution turned out to be quite simple - the transfer case needs a structure that will absorb vibrations. Installing a subframe solves this problem.