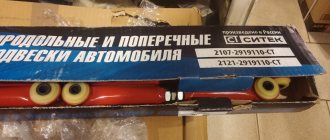
The rear suspension on a Chevrolet Niva includes the following parts:
- cross bar;
- lower spring gasket;
- bolt that secures the lower rod;
- lower longitudinal rod;
- rubber and spacer sleeve;
- bracket;
- nut;
- upper longitudinal rod;
- upper spring gasket;
- compression progress buffer;
- rear shock absorber;
- additional buffer.
Now let's look at the structure of each of the above parts. So, the rods transmit the pushing and braking signal through the rear axle beam. The transverse one keeps the trunk from moving sideways. The reaction rods are attached to the body brackets. The hinge consists of a rubber bushing 5. The elastic parts of the suspension include cylindrical coil springs. The installed spring rests its end on the support cup. The insulating top gasket is located in the stamped trunk cup. The main buffers are installed inside the springs, and they are secured with a mushroom-shaped clamp. The bracket contains the main buffer, which is bolted to the underbody.
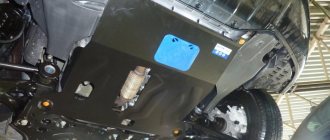
Purpose and design of the front and rear
Chevrolet Niva is designed for driving on asphalt and off-road. Therefore, the car, in addition to all-wheel drive, has increased ground clearance. The latter performs three functions:
- Reduced shock loads on the body, wheels, bearings.
- Providing traction.
- Reduced body vibrations when driving over uneven surfaces.
The pendant is divided into two parts:
- The front one is shown in the diagram below. Includes four control arms (two on each side), ball joints, telescopic shock absorbers, coil springs and anti-roll bar. The front suspension is independent - vibrations of one of the levers do not affect the position of the other.
- The rear is shown in the diagram below. Includes rear axle beam, torque rods, telescopic shock absorbers and coil springs. The beam rigidly connects the wheels. They cannot oscillate independently. Accordingly, the rear suspension is dependent. This slightly reduces comfort and maneuverability. But the beam increases the rigidity and reliability of the structure.
In addition to the listed parts, the suspension also includes other elements: rubber bumpers, silent blocks, bolts, nuts, fasteners, gaskets, brackets. All of them are subjected to large dynamic and static loads. In addition, the rubber parts of the silent blocks and the boots of the ball joints dry out over time and need to be replaced even after the car has been stored in a garage for a long time.
With your own hands
An external engine air intake, which will save the car from water hammer and help overcome water obstacles - the snorkel on the Chevrolet Niva is a reliable companion during long journeys on dusty and road-like surfaces (in off-road conditions).
The elegant device is installed on the left pillar, enlivens the design and is completely invisible from the interior. The highlight of the manufacturers is the relatively simple installation of the snorkel according to the instructions with minimal requirements for the skills of the performer. Hunting and fishing with unexpected weather conditions will not result in troubles on the way home after installing a useful device on the hood of the Niva. You can even risk driving a Chevy Niva along the coast if you get bored with the monotonous road surface after picturesque views of nature, a campfire and a delicious barbecue with friends. For those who doubt it, here is a list of arguments in favor of installing an air intake on the Chevrolet Niva and the advantages of the device:
the air intake point moves from a vulnerable and relatively low position to a safe and high place;
the snorkel on the Chevrolet Niva constantly provides an influx of clean, cool air;
the risk of engine damage when crossing fords from water ingress is reduced;
ensures efficient operation of the “heart” of the Chevy Niva when driving in a column in unfavorable conditions (dust, dirt from cars in front).
Since the air intake on the Chevrolet Niva is not an innovation and is successfully imitated by the Kulibins, before inventing your own device, it is worth assessing the difference between the finished product and the results of applied art in terms of efficiency, aesthetics and quality.
Snorkel-original - a high-quality alternative to homemade products
A homemade external air intake with your own hands is a flight of fancy for the car owner using various improvised means. Such a device can look different, it all depends on the materials and skill of the author of the masterpiece. Some models look very extravagant and can amaze the delicate taste of a connoisseur of beauty with their aggressive appearance and surreal design.
Materials for a do-it-yourself snorkel for a Chevrolet Niva are fiberglass, fiberglass, epoxy resin, chrome pipe, corrugation, fastener clips, plastic joints, O-rings and even original round ventilation grilles. The entire range of available products from the plumbing department of any supermarket must be adapted to the car using glue, an industrial hair dryer, a hacksaw, a drill and welding. Some manage to achieve the state of “modestly and tastefully”, otherwise the shniva risks striking the sophisticated public with an awkward pile on the hood.
The original looks elegant and predictable, harmoniously complements the contours of the body and does not interfere with visibility. For fans of tuning and aerography, the air intake for the Chevrolet Niva can be supplemented with a stylish image or give the car a strict and presentable look. The standard kit includes an adapter, O-rings, hardware, connecting pipes, snorkel and installation instructions.
Snorkel for Chevrolet Niva - overview of the range
A popular device from F-Dising will cost a car enthusiast from 6,000 rubles, and for the lazy half of humanity they offer a service - installation for 1,000 rubles. Supporters of high-quality and reliable products are invited to install an air intake on the hood made of LLDPE - linear polyethylene. Advantages of reinforced products:
high physical and mechanical properties
excellent performance properties
crack resistance
shiny surface (a la Australian Safari snorkel).
The cost of the reinforced product will be 3,800 rubles, the kit includes fastening materials, clamps, a pattern, and an air intake. A fiberglass product will cost 4,000 – 4,600 rubles, depending on the aesthetics: painted, unpainted.
Installing a snorkel on a Chevrolet Niva
When choosing finished products, all manufacturers offer installation instructions (one of them can be downloaded at the end of the article). All products are installed along the left pillar; the contractor will need to make a hole in the mudguard, spar, mounting holes on the roof, wing and a figured cutout in the wing. For installation you will need a set of tools and materials:
ruler;
jigsaw (cricket scissors), riveting gun;
drill, drill bit (4 and 10 mm);
ratchet wrench;
polyurethane sealant, masking tape, anti-corrosion primer;
water based marker.
Installation is carried out according to the instructions of the selected manufacturer. As a rule, it is recommended to jack up a Chevrolet Niva, remove the fender protection, wheel, air filter tank, pipes, clean the body and tape the surface with tape. The outline on the left wing is marked according to the template, then cut out, the pipe is inserted and the snorkel is installed.
The next step is to mark the fastening points, holding the snorkel, remove the product, drill holes and remove the tape. The last step is to install threaded rivets, glue them and apply sealant evenly to the surface. Then install the air intake for the Chevrolet Niva and secure with bolts. Excess sealant is removed with a rag.
Basic faults
Chevrolet Niva suspension parts are designed for different service life.
The levers, beam and anti-roll bar do not need to be changed even after 100-200 thousand kilometers.
But rubber-metal hinges, boots and bushings gradually lose their properties even while parked.
VAZ-2123 owners have to deal with the following malfunctions:
- Wear of silent blocks, ball joints.
- Damage or cracking of anthers.
- Reduced performance of shock absorbers.
- Breakage of jet rods.
In addition to replacing faulty parts, it is necessary to regularly check and adjust the angles of the front wheels.
Otherwise, the car's handling deteriorates, and the tires begin to wear out rapidly. Wheel alignment is checked every 10-15 thousand kilometers and after very strong impacts when falling into road potholes.
Chevrolet Niva Rear suspension Chevrolet Niva
Rear suspension: 1 — rubber bushing; 2 - spacer sleeve; 3 — lower insulating gasket of the spring; 4 — lower spring support cup; 5 — compression progress buffer; 6 — suspension spring; 7 — shock absorber; 8 — bolt for fastening the upper longitudinal rod; 9 — bracket for fastening the lower longitudinal rod; 10 — lower longitudinal rod; 11 — body floor cross member; 12 — bracket for the transverse rod; 13 — rear axle beam; 14 — upper longitudinal rod; 15 — additional compression progress buffer; 16 — transverse rod; 17 — upper insulating gasket of the spring; 18 — rubber bushing for the shock absorber eye.
The rear suspension is dependent, with coil springs and hydraulic telescopic shock absorbers. Two lower longitudinal bars prevent the longitudinal movement of the beam, two upper ones prevent the beam from rotating around its axis under the influence of traction and braking forces on the rear wheels. The transverse bar (“Panhard rod”) limits the displacement of the beam in the transverse direction. Rubber-metal hinges are pressed into the eyes at the ends of the rods. They can be replaced separately, provided that the lugs themselves are not worn out. The shock absorber is attached with its lower part to a bracket on the rear axle beam, and its upper part to an eye in the rear wheel arch through rubber and steel spacer bushings. The bolts for fastening the rods and shock absorbers can only be tightened in the “car on wheels” position. The suspension spring rests on the lower and upper cups. A plastic spacer is installed in the lower support cup, welded to the rear axle beam. The upper end of the spring rests through a rubber gasket on the upper support cup welded to the body. The compression buffer bracket is also welded to the upper cup. At full suspension travel, the buffer rests on the lower spring support cup. When replacing springs, make sure they are of the same class as the front suspension springs.
Signs of trouble
Some problems can be identified by hearing while driving.
Worn ball joints or silent blocks, faulty shock absorbers or broken rods knock, squeak or ring when driving on uneven roads. In addition to extraneous sounds, suspension malfunctions manifest themselves as follows:
- Rocking or jumping of the body when driving over uneven surfaces.
- Pulling the car to the side.
- Increased braking distance.
- Deterioration in controllability.
- Accelerated or uneven tire wear.
Important: damage to the anthers can only be noticed upon inspection. If you do not replace them in time, dirt will get into the hinges and cause them to break.
The need for self-repair
Carrying out any repair requires experience, plumbing skills and a suitable set of tools. Most repairs cannot be done without an inspection hole.
Replacing ball joints and silent blocks is also impossible without pullers, and special stands are needed to check and adjust the locking angles of the front wheels.
Only if you have the above conditions and experience in carrying out repairs, is it possible to independently repair the car suspension. The most common cases are when owners prefer to go to a service station instead of purchasing tools for one-time work.
You need to prepare thoroughly for suspension repairs, because safety on the road depends on it. If you feel that you can handle it on your own or do not have the necessary tools, it would be right to play it safe and use the services of professionals.
Tuning
There are ready-made suspension modification kits available in stores. Three types of tuning are popular:
- Lifting - increasing ground clearance by installing spacers under the springs and installing shock absorbers with increased travel.
- Reinforcement - replacement of reaction rods and other parts with more durable ones.
- Installation of air suspension, which allows you to adjust the ground clearance and stiffness in accordance with the road condition
The last option is the most complex and expensive. But it allows you to quickly adjust the behavior in accordance with operating conditions.
Important: the law regards some tuning options as re-equipping a car. In such cases, you need to go through the certification procedure and make changes to the technical passport.
Rear suspension of Chevrolet Niva from 2009.
The rear suspension of the Chevrolet Niva is dependent, with coil springs and hydraulic telescopic shock absorbers. The two lower longitudinal bars prevent the longitudinal movement of the beam, the two upper ones prevent the beam from rotating around its axis under the influence of traction and braking forces on the rear wheels.
Rear suspension: 1 — rubber bushing; 2 - spacer sleeve; 3 — lower insulating gasket of the spring; 4 — lower spring support cup; 5 — compression progress buffer; 6 — suspension spring; 7 — shock absorber; 8 — bolt for fastening the upper longitudinal rod; 9 — bracket for fastening the lower longitudinal rod; 10 — lower longitudinal rod; 11 — body floor cross member; 12 — bracket for the transverse rod; 13 — rear axle beam; 14 — upper longitudinal rod; 15 — additional compression progress buffer; 16 — transverse rod; 17 — upper insulating gasket of the spring; 18 — rubber bushing for the shock absorber eye.
The transverse bar (“Panhard rod”) limits the displacement of the beam in the transverse direction. Rubber-metal hinges are pressed into the eyes at the ends of the rods. They can be replaced separately, provided that the lugs themselves are not worn out.
The shock absorber is attached with its lower part to a bracket on the rear axle beam, and its upper part to an eye in the rear wheel arch through rubber and steel spacer bushings. The bolts for fastening the rods and shock absorbers can only be tightened in the “car on wheels” position. The suspension spring rests on the lower and upper cups.
A plastic spacer is installed in the lower support cup, welded to the rear axle beam. The upper end of the spring rests through a rubber gasket on the upper support cup welded to the body. The compression buffer bracket is also welded to the upper cup. At full suspension travel, the buffer rests on the lower spring support cup. When replacing springs, make sure they are of the same class as the front suspension springs.
Information relevant for Chevrolet Niva cars 2009, 2010, 2011, 2012, 2013, 2014, 2015, 2016, 2022, 2022 model years.
Repair and service of cars, engines and automatic transmissions
The rear suspension of the Chevrolet Niva is dependent, with coil springs and hydraulic telescopic shock absorbers.
The two lower longitudinal bars prevent the longitudinal movement of the beam, the two upper ones prevent the beam from rotating around its axis under the influence of traction and braking forces on the rear wheels.
The transverse rod of the Chevrolet Niva rear suspension limits the displacement of the beam in the transverse direction.
Rubber-metal hinges are pressed into the eyes at the ends of the rods.
They can be replaced separately, provided that the lugs themselves are not worn out.
The shock absorber is attached with its lower part to a bracket on the rear axle beam, and its upper part to an eye in the rear wheel arch through rubber and steel spacer bushings.
The bolts for fastening the rods and shock absorbers can only be tightened in the “car on wheels” position.
The Chevy Niva rear suspension spring rests on the lower and upper cups.
A plastic spacer is installed in the lower support cup, welded to the rear axle beam.
Fig.38. Chevrolet Niva rear suspension
1 — rubber bushing; 2 - spacer sleeve; 3 — lower insulating gasket of the spring; 4 — lower spring support cup; 5 — compression progress buffer; 6 — suspension spring; 7 — shock absorber; 8 — bolt for fastening the upper longitudinal rod; 9 — bracket for fastening the lower longitudinal rod; 10 — lower longitudinal rod; 11 — body floor cross member; 12 — bracket for the transverse rod of the Chevy Niva rear suspension; 13 — rear axle beam; 14 — upper longitudinal rod; 15 — additional compression progress buffer; 16 — transverse rod; 17 — upper insulating gasket of the spring; 18 — rubber bushing for shock absorber eye
The upper end of the Chevrolet Niva rear suspension spring rests through a rubber gasket on the upper support cup welded to the body.
The compression buffer bracket is also welded to the upper cup.
At full suspension travel, the buffer rests on the lower spring support cup.
When replacing springs, make sure they are of the same class as the front suspension springs.
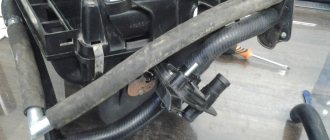
Removing the shock absorber of the rear suspension of a Chevrolet Niva
— Using a spanner wrench, unscrew the bolt of the lower shock absorber mounting to the bracket.
— We unscrew the nut of the bolt of the upper mounting of the shock absorber of the rear suspension of the Chevy Niva, holding the bolt with a wrench of the same size.
— Remove the bolt and remove the rear shock absorber.
— To remove the shock absorber bracket, unscrew the three nuts securing the bracket to the flange of the rear axle beam and remove the bracket.
— We install the bracket and shock absorber of the Chevrolet Niva rear suspension in the reverse order.
— If, when installing the bracket, the bolts move inside the brake mechanism and it is impossible to tighten the nuts, you must remove the brake drum and hold the bolts.
Removing the lower longitudinal rod of the Chevrolet Niva rear suspension
— We carry out the work on an inspection ditch or a lift.
— We unscrew the nut of the bolt securing the rod to the rear axle beam, holding the bolt from turning with a wrench of the same size.
— Using a soft metal drift, we knock out the bolt and remove it.
— We remove the rear tip of the rod from the eye of the Chevy Niva rear axle bracket.
— We unscrew the nut of the bolt securing the rod to the body bracket, holding the bolt from turning with a wrench of the same size.
— We take out the bolt and remove the rod.
— To remove the bracket for fastening the front end of the Chevrolet Niva rear suspension rod, unscrew the four nuts and remove the bracket.
— Install the removed parts in reverse order.
— We finally tighten the nuts of the rod mounting bolts in the “car on wheels” position.
Removing the transverse rod of the rear suspension of a Chevrolet Niva
— We unscrew the nut of the bolt securing the rod to the body bracket, holding the bolt from turning with a wrench of the same size.
— Using a soft metal drift, we knock out the bolt and remove it.
— Unscrew the nut of the bolt securing the rod to the rear axle beam bracket, holding the bolt from turning with a wrench of the same size.
— Using a soft metal drift, we knock out the bolt and remove it.
— We remove the transverse rod of the rear suspension of the Chevrolet Niva.
— Install the bar in the reverse order.
Removing the rear axle beam of a Chevrolet Niva
— We carry out the work on an inspection ditch or overpass.
— We hang up the rear of the car and remove the rear wheels.
— Remove the driveshaft from the flange of the main gear drive gear.
— We unscrew the bolts securing the sheath holders of the rear cable of the parking brake system to the brake shields and remove the cable ends from their holes.
— Disconnect the two rear brake hoses from the pipe fittings located on the rear beam of the Chevrolet Niva.
— Remove the tip of the rear brake pressure regulator lever from the rear axle bracket rod.
— We remove the upper longitudinal and transverse rods from the beam.
— We place a stop under the beam.
— Disconnect the shock absorbers from the rear axle beam brackets.
— Lowering the beam, remove the springs of the rear suspension of the Chevy Niva.
— Install the beam in reverse order.
— The nuts of the rod mounting bolts and the shock absorber mounting bolts are finally tightened in the “car on wheels” position.
Removing the upper longitudinal rod of the Chevrolet Niva rear suspension
— We unscrew the nut of the bolt securing the rod to the rear axle beam, holding the bolt from turning with a wrench of the same size.
— We knock out the bolt through a soft metal drift.
— We unscrew the nut of the bolt securing the rod to the side member of the Chevrolet Niva body, holding the bolt from turning with a wrench of the same size.
— We take out the bolt and remove the rod.
— Install the bar in the reverse order.
— We finally tighten the nuts of the rod mounting bolts in the position of the car on wheels.
Removing the rear suspension spring of a Chevrolet Niva
— We carry out the work on an inspection ditch or overpass.
— Disconnect the pressure regulator drive lever from the rack.
— We hang out the back of the car.
— Disconnect the lower mount of the Chevrolet Niva rear suspension shock absorber.
— Use a screwdriver to pry the spring onto the bottom coil and remove it.
— Remove the upper rubber and the lower plastic insulating gasket of the spring.
— To replace the compression stroke buffer of the Chevrolet Niva rear suspension, remove it from the limiter hole.
— Before installing the spring, attach the top gasket to it with insulating tape.
— When installing the spring, the end of its lower coil should rest through the plastic spacer against the flange of the lower support cup.
Kayaba oil shock absorbers
Kayaba oil shock absorbers have proven themselves to be reliable; for a long time the price for them was high, but in recent years you can buy them only 25 percent more expensive than Russian ones, which are installed at the factory (usually these are products from SAAZ, Skopinsky Automotive Component Plant).
Although there is an opinion that it is not imports that have fallen in price, but domestic products are becoming more expensive, catching up with branded ones in price. For a long time, counterfeits were simply the bane of manufacturers. No matter how they tried to label the products, there were still craftsmen of fakes. Finally, as described above, designers have created shock absorbers that cost a little more than Chinese ones, so it has become unprofitable to fake them. However, even today there may be fakes, but they can be easily distinguished.
Which ones to choose?
Last month, PartReview users preferred KYB. 19% of positive votes belong to this manufacturer.
Hola shock absorbers took second place - 18%.
The SAAZ company closes the top three with a result of 10% of the votes.
In the general rating of shock absorbers, which takes into account the opinions of owners of different brands and models of cars, these brands occupy the following positions:
- KYB received 8th place, PR score - 76. Data from 293 reviews and 939 votes are taken into account.
- Hola took 5th place, with a PR score of 81. Based on 293 reviews and 286 votes.
- SAAZ is in 18th place, and the PR score is 63. Data from 73 reviews and 236 votes are taken into account.
Also interesting: Buy alternative optics for Lada Niva 4x4 VAZ 2121, 21214, 2131, Urban
This raises the question of which of the options offered on the market are the most effective and reliable. There is no clear option; a lot depends on the conditions in which the car is operated. Based on this, they choose which variety to use.
The question also arises about manufacturers. There are quite a large number of companies on the market that produce similar parts. Their quality is approximately the same, but the price may vary. This is one of the most important factors in selection.
Design features of the Chevrolet Niva rear suspension
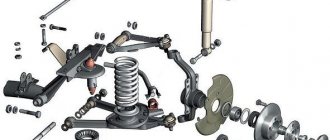
Rear suspension parts: 1 — transverse rod; 2 — lower spring gasket; 3 — lower longitudinal rod; 4 — bolt for fastening the lower rod; 5 — rubber bushing of the hinge; 6 — spacer sleeve; 7 - nut; 8 — bracket; 9 — upper longitudinal rod; 10 — additional compression progress buffer; 11 — upper spring gasket; 12 — compression stroke buffer; 13 - rear shock absorber.
The vehicle's rear suspension is dependent and includes a guide device, elastic elements and devices that dampen body vibrations. The rear axle beam is pivotally connected to the body using two lower 3 and two upper 9 longitudinal reaction rods and one transverse rod 1. The longitudinal rods transmit pushing and braking forces from the drive wheels through the rear axle beam to the body. The cross bar keeps the body from moving laterally. The reaction rods are attached to the body brackets and the rear axle beam through rubber-metal hinges, which are structurally identical and differ only in size. The hinge consists of a rubber bushing 5 installed in the eye of the rod, a spacer bushing 6, which passes through the hole of the rubber bushing, a thrust washer and a bolt securing the rod. The elastic elements of the suspension consist of twisted cylindrical springs, two main buffers 12 of the compression stroke and an additional compression buffer 10. The spring installed in the suspension rests with its upper end on the support cup through a rubber insulating gasket 11, which is placed in a stamped steel cup of the body. The lower end of the spring rests on the cup of the rear axle beam through an insulating gasket 2. The main buffers 12 are installed inside the springs and secured with a mushroom-shaped clamp in the holes of the upper supports. The additional buffer 10 is mounted on a bracket bolted to the underbody. The damping device consists of two hydraulic shock absorbers.
Rear suspension from the bottom behind the car: 1 — rear axle beam; 2 — compression stroke buffer; 3 - additional compression progress buffer; 4 - transverse rod.
Rear suspension from bottom front: 1 — spring; 2 — upper longitudinal rod; 3 - lower longitudinal rod.
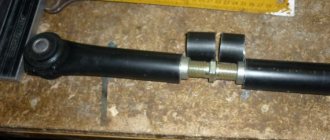
Replacing the cross rod
- First, we unscrew the nut located on the bolt securing this element to the body so that the bolt does not turn, you need to hold it with a key.
- it can then be knocked out using a punch.
- After this, you need to unscrew the nut on the bracket on the other side and knock out the bolt in the same way.
- Now you can completely remove the bar