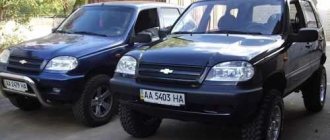
I've been wanting to lift my car for a long time. And so, having gained enough information, I got down to business)) I didn’t want to raise it high, because... installation of 29 wheels is not planned, I decided to make a so-called civil elevator according to the dimensions of the famous Rybachok)))
The turner turned out the bushings, we welded brackets for the shock absorbers and clips for the rubber bands for the rear shock absorbers.
Under the upper ball bushing 20 mm, under the cup - from 10.7 to 20 mm. Reinforced elastic bands at the back. We put brackets on the shock absorbers - when compressed, the shock absorbers make a loud knock. I checked the stroke of the shock absorber - it looks like 19 cm, the distance from the cup to the bump stop is 18. The bracket moves the upper ear of the shock absorber 45 mm down - clearly too much)) Removed. Today I noticed that the shock absorbers knock slightly when breaking, there is still not enough travel. There is a way out - lift the rear with an elastic band, or redo the brackets. I will think.
In total, the front lift was 3-3.5 cm, the rear 2 cm. Under the beam on small winter tires (205/70/15) - 24 cm.
Not bad, but sometimes the thought arises: maybe it was necessary to raise it by 5 cm? If the CV joints are covered, maybe I’ll redo it)))
P.S. Later I raised my butt another 3 cm. Continued in post Suspension lift 2
A suspension lift is one of the most popular tuning elements for a Niva Chevrolet. As a result of the operation, two parameters increase: ground clearance and space in the wheel arches. This allows you to install wheels with a large outer diameter and fully reveal the off-road qualities of the car.
What to pay attention to when lifting
We install a 30 mm spacer; if we do not install the spacers under the cup that come with the lift kit, you can install a longer spring or a polyurethane buffer.
Then a problem appears: the spring is crooked, it can touch the body of the bump stop, constant grinding, knocking, squeaking. The Niva elevator kit is best suited. We don’t need to change the spring, we don’t change the shock absorber and the suspension works softly and at the same time the car rises by 50 mm. Why don't we change the shock absorber? Spacers are installed under the spring cup. which maintain the same height position of the cup as on the drain. The shock absorber remains standard. If we install a long shock absorber, the upper shock absorber house will begin to break out. It sometimes cracks. Or the ears will fold on the cup.
We also need to modify the cup for the steering rod.
When turning the wheel, if the cup had not been modified, the rod would have stuck. And there was a restriction on turning, and there would be knocking when the suspension moved.
Consequences of lifting
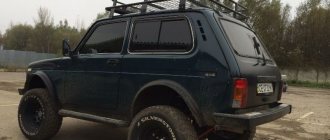
In the struggle to increase the vehicle's cross-country ability, some owners are ready to sacrifice other characteristics. And it should be noted that there is something to sacrifice, but, first of all, let’s highlight the advantages of the modified Chevrolet Niva suspension. After lifting, as an additional measure, special “mud” tires are installed on the car. They have a higher profile, which also leads to increased ground clearance. After installing the elevator from the Niva, you can get a real SUV, and this is the main advantage of such tuning.
There are additional positive aspects that the new suspension brings. This is a change in the image and appearance of the car, the ability to install tires with a larger radius, as well as eliminating the possibility of damage to the engine and gearbox when driving off-road. The elevator cannot but affect traffic flow.
Watch this video on YouTube
Not without a fly in the ointment. A certain category of auto experts generally speak categorically about changing factory settings. According to an objective assessment, as a result of changes in suspension components, certain negative aspects arise. By raising the gearbox relative to the vehicle axis, the angle between the drive shaft and the axis of the front wheel hub changes. The CV joint begins to experience increased loads. This leads to a decrease in its resource.
After lifting, the center of mass rises relative to the horizon. Statistics show that the Chevrolet Niva lift leads to accelerated wear of suspension and transmission parts. Despite the above arguments, for some motorists, increased cross-country ability is still the determining factor. Indeed, a passable car is considered an invaluable assistant when hunting or fishing.
What is included in the elevator kit
It consists of a 60 mm spacer for Niva springs, a nylon bumper, and an adjustable bunk rod.
Also included is an extended brake force adjuster rod,
it is lengthened by welding the lengthening plate. This lift kit for Chevrolet Niva allows you to raise the car by 50 mm in ground clearance for installing large wheels. A caprolon spacer is needed so that the cooking wheel does not take over. A bracket is installed on the rear axle under the standard shock absorbers. There is a standard mount and allows you to move the shock absorber higher to a height of about 40 mm.
It makes sense to do this when you are going to install a lift kit on Niva 2121.
The bridge was raised and the brake hose was stretched, do not forget that the suspension also goes down. Or we replace this hose with a longer one. Or we cut off the bracket and lengthen it by the same amount as this rod is lengthened. This lift kit includes a plate for transferring the hose, but if you untwist it you will have to pump the brakes. This time. We simply cut off the rod in place, digest it by first wrapping the joint with a rag and watering it with cold water, then paint over it. The lift kit for Niva 21214 is installed in the same order.
Detailed video about increasing the ground clearance of Shniva:
Hello, dear friends! Today I propose to talk to you about the elevator kit for the Niva. This could be a Chevrolet Niva, that is, series 2123, or the more “our” Niva Urban, 2131 or 4x4, and representatives of the 2121 series, that is, 21213, 21214. It all depends on what kind of car you have at your disposal.
Russia, Ukraine, Belarus and a number of other countries are the greatest admirers of Niva cars. They are affordable and provide many benefits.
Some people prefer to do everything themselves. I can’t say that modifying the front and rear suspension of a Niv car will be an easy job in a minute. No, you will have to spend a lot of effort, time and patience on this.
Chevrolet
Cruze
Lacetti
Are the springs sagging? Breaks through shock absorbers? Roll in corners or just want to lower your car. Technoressor springs! They help to cope with some problems that arise when operating a car. Springs lowered by 30/50/70 mm will make the car lower, more responsive when steering, and improve its appearance. Springs of standard height or 20mm to the factory ground clearance will make the car less susceptible to loads and more passable.
Visual signs that installation of elements is required
If the standard models have sagged, they have cracks and various chips, then replacement is required. The most common problem is when it starts to move to the side, this indicates that the coil is damaged and it will be impossible to return it to its original state, so the only option here is a complete replacement.
You can also visually determine that the installation of additional spacers is required, this is a misalignment of the rear or front part, or there is no smooth movement on time, this indicates that a replacement may be needed, so it is better to inspect the structure. In addition to the fact that when the springs wear out, controllability is lost due to the deterioration of rigidity, the ground clearance decreases, which leads to a decrease in the cross-country properties of the Niva SUV
Spring options for shevik
What springs should I put on a Chevrolet Niva? SUV drivers often complain that standard products sag very quickly, and there is a need to correct the situation. In this case, answering the question of which suspension elements are best installed on a Chevrolet Niva, it is worth noting that the best option are those that are suitable for the price.
- Izh-Techno are an excellent solution for replacing standard models. The cost of the kit is 2800-3200 rubles, but the service life of these models is much longer. For the Chevrolet Niva, the Izh-Techno spring 1 is recommended. The domestic auto industry has something to boast about, so if you do not want to overpay, then it is better to install the Izh-Techno kit.
- Kilen. These products are produced in Sweden, which already indicates their high cost. So, one element costs about 1000-1200 rubles. The thickness of the coils of this product is 14 mm for the front and 14.9 mm for the rear. For comparison: for standard products the size of the coils is smaller and is 13 mm.
- Lesjofors. A practical analogue of Kilen, which even have the same numbers.
- Raid. Currently they occupy a leading position, so we will tell you more about them.
Also interesting: VAZ Niva 2121 tuning recommendations
Features of lifting installation
Tuning the Niva Chevrolet suspension with your own hands is a fairly simple task. Especially considering that you only need to install a special kit, which is sold with all the instructions. However, this issue should be approached with full responsibility and dedication, since even a small miscalculation can cause big problems.
If you neglect the rules for re-equipping a car, you may end up with a car that is unsuitable for further use. For this reason, if the owner is not confident in his own abilities, then it is better to entrust the work to experienced craftsmen.
Factory Niva elevator
How to raise a cornfield? The easiest way to lift a Niva is to use an already tested lift kit that was manufactured in the factory. When using the kit, you can increase the ground clearance by 5 cm. We change the tires from R15 to R16. This is the most economical option. Ground clearance increases by 4-5 cm. Suitable for village roads and fishing.
Everything for the elevator can be purchased separately. For example, we buy springs from a Chevy Niva 2123, they are longer than those on the regular Niva 2121 model. Then we take 5cm polyurethane gaskets back, gas-oil shock absorbers from a Chevrolet Niva, they are longer than on the regular model, and accordingly they have more travel. The rear also needs an adjustable rod so that the bridge does not go away.
For the front of the car we also take springs from the Chevy Niva, they are one turn larger than the usual springs on the Niva 2121. We put a round gasket under the ball, then we file it down ourselves so that there is no friction from the wheel when driving. We install a gas-oil shock absorber from a Chevrolet Niva on the front and back. It is important to understand that if the Niva is old and the suspension is not known when it was changed, during lifting all the “sores” come out and you need to be prepared for this.
Lift options
How and where you will make a lift for your crossover, decide for yourself. I will try to tell you about all the nuances of this procedure so that you understand what to expect and what to prepare for.
Let's start with the existing elevator options. Suspension modification professionals distinguish two types of such procedures:
I will say right away that a body lift lifts the entire body by using stands, modifying the hose and other parts. In theory, such tuning is very simple, but in the case of the Niva it is not used. And why all? Yes, because the Niva 2121 and other representatives of the series do not have a frame. If there was a frame, then there would be no questions.
From this we conclude that for our Niva the optimal solution would be suspension lifting. It provides the following benefits:
- increases crossover cross-country ability;
- lifts the entire machine;
- allows you to install larger wheels without having to trim the arches;
- provides the car with a more attractive appearance;
- makes the Niva an ideal car for fishing, hunting and driving on the most difficult sections of roads and off-roads.
If you raise the car by about 45 mm, achieve a lift of 50 mm, or even take the height to a bold 60 mm, you can easily insert wheels with a diameter of up to 29 inches into the factory arches. Do not forget that installing large wheels affects fuel consumption.
Many people mistakenly believe that it is easier to cut out the arches, insert 33-inch tires there and thereby raise the car. In practice, with such solutions the machine rises slightly. Most importantly, this does not greatly affect the geometric cross-country ability. I would recommend installing 31-inch wheels and lifting at the same time. This combination will provide the best result. Just choose your car wheels wisely and don’t forget about the seasonal rules for storing tires.
I'll make one remark. When lifting the car, the service life of the internal CV joint and the factory boot is reduced. To fix the problem, try replacing the internal boots on the CV joint with external ones, and also lower the FRM (front axle gearbox) by 10 mm. This way it will be possible to reduce the angle of operation of the CV joint.
Why do you need spacers for springs?
Over time, the standard set tends to sag, thereby losing rigidity, elasticity and functionality. To correct the situation, a replacement will be required, but not in all cases. So, if the product had the property of sagging, but without deformation, then you can do without replacement. For this purpose, there are special spacers that, in addition to restoring functionality, increase the vehicle's ground clearance.
This is what spacers look like
Spacers are available in various designs:
- Spacers between the spring support and the body element cup. Often this type is applicable for MacPherson-type suspensions, when when turning the strut rotates with a shock absorber.
- Interturn spacers are the simplest in design and installation. Can be installed on both rear and front springs. They do not have the ability to change ground clearance, but noticeably change the elasticity of the product.
- Spacers between the spring and the body bowl are the most common option, as they combine two functional features: increasing ground clearance and adding suspension stiffness. Standard and reinforced spacers are available. Standard spacers are designed to slightly increase ground clearance, while reinforced ones differ from the first ones in the height of the structure. The difference in height is 30 mm, which indicates a significant increase in ground clearance. Reinforced types of spacers for rear springs are especially popular.
Rear suspension lift
Watch this video on YouTube
- Remove the shock absorber.
- Remove the shock absorber bracket.
- Pull and remove the spring.
- Place the spacer on the spring and install the spring.
- Connect the shock absorber bracket supplied.
- Install the shock absorber adapter and install the shock absorber itself.
- Mount the Panhard rod adapter.
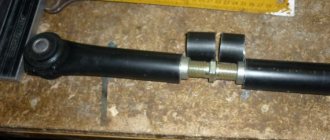
- Install a new regulator rod (from the kit)
More complex manipulations are performed when installing larger rubber. The shock absorber bracket is made independently and welded. After installing the spacers, the rear axle moves forward. To fix this, you need to install extended rods. They are made adjustable using homemade couplings. But in some kits such rods are supplied.
How to lift a cornfield yourself
If you want to do the Niva lift yourself, then take this procedure very seriously, since despite the simplicity of the work, the slightest mistake will result in irreversible consequences in the future. Therefore, no matter what the car becomes unusable for use, you must strictly follow all the rules, and if there are any doubts, then it is better to turn to a professional.
In order to carry out all the work, it is enough to buy a ready-made lift kit, but there are car owners who upgrade the parts themselves, if you are one of them, then you need to stock up on the following parts:
- Set of springs
- Rubber spacers for springs with steel cups
- Shock absorber kit
- Special spacers for ball joints, the thickness of which should be approximately 30 millimeters
- Make a special mount for the rear shock absorbers
- There are twelve spacer washers under the cup with the following dimensions:
- For cups and long ball bolts
- Two jacks and a spring tie
Also interesting: Installing a towbar on a Niva with your own hands - how to install and connect the trailer hitch
You also need to additionally make special spacers for the rear shock absorbers. They can be made from corners, and bushings whose thickness should be approximately 32 millimeters are welded to them.
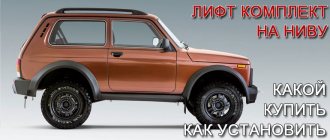
Suspension lifting Niva VAZ 2121 21213 21214 2131
We will tell you how to properly perform tuning modifications in this material.
Do-it-yourself elevator - drawings, diagrams, sizes, types of kits. Lifting varies in the degree of intervention in the standard structure. For some, it is enough to raise the SUV by a few centimeters, and for others by as much as 20.
Extreme tuning – maximizing cross-country ability for traveling on severe off-road conditions.
- Regular jack
- Hijack jack
- Spring puller
- Balloon wrench
- Ratchet socket set
- Set of open-end wrenches
- Mount
- Wooden deck (stump)
It is advisable to perform such work with a partner. First of all, it's safer. Secondly, some lifting work is performed with four hands. Let's take the front suspension as an example.
Raise the front end. You can safely cling to the standard bumper, only the jack is installed under the pipe securing it. By removing the wheel, we get full access to the lever and spring. The front suspension 21214 is made using a double wishbone design, which simplifies the task.
The lever travel is limited by the shock absorber. Unscrew its fastening and move it to the side. Next you need to free the suspension from the anti-roll bar. The mounting bolts may become stuck due to corrosion, so we will use a penetrating liquid (such as WD-40). The stabilizer silent block clamp can be pryed off with a pry bar.
Then disconnect the hub from the lower arm. To do this, you need to jack up the suspension and fix the steering knuckle of the wheel. You can tie it with wire. Then unscrew the 3 mounting bolts and release the ball joint.
We fix the spring with ties and lower the jack. We remove the old elastic element. In some cases, it is enough to simply lower the lever with your foot, and the spring will come out without the use of ties.
Remove the upper support rings from the old springs. With their help, the elastic element is centered in the cups.
They come together easily with a hammer and screwdriver. We install the rings on new, longer springs. We put the elastic elements in their regular places and jack up the lower arm until it is completely aligned with the lower cup. At the same time, an assistant centers the shock absorber eye and moves the steering knuckle to the mounting location of the lower ball joint. We tighten the ball “triangle” and attach the shock absorber mounting axis.
By manipulating the jack, we “catch” the mounting holes for the stabilizer bar clamp. With its bolts it should get into the normal place without distortion. After such modernization, the clearance increases by 30-50 mm. This is enough to install wheels of larger diameter, and the bottom will still rise above the ground.
The rear axle of the Niva can be lifted by installing spacer supports of increased height. When using a size of up to 50 mm (according to changes in front end height), no modifications to the rear axle are required. By lifting the rear axle, maintenance can be carried out on the axle and brake system.
The handbrake cable may need to be replaced. It is lengthened by a couple of centimeters. Otherwise, the Niva lift will lead to increased wear of the brake pads in the rear drums. Disconnect the lower shock absorber mounts and lower them until the springs stretch.
We take out the elastic elements and knock off the support rings from them. We clean the upper cup and carry out anticorrosive treatment. We install new supports of increased size and seat the springs using a jack. We fasten the shock absorbers, assemble the axle, and mount the wheels.
Such a lift will not arouse suspicion among traffic police inspectors, and the cross-country ability of your NIVA 2121 will improve. No drawings, much less homemade parts, are required. You buy new springs and about the rates, the rest is a matter of technology. Labor costs for an elevator of one NIVA are two people/one day off.
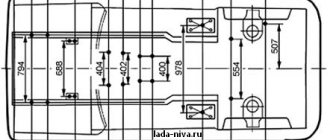
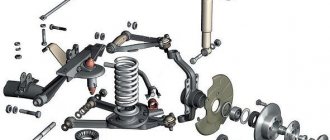
To understand the process, let’s look at the geometry of the suspension on NIVA SUVs (front axle). The drawings clearly demonstrate the position of the elements relative to each other.
If you organize an elevator only by increasing the length of the spring, its bending radius decreases, and lateral loads appear on the mountings of the levers.
To compensate for this side effect, spacers are used: under the spring cup and ball joint.
The spacer is installed between the cup and the spring. There are no unsprung masses, the radius of curvature of the elastic element is even smaller than in the previous version. The disadvantage is that the attachment of the additional element is not so reliable.
In all cases, the elevator changes the position of the axle shaft. The load on the tripods (gimbals) increases. When lowering the suspension, the travel of the upper arm to the bump stop decreases. To restore the geometry, a spacer is installed under the upper ball joint. Factory kits are designed taking into account all the design nuances of the front axle and rear axle.
The set includes:
- Drawings for correct installation
- Spacers
- Extended shock absorbers
- New trailing arms for the axle
- Extended Panhard Rod
- New bowls and springs
Some kits for Niva 2121 offer extended brake hoses. When lowering the wheels, the standard brake system may be too short.
Replacement process: To install the lift kit, a garage with a pit and a standard set of repair tools are enough. Those who independently service LADA 21214 know what we are talking about.
Also interesting: Which spark plugs are better for a Chevrolet Niva?
Preparation of the front axle is described in the Niva budget elevator section. Only when installing the kit is the steering knuckle removed completely. If you manage to fix it without removing the CV joint, good.
Usually it is completely separated from the suspension.
Next, dismantle the lower spring cup and install three ring spacers under it. There are no more modifications to this lever. An enlarged support ring is installed on top of the elastic element. To compensate for the divergence of the levers, we mount a spacer under the upper ball mount. Since all the parts are from the same set, the sizes are synchronized.
This element is the most responsible. If the geometry “floats”, the front suspension travel will be disrupted. To fine-tune the height, the monolithic upper ball spacer can be replaced with stacked washers. By selecting the quantity, you adjust the parameters of the front axle, just like on a rally car. If the kit includes new shock absorbers, they should be installed.
The eyelets for the levers remain standard, the extended parts from the kit have standard fastenings. Depending on the size of the front axle lift, you may be limited to raised cups, or add spacers for the springs. It is better to choose a customizable Panhard rod. You can adjust its length when changing the clearance height.
Regardless of whether you have chosen a budget or professional elevator, after final assembly it is necessary to conduct test runs. If there are flaws in the installation, or the dimensions are incorrect, it is better to check it away from public roads.
Making a Niva-2121 elevator with your own hands, the drawings, the dimensions of which are freely available, will not be difficult. Thanks to such a trick, you can make your car more stable on the road and overcome a lot of obstacles with it. Of course, to bring a truly high-quality Niva elevator to life with your own hands, you will have to work hard.
The process will take time and require effort, because even the easiest elevator requires a significant immersion in the technical aspects of the issue. However, the end result will live up to all expectations, allowing the modest Niva to show its exceptional side.
In order to slightly increase the ground clearance, it is advisable to use a factory lift - a kit for Niva-2121, sold both in company stores and in car markets.
Using the included instructions, you can carry out the desired tuning in just 1 day.
However, there is one significant drawback: the suspension lift is produced exactly as much as the manufacturer considers necessary.
At the same time, if there is an urgent need to tailor the car to specific needs or the specifics of the road, you can make a lift kit for the Niva on your own.
You just need to prepare the following set of tools:
- rear and front springs (the best parts on a Chevrolet Niva are 31.5 cm long and 1.57 cm thick, but these parameters can easily be changed according to the owner’s requirements);
- rubber spacers for springs with special metal cups;
- shock absorbers;
- spacers for the upper ball joint (not sold in stores, so they can only be made to order);
- brackets for rear shock absorbers;
- washers for the Niva-21214 cup of an enlarged type with an internal diameter of 1 cm and an external diameter of 3 cm;
- jack;
- boards;
- spring ties.
When choosing spacers for springs for rear shock absorbers, you don’t have to go too deep into the search and make them yourself from an ordinary metal corner. The internal diameter of the product is 13.2 mm, the external diameter is 32 mm.
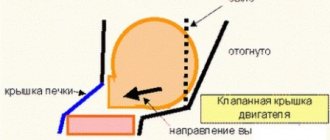
In addition, during the work you must refer to the diagram (Fig. 1).
And, if all the subtleties of the technical stuffing of 2131, as well as 2121, are agreed upon and ordered, you can immediately get to work. Just a few hours of painstaking work, and the Niva tuning will be completed.
Conventionally, the installation can be divided into 2 stages: installation of the rear and front suspension. It all starts with a fairly ordinary procedure - removing the wheels and releasing the silent blocks.
Now, in order for the Niva-21214 to be securely fastened, a jack should be installed under its ball joint and the car should be raised until the spring is completely compressed. It is not possible to lift the Niva-2121 with your own hands. Only reliable fixation using technology.
The next step is installing the ties and unscrewing the fasteners installed on the shock absorber.
How to increase the ground clearance of a Chevrolet Niva with your own hands?
Let's consider one of the lifting methods.
Before starting work, you need to prepare a set of tools:
- jack (2 pieces);
- set of wrenches;
- device for tightening springs;
- ball joint remover;
- pliers;
- mount.
To install the rear shock absorber bracket you will need a welding machine, and to rearrange the rear suspension cups you will need a grinder.
Upgrading the machine requires a ready-made lifting kit or independent selection of parts:
- Extended length shock absorbers.
- Steel cups and rubber spacers.
- Mounting for rear shock absorbers.
- A set of springs (sometimes old ones are used).
- Spacers for ball joints 30 mm thick.
- Washers for cups.
- Long bolts.
- Spacers for rear shock absorbers.
The procedure for lifting the rear and front suspension is different. Therefore, we will consider the operations separately.
Budget option for lifting
It will be necessary to manufacture or order a specific elevator kit. You will need bushings with a height of 20 mm, 17.8 mm, 13.2 mm and 10.7 mm with an outer diameter of 30 mm and an inner diameter of 10.5 mm. There should be 2 pieces. each type. Also purchase 2 spacers for ball joints 2 cm thick and extended bolts. Having collected all the necessary parts, you can start working.
- Remove the wheel and use the lower arm to support the Niva on a stand. Tighten the spring with ties. Dismount the stabilizer, shock absorber, and ball joints.
- Raise the Niva, remove the spring and unscrew the lower arm. Detach the cup and cut off the stabilizer. Make a cut in the cup about 3-4 mm wide between the mounting holes on the side of the outer CV joint, so that subsequently the plastic boot does not rub against the cup.
- Install the bushings so that the highest one is closer to the wheel, then in descending order. Fill the resulting gap in the stabilizer mount.
- Reinstall the lever and spring, jack up the lever. Fix the shock absorber. Install the lower and upper ball joints.
- Remove the ties from the spring and rest the lower arm on the stand. Tighten the shock absorber. Install the wheel and lower the car.
The arches will need to be widened if the wheel size is more than 30 inches. If this is not done, the wheel will touch the metal of the arch and may damage it. The set of tools for cutting metal is minimal:
- grinder or jigsaw with a metal blade;
- welding machine;
- calipers;
- hammer, pliers, file;
- anticorrosive, primer, paint and polish.
Let's start cutting from the front arches. The front of the Niva needs to be hung up, the wheels and fender liners removed, the part needed for cutting needs to be measured and marked with a caliper. Cut carefully, exactly according to the markings, slowly. Bend the edge of the arch inward with pliers and a hammer.
Cutting the rear arches is carried out in two steps: first we cut the arch, then the welded fender liner.
You need to bend it in the reverse order: the fender liner will be first, then the arch. Weld the flange along the inner edge. At the end, treat the cavities with anti-corrosive agent, strip the paint on the tuned arches. Now prime and paint. The tuned car is ready to travel over rough terrain and is able to go where no one has gone before.
Front suspension lift
To increase ground clearance, you need to do the following:
- Jack up the car.
- Remove the front wheel.
- Place a second jack under the ball joint and lift it so as to load the spring.
- Install the tie rod.
Tip: tighten the part with twists of steel wire. However, this method is dangerous. The tie may unwind or burst, causing the spring to suddenly straighten out and cause injury or damage to the wing.
- Loosen the shock absorber bracket.
- Unscrew the stabilizer and ball joint mounts, then remove the parts.
- Remove the spring.
- Lower the jack under the lever.
- Move the hub to the side.
- Remove the cup.
- Install spacer washers.
- Secure the cup and spring.
- Jack up the lever.
- Secure the hub, stabilizer and ball joints.
- Screw on the shock absorber.
- Install the wheel.
- Repeat the steps on the other side of the front suspension.
This completes the first part of the procedure.
Suspension lifting Niva VAZ 2121 21213 21214 2131
Hello, dear friends! Today I propose to talk to you about the elevator kit for the Niva. This could be a Chevrolet Niva, that is, series 2123, or the more “our” Niva Urban, 2131 or 4x4, and representatives of the 2121 series, that is, 21213, 21214. It all depends on what kind of car you have at your disposal.
Russia, Ukraine, Belarus and a number of other countries are the greatest admirers of Niva cars. They are affordable and provide many benefits.
Some people prefer to do everything themselves. I can’t say that modifying the front and rear suspension of a Niv car will be an easy job in a minute. No, you will have to spend a lot of effort, time and patience on this.
You can find out how much such a service costs at a service station. The price for a professional lift is steep, so not every owner of a not-so-expensive crossover like the Niva is willing to spend that kind of money, having the opportunity to do everything themselves. And if you put a power bumper and an expeditionary trunk on top, it will turn out great. At least now on a round-the-world trip on Niva.
Also interesting: How to connect fog lights via a relay and a button: diagram
Lift options
How and where you will make a lift for your crossover, decide for yourself. I will try to tell you about all the nuances of this procedure so that you understand what to expect and what to prepare for.
I will say right away that a body lift lifts the entire body by using stands, modifying the hose and other parts. In theory, such tuning is very simple, but in the case of the Niva it is not used. And why all? Yes, because the Niva 2121 and other representatives of the series do not have a frame. If there was a frame, then there would be no questions.
From this we conclude that for our Niva the optimal solution would be suspension lifting. It provides the following benefits:
- increases crossover cross-country ability;
- lifts the entire machine;
- allows you to install larger wheels without having to trim the arches;
- provides the car with a more attractive appearance;
- makes the Niva an ideal car for fishing, hunting and driving on the most difficult sections of roads and off-roads.
If you raise the car by about 45 mm, achieve a lift of 50 mm, or even take the height to a bold 60 mm, you can easily insert wheels with a diameter of up to 29 inches into the factory arches. Do not forget that installing large wheels affects fuel consumption.
Many people mistakenly believe that it is easier to cut out the arches, insert 33-inch tires there and thereby raise the car. In practice, with such solutions the machine rises slightly.
Most importantly, this does not greatly affect the geometric cross-country ability. I would recommend installing 31-inch wheels and lifting at the same time. This combination will provide the best result.
Just choose your car wheels wisely and don’t forget about the seasonal rules for storing tires.
I'll make one remark. When lifting the car, the service life of the internal CV joint and the factory boot is reduced. To fix the problem, try replacing the internal boots on the CV joint with external ones, and also lower the FRM (front axle gearbox) by 10 mm. This way it will be possible to reduce the angle of operation of the CV joint.
I don’t argue that in Samara, Nizhny Novgorod, Moscow or cities like Yekaterinburg and St. Petersburg there are many companies ready to do any amount of work on your car and suspension in particular for your money.
If you decide to do everything yourself, I have nothing against it. I only advise you to use only factory-made, high-quality kits for the Niva elevator.
Kits from Izh Techno have earned good reviews; you can also find excellent options in the store on Sedova Street in St. Petersburg. This store is called Niva 4x4. The T 34 lift kit also showed excellent performance. Each of them is excellent for the Niva, which is why it is widely used by car owners when modifying the front and rear suspension.
There is an option to assemble the kit yourself. But this will require accurate drawings and even more time and effort. I don’t see the point in this, since it is better to take a ready-made set after looking at a review of different sets.
To work you will need to take:
- front and always rear new springs;
- spacers made of rubber for springs with a metal cup;
- spacers for the Nivov ball joint (upper);
- shock absorbers;
- brackets for rear shock absorber springs;
- cup washers;
- set of tools;
- jack;
- durable boards;
- ties for working with springs.
Sizes are selected individually, based on what kind of car you have and what results you are aiming for. You can buy something without any problems. Although some elements will have to be ordered or done yourself. That's why buying a ready-made lift kit seems preferable to me.
Elevator assembly
The installation procedure is divided into installing a front and, accordingly, rear car suspension lift.
There is nothing particularly complicated here. Especially for those who have already had to work with the suspension, change something, repair and dismantle it.
Let's look at the processes separately.
Front suspension
Let's start with the front of the Niva. Then I’ll tell you separately how work is done on the rear suspension of the crossover.
- It all starts with removing the wheels and releasing the silent blocks. The activities are elementary, so we won’t pay much attention to them;
- Securely secure your Niva. To do this, place a jack under the ball joint. The machine rises until the spring is fully compressed;
- Next, the ties are installed on the fastenings and the fastening elements that you will see on the Niva’s shock absorbers are dismantled;
- Now we remove, that is, we unscrew the ball joints and remove the stabilizer. Be careful here, as there is a risk of damaging the brake hoses, which are located very closely. You will see bolts near the wheel. Remove them and set them aside. They will no longer be useful as longer counterparts will be used instead;
- Prepare spacers for springs in advance and keep them on hand. Carefully install them in place so that everything is smooth and accurate;
- The bumper is carefully bent by 2-4 mm and the two outer bolts are replaced with elongated ones;
- A washer spacer should be installed between the cup and the lever;
- Now the spacers with the spring and your cups are installed. Don't forget to center them. The lever is carefully jacked up;
- We got to the lower and upper car ball joint. A stabilizer is installed on them and then the shock absorber is delicately returned to its place;
- Replace the hub and install the wheel.
That's it, the work is completed.
Rear suspension
Here you will have to buy yourself or borrow a welding machine from a friend, because you can’t do without welding. Get a semi-automatic one.
Also interesting: Buy tires in the online store
The procedure for lifting the rear suspension of a Niva will look something like this:
- The cups are carefully placed under the Nivov springs so as not to be damaged;
- The rear shock absorbers included in the kit are installed on the car. Additionally, I advise you to secure the bracket by welding;
- When you install the element, your rear axle will move forward slightly. To avoid such a change, all rods must be lengthened;
- The lower cup is cut off and shifted by about 20-30 mm. When moving, pay attention to the crosspieces, which are easily damaged;
- The cups are welded firmly into new places using a welding machine;
- The rocker arm of your brake system is extended. As a result, the extension should add 30 mm;
- Pins are welded under the shock absorbers using semi-automatic welding. Just not yours, but car ones.
Be sure to visit the service station after this. Not to show off the work, but to perform a wheel alignment.
Remember that lifting will require further installation of main pairs with a different gear ratio. And forget about alloy wheel sets. Now only stamped discs will be your property.
If you really want to perfect the car, then spend a little more money on a new limited-slip differential.
All responsibility for lifting lies entirely with you, even if you ordered the service from a car service center. Remember that the consequences may be very unpredictable. Although practice shows how satisfied car owners are with the elevator and that such reconstruction brings benefits and driving pleasure.
Increasing the ground clearance of the VAZ 2121 (lifting) allows you to increase the vehicle's off-road capability. Thanks to simple manipulations, the ground clearance increases significantly by changing the suspension height (the Niva lift kit will help you here, which makes the work very easy to do even with your own hands without the help of a service center) and installing slightly larger diameter wheels.
Special pads are installed above the upper springs (in some cases, the kit involves installing guide washers under the lower pad), which entails:
- An extension should also be added under the swing arm in order to compensate for the increased pressure exerted on it and set it to its normal geometric position (included in the kit);
- It will also be necessary to overcome the problem of the outer traction links hitting the stabilizer during deep turns. This problem can be solved in several ways: either by replacing the mount for the stabilizer, or by replacing the left and right swing arms. In the latter case, the stroke algorithm of the traction tip is reversed, from top to bottom.
Increased ground clearance
As for replacing shock absorbers, the lift kit for the Niva, in addition to spacers for springs, contains extensions for them and reinforced mounting brackets. It is also worth noting that there are ready-made reinforced shock absorbers, initially designed for lifting your iron horse. If the work on the front part of the Niva 2121 suspension is completed, it’s time to move on to its rear part.
Increasing the rear suspension clearance by installing additional spacers above the springs (5 cm) entails a number of modifications such as:
- it will be necessary to change the position of the body relative to the suspension in the transverse plane, for which the Panhard rod must also be adjustable (have a cut with an adjustable coupling) or mounted on a special extension from the lifting kit;
- it is advisable to lengthen the short rods (this will eliminate problems with biting the cross);
- jet thrust can also be enhanced. Here you can go in several ways: either increase the strength of the stock one by additionally welding a corner, or you can buy ready-made, double ones (the standard Nivov lift kit does not require such modifications, but these manipulations will significantly increase the reliability of the suspension).
Read news about the new Niva
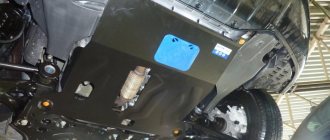
- Chevrolet Niva front axle gearboxes buy in Balashikha in the online store