Replacing the glove compartment light bulb:
First, open the glove compartment on the left side, there we see a small lamp, you need to remove it, to do this, insert a screwdriver into the groove and pull it out, as shown in the picture.
We insert the screwdriver until the lid opens and take it out; you can see everything in the picture.
In order to get to the light bulb, you need to remove the white base, pressing on the plastic latch, and pull the base up.
That's all, you can take out the old light bulb and put in a new one, you can put in a white LED light bulb. Let's put everything back together in reverse order.
Replacing the trunk light bulb on a Lada Kalina:
The replacement is done approximately the same as in the glove compartment, there is nothing complicated, with certain skills it can be done in five minutes.
Since the design of the trunk and glove compartment lighting lamps is the same, the principle of replacing them will be identical. For this procedure you will need a flat blade screwdriver. This work will not take even 10 minutes. Let's look at everything in order:
Glove box
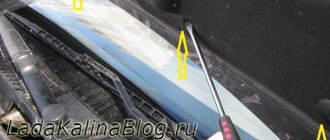
We open the glove box and on the left side we see this small lamp that needs to be removed. To do this, insert a flat-head screwdriver into the groove on the right side of the cover, as shown below:
And we insert the screwdriver until the lid opens, after which we remove it from there. The result of this action is shown in the picture below:
And to get to the light bulb, you need to remove the upper white base; to do this, press on the plastic latch of the lamp cover (in the picture above this latch is clearly visible in the left corner), and pull up the base:
Now you can easily remove the light bulb and install a new one. Then we put everything in the reverse order of removal. At the same time, you can eliminate some extraneous sounds that arise in the glove compartment area from this particular plastic part. I made everything as simple as possible, glued small pieces of sound insulation along the edges, and inserted halves of matches into the wire plugs.
I think that everything is clear with this, and no one should have any questions. Now let's talk about the trunk.
Trunk
Here everything is done in almost the same order. We open the trunk and on the left side we see the lamp itself, which can be removed in the same way as in the glove box, but in this case there is no need to remove it, since there is access to the lamp itself from the reverse side.
Since access to the lamp is free, replacing it will be even easier than in the glove compartment, simply by spreading the contacts, removing it, and putting the new one back.
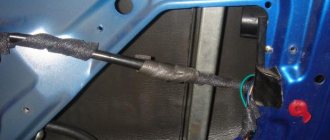
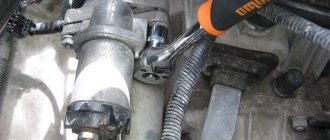
All Kalina fans know that Kalina’s standard trunk lighting is, to put it mildly, not very good. It is very difficult to find anything in the trunk at night. A lot has been written on this topic, but maybe I didn’t read carefully and I had one difficulty. How to power diode strips without causing excruciating pain later? The easiest way is to cut into the wiring of the standard lamp "with twists", insulate it with electrical tape and enjoy. Rejected for several reasons: I don’t like twisting, and most importantly, in order to remove the rear shelf supports, everything would need to be untwisted and re-insulated. Method No. 2 - use couplers, rejected in principle for the same reasons and due to the lack of them in stock. We will go our own way. To begin with, I removed the standard lampshade:
In the photo, on the positive terminal, you can see an unknown radio element of unknown purpose. But once it is installed, it means it is needed. (By the way, who knows why?) We will take power directly from the terminals of the standard lamp. To do this, 0.8 mm holes were drilled in the terminals. (I forgot to take a photo, but the location of the holes will become clear from the photo below). Need contacts. The only ones available were:
Didn't like it - very flimsy. Therefore, I took a piece of copper wire and hit it with a hammer several times. I received these blanks:
However, I only photographed one. But we need 2 of them. I processed the resulting blanks with a needle file and made tails to fit into the 0.8 mm hole. I irradiated the contacts. I used a “female” type terminal for measuring workpieces; the contact should be made with a slight interference. The tail on one of the contacts must be bent at an angle of 90.
Solder the contacts to the standard lamp:
We remove the supports of the rear shelf and glue the LED strip on them, having previously soldered the wires for connecting power to the strip (200 mm each):
I inserted 2 wires into each female terminal connected to the standard lamp, to connect the right and left sides. We put the supports in place. We connect the left side immediately:
I decided to run the wire for connecting the right side under the roof lining, for which I removed the door seal 5 and passed the wire through - I measured it “in situ”:
We make a wire with these tips (the mating part is soldered to the diode strip):
We stretch the wire, put the seal in place, connect the terminals and evaluate the result:
The standard lamp has been saved and is in its place; you need to buy an LED one. After soldering, I wrapped all the tips in heat shrink, so we got almost branded connectors. Result: the trunk lighting has improved significantly, but the center is still not illuminated, we need to come up with some kind of reflectors. On the plus side, removing and disassembling the shelf supports takes 1 minute, everything is on connectors.
The standard incandescent lamps installed in the interior lighting on the Kalina do not cause much delight, so many owners of this car seek to replace them with LED or brighter lamps. It is best to replace conventional lamps with LEDs.
Installation process
The option with LED trunk lighting looks the most acceptable and effective. LED strips can be replaced on LED-based strips, as well as light bulbs. The last 2 options are suitable for those who have a sufficient number of flat areas in the car. LED lines are limited in length, and given the complexity of the configuration of most racks, it will be difficult to choose a good option.
When using LED strips, do not forget that cutting them into individual elements is allowed strictly according to the markings provided by the manufacturer. It is by cutting the tape into pieces that you should begin preparing for installation.
Having determined the required number of segments and their length, cut them, after which you will need to solder wires to each strip on both sides. Each wire should be about 20 centimeters long. They will be useful in the further connection process. It is recommended to enclose the LED strips themselves in special heat-shrinkable tubes. They come in different diameters and colors. If the diodes themselves are colored, a transparent tube will do. If you want to give ordinary white diodes a special color when glowing, take the appropriate tubes. You can combine several colors for different sections of LED strip. When everything is ready, tools and materials are in front of you, disconnect the negative terminal from the battery. If you are afraid, you can completely remove the battery from the car. Decide on the areas where the LED strips will be fixed. It is advisable to degrease them. Regular alcohol is suitable for such purposes. In some cases, fastening is done using double-sided tape
In this case, degreasing is especially important. If you don’t trust the adhesive tape, or it cannot be used at the selected locations for attaching the backlight, use plastic ties or clamps. The ties are tightened along the LED strip, and the tails are then simply cut off. Many LEDs come from the factory with an adhesive side. Therefore, to fix it, you just need to remove the protective film, apply the tape to the surface, and press well. Under no circumstances press on the tape in the place where the diodes themselves are located.
There is a high risk of damaging them. On dirty surfaces, even good glue or high-quality double-sided tape will not be able to hold the tape for a long time. This once again confirms the need for thorough degreasing.
Having completed the installation yourself, simply fixing the tape, the lighting in the trunk will not work. After all, the LEDs did not receive the necessary power to operate.
Don't rush to start connecting. First you need to make sure that all LED strips and fixed sections are working. Otherwise, you will do a lot of work in vain.
The easiest way to check is by connecting the backlight directly to the battery. In addition to the battery, be sure to take 2 wires necessary to connect to the power source, a switch and a fuse. The latter should be installed as close as possible to the battery, which will allow quick access to it if the need arises. Such a connection is considered the most correct and rational.
To connect to the car's standard wiring, which is necessary for the backlight to work, the tape can be connected in different areas. But motorists agree that the most convenient option would be to connect it to the standard luggage compartment lamp. This will allow it to turn on and off when opening and closing the trunk, and also work in tandem with the lighting of the vehicle interior itself.
What kind of lamps are installed in the interior lamp?
Instead of conventional incandescent lamps, you can install LED lamps with exactly the same bases. In addition to the usual lamp, you can install universal interior lighting in the center; we will talk about it below.
There should be no problems with the c5w lamp; there are a lot of LED analogues, which one you choose depends only on you. If you suddenly find yourself in a professional car lighting store, it is better to buy lamps with 5730 diodes, they will shine brighter than others.
In addition to a regular lamp, you can install universal interior lighting in the central lamp. It comes in different sizes, so you can choose it according to the size of the lampshade. The kit includes 3 different adapters for lamps: c5w, w5w and t4w.
or simple lamps with c5w socket
LED lamps have polarity, so when installing, pay attention to the + contact. If the lamp does not work during installation, simply turn it over.
When choosing t4w LED lamps, pay attention to their size; the width of the lamp may not fit into some lampshades.
What problems does satellite navigation solve? You need to know
How Glonass works is easy to understand by carefully reading the following paragraphs. The device, using navigation and several installed sensors and controllers, allows for optimization of work for a transport corporation or taxi. These special sensors are called counters. So, these meters are installed on the fuel system, interact with the “brains”, as a result, information about the vehicle is displayed before the eyes of the company owner.
It becomes possible to control consumption, but remotely; monitoring allows you to find out whether the driver is driving to the left or not. Fuel control is important for management, because often drivers are not averse to draining a certain amount of gasoline.
Navigation gives management an understanding of where the vehicle is, the time of movement, how the driver works, and so on. Based only on data on consumption, driving schedule, information about movement, it is possible to reduce the subjective factor. Responsibility increases, there are fewer leftists, they don’t break the rules, they don’t speed up the speedometer.
In addition, the vehicle’s condition, service life and operation are monitored. But all this is doable, taking into account the fact that the device itself is working and functioning correctly.
How to remove the lampshade on Kalina
Removing the lamp cover will not cause you any problems; it can be easily pryed off with a sharp object. To remove the lampshade itself, you will have to unscrew two self-tapping screws.
Carefully pry up the cover of the central lamp and remove it
To remove the ceiling completely, dismantle the ceiling lining
Unscrew the fastening screws and pull out the lampshade
Carry out the collection in reverse order. As a result, after installation we should have a light like this:
How to change the polarity on the interior lamp of Lada Kalina
You can do this in two ways:
For 15 years I have been repairing various types of cars, including brands such as VAZ, UAZ, Chevrolet, Mazda, Kia and many others. Everything related to the gearbox, engine or chassis. You can write me your question below in the comments and I will try to answer it in detail.
Now the light in the trunk appears regardless of the operation of the headlights... and the circuit itself automatically turns off after some time of inactivity on security (that is, if the limit switch dies, the battery will not run out from the lamp and tape)
There is a red wire in the lampshade...then we cut it to it...
led under the ceiling to the corner, then under the elastic band inside...
then I cut the red wire and connected a new one to it... and we isolate everything... voila... now you don’t have to stomp into the interior to turn it on... and then to turn it off =))
Additional lighting for the trunk of Kalina
| Everyone knows how dim the standard lighting in Kalina’s trunk is; finding anything in it at night is simply unrealistic. Another modification to the trunk is dedicated to the lighting. |
Making Kalina's trunk lighting brighter is very simple, and most often an LED strip or a more powerful lamp is used for this. How to secure and connect additional lighting in the trunk is up to you, here are some examples of how this is done on different types of Kalina body:
Trunk light Kalina Hatchback
Trunk lighting Kalina Universal
Trunk light Kalina Sedan
By the way, if you often have to remove the rear shelf, then it is better to secure the strip with LEDs on the plastic sides, next to the standard lamp. And yet, if you make the lighting independent of the dimensions, then using the trunk will be even more convenient.
Similar materials
We create interior lighting ourselves
There is not enough light in the interior of the standard Lada Kalina, so most car owners improve their lighting themselves by installing 0.6 W LED lamps instead of 5 W incandescent bulbs.
The most popular LED lamps of the F-3s50f37 brand provide a luminous flux of 80 lumens and have much lower power. A rectifier is built into the lamp design, which protects the product from incorrect polarity connection.
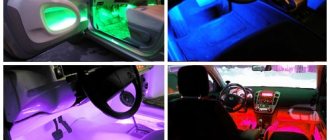
Additional lighting in the Kalina's cabin allows you to create more comfortable conditions, especially at night. It is an LED strip secured with double-sided tape. The device is glued to the bottom of the dashboard and illuminates the floor under the feet of the driver and passenger.
It is more convenient to fix the floor lighting for rear seat passengers on the air ducts. Connecting lighting to the on-board network can be done in several ways. The simplest one is to connect via a toggle switch to the “plus” of the low beam. If it is necessary for the backlight to turn on when the doors are opened, then it should be connected through the door limit switches.
Interior lighting plays an important role. It not only creates a comfortable atmosphere, but also makes driving conditions favorable, reduces driver fatigue and the risk of road accidents. For this reason, additional lighting has become widespread in recent changes to factory models.
The light in the Kalina, to put it mildly, is not very comfortable, rather dim, only one lamp, no lighting under the feet, in the trunk on the left there is one dim lamp. It was decided to fight this.
The following parts were ordered on the Energomash website:
— Board PL 27 lampshade 51.3714
- 1 PC.
— 219.40 rub. — Board PL 57-01 lampshade 51.3714
— 2 pcs.
— 128.40 rub. — LED strip white glow, 20cm, 12 LEDs
— 4 pcs.
— 320.00 rub. — LED strip white glow, 50cm, 30 LEDs
— 1 pc.
— 200.00 rub. — Transportation costs
— 1 pc. — 110.00 rub.
The PL 27 board and 2 57-01 boards are installed in the standard lampshade. Instead of conventional light bulbs, we get LED ones. At the same time, the light becomes much brighter, you can comfortably read something and find a lost item much easier.
Additional trunk lighting Lada Kalina 2
The new Kalina 2 has changed for the better in many ways, the car's interior has become more modern, and the exterior has also become more attractive. However, AvtoVAZ decided not to change some details, for example, the trunk lighting of the new Kalina is dim. Today we will show you how to install additional lighting in the trunk of a car.
The point of the modification is to improve the standard trunk lighting by installing LEDs in it, or replace it with an alternative, brighter one. Thus, the installation will not require the manufacture of new fasteners, because The lighting will be placed in regular places.
Let us recall that in the previous article we looked at soundproofing the hood of the Lada Kalina 2 as a method of eliminating the sounds of engine operation.
If you decide to abandon the standard lamp due to dim light, then you can improve the trunk lighting using an LED strip. You can fix the LED strip on a shelf, on the trunk lid, or on the side shelves using double-sided tape or plastic clamps. Example for Lada Kalina 2 hatchback:
On the Lada Kalina 2 station wagon, the trunk lighting is modified in a similar way. In both cases considered, the trunk lighting is connected to standard connectors. The disadvantage of this connection is that the backlight will only work when the lights are on.
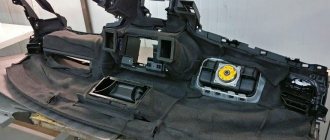
Description of the functions of the interior lighting unit (BOS)
1 – area where the microphone of the in-vehicle emergency call system is located; 2 – area where the in-vehicle emergency call system loudspeaker is located; 3 – emergency call key for the in-vehicle emergency call system; 4 – status indicator of the in-vehicle emergency call system (red). Lights up for 5 seconds each time the ignition is turned on and then goes off. The indicator also lights up if there is a malfunction in the SVEOS system; 5 – front passenger seat belt unfastened indicator (red); 6 – indicator of the disabled front passenger airbag (yellow); 7 – key for turning the general interior lighting section into “on” mode; 8 – key for turning on the general interior lighting section in the “on when the door is open” mode; 9 – key for turning on individual lighting of the driver’s seat; 10 – key for turning on the individual lighting of the front passenger seat; 11 – section for individual lighting of the driver’s seat; 12 – section for individual lighting of the front passenger seat; 13 – general lighting section.
When the ignition is turned on, the system status indicator No. 4 lights up red for 5 seconds, then goes out. The indicator also lights up red when any errors are detected in the functioning of the SVEOS. To determine errors, wait 1 minute after turning on the ignition. The table describes the operating modes of the alarm:
| Nature of the malfunction | SVEOS operating mode | SOS button illumination color (white/red) | Indicator status |
| Everything is fine | Initialization (when ignition is turned on) | White | Lights up for 5 seconds. |
| Standby mode | White | Does not burn | |
| Dialing | Red, flashing | ||
| Voice communication | Red, lit | ||
| Malfunction of SVEOS components | Standby mode | White | Lit |
| Dialing | Red, flashing | ||
| Voice communication | Red, lit |
Tuning the trunk of Kalina
If there is a need to transport large cargo and the standard trunk of the car is no longer enough, then there are two options: buy a trailer or transport the cargo on the roof. Do you know how to install roof rails on a Granta or Kalina sedan?
Everyone knows that the rear parcel shelf of Kalina rises up along with the trunk lid. However, the elastic bands that hold the trunk shelf in place are too long, causing it to rise up a little, forcing us to bend over to put things in the trunk. Do you know how to make access to Kalina’s trunk more convenient?
The trunk of a car deserves special attention, especially when it is of impressive size. Tuning the trunk of Kalina, like any other car brand, consists of a set of modifications, and we’ll talk about them.
Everyone knows how dim the standard lighting in Kalina’s trunk is; finding anything in it at night is simply unrealistic. Another modification to the trunk is dedicated to the lighting.
Trunk
Here everything is done in almost the same order. We open the trunk and on the left side we see the lamp itself, which can be removed in the same way as in the glove box, but in this case there is no need to remove it, since there is access to the lamp itself from the reverse side.
Since access to the lamp is free, replacing it will be even easier than in the glove compartment, simply by spreading the contacts, removing it, and putting the new one back.
Instructions for replacing lamps
Replacing the light bulbs in Kalina's lampshade is easy. To do this, you will need two screwdrivers: one – flat, the second – Phillips. The procedure looks like this:
- Remove the lampshade glass. To do this, you need to insert a flat-head screwdriver into the grooves on the glass of the lampshade and carefully open the glass, which opens access to the interior lighting lamps.
- Replace light bulbs.
- If you need to remove the lighting unit with control buttons, insert a flat-head screwdriver into the groove of the unit on the driver's side and press the tool. The plastic cover will come off easily, so it is better to hold it with your free hand. This will give you access to the screws securing the unit to the roof sheathing.
- By unscrewing the two screws with a Phillips screwdriver, you can remove the lighting unit by pulling it towards you with a little force.
- To completely dismantle the device, you must disconnect the electrical connector.
Modification of the trunk of the viburnum | Club LADA
The rear shelf of Priora, Kalina and Granta is famous for its crickets, they are especially noticeable on hatchbacks and station wagons. According to statistics, 70% of car owners, after purchasing a domestic car, almost immediately soundproof the rear of the car. Do you know what to do if a shelf creaks?
If desired, all logos on the trunk lid can be removed. There are several ways to remove nameplates from a car; we will consider them separately.
Soundproofing the trunk brings a significant effect when it comes to a hatchback or station wagon body. Let's figure out how to make soundproofing of the trunk lid of Kalina with your own hands.
The Lada Kalina does not have a trunk button, so you have to open it only with the key. The photo report is devoted to how to make the trunk door open using a separate button.
To prevent various rubbish from hanging out in Kalina’s trunk, you can buy a special universal net to contain the load. But if a false floor is installed, then all the things from the trunk will be decoratively hidden.
The trunk of a car deserves special attention, especially when it is of impressive size. Tuning the trunk of Kalina, like any other car brand, consists of a set of modifications, and we’ll talk about them.
Everyone knows that the rear parcel shelf of Kalina rises up along with the trunk lid. However, the elastic bands that hold the trunk shelf in place are too long, causing it to rise up a little, forcing us to bend over to put things in the trunk. Do you know how to make access to Kalina’s trunk more convenient?
To repair the lock of the fifth door of a Kalina hatchback or station wagon, or to replace the purifier gearmotor, you will first have to remove the upholstery of the fifth door.
If there is a need to transport large cargo and the standard trunk of the car is no longer enough, then there are two options: buy a trailer or transport the cargo on the roof. Do you know how to install roof rails on a Granta or Kalina sedan?
Initially, the owners began to notice water in the trunk of Kalina and Priora hatchback/station wagon, and later the new Granta liftback inherited this problem. We find out the possible reasons for the appearance of water in the trunk and ways to eliminate this problem.
Door switches: where they are located, connection, checking
Initially, limit switches were installed on the doors to automatically turn on the interior lamp. Their connection scheme was the simplest - everything was connected in parallel, that is, it did not matter which door was open. In budget car configurations, only the driver's door switch was often installed.
Video: Problems with limit switches in Lada Vesta, Grant and Kalina
The weak link of such limit switches was the need to place them in an extremely inconvenient place: the protruding part of the metal sheet of the door in the lower corner pressed on them; less often, designers managed to place the limit switch higher. Because of this, they often failed even despite the sealing cap on the outside. For a car with an alarm, this meant randomly triggering the alarm at the wrong time, or, just as bad, being able to open the door without setting off the alarm.
Subsequently, the connection diagrams for limit switches in doors became more complex - initially to indicate a specific open door on primitive on-board computers. Here, each door had its own signal wire, which complicated the installation of alarms: since the limit switches need to be connected to the only input of the central unit, an attempt to connect it with all the limit switches immediately leads to a violation of the display on the on-board computer screen (shows all doors open at the same time). Because of this, it is necessary to use diode isolation, which allows you to logically combine the outputs of the limit switches without disturbing the operation of the computer.
It works simply: since the diode conducts current only in one direction, when any of the limit switches is closed, the alarm output is connected to ground in any case, but the pressed one is connected to the rest of the limit switch wires through a back-to-back pair of diodes that do not pass current.
The solution to the problem with the reliability of limit switches turned out to be quite simple. It has long become the norm that the door end is located in the lock mechanism itself, that is, it is raised high and well protected from water, if, of course, the glass seal is in good working order. Note that the very principle of operation of the door limit switch has changed. If the door limit switch is installed in the slam, then it is triggered at a certain position of the door, closing the contacts when it begins to open.
If the door switch is in the lock, it is triggered by moving the locking mechanism: often (but not necessarily) it is enough to lift the handle without opening the door itself to close the contacts. This, by the way, makes installing alarms more convenient: you can leave the door open during operation by clicking the lock pawl with a screwdriver, and the alarm will no longer “see” the door open.
It is so good, for example, to adjust the shock sensor by arming the car with the door open, and not repeating the cycle “closed - armed - struck - disarmed - opened the door - changed the setting” for each adjustment.
On modern cars, the driver's door switch has received one more function - it is usually responsible for “falling asleep” and “waking up” of the on-board electronics. For this reason, on alarm systems with auto-start, it is necessary to connect a circuit simulating the opening of the driver’s door: the on-board controller at the end of the auto-start cycle will “see” that after turning off the ignition the door opened and closed, and will normally switch the car into a low-power mode.
In this case, a short-term “ground” pulse often appears on the limit switch wire, which, with a conventional diode isolation circuit, triggers an alarm for opening the door some time after arming. To avoid this, the diode decoupling circuit is complicated.
The difference with the previous diagram is that the diodes also cut into the standard wiring, and the alarm is connected between the diode and the limit switch. In this case, when the limit switch is closed, ground comes to both the standard vehicle on-board circuit control unit and the alarm system. But, when the controller creates a “ground” pulse in the standard wiring, the alarm input is blocked by back-to-back diodes, and no alarm is triggered.
It is important to understand that the duration of such pulses is very short, and the alarm can work correctly even when decoupled with one diode per line: for example, Sherkhans are less sensitive than StarLine, according to the author’s experience. But sometimes random activations are possible, and this is often associated with owner problems, when the limit switches are absolutely in good working order, but the car still sometimes “screams on its own”
Trunk volume of Lada Kalina station wagon
One of the popular modifications to the trunk is to install a second floor in it in the form of a low box (raised floor). This design will allow you to store things (tools, sound amplifier, etc.) that will not dangle or get in the way during use. Let's consider a classic version of this tuning of the trunk of modern Lada cars.
It is more practical and easier to make a rectangular raised floor, the dimensions of which will depend on the car model. You can draw up a drawing or diagram based on the dimensions from the articles on our website (Lada Priora hatchback/station wagon, Granta sedan/liftback, Kalina station wagon, Kalina 2 hatchback and station wagon, or Niva 4x4). Or pull out the trunk mat and take measurements from the insert glued on the back side, and take the height to be 15 cm.
Let's look at a specific example of making a raised floor with your own hands for a Lada Granta liftback. For other Lada models, all actions are performed in the same way:
1. Cut pieces of plywood (5-6 mm) into pieces of the required sizes using a jigsaw or saw.
2. If desired, the plywood can be painted (in this example, white) or coated with drying oil to protect it from moisture.
3. The top cover is tightened with material (for example, carpet), using a furniture stapler or glue.
4. The box is assembled using corners and hinges. The top lid can be made double so that, if desired, only part of the hidden trunk can be opened.
5. We apply design solutions. For example, when placing amplifiers in such a trunk, it will be convenient to have a viewing window made from a piece of monolith. To install it, we cut out a 5 cm groove along the contour from the bottom of the lid. We place the glass in it and glue it, and secure it with metal slats for reliability. Holes for ventilation can be made in the sides of the resulting box.
As a result, all that remains is to install a false floor in the trunk of the Lada and fill it with the necessary contents. The side niches in the trunk are deeper, which allows you to place additional things in them. Such modification of the trunk will require at least three free evenings, but the result is worth it!
Lada XRAY already has a second floor from the factory. There is a separate article on this topic for the Largus trunk. We offer one more instruction that will improve the lighting in the trunk of Lada cars.
Very easy installation, no additional modifications required. The shelf is designed to improve the sound quality of the speaker system as a whole, as well as to eliminate unpleasant creaks, rattles and overtones when the car is moving.
Instead of plastic sidewalls, wooden ones are installed, and speakers are attached to them.
The main advantage of this design is that when the shelf is removed to transport large items, the speakers remain in the car.
Standard characteristics:
| Upholstery material: | Carpet |
| Upholstery color: |
We produce standard and individual orders, maintain an effective pricing policy, and offer the best price-quality ratio.
If desired, you can purchase fasteners for RUB 130
The manufacturer reserves the right to change the characteristics of the product, its appearance and completeness without prior notice to the seller.
| Holes on the sides: | 6x9″ |
| Speaker installation: | Hidden |
| Net/gross weight: | 10.3kg/11.7kg |
| Dimensions in packaging: | 88cm x 34cm x 20cm |
| Equipment: | Shelf, sides (2 pcs.) |
| Automobile model | Lada Kalina |
| Speaker size | 13 cm, 16 cm, 20 cm, 6x9″ |
| Modification | Solid |
| Automobile model | VAZ 1117 Kalina |
| Basic speaker setup | Hidden |
What are the characteristics of the trunk?
What is the actual volume in liters? If you fold the rear row of seats, the Granta's trunk volume will reach 770 liters, and in the standard position of the rear passenger row, the trunk volume will be 440 liters. This model is the first ever liftback among the entire AvtoVAZ family. In terms of luggage compartment capacity in its standard state, the Granta managed to outstrip such a popular European hatchback as the Volkswagen Golf. However, with the rear row seats folded, the Golf takes the lead thanks to the trunk volume of 1200 liters, which turned out to be unattainable for the Lada designers. After all, the primary goal was to maintain a single wheelbase and platform similar to a sedan.
So, what is the real opinion of Granta owners about the capacity and ease of use of the luggage section, because its volume in liters is quite impressive. The Internet is replete with an incredible variety of photographs posted by the owners. Sometimes the Lada Granta liftback can plunge you into amazement - how much useful luggage its luggage compartment is ready to accommodate. However, in reality, not everything becomes as rosy with the amount of space in the trunk as it is positioned in advertising.
The rear seats have the only ability to fold completely when the front seats are moved close to the instrument panel. The inconvenience is that the rear headrest requires preliminary dismantling before folding. The top shelf in the luggage compartment can be removed without any extra effort, which is very convenient when transporting large items. Due to this action, space will not be added, but the luggage will not rest against anything. Niches on the right and left sides are suitable for storing medium-sized bags or a set of essential tools in case of an unexpected breakdown.
Above these technological recesses there are hangers designed for bags, which eliminates the need to clutter the rear seats with them. There is a light above the left niche, but it turns on when the low beam of the head optics is activated. An excellent solution for cloudy weather or dark periods of the day, however, the inconvenience is that you may forget to turn on the headlights beforehand.
Under the luggage mat you can find a full-fledged spare wheel, to which the manufacturer has added traditional attributes: a jack and a wheel wrench. There is enough space in the niche to accommodate a spare wheel with a large radius (if you wish to install 16-inch wheels). There is still room for the tool. This is easy to verify, you just have to look at the photo.
The luggage compartment mat in the LADA Granta liftback made of rubber has not become popular among owners. The quality of the material is a little worse than expected, and it will not be possible to stick a traditional “motorist’s bag” to its surface with Velcro. The option of a rug with a pile covering will not be practical, since it is subject to the risk of contamination from spills of various liquids or dirt.
The rubber cover in the trunk can be easily placed on top of the standard one. If the niche for the spare wheel will be used for other luggage, then you should take into account the fact that one mat will rest against the niches on the sides of the trunk. If you place any object above the spare wheel niche, it will fall into its recess.
Trunk Kalina hatchback
Just recently I began to notice that the shelf in Kalina’s trunk began to rattle and sag. It was secured with rather weak plastic sides that could barely hold them up. I have the speakers installed on the front door, but I haven't had time to install them in the back yet, so I decided to install side supports under the shelf. Of course, I didn’t plan them myself from valuable wood, but ordered them from a specialized workshop.
They carefully examined my car, took the necessary measurements and got to work. I didn’t bother them with my presence and retreated towards the house. But still, after a couple of hours, curiosity took over and I came back to the auto repair shop to watch the process. However, to my great surprise, all the work had already been completed and all I had to do was pay the bill, which also pleasantly surprised me; in principle, I was expecting a larger amount than the one that was presented to me.
The work itself pleased me with its accuracy and reliability. Now even if you sit on this shelf yourself, it seems like you won’t bend in life. Plus, on top of everything else, there were additional pockets that were not planned by me, but they also made me happy, you could hide some valuables there and no one would have guessed that there was a pocket there. I left the auto repair shop in such a good mood. I've been driving this car for quite some time, and so far the Kalina hatchback has never let me down with shaking in the trunk. And the pockets serve as tools. Naturally, you can’t put particularly bulky tools there, like a jack, but it’ll do just fine for small things.
Rate this article: Share with friends!
Disabling the Glonass Era on Vesta - the treasured SOS button
Is it possible to get rid of Glonass tracking? Let’s try to give an accurate and reasoned answer. But understand that you will carry out this work only at your own peril and risk. Lada Vesta is one of the first Russian cars that received such a system already in the “base”; all trim levels are equipped with it from the factory. You can argue for a long time about the benefits or harm of the option. The mission of this option is as follows:
In the event of an accident, the device sends geolocation data to the control room, from where the information is transmitted to emergency services.
When you press the button, the operator is dialed; the device has a SIM card. This is manual mode. In automatic mode the pump will work:
- From airbag deployment;
- Triggering of the accelerometer sensor;
- Automatic mode recognizes several types of accidents:
- Side impact - if the car was hit from the side;
- Rear collision - a car coming from behind hit you;
- Car overturn - if the car has turned over.
After an accident or after pressing a button, the sos-system will connect with the operator and send additional information about the vehicle and the accident:
- car vin code,
- the speed at which it moved;
- impact damage: where the car is damaged, the color of the car;
- What kind of gasoline is it filled with?
If after an accident no one is able to press the button, then everything will go away on its own. Then the dispatcher will call the car and if no one answers, he will send help.
In addition to the sos button itself, the device has the following components:
- Microphone for communication;
- Speaker - to hear the operator;
- SIM card and modem - for communication with the Internet and operator;
- Accelerometer and gyroscope;
- GNSS/GSM antenna - communication amplifier;
- Module for GLONASS navigation.
It is clear that the whole sos button project has good intentions and can save lives.
Suspicious Lada Vesta drivers are worried that they are being followed. You can simply turn off the SOS on the Lada Vesta by removing the power supply connector. However, be aware that the system has backup batteries, so to turn off Glonass completely, you will need to wait at least 48 hours.
Sound insulation of the trunk Kalina 2 (VAZ 2192, 2194)
is the same for all brands and types of cars, however, specific cases have their own characteristics. In the case of the Lada Kalina 2, the whole process begins with removing the trunk trim and tailgate trim, which does not cause difficulties. Next, the entire surface should be cleaned and degreased with White Spirit.
The first layer of trunk sound insulation is vibration isolation material. It is recommended to start installing sound insulation from the rear arches; it is through them that the main noise from the road is transmitted. To soundproof arches, it is recommended to use a material with the highest vibration absorption coefficient, for example, Bimast Bomb. We cut sheets of a suitable size (the larger the pieces, the better), and heat the bitumen side with a hairdryer. We apply the material to the cleaned metal of the body and roll it out with a hard (plastic/iron) roller. We glue the next sheet of vibration isolator overlapping or at the joint. After this, we move on to soundproofing the horizontal surface of the trunk, paying special attention to the part where the muffler resonator passes (for Lada Kalina 2 this is the left side).
Connection
There are 3 connection options:
- To the standard lamp - ERA-GLONASS unit;
- To the lamp in the trunk;
- To the radio.
To the standard lamp – ERA-GLONASS unit
To do this, you first need to remove the lamp itself, but first the terminal from the battery is reset. Afterwards, from the front of the lamp, between the sedan roof trim and the plastic frame, a blade or screwdriver is inserted and the fasteners are disengaged, after which the frame itself is dismantled. The clamps are plastic, so work carefully.
Next, unscrew the 2 screws that secure the lamp to the body.
After this, use a screwdriver or blade to pry off the fastening, which is done through the technical hole in the back of the lampshade, and it is removed.
Finally, you just need to disconnect the plug.
Connection diagram
As for the direct connection of the lampshade of the second row of seats in the Lada Vesta, it is carried out to the ERA-GLONASS plug.
In this case, it is not recommended to be guided by the color of the wires, since the color may vary depending on the year of assembly and version. Therefore, it is necessary to be attached to the pinout:
- Contacts 11 and 14 – when the main relay is activated (open doors or the key turned in the ignition), +12V power appears. If the key is removed from the ignition, the power goes out after a few minutes.
- Contact 15 – ground (usually black or black-blue).
- Contact 17 (white) – ground from the door limit switches. It appears briefly when the doors are opened.
If you are not sure when connecting, it is recommended to ring everything with a tester.
To the radio
Connecting the lampshade of the second row of Lada Vesta seats to the radio is as follows:
- Plug A4 of the ISO connector of the radio – provides +12V from the battery;
- Plug A7 of the ISO block of the radio - gives +12V when turning the key in the ignition;
- Plug A8 of the ISO block of the radio or a point on the body is ground.
As you can see, the process of connecting to the lamp in the trunk or radio is the least troublesome in terms of dismantling and the simplest, however, this results in the need to pull wiring to them, laying it under the plastic covers of the pillars, etc. Therefore, most car owners connect to the standard front lamp.
This completes the installation and connection of the lampshade for the second row of seats in the Lada Vesta. Assembly is carried out in reverse order.
Lada Kalina I generation
The trunk volume on the Lada Kalina hatchback, according to the manufacturer’s manual, has a volume of 240 liters (up to the shelf), and with the rear seats folded down it is 550 liters.
Kalina in a sedan body has almost the same performance, but in this case the owner is limited in volume due to the rear window and shelf.
Station wagon body (the question is about it)
And by far the most spacious trunk in the Lada Kalina family is the station wagon. Even when not unfolded, its volume is about 355 liters, while with the seats folded down you can achieve a figure of 670 liters.
The dimensions of the station wagon body are amazing. So, thanks to the folded seats, an object with a length of almost 1.5 meters and a maximum width of 1.3 - 0.9 meters can easily fit inside the body.
Location of additional fuses in Lada Kalina
Three additional fuses and a diagnostic connector in the Lada Kalina are located under the central panel.
Purpose of fuses
| № | Denomination (A) | Purpose |
| F1 | 15 | Main relay circuits (winding of the cooling system electric fan relay, canister purge valve, air flow sensor, speed sensor, oxygen concentration sensor, ignition coil) |
| F2 | 15 | Fuel pump fuse Lada Kalina |
| F3 | 15 | Constant power supply circuit of the electronic engine control unit |