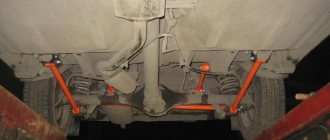
Tie rods are important parts of the Chevrolet Niva suspension. They limit the movement of the rear axle, preventing it from moving forward or backward.
When driving off-road, the rods are subject to a high load. This may cause their deformation, wear of the silent blocks or breakage of the fastening.
As a result, the position of the rear axle is disrupted, the car begins to pull to the sides and tire wear accelerates. Therefore, you need to monitor the condition of the torque rods and silent blocks of the rear suspension.
What links are included in the rear suspension?
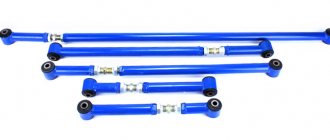
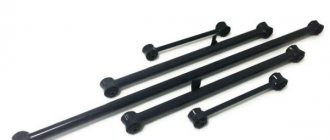
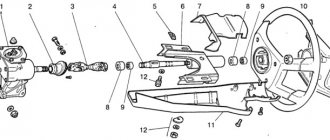
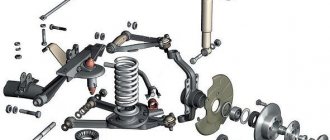
The Chevy Niva bridge is held in place using five parts. To prevent longitudinal and transverse displacement, four longitudinal rods (two each: front and rear) and one transverse rod are used. At the ends of the products there are eyes into which silent blocks are inserted to prevent knocking in the suspension. One end of the rod is attached to the bridge, the other to the car body.
The parts have the same diameter and differ only in length. The longest is the transverse thrust. The length of the elements ensures vertical mobility of the rear axle. Thanks to this, the silent blocks do not twist, even if the suspension moves by the full stroke of the shock absorber.
Do-it-yourself adjustable panhard rod for the field
It's wet, damp and uncomfortable outside. The security officer is put aside and waits for the weather again.
And my hands are itching)))))
I took a spare panhard rod and decided to make it adjustable.
Otherwise, after the elevator, the bridge shifted to the right by 3 centimeters.
In the store I bought 2 adjustment bolts on the steering tip from a VAZ 2110. An adjustment sleeve from a VAZ 2108 with a thread inside. The locking nuts are also from the Soviet automobile industry with right-hand and left-hand threads.
We saw the panhard rod (I think you can use the dimensions as a guide. I sawed it so that it initially turned out to be 1 cm longer than the standard.
Next, we weld onto the bolt so that it fits tightly into the pipe. DO NOT MIX THE SIDE OF THE BOLT, otherwise it will turn out that 2 either right or left threads will stick out. It is better to do everything assembled with a bushing.
Next, we hammer the bolts into the pipe, check the straightness and weld it.
I was afraid to weld with conventional arc welding and electrode 3. But it turned out to be welded just fine, even with little experience in welding))))
Next, sand and paint everything. I want it in yellow or red, I don’t have any paint yet, I have to buy it))
After installation, secure the nuts with a small amount of welding to prevent them from unscrewing inadvertently.
Thank you for your attention, peace to everyone))))
The tests have now been completed. The modification has a place to live and exist even for extreme off-road loads.
Reg.: 09.28.2006 Topics / Messages: 39 / 2022 From: Moscow, Vodny Stadion metro station Age: 12 Car: Niva with V8 - unfinished construction, Yamaha XT600E, Dodge Ram 1500
Reg.: 11/16/2009 Messages: 34 From: Moscow, Southern Administrative District Age: 42 Car: ford ranger 07, was 21214 97 monoinjection, -arches+lift30mm+BFG MT 30″
Reg.: 09.28.2006 Topics / Messages: 39 / 2022 From: Moscow, Vodny Stadion metro station Age: 12 Car: Niva with V8 - unfinished construction, Yamaha XT600E, Dodge Ram 1500
Reg.: 10.15.2006 Threads / Messages: 5 / 5013 From: kolomna Age: 44 Car: 21213 98. 1875cm3 48mm split gear megasolex zero filter prosport automatic octane corrector ASTRO-PENZA
Reg.: 12.12.2008 Threads / Messages: 2 / 4250 From: Omsk Age: 48 Car: VAZ-1118, 2008
Reg.: 01/09/2008 Threads / Messages: 4 / 3014 From: Tolyatti Age: 44 Car: 2131 2001.
Many car enthusiasts will be interested in an adjustable panhard rod with their own hands; this is a fairly frequently required modification on many car models. This interest is due to a number of features that this suspension element has. After all, all drivers know that panhard rod can have a significant impact on the handling of the car. That is why they pay a lot of attention to it. Moreover, the problem may concern not only this element, but also surrounding parts. Below we will figure out what it is, why adjustment is needed, and how to properly make this part yourself.
A DIY adjustable panhard rod may be required in a variety of situations. It is worth noting that almost all modern cars are equipped with non-adjustable rods, this leads to a number of difficulties. This is why car enthusiasts often modify a standard part, especially since it is not difficult, and it does not negatively affect the reliability of the suspension.
Content
What it is?
First, let's figure out what a panhard thrust is. This will allow you to understand the principle of its operation, as well as the basic requirements for it.
This rod is installed on the rear axle of the car, often called “transverse reaction rod”. Its task is to ensure straightness of movement, and it also keeps the body from shifting relative to the central axis. One end of it is attached to the body, the other to the bridge.
When moving in conjunction with other rear suspension arms, it controls and keeps the axle from moving relative to the line of travel. If the attachment to the body or axle is not strong, which can occur due to wear of the bushings, the rear of the car “wobbles” when driving.
Types of breakdowns and their causes
The parts are made of high-strength alloy steel, so they are practically not subject to deformation.
The jet rod can only bend as a result of hitting large stones or tree stumps off-road.
More often, car owners have to deal with other problems:
- Cracks in the welds between the rod base and the eyes. If a breakdown is not detected in time, the part may fall apart while moving.
- Corrosion of rods. A rusted base loses strength and is easily deformed or broken.
- Wear and damage to rubber bushings of silent blocks. Over time, rubber dries out and cracks. This process is enhanced by physical activity. As a result, play appears in the connection of the rod with the bridge and the body. This worsens the car's directional stability and can lead to the lugs coming off.
Important: the appearance of a knock in the rear suspension may indicate wear of the torque rod silent blocks. If the malfunction is not corrected in time, the lugs will quickly come off under the influence of increased shock loads.
Panhard rod length Niva
So, today we will tell you how to make an adjustable panhard rod from a regular VAZ panhard rod in a garage. What is it for? Well, firstly, even if your springs just sagged, then the bridge will already move from its point, or if you are a supporter of “lowered” cars, or, on the contrary, put high spacers under the springs to carry loads, then you simply have to convert your standard linkage to an adjustable one . Since the panhard rod is the same on all classics from the VAZ-2101 to the VAZ-2107, and is also absolutely identical on all Niva models, starting from the VAZ-2121, this manual is universal. And so, let's go.
For the conversion you will need 5 parts: 2 tie rod bends from 2108 (a bushing with edges for a wrench. On one side there is a right-hand thread and on the other left), a tie rod bend from 2110 in the form of a double-sided bolt with multi-directional threads, 2 nuts on the right and left-hand thread.
The panhard rod is removed from the car.
Then we saw the rod in any place you like
Which ones are better?
There are parts from several manufacturers on the market, among which the following options can be distinguished:
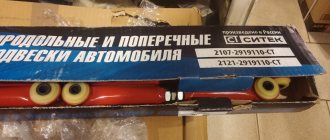
- Cross and Detal-Resurs are two budget brands that produce suspension parts for the Niva. Price - from 1600 rub. per set.
- Sitek - budget spare parts with rubber or polyurethane silent blocks. They are distinguished by their small wall thickness and low weight. Suitable for those whose route mainly runs on asphalt. Price - 2200 rub.
- Niva Urban - inexpensive high-quality spare parts for Niva Chevrolet. The manufacturer produces rods for the entire VAZ family. Price - 2600 rub.
- UG is another budget rod from a little-known company. Like Sitek, they are not intended for active off-road running. Price 3000 rub.
- SC is a more expensive model, characterized by a rectangular cross-section. Judging by the mass, the manufacturer did not spare the metal. The quality of the seam does not cause any complaints from car owners. Price - 3400 rub.
- Niva Extreme - reliable, durable suspension parts that are preferred by fans of extreme racing. The only drawback is the price, which is almost 5,000 rubles.
Note: the high price of Niva Extreme parts is due to their non-standard design. These are enhanced traction.
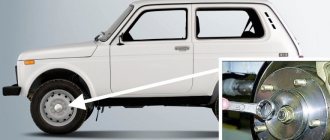
Replacing jet rods
The work is carried out on an overpass or inspection ditch. To replace jet rods you need to prepare:
- hammer;
- a pair of spanners 19;
- metal brush for cleaning threads;
- mounting blade;
- WD-40 liquid.
Reaction rods need to be changed in the following sequence: transverse, front, rear. You should not lift the rear axle with a jack, otherwise there will be difficulties in aligning the holes of the silent blocks and mounting brackets.
Work order:
- Clean threaded connections with a wire brush and spray with WD-40.
- Unscrew the lower mounting nut and move the shock absorber to the side so that it does not obstruct access to the transverse link nut.
- Unscrew the threaded connections holding the silent blocks and remove the transverse rod.
- Install a new rod and screw it on the top side.
- Align the holes in the silent block and the bracket, insert the bolt and tighten the nut.
Attention: to protect the threads from corrosion, use gear oil or Litol. If you do this, it will be much easier to unscrew the nuts next time.
- Unscrew the fasteners, remove the front rod and replace it with a new one.
- Repeat the previous step for the remaining front and two rear links.
Tip: the fastening bolts firmly adhere to the bushings of the silent blocks. Use a hammer to move them out of place. This must be done carefully so as not to damage the thread.
If the rods have not rusted or bent, or cracks have not appeared on them in the area of the welds, you can only get by by replacing the rubber-metal bushings. In this case, you can save on buying new rods and get by only with silent blocks.
Signs of trouble
The levers, beam and anti-roll bar do not need to be changed even after 100-200 thousand kilometers.
Also interesting: How the differential lock works on the Niva: diagram
But rubber-metal hinges, boots and bushings gradually lose their properties even while parked.
VAZ-2123 owners have to deal with the following malfunctions:
- Wear of silent blocks, ball joints.
- Damage or cracking of anthers.
- Reduced performance of shock absorbers.
- Breakage of jet rods.
Otherwise, the car's handling deteriorates, and the tires begin to wear out rapidly. Wheel alignment is checked every 10-15 thousand kilometers and after very strong impacts when falling into road potholes.
Some problems can be identified by hearing while driving. Worn ball joints or silent blocks, faulty shock absorbers or broken rods knock, squeak or ring when driving on uneven roads.
In addition to extraneous sounds, suspension malfunctions manifest themselves as follows:
- Rocking or jumping of the body when driving over uneven surfaces.
- Pulling the car to the side.
- Increased braking distance.
- Deterioration in controllability.
- Accelerated or uneven tire wear.