Replacing the canister and canister purge valve
Note. The location of some parts may differ slightly depending on the vehicle modification. This page shows an example of a Euro-3 engine. Replacement on a Euro-2 engine is shown here
Removing the fuel vapor recovery system adsorber
We remove the adsorber for replacement if the seal of its housing is broken (determined by the smell of gasoline or visually).
Remove the pipe and spare wheel support. (see here)
The absorber is located under the brake master cylinder. For clarity, the work is shown with the master brake cylinder and vacuum brake booster removed.
Press the tube tip lock.
Using a slotted screwdriver, loosen the clamp securing the fuel vapor removal hose from the adsorber to the purge valve.
. and remove the hose from the adsorber fitting.
Using the “10” head, loosen the tightening of the adsorber fastening clamp.
. and remove the adsorber from the engine compartment.
An adsorber with a tube for supplying fuel vapor to it.
Install the adsorber in reverse order.
REMOVAL OF THE CANSORBER PURGE SOLENOID VALVE
The absorber purge valve is mounted on the intake manifold bracket.
We are working to replace the valve.
By pressing the lock of the engine control system wiring harness block, disconnect the block from the canister purge valve.
Use a Phillips screwdriver to loosen the clamp securing the fuel vapor supply hose from the adsorber to the purge valve.
. and remove the hose from the valve fitting.
Using a slotted screwdriver, loosen the clamp securing the fuel vapor supply hose from the valve to the receiver.
. and remove the hose from the other valve fitting.
Insert a slotted screwdriver into the groove of the valve and press the tongue of the bracket.
. move the valve from the bracket.
For clarity, the two bottom photos show the removal of the valve on a dismantled bracket.
Using a slotted screwdriver, press out the tongue of the bracket.
We install the solenoid valve for purge the adsorber in the reverse order.
Video
Source
Removal
Disconnect the wires from the battery and remove the horn cover trim. Unscrew the steering wheel nut, remove the steering wheel, and then both halves of the steering shaft casing.
Note. If it is necessary to remove only the steering gear housing, unscrew the bolt securing the lower cardan joint of the intermediate shaft to the worm shaft and the bolts securing the housing to the body side member.
Remove the instrument panel and disconnect the plug blocks of the three-lever switch from the plug blocks of the wire harness.
Disconnect the wires from the ignition switch terminals and, by unscrewing the fastening screws and pushing in the lock latch, remove the ignition switch. Loosen the clamp securing the housing of the turn signal switch, headlights and windshield wiper and remove it.
Unscrew the bolt securing the lower universal joint fork of the intermediate shaft to the steering gear worm shaft.
Unscrew the bolts securing bracket 6 (Fig. 5-3) and remove the steering shaft with the bracket.
Rice. 5-3. Steering parts:
1 — steering gear housing; 2 - shaft seal; 3 - intermediate shaft; 4 - upper shaft; 5 — fixing plate of the front part of the bracket; 6 — bracket; 7 - upper part of the facing casing; 8 — bearing sleeve; 9 — needle bearing; 10 — steering wheel; 11 — lower part of the facing casing; 12 — mounting parts for the steering shaft bracket.
Unscrew the nuts securing the ball pins of the side and middle links to the bipod, and then use a puller A.47035 to press the ball pins out of the holes of the bipod.
Remove the steering gear housing by first unscrewing the bolts securing it to the body side member. Remove the steering shaft seal from the hole in the front panel.
Adsorber and adsorber purge valve (KPA); errors 0441, 0443, 1410, 1425, 1426
Name: Anton Reg.: 04/11/2008 Messages: 844 From: Moscow was, now Ryazan region. Pitelino Age: 49 Car: Niva 21214 2007
Reg.: 07/16/2013 Messages: 53 From: Russia Tyumen Age: 44 Car: Niva engineer, 21214 2003
Reg.: 01/08/2005 Topics / Messages: 3 / 1363 From: Krasnodar Age: 43 Car: VAZ-2131 Louse ME17.9.7, 2022; VAZ-21214 2008, LICE 7.9.7.Prestige 12V214. T-MAX
Nope. Not this way. The adsorber bucket always has a connection with the atmosphere. This spout is covered with a lid and few people know about it. Its diagram is like this.
Sorry, the picture is from an enemy forum. Whether the valve works or not, the pressure from the tank will be released into the atmosphere through the coal. The stench is adsorbed by the coal, and the air escapes into the spout under the cap. It’s just that if the valve is not working, the adsorber will not be purged, the coal will be filled with gasoline vapors and will soon begin to stink.
The plug that prevents pressure from being released from the tank is located between the tank and the adsorber. Some valve was installed upside down or it was stuck. It's lucky that it didn't stick in the other direction. Then, when gasoline was produced, the tank would not fill with air and it would flatten something like this
UPD> By the way, I just thought about it. Didn't you dip your car in kaki on your eyebrows? I have seen several cases when a clay solution with frogs and moss was poured into an adsorber, where it dried out and the connection between the tank and the atmosphere was naturally lost.
Reg.: 07/16/2013 Messages: 53 From: Russia Tyumen Age: 44 Car: Niva engineer, 21214 2003
I’ll ask some more questions, soon I’ll get to civilization and start troubleshooting..
I found it on the Internet, I have an extremely similar situation. https://www.drive2.ru/l/8023108/
Reg.: 01/08/2005 Topics / Messages: 3 / 1363 From: Krasnodar Age: 43 Car: VAZ-2131 Louse ME17.9.7, 2022; VAZ-21214 2008, LICE 7.9.7.Prestige 12V214. T-MAX
Almost so. Only if the CPA is closed will the excess pressure go into the atmosphere. This excess doesn’t care whether you have a CPA or not. But if your adsorber or middle pipe is clogged, then the vapors have nowhere to go. That's why I asked about drowning.
The problem with XX is generally more often related to the firmware, the condition of the spark plugs/coils and the presence of air leaks after the mass air flow sensor. The CPA will be the last to influence there.
How to check the adsorber
Many car owners may be interested in the question of how to check the adsorber and its purge valve when the diagnostics showed it to be faulty (an absorber error popped up). It is quite possible to make such a diagnosis in a garage, however, for this it will be necessary to dismantle either the entire adsorber or just its valve. And to carry out such a test, you will need metalworking tools, a multifunctional multimeter (to measure the insulation value and the “continuity” of the wires), a pump, and a 12 V power source (or a similar battery).
What is an adsorber for?
Before moving on to the question of how to check the operation of the adsorber, let us briefly describe the operation of the gasoline vapor recovery system (in English called Evaporative Emission Control - EVAP). This will give a clearer picture of the functions of both the adsorber and its valve. So, as the name implies, the EVAP system is designed to capture gasoline vapors and prevent them from entering the surrounding air unburned. Vapors are formed in the fuel tank when gasoline is heated (most often during long-term parking under the scorching sun in the warm season) or when atmospheric pressure decreases (very rarely). The task of the fuel vapor recovery system is to return these same vapors to the engine intake manifold and burn them along with the air-fuel mixture. As a rule, such a system is installed on all modern gasoline engines in accordance with the Euro-3 environmental standard (adopted by the European Union in 1999).
The EVAP system consists of the following elements:
There are also additional wiring harnesses leading from the electronic engine control unit (ECU) to the said valve. With their help, this device is controlled. As for the adsorber, it has three external connections:
The adsorber is a kind of barrel (or similar vessel) that is filled with ground coal, in which gasoline vapors actually condense, after which they are sent to the car's power system as a result of purging. Long and proper operation of the adsorber is possible only with its regular and sufficient ventilation. Accordingly, checking the car adsorber is to check its integrity (since the body may rust) and the ability to condense gasoline vapors. Even older adsorbers pass the carbon contained in them through their system, which clogs both the system and their purge valve.
Checking the adsorber valve with a multimeter
The solenoid valve for purge the adsorber directly purges the system from gasoline vapors present in it. This is done by opening it upon command from the ECU, that is, the valve is an actuator. It is located in the pipeline between the adsorber and the intake manifold.
As for checking the adsorber valve, firstly, it is checked that it is not clogged with coal dust or other debris that can get into the fuel system when it is depressurized from the outside, as well as with coal from the adsorber. And secondly, its functionality is checked, that is, the ability to open and close on a command coming from the electronic engine control unit. Moreover, not only the presence of the commands themselves is checked, but also their meaning, which is expressed in the time during which the valve must be open or closed.
Interestingly, in engines equipped with a turbocharger, a vacuum is not created in the intake manifold. Therefore, for the system to operate, it is provided with another two-way valve that operates and directs fuel vapor into the intake manifold (if there is no boost pressure) or to the compressor inlet (if there is boost pressure).
Please note that the canister solenoid valve is controlled by an electronic unit based on a large amount of information from temperature sensors, mass air flow, crankshaft position and others. In fact, the algorithms by which the corresponding programs are built are quite complex. It is important to know that the greater the engine air consumption, the longer the duration of the control pulses from the ECU to the valve and the stronger the canister purge.
That is, what is important is not the voltage supplied to the valve (it is standard and equal to the total voltage in the automotive electrical network), but its duration. There is such a thing as “adsorber purge duty cycle”. It is scalar and is measured from 0% to 100%. A zero threshold indicates that there is no purging at all, respectively, 100% means that the adsorber is purged as much as possible at a given time. However, in reality this value is always somewhere in the middle and depends on the operating conditions of the machine.
Also, the concept of duty cycle is interesting because it can be measured using special diagnostic programs on a computer. An example of such software is the Chevrolet Explorer or OpenDiag Mobile programs. The latter is perfect for checking the adsorber of domestic cars VAZ Priora, Kalina and other similar models. Please note that an additional scanner, such as an ELM 327, is required to use the mobile application.
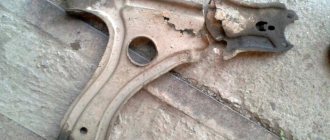
Replacing steering rods (tips) on a VAZ classic (2101-2107)
Published: 1 year ago
Replacing steering rods on a VAZ classic car using the example of the VAZ 2105. The procedure is the same for all classics.
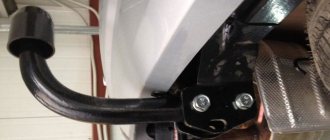
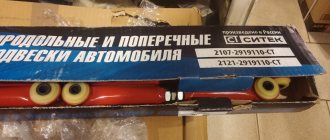
Set of reinforced tie rod couplings for Niva
A set of reinforced steering rod couplings for Niva cars - reinforced through the use of a closed and, accordingly, more rigid threaded connection. Hex key 24mm. At the same time, the closed threaded connection is protected from corrosion and reduces the possibility of backlash in the rod adjustment unit.
The use of this design eliminates damage to the short steering rod (bending, weakening of the coupling) and guarantees the preservation of toe adjustments under the most severe operating conditions.
IMPORTANT! The couplings are designed for two short ends. To adjust the toe it is necessary to disconnect the steering tip from the steering knuckle bipod.
Make: Niva, LADA 4×4, Chevrolet Niva. Body: VAZ-2121, VAZ-21211, VAZ-21212, VAZ-2122, VAZ-21213, VAZ-21214, VAZ-21215-19, VAZ-2131, and their modifications.
1. Reinforced steering rods Niva, LADA 4×4, Chevrolet Niva — 2 pcs., material steel st45 2. Nuts M24 10 mm — 4 pcs., material steel st45 3. Nuts M24 5 mm — 4 pcs., material steel st45
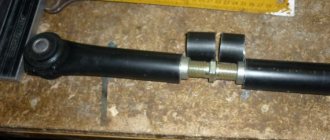
Manufacturing of reinforced steering rods at NIVU
Made reinforced steering rods. The main body is a 24mm hexagon. In the role of tips - short classic steering tips, contrary to expectations, adjusted the toe quickly.
Close-up of the tip. I took the Track-style, it seems to be the most reliable.
New traction compared to old
It is important that when the rods are installed and adjusted, the threads are exposed as small as possible. This is important from the point of view of node reliability
I made 4 lock washers from aluminum.
I couldn’t find the central link Track-style, I took something called Trial, let’s check) It weighs 100g more than the old one, apparently they strengthened something.
Don’t forget to add lubricants, the current manufacturer saves on everything! After the lubricant is pumped in, insert the paste from the gel pen, squeeze the boot and release the air with excess lubricant.
We install it in place.
First, I moved the lower arm as far forward as possible, leaving only one washer behind to increase the castor...
We adjusted the rear axle with a panhard. Using short rods, we adjusted the shank flange parallel to the transfer case flange. The wheel alignment is normal. Everything is in the green zone!
After the camber is completed, we flatten the stopper.
Don’t forget to use solid washers for adjusting the camber! Camber alignments really like to fly out!
Now all that remains is to assemble the interior. The work on the suspension and exterior has been completed for now...
Grease seals in steering rods to increase the service life of Niva steering rods
Now the time has come to change the steering rods, due to the fact that they have served their purpose for a long time. I decided to increase the service life of helmsmen by introducing grease fittings into them. A convenient thing with a syringe of lithol bam, bam and you move on. I bought everything I needed and things went well. 1. Drill a hole with a 5.2 drill
2. Use a slash to cut the thread into 6
3 Screw the grease fittings into the steering rods and use a syringe to pump lithol into the ball joint of the rods
4 We install and receive steering wheels with an extended lifespan.
Source
How to check the adsorber
Now let’s move directly to the algorithm for checking the adsorber (its other name is the fuel vapor accumulator). The main task in this case is to determine how sealed its body is and whether it allows fuel vapors to escape into the atmosphere. So, the check must be performed according to the following algorithm:
It is also necessary to perform a visual inspection of the adsorber. This is especially true for its body, in particular, for rust spots on it. If they occur, then it is advisable to dismantle the adsorber, get rid of the mentioned spots and paint the body. It is imperative to check whether coal from the fuel evaporation accumulator is leaking into the EVAP system pipelines. This can be done by inspecting the condition of the adsorber valve. If it contains the mentioned carbon, then you need to change the foam separator in the adsorber. However, as practice shows, it is still better to replace the adsorber completely than to engage in amateur repairs that do not lead to success in the long term.
How to check the adsorber valve
If after checking it turns out that the adsorber is in more or less working condition, then it makes sense to check its purge solenoid valve. It’s worth mentioning right away that for some machines, due to their design, some actions will differ, some of them will be present or absent, but in general the verification logic will always remain the same. So, to check the adsorber valve, you must perform the following steps:
You can also check the adsorber valve using a multifunctional multimeter, switched to ohmmeter mode - a device for measuring the insulation resistance value of the electromagnetic winding of the valve. The probes of the device must be placed at the coil terminals (the places where the wires coming from the electronic control unit are connected to it; there are various design solutions), and the insulation resistance between them must be checked. For a normal, serviceable valve, this value should be within approximately 10...30 Ohms or differ slightly from this range. If the resistance value is small, it means that there is a breakdown of the electromagnetic coil (short interturn circuit). If the resistance value is very large (calculated in kilo- and even mega-ohms), then the electromagnetic coil breaks. In both cases, the coil, and therefore the valve, will be unsuitable for use. If it is sealed into the housing, then the only way out of the situation will be to completely replace the valve with a new one.
Thus, in order to know how to check whether the adsorber valve is working properly, you need to dismantle it and check it in a garage. The main thing is to know where its electrical contacts are located, and also to perform a mechanical inspection of the device.
Steering
Steering
The Niva uses a worm-type steering gear. It provides reliable vehicle control at any speed and in different road conditions. The worm mechanism is equipped with a globoid type worm (variable shaft diameter) connected to an intermediate shaft and roller. A bipod is installed on the outer part of the roller shaft, which, through rods, activates the rotating mechanism. The rotation of the steering wheel ensures the movement of the bipod through a worm gear; it turns the wheels with rods.
The worm steering mechanism has a low level of sensitivity to shocks and impacts transmitted from the wheels on uneven roads. It has the ability to direct a VAZ vehicle to large turning angles and, accordingly, provides excellent maneuverability of the vehicle. The disadvantage of a worm gear is that it is difficult to manufacture. Worm steering has many connections and therefore requires periodic adjustments and adjustments.
The worm steering mechanism is used on off-road passenger cars with dependent wheel suspension, light trucks and buses. The simplicity of the design has an increased service life and a high degree of maintainability. A slight drawback may seem to be a slightly increased effort on the steering wheel, which occurs for a number of reasons. Having analyzed the design of the steering gear and the loads acting on it, we determine problem areas and ways to solve problems.
Also interesting: Do the valves bend in the field?
The basic steering gearbox is equipped with a worm pair, which during operation causes steering resistance due to friction between the worm and the worm gear. This is the operating principle of a worm gear; therefore, it is not possible to completely get rid of this factor. The solution is to use high-quality lubricant in the gearbox and monitor the condition of the working surfaces.
The steering gearbox has two rolling bearings (worm shaft), two plain bearings on the bipod shaft (also known as the worm wheel shaft). The bearings themselves, in good and lubricated condition, reduce friction of the main parts (and, accordingly, reduce the force on the steering wheel).
In addition, the pendulum arm, which rotates on two plain bearings and ensures the movement of the steering rack, makes its contribution. The use of high-quality lubricant and periodic monitoring of the condition of boots, connections and rods will reduce the possibility of increased force on the steering wheel.
Thirdly, the six steering fingers must provide a high-quality connection, work correctly in the same planes with the system, and ensure the mobility of the steering mechanism.
How to repair the adsorber and valve
It’s worth noting right away that in most cases both the adsorber and the valve cannot be repaired; accordingly, they need to be replaced with similar new units. However, as for the adsorber, in some cases, over time, the foam in its body rots, which is why the carbon contained in it clogs the pipelines and the solenoid valve of the EVAP system. Rotting of foam rubber occurs for banal reasons - from old age, constant temperature changes, exposure to moisture. You can try to replace the foam separator of the adsorber. However, this cannot be done with all units; some of them are non-separable.
If the adsorber body is rusted or rotten (usually also due to old age, temperature changes, constant exposure to moisture), then you can try to restore it, but it is better not to tempt fate and replace it with a new one.
Checking the valve using a homemade tester
Similar reasoning is valid for the solenoid valve of the gasoline vapor recovery system. Most of these units are non-separable. That is, the electromagnetic coil is sealed into its body, and if it fails (insulation breakdown or winding break), it will not be possible to replace it with a new one. Same with the return spring. If it has weakened over time, you can try to replace it with a new one, but this is not always possible. But despite this, it is still better to perform a detailed diagnosis of the adsorber and its valve in order to avoid expensive purchases and repairs.
Some car owners do not want to pay attention to the repair and restoration of the gasoline vapor recovery system, and simply “turn off” it. However, this approach is not rational. Firstly, this really affects the environment, and this is especially noticeable in large cities, which are not known for their clean environment anyway. Secondly, if the EVAP system does not work correctly or does not function at all, then under pressure gasoline vapors will periodically escape from under the gas tank cap. And this will happen as often as the temperature in the gas tank increases. This situation is dangerous for several reasons.
Firstly, the tightness of the tank cap is broken, the seal of which is broken over time, and the car owner will probably have to periodically buy a new cap. Secondly, gasoline vapors not only have an unpleasant odor, but are also harmful to the human body. And this is dangerous provided that the car is parked in an enclosed area with poor ventilation. And thirdly, fuel vapors are simply explosive, and if they come out of the gas tank while there is a source of open fire next to the car, a fire hazard will arise with very dire consequences. Therefore, there is no need to “turn off” the fuel vapor recovery system; instead, it is better to keep it in working order and monitor the adsorber and its valve.
Conclusion
Checking the adsorber, as well as its electromagnetic purge valve, is not very difficult even for novice car owners. The main thing is to know where these components are located in a particular car, as well as how they are connected. As practice shows, if one or the other unit fails, they cannot be repaired, so they need to be replaced with new ones. As for the opinion that the fuel vapor recovery system needs to be turned off, it can be attributed to misconceptions. The EVAP system must work normally and ensure not only environmental friendliness, but also safe operation of the vehicle in various conditions.
Source
Adsorber… — Chevrolet Niva, 1.7 l., 2005 on DRIVE2
One miserable day, once again digging around in the garage, refining and polishing my auger, I decided to remove the adsorber from the tank ventilation system... idiot... But the fact is that hood to hood there was an auger already with the adsorber removed and happily living without it third year (although she is 2009, and mine is 2005). The place has become free and it doesn’t seem to affect the work. I checked all the valves in the system. Everyone is working. I took off this hellish devourer of the engine compartment and thought about hanging a second fire extinguisher there in the future (one was not enough to burn on the 213th field - I really didn’t like it). The hose was screwed onto the tube after the adsorber. And put the sensor in a secluded place with a clamp so that it doesn’t interfere) In general, I did it exactly like on the neighboring shniva. Well, I changed the fuel filter a bunch. Started it and stalled. I think there is air in the system. I arrived home, drowned out some strange sounds gurgling from under the back seat. I rode for a couple or three days. The engine runs rough and stalls periodically. I think I'll put it back, maybe it will work. Put. It's gone. All these days it was cool and I drove with the windows closed. And then the heat hit over 30, I opened the windows and was shocked by the smell of gasoline in the cabin. When you close the windows it doesn’t smell, when you open it it smells... I think either miracles, or I messed up somewhere, or it’s just a Russian car and it’s normal for it to break down every day). I came home, googled it and went crazy. Many people have had the same bullshit and the tank burst! I think I should go take a look. I took off the saddles and opened it, which means this Pandora’s box with the tank... and there...
Full size
Full size
Full size
Full size
Full size
They ahhhhhhhhhhhh dad. Like, it’s a good thing I don’t smoke, otherwise God forbid I would get fucked up. Took it off and took a closer look
Full size
and it turned out that the seams were all intact, but the soldering had burst (not even welding!.. oh AVTOVAZ((( ) on the filler neck and on the return line. They soldered
Full size
Full size
Yes, they put it back, something to admire. While I'm driving with this tank, everything seems to be fine. True, the volume is only 35-40 liters. A new one costs 7500 here (I will change the money. In general, they say the adsorber is not needed and many people remove it and drive quietly for years, but know that there may be problems)
Issue price: 7,500 ₽
Is it worth turning off the adsorber, pros and cons, possible consequences
Before turning off the adsorber in a car, it is important to understand how much this will affect the performance of the vehicle, including environmental ones, as well as driving safety.
In the article we will analyze the purpose and operating principle of the adsorber, where it is established, when it needs to be changed and whether it is possible to turn it off and drive without the device, how to properly remove it on a VAZ 2110, 2112, 2114, Lada Priora, Grant, Largus, Gazelle and whether it is necessary to flash the ECU after shutdown devices.
Purpose and principle of operation
Adsorber - is a container filled with activated carbon, which acts as a filter element. This element is the main part of EVAP - Evaporative Emission Control (gasoline vapor recovery system).
The system has been integrated into the fuel system of cars with Euro-2 standards and higher. Those. you won’t see an adsorber on a VAZ classic or even a 2108 model, not to mention Moskvich, Volga 3110, etc.
The goal is to reduce harmful emissions into the atmosphere and eliminate gasoline odors in the car interior.
But despite the simplicity of the design, in addition to the housing and the filter element, the adsorber consists of:
Fuel vapors accumulating in the gas tank must go somewhere. In old cars they escaped into the atmosphere through a special tube. In modern vehicles, fuel tanks are isolated from the external environment.
Gasoline vapor, through a separate outlet pipe, enters the adsorber and condenses there in the form of fuel, which is returned back to the tank or to the intake manifold. In the first case, the process occurs with the engine turned off, in the second - with the engine running.
As soon as the car starts, the ECU sends a signal to the solenoid valve. The latter opens and the activated carbon (sorbent) is purged. Fuel vapors are “extracted” from the sorbent and immediately enter a special receiver and then into the combustion chamber.
To find out more about what an adsorber is, follow the link.
Secrets of the mechanism
In addition, the force is affected by the ball joints and their condition. The VAZ 2121 has four supports, and damage or breakage of even one will lead to poor performance of the entire steering mechanism. Periodic monitoring of the condition of the boots, timely routine replacement of ball boots, and the use of high-quality spare parts have a positive effect on both the reduction of steering effort and the handling of the Niva 2121 as a whole. When replacing new ball joints, it is necessary to check the amount of lubrication and the integrity of the boot, since the leakage of the cap significantly reduces the service life of the unit and causes an increase in friction.
A significant influence is exerted by the two front wheels, which rub against the road surface when cornering. The laws of physics and the principles of driving a vehicle cannot eliminate this factor.
In all main mechanisms, the rubbing surfaces are metal (ground, polished, chrome-plated), the quality of their processing and the presence of lubrication are fundamental.
In the VAZ steering gearbox, the bipod shaft is equipped with two supports with bronze bushings, the friction between the shaft and the body is increased. Bronze bushings (sliding bearings), due to the fact that the friction coefficient in the steel-bronze pair is quite low. But it is still insufficient to achieve minimal resistance, so great importance is attached to the presence of a sufficient amount of grease in the steering gearbox. On the other hand, it is possible to use needle roller bearings instead of bronze bushings.
Where is it installed?
As a rule, the adsorber is installed under the hood on the right in the direction of travel of the car, for example, in the VAZ 2110 it is in the form of a barrel.
In other cars, it can be square and installed to the left of the engine (in the direction of travel), under the air duct (Lada Granta), the vacuum brake booster (some Nissan models) or in the radiator area. For VAZ 2114 it is located near the battery and air filter.
On the Volkswagen Passat B3, the adsorber is located under the air filter on the right side in the direction of travel.
Other vehicles - see your model's owner's manual.
Why do they refuse the adsorber?
Despite the advantages of this design solution, and these are: fuel economy, absence of odor in the cabin, reduction of harmful emissions into the atmosphere (although many do not care about this), the adsorber has a number of significant drawbacks, due to which many seek to disable it or completely remove it.
Disadvantages, they are also signs of malfunction:
Therefore, when a product fails, many people turn it off and remove it, or take a more complicated path - they open the case and replace the old activated carbon with a new one.
Lubrication
Experienced users often change the lubricant, even in the absence of breakdowns, for the following reasons:
- The standard blue padding is too thick;
- Possible decrease in plasticity in winter;
- it accumulates near the lid and minimally reaches the friction pairs.
Standard gearbox lubrication
Graphite grease with Motul 4100 10W40
Some cars, for example, VAZ 21213 Niva, use transmission oil, as indicated in the official manufacturer's manual for the service station. To do this, the upper crankcase cover has a hole protected by a threaded plug; oil can be added without disassembling the gearbox.
VAZ 21213 gearbox with lubrication hole
How to disable or remove the adsorber on a car and do you need to reflash the ECU?
You need to understand that when the adsorber is removed, the solenoid valve is turned off, which is directly connected to the controller and controlled by the latter.
This will lead to error p0443, which we already mentioned above. The tubes are also silenced, in particular the one that goes to the intake manifold.
What is the disadvantage of such a shutdown?
The fact is that through the tube that goes to the intake manifold, air is constantly sucked in; even in idle mode, the so-called small purge of the adsorber occurs. At high speeds from 1500 – 2000 and above there is a lot of purging.
In the ECU firmware, constant air leaks and the flow of fuel vapor are taken into account when forming the air-fuel mixture, despite the fact that all this goes past the mass air flow sensor, the causes of the malfunction of which can be found out by clicking on the link.
If you plug the pipe, which many people do, a certain amount of air will not flow into the intake manifold bypassing the ECU, but the latter still takes them into account.
That is, the controller takes into account one volume of air, but another (smaller) one actually enters. As a result, the amount of fuel is generated by the ECU based on more air than is supplied. This leads to an over-enrichment of the air-fuel mixture.
As a result, the engine does not work correctly, because the mixture is constantly over-enriched where it is and is not needed, and fuel consumption increases.
It is also worth talking about the transient mode of operation of the engine, which can manifest itself when approaching an intersection, a traffic light, lying to a policeman, at the moment when the gas is released.
At this moment, a failure may occur - a decrease in speed below idle. The engine seems to choke, it doesn’t have enough air, the reason is an over-enriched mixture. After a few seconds, the situation is resolved electronically.
Therefore, it would be correct to disable the adsorber in the following ways:
How to disable the adsorber on a VAZ 2110, 2112, 2114
Taking into account the recommendations above, we do the following:
With this scheme, when the valve opens, clean air enters the system, albeit without gasoline vapors.
We exclude the valve
This method is even simpler. We dismantle everything, including the valve. We put a fuel filter on the pipe coming from the gas tank, and we plug the pipe going to the intake manifold with a bolt and clamp.
The consequences of this method are described above, but this method also has the right to life.
As for Priora, Granta, Lada Largus, Gazelle and other cars, the absorber is turned off in similar ways as described above.
Toyota Chaser
It is worth considering one of the foreign cars, for example, the Toyota Chaser.
The shutdown principle is similar to the previous ones:
Fuel vapor recovery system for an injection engine on Niva
The fuel vapor recovery system of the VAZ-21214 injection engine on the Lada 4x4 car prevents the release of fuel vapors from the power system into the atmosphere, which adversely affect the environment. The system uses the method of vapor absorption by a carbon adsorber. It is installed in the engine compartment and connected by pipelines to the fuel tank and purge valve.
Fuel vapor recovery system for the VAZ-21214 injection engine on the Lada 4x4, design and principle of operation.
The fuel vapor recovery system used in the fuel supply system of the VAZ-21214 injection engine includes:
— Separator. - Adsorber. — Electromagnetic valve for purge the adsorber. — Connecting tubes and hoses.
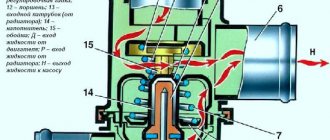
Diagram of the fuel vapor recovery system of the VAZ-21214 injection engine on a Lada 4x4 car.
The principle of operation of the fuel vapor recovery system of the VAZ-21214 injection engine on the Lada 4x4.
Fuel vapor from the tank enters the separator through a hose. The separator, made in the form of a stamped metal tank with two threaded rods, is secured with nuts in the side niche of the right rear part of the body. The separator is connected by hoses and pipelines to the adsorber in the engine compartment.
There is a gravity valve in the line for removing fuel vapors from the separator, which prevents fuel from leaking out of the tank when the vehicle rolls over. Fuel vapor from the tank partially condenses in the separator. The condensate is drained back into the tank.
From the separator, fuel vapors enter the adsorber (a container with activated carbon) located in the engine compartment. In the adsorber, fuel vapors are absorbed by activated carbon. The second fitting of the adsorber is connected by a hose through the solenoid valve for purge the adsorber with the receiver of the intake pipeline, and the third is connected to the atmosphere.
When the engine is stopped, the purge solenoid valve is closed. And in this case, the adsorber does not communicate with the receiver. The controller, by controlling the solenoid valve, purges the adsorber after the engine has operated for a specified period of time. Since the transition to closed-loop fuel control mode.
The valve connects the adsorber cavity with the receiver, and the sorbent is purged. Gasoline vapors are mixed with air and discharged through the receiver into the intake pipe and then into the engine cylinders. The greater the engine's air consumption, the longer the duration of the controller's control pulses and the more intense the purge.
Malfunctions of the fuel vapor recovery system entail:
— Idle speed instability. - Stop the engine. — Increased toxicity of exhaust gases. — Deterioration in driving performance of the vehicle.
Similar articles:
- Exhaust system of VAZ-21213 and VAZ-21214 engines on Lada Niva and Lada 4x4, device, design, principle of operation, diagrams, names and catalog numbers of parts.
- Rear suspension structure of VAZ-21213 Lada Niva and VAZ-21214 Lada 4x4, design, rods, springs, shock absorbers, condition check.
- Clutch device for VAZ-21213 Lada Niva and VAZ-21214 Lada 4x4, design, pressure and driven disks, master and slave cylinder, clutch drive.
- Electrical diagrams of VAZ-21213 Lada Niva and VAZ-21214 Lada 4x4, electrical diagrams of the front and rear wiring harness, and instrument panel wiring harness.
- Fuel supply system for the VAZ-21214 injection engine on the Lada 4x4, device, design, principle of operation, diagrams, names and catalog numbers of parts.
- Adjusting the clearances in the valve drive of the VAZ-21213 carburetor engine on the Lada Niva, names, catalog numbers and applicability of drive parts.