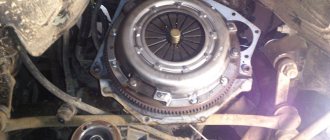
Why do they replace hydraulic compensators with bolts on a Chevrolet Niva?
By replacing the adjusting supports in the Chevrolet Niva engine with hydraulic compensators, the engineers hoped to eliminate all the problems with adjusting the thermal clearances of the valves and reduce the noise level ; in fact, it did not work out as desired. The quality of hydraulic compensators is so unstable that out of a dozen parts, only one or two can work tolerably and according to the parameters. Naturally, this affects the operation of the engine - constant knocking under the valve cover, the engine trembles, constant failures and difficult starting.
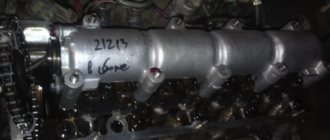
Hydraulic compensator and adjusting bolt.
And that's not so bad. An inaccurately executed hydraulic compensator can bite and prevent the valve from closing in time . If this happens at high speeds, the valve inevitably meets the piston. What this threatens is clear - at least a bent valve, which means loss of compression and misfires. The controller immediately sees the malfunction and simply turns off the injector to save the catalyst. The engine stalls, seemingly for no apparent reason. Even in those engines where there are grooves in the piston bottom and the meeting of the valve with the cylinder is theoretically impossible, the valve does not close completely, its edges burn over time and the story with compression repeats itself.
Video about the difference between engine operation on hydraulic compensators and bolts
Why do Chevrolet Niva valves knock?
On regular “Classic” VAZ engines, rockers are installed in the gas distribution mechanism, and the valve clearances are adjusted with screws. On VAZ-2123 engines, instead of screws, hydraulic compensators are installed - they are made in the form of the same adjusting screws, but excess gaps in the hydraulic device are removed due to a plunger pair operating under oil pressure. The hydraulic compensator on the Shevinivsky engine is designed very simply, and consists of four parts: • the body itself; • return spring; • the lower and upper parts of the plunger pair (check valve with piston and the plunger itself). Valve knocking in the Chevrolet Niva timing belt can occur for several reasons:
• there is insufficient oil pressure in the system; • the engine oil is dirty, the oil channels are clogged; • insufficient oil level in the lubrication system; • the seat for the compensator is worn out; • the parts themselves are of low quality and therefore require replacement. Often the hydraulic compensators (HC) of the Chevy Niva knock only when cold, and after 30-40 seconds the knock disappears. The reason for this phenomenon is the supply of oil pressure to the hydraulics with a slight delay. To get rid of this problem, you can try replacing the oil and oil filter. When the valves knock “hot” - this is worse, you need to remove the camshaft from the main body and clean the channels. If flushing does not help, the hydraulic compensators need to be replaced.
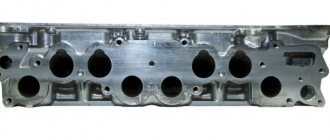
Chevrolet Niva hydraulic compensator
Valve knock can be different, and it does not always occur due to the fault of the “hydrics”; it can be caused by:
• worn camshaft cams; • worn rocker surfaces; • wear of the end of the valve stem itself.
But it often happens the other way around - due to hydraulic compensators, intense wear of the rockers and camshaft occurs.
It is not recommended to drive with valve knocking:
• parts of the gas distribution mechanism fail; • due to large valve clearances, engine power decreases and fuel consumption increases; • listening to such a knock is unpleasant.
Everything you need for replacement
For work you will need the following tools and materials:
• flat and Phillips screwdrivers; • ratchet wrench with extension and set of attachments; • socket wrench (tube) for 10 and 12; • soft wire, wire or plastic clamps; • torque wrench; • valve cover gasket; • clean rag.
What is needed for replacement
The most unpleasant stories happened with hydraulics before July 2008. Then the plant began installing imported compensators, but also changed the head design to accommodate them.
It is not possible to install new compensators in old heads.
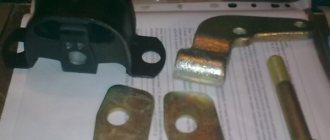
There is only one way out - replacing the hydraulic compensators with the good old classic adjusting bolts, the same as on classic VAZs. So to replace we need this classic set :
- locking plates , 4 pieces, article number 2101-1007078 ;
- eight adjusting bolts with article number 2101-1007075 ;
- nuts and bushings should be included with the bolts ( 2101-1007076 and 2101-1007077 );
- load springs , 8 pieces, article number 2101-1007117 .
Set of adjusting bolts with springs and locking plates.
In addition, you will have to buy the old-style 213 camshaft, article number 21213-1006008 . This shaft has a different form of working cams, which is designed to work with supports. In addition, with it the engine will become a little more responsive. And to adjust the thermal gap you will need a 0.15 mm feeler gauge . The tools that will come in handy are the emergency kit and nothing else.
About the design of gas distribution mechanisms
In a simple case, the compensator is an extension of the valve heel. More precisely, the hydraulic compensator is mounted on the valve and transmits the force received from the cam. This diagram is clearly shown in the figure:
Here the compensator comes into contact with the cam
What is considered is one of the options. But there is another one, when the cam presses on the rocker arm. The rocker itself is pushed up by two different elements. On one side it will be a valve, on the other - a hydraulic compensator. The first of them moves, the second remains at the same level:
The compensator presses on the rocker from below
If the compensator is faulty, a gap will appear between the cam and the rocker arm.
Previously, the timing design used a single camshaft (SOHC), and the force to the valve heels was transmitted through a lever. In order to eliminate the gap, the lever was equipped with an adjusting screw 5. It was fixed with a lock nut 6:
Timing diagram with lever rocker arms
The mechanism discussed above can be equipped with hydraulic compensators. Their device is shown in Figure “b”:
Schemes “a” and “c” correspond to the first and second cases. There shouldn't be any questions here.
Note that hydraulic compensators are not used in the design of the 4A-FE and 5A-FE (Toyota) engines. They are available in motors of the following series: 2S, 1NR, ZR, TR, 5M.
Flushing
Using new oil will not always help eliminate knocking. This is due to how severe the fault was. In this case, it is necessary to identify the faulty element and dismantle it for subsequent washing in gasoline. Often, due to the use of bad oil, gradual contamination of the compensator occurs. The removed compensators are mounted back into place in the order in which they were dismantled. It is worth noting that washing the elements is a rather complex process that will require special skills from the car owner.
The knock can be eliminated in the following way:
- Rotate the crankshaft until the valve corresponding to the faulty element opens.
- Then you need to turn the valve at an angle to restore the correct installation of the part.
- After this, you should start the engine and check for sound.
This method is applicable if the hydraulic compensators on a Grant car are knocking when cold. If the cause is not eliminated and the sound is still observed, a complete replacement of the part is required.
It is worth remembering that, due to the design of modern cars of domestic production, in all models of the latest generations, when starting the engine, a short-term knocking of the hydraulic compensators is observed. There is nothing wrong with this, and it is not always possible to eliminate such a malfunction even as a result of repairs in a specialized center or after a complete replacement of the part.
System health check
After all the parts have already been installed, clean the valve cover from dirt, dust and oil drips . Using a small brush, remove the remaining sealant and old gasket from both surfaces of the base; this can also be done with the back of a penknife. We apply sealant to the perimeter of the supporting cover and install the purchased gasket, making sure that it does not extend beyond the edges of the upholstery. We apply exactly the same layer on the opposite surface and fix it with light pressure. If you still have questions about repairs, you can watch a video on replacing hydraulic compensators in two parts.
Video: How to change hydraulic compensators on a Chevrolet Niva with your own hands
Now, when driving, the knocking in the car should completely stop, but if this does not happen and you hear an annoying sound, then you should contact the nearest car service center for a full diagnosis and subsequent repairs.
Installation
Several times they sent me links from forums about the fact that they installed German hydraulic compensators, but it became little better than it was. The issue is not with the INA hydraulic compensators, but with the cups. If you look at how the hydraulic compensators are installed in the cylinder head, you will see that the vector of application of force by the camshaft cam goes vertically, and the hydraulic valves and cups are at an angle to the vertical. The cups are traditionally made from shit of poor “half-baked” material, so after a while (50-70 thousand km) an elliptical groove begins to appear, along which the oil pressure required for the hydraulics begins to disappear. Therefore, if you want to update the system and install German hydraulic compensators, install new glasses.
A series of articles devoted to hydraulic compensators and bolts:
Part 1. Hydraulic compensators, review article
As promised, I describe my method of installing and pumping hydraulics with pictures.
The design of the VAZ21214 hydraulic compensator is shown in the picture (drawn schematically).
First of all, remove the covers that secure the plunger (they are made of tin and can be pryed off with a screwdriver); the functionality of this cover is purely for transport.
We disassemble the hydraulic compensator (partial disassembly) according to the first figure. By the way, if you did not wash the hydraulics with partial disassembly, I recommend doing a complete disassembly, i.e. disassemble the check valve, the valve plate is pryed off with a knife, be careful not to lose the small spring (not shown in the diagram, located between the plate and the ball, it springs the ball). We wash all parts thoroughly in gasoline. Dry and collect. Place it in a clean container (I recommend marking the location of the hydraulic compensators). Accordingly, we wash and dry (blow out) the wells of the hydraulic supports and the oil supply ramp (it is disassembled).
We check the functionality of the hydraulic compensators. Hydraulics are dry and assembled. We hold the hydraulic fluid in the palm of our hand and press the plunger with our thumb. The hydraulic fluid should shrink and return to its original position without jamming.
Before installation, the hydraulic compensators are a) washed b) dry c) plunger covers are removed d) checked.
Let's start the installation.
To work you will need a) a torque wrench b) a 24mm socket c) an awl d) tweezers or a slotted screwdriver e) a medical syringe 5 ml or more f) clean motor oil
Operating procedure:
1) Checking the hydraulic mount. We squeeze the assembled and dry hydraulic mount with the force of a strong finger, it should be compressed and return without jamming. 2) install the oil supply ramp, screw in the dry hydraulic mounts by hand 3) tighten all the hydraulic mounts (while they are dry) with a torque of 22 N per m
We check that when you press the hydraulic mount, it is pressed to the end, returns to its original position and does not jam. If it jams, then the following options are possible: a) reduce the moment to 18 N per mb) swap the hydraulic mount with the neighboring one c) replace it with a new one. Please note that all hydraulic mounts must be tightened with the SAME torque.4) Fill each hydraulic support with oil in ordera) pull out the plunger, put it aside in a clean place (for example, an empty small box). b) use tweezers (or a slotted screwdriver) to remove the piston with a ball valve, if it comes with the piston and spring, unhook the spring and lower it back into the hydraulic support housing. We put the piston in the same place as the plunger) We fill the syringe (I use 5 ml) with motor oil, fill the oil with the syringe into the hydraulic support body to the brim. d) lubricate the piston with oil, fill it with oil d) insert the piston into the body, pressing the valve ball with an awl
We push the awl all the way until the piston plunges in and you feel that the spring has compressed (you can hold it in this position for another 2-3 seconds). f) add oil in the housing to the level (to the edges) g) fill the plunger with oil and insert it into housing) check the hydraulic mount, it should not shrink. After you have assembled all the hydraulic mounts in the described way, put the engine in working condition by installing the CV, sprocket, chain, tensioner, etc., connecting the missing pipes and wires. Feel free to start it and you will be pleasantly surprised by the sound of your engine. S.: So that no more questions arise. IT IS NOT NECESSARY TO SETTLE THE HYDRIKS AFTER ASSEMBLY!
How to test hydraulic compensators and determine the nature of the malfunction?
Having studied the above information, of course, questions may arise about how to determine which hydraulic compensator is knocking, how to diagnose the type of failure, and how to pump hydraulic compensators. To determine the nature of the breakdown, you should perform the following steps, and then draw conclusions.
- When, when starting the engine, an increased level of noise immediately appears, and after five to six seconds it disappears, then there is nothing to worry about. The compensators are in good condition, and the cause of the noise is oil leaking from them. Then the oil is pumped up and the noise disappears.
- Check for noise at idle speed of the car engine. If the noise is intermittent and disappears completely when the noise increases, then a malfunction has occurred. It can be caused by leaky closure of the valve, as well as by the occurrence of blockage or carbon deposits in the area of the plunger pair.
- If the engine is well warmed up and there is continuous noise at idle, then the reason is an increase in the gap resulting from abrasive wear of the hydraulic compensator. Basically, this happens, as mentioned above, due to the use of low quality oil.
- This option is also possible - noise appears at high speeds and disappears at low speeds. In this case, this happens due to the fact that the oil foams.
- If the appearance of characteristic noise does not depend on the number of revolutions, then the malfunction is more difficult to determine, since it can be caused by any of the reasons. It's better to contact specialists.
- There are times when noise can be heard at idle, which increases with increasing rpm up to 2000 rpm, no more. Here, the occurrence of noise is not related to the operation of compensators.
So, if the reason for the incorrect operation of the hydraulic compensator is the appearance of carbon deposits or blockages, then you need to clean the yoke. To do this, it is necessary to dismantle it, and then, after cleaning, the hydraulic compensator is installed in place and tested.
If the device is worn out (after long runs or due to bad oil), then there is only one way out - replacing the hydraulic compensator with a new one.
If you want to learn how to replace hydraulic compensators, you can consult with specialists or watch the corresponding video on the Internet.
It is always worth remembering the important role the oil quality plays for the operation of the hydraulic compensator. Professionals also recommend changing the oil a little earlier than scheduled. For example, if the oil is supposed to be changed after 12 thousand km, then do it after 10 thousand km.
In the case when noise appears when the speed increases and disappears when the speed decreases, a conclusion is usually made about foaming of the oil in the car. Here, the cause of the malfunction is usually determined as follows:
- Check the existing oil level when the engine is cold.
- If necessary, add oil or drain excess.
- Then you need to start the engine, while gradually increasing the speed.
- If the same noise effect occurs again, this indicates air has entered the lubrication system. This means that the parts are damaged. In this case, it is better to contact a car service specialist.