The fact that the wheels on a Chevrolet Niva rotate smoothly is determined by the presence of bearings in the hubs. They can stand on both the front and rear wheels. Bearings are designed to reduce friction.
If such bearings fail, the wheel warps and the rubber begins to wear unevenly and quickly . If the bearing is damaged while the car is moving, the wheel will simply lock and stop rotating. For this reason, it is important to pay timely attention to bearings, especially on the Chevrolet Niva, since the car is an SUV and therefore experiences heavy loads on the chassis.
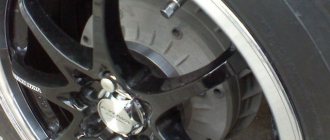
Front hub design on Niva Chevrolet
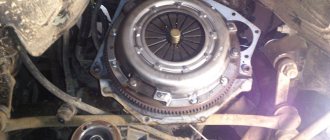
The hub on a car is the element that connects the wheel and the drive shaft. It has two bearings, which reduce the friction force when rotating on the shaft.
Diagram of hub assembly.
A special feature of the hub is that the play gap can be adjusted.
This gap may increase over time and due to wear and tear of parts. In this case, the wheels begin to vibrate on the axles, which is the cause of premature tire wear . To correct the situation, the wheel bearings should be changed in a timely manner.
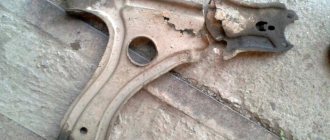
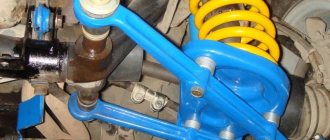
Hub assembly on steering knuckle
When is it necessary to change a wheel bearing?
With such lifting, the load on the wheel bearings will be increased.
There are two reasons that may indicate that the bearings need to be changed . This:
- Increased wheel play and knocking in the hub area.
- Grinding or humming noise in the hub area.
To more accurately determine the breakdown, you should disassemble the mechanism and inspect it.
Replacement process - step by step
The steps to replace the front bearing, after removing the nut, can be divided into 4 stages: 1
) Removing and disconnecting the steering knuckle and brake drum along with the hinges, from the strut and CV joint.
2
) Pressing out old parts.
3
) Pressing in new wheel bearings (two of them for each wheel).
4
) Reassemble the assembly and tighten the nut and adjust the gap.
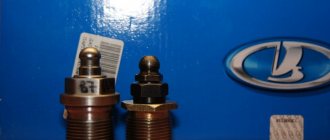
For repairs you will need a standard set of plumbing tools
.
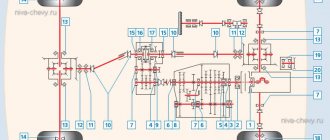
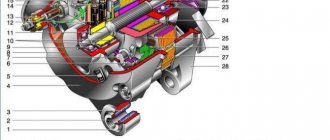
• Pullers for pressing out the ball pin and inner ring of a worn part. • You also need a strong 30mm socket wrench to loosen the nut. • Screwdriver to unscrew the brake caliper. We place the car on a flat surface, engage first gear, remove the handbrake, and put chocks under the wheels. This completes the preparation. Also, before repairing, it is necessary to study the location of the elements of the car's chassis according to the diagram: (pay attention to the steering knuckle - position 27
, bearing - position
9
).
Required set of tools for work:
• Socket wrench with long base;
• Set of sockets and ratchet; • Round nose pliers; • Hammer; • Mandrel or pipe for pressing; • Puller with claws (if possible); • Jack and vice; • Torque wrench to properly tighten the hub nut. The first stage begins with the following actions: 1
. Using a jack, we lift the required side, loosen the hub lock nut in advance, remove the wheel, put it under the side member, 2 more boards and a block on top, and place the car on this stop.
2
. We lift it with a jack by the lower suspension arm, so as to compress the spring as much as possible, put a reliable stand under the lower arm, and you can leave the jack.
3
. We turn the wheel towards the one being replaced, unscrew the caliper bracket, remove the caliper and pads, hang the caliper itself on a wire by the spring, trying not to load the brake hose. We turn the wheel in the direction opposite to the one being changed. Unscrew the ABS sensor (8 bolt).
4
. Undo the cotter pin, unscrew the tie rod ball pin nut, knock out the pin with a puller (or alternatively, unscrew the steering gear bipod from the steering knuckle, but do not touch the tie rod ball pin nut). Unscrew the hub nut head 27. Unscrew 3 bolts 13 fastening the upper and lower ball joints. We do not touch the nuts of the ball pin itself.
5
. That's it: now the entire hub, together with the brake disc, steering knuckle and two ball joints on it, should be removed from the CV joint splines. It is necessary to remove carefully, without distortions. Separate the brake disc from the hub. We remove the caliper protective screen, unscrew it and remove the bipod of the steering mechanism.
6
. We clamp the steering knuckle in a vice. We remove the old oil seals (mount) using any convenient method.
7
. Using a suitable soft metal mandrel, remove the outer races of the old bearings from the hub. We wipe and clean everything. We disassemble the new bearings. We press the outer bearing races into the hub. For pressing, we use the outer races of old bearings or a suitable mandrel. It must be taken into account that new races should be installed with the wide edge inside the hub. We try not to crush the outer narrow edge of the clip when pressing it. Before pressing, you can heat the hub with a blowtorch.
8
. We put grease between the bearings in an amount of 2/3 of the available space. On one side of the hub we install the inner race of the bearing, the ring and press in a new oil seal. We press the new oil seal using the old one. On the other side of the hub we perform the same operation. The hub and knuckle are assembled and ready for installation. Without making significant efforts, we install the steering knuckle with the hub back onto the CV joint splines and tighten the hub nut. We fasten the ball joints and bipod of the steering mechanism. We put the caliper bracket in place, under the 2 bolts of which the caliper protective screen is installed. We bend the antennae of the screen at the edge of the bolts, thereby locking the bolts. We return the caliper and brake pads to their place. Check all connections again. Use a jack to lift the car off the stand and install the wheel. By hitting the wheel at 12 and 18 o'clock alternately or simply turning the wheel, we tighten the hub nut. Adjust the tightening of the hub nut.
Adjusting the wheel bearing NIVA Chevrolet
1
.
After assembling the unit, tighten the locknut to a torque of 19.5 N.*M (or 1.95 kgf.m), turning the hub itself to the sides. 2
.
We loosen it back and tighten it to a torque of 6.8 N*M (or 0.68 kgf.m). 3
.
We check the gap according to the diagram, the limits are from 0.02 to 0.08 mm. 4
. We lock the locknut by bending the edges.
About maintenance-free bearings
A good way to strengthen the suspension is to install non-adjustable double-row wheel roller bearings on the Niva instead of the standard ones. But there is one caveat - such products have a different outer diameter, to solve this problem there are 2 ways: bore the “original” knuckles or buy and install a ready-made kit. A SKF bearing marked IVEKO BTH-1024 C is suitable.
How to choose a bearing?
The conversion is very simple. If you have a familiar turner, all the work can be easily done with your own hands. In addition, you can buy a ready-made set - bearings with boots, hubs and steering knuckles. When choosing, it is important not to make a mistake, since the number of splines on the front hub depends on the year of manufacture of the car - there can be 22 or 24 of them:
- on the series from September 2002 to October 2003 there is a 22-spline hub;
- on other models a set of 24 splines is installed.
Also interesting: Replacing the front brake pads of a Chevrolet Niva
If you don't want to buy a whole set, you can go to a turner and have the hub and steering knuckle bored to new sizes. To do this, you need to buy a bearing, disassemble the assembly, wash the parts in gasoline and take it to a turner for adjustment.
For Chevrolet Niva, you can choose one of the following options for Iveco bearings, depending on the width of the car hub:
- 37 mm - the same hubs are found on some Fiat and Opel models, Moskvich 2141;
- 50 mm – similar parameters on the BMW unit;
- 55 mm - classic dimensions for Chevrolet Niva, no modification of the unit is required;
- 57 mm are the “original” bearings of the axle shafts of the rear axle 2121.
Symptoms of a problem
Bearing wear manifests itself as the following symptoms:
- Vibration of the front wheels, which can be reflected in the steering wheel or felt in the cabin.
- Knocking or crackling sounds in the front of the car when driving;
- Heating of the front wheels in the axle area.
If such manifestations occur, you need to check the condition of the wheel bearings. To do this, jack up the car and rock the wheel in different directions. Play and knocking in the bearing area indicates the need for replacement and adjustment. The malfunction may also manifest itself in the form of noise when the wheel rotates.
1. The hubs get hot. It is important to understand that when braking, the kinetic energy of the car is converted into thermal energy. As a result, the brake discs and the hubs on which they are attached become very hot. Heating of the part during movement, and not during braking, indicates wear of the bearing or its incorrect adjustment.
The second option is typical for adjustable hubs. The adjusting nut must be tightened with a force of 2 kgf*m. If you tighten it further, the tapered bearings will be too tight.
Their rotation will be difficult. Prolonged operation of the machine in this condition leads to bearing failure and wheel jamming.
Also interesting: Refinement of the Chevrolet Niva stove - Auto magazine MyDucato
2. The adjusting nut is unscrewed while moving. Sometimes this happens literally after 20-50 kilometers. The phenomenon is observed in three cases: the master forgot to tighten the nut, there was a misalignment between the bearing races, or play appeared in the coupling of the CV joint with the hub.
Algorithm of actions
Ever since designs with double-row bearings appeared, everything has gone wild. Let's put everything in a row. I know of about 5 different designs, and perhaps only one does not cause serious complaints about its performance. Now a specific algorithm of actions. If you are lucky and your standard unit has traveled more than 20-30 thousand km, the car has a roll and only needed tension adjustment, then you have coaxially bored knuckles. Install good Russian or German bearings and good hubs as needed and ride on, happily ever after
The most important and important thing is that the Niva wheel bearing must have a steel cage. If you are unlucky and the wheel bearings are a “consumable material”, or regardless of replacement, the car does not roll - you have misaligned knuckles and then it is better to think about other designs, since you have nothing to lose
There is an article on the website about the option with a wheel bearing from an IVEKO truck.
Unregulated
As a rule, the Niva has a standard adjustable hub, which requires periodic adjustment. But in order to get rid of this inconvenience, non-adjustable hubs for the Chevrolet Niva were developed, which have such positive qualities as:
- No maintenance required. They don't need to be adjusted
- The bearing in the device does not rotate
- It is filled with special lubricant from the factory, so there is no need to lubricate it.
- Due to the fact that the work occurs thanks to the ball bearing in the unit, friction is reduced
- There is no wear on the seat in the rotary cam
- Not adjustable as it is tightened from the factory
- No need to change the bearing
- Long service life which is equal to 100-120 thousand kilometers
Installation
When the turning work is completed, we begin assembling the unit. Everything is simpler here - no adjustment is required, and the locknut is tightened “from the heart.” There is no need to worry about over-tightening the hub; it is almost impossible.
Stages of work:
- place the steering knuckle on a flat, hard surface;
- install the support washer and, using a head or steel pipe, carefully press the bearing into place;
- install the second support washer, then use the same tools to carefully hammer in the oil seal;
- repeat these works on the opposite side of the steering knuckle;
- put the steering knuckle on the hub and tighten the locknut to a torque of about 200 Nm or with moderate force;
- put on the wheel, rotate it and check the functionality of the bearing;
- We fasten the steering rack and ball joints.
We carry out similar work on the opposite side of the car. After the installation is completed, we go and enjoy - now replacement may be required no earlier than after 100 thousand kilometers, and maybe later. The manufacturer provides the same warranty provided that the installation was carried out correctly.
First changes and Lada 4x4
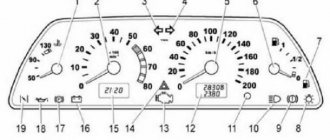
Since the mid-nineties, or more precisely since 1995, changes began to be made to the design of the car. Firstly, if previously the car had a 1.6-liter 4-cylinder 73-horsepower gasoline engine, now the volume has been increased to 1.7. The manual transmission now had five steps instead of the previous four. Secondly, they changed the dashboard, installed more comfortable seats in the cabin, and replaced the taillights with more modern ones in order to externally try to get closer to the Western automobile industry.
In 2006, “Niva” was officially renamed “Lada” 4x4, and models exported were called “Lada Taiga” 4x4 - this is what the car is now called in European countries. Externally and internally, the car has changed, if at all, only slightly: new mirrors have appeared - larger ones, the indicators and instruments on the panel have been changed. The new car model released in 2015 called “Lada 4x4 Urban”, which is considered “luxury”, did not receive any major changes - except for new bumpers, electric windows and air conditioning in the cabin.