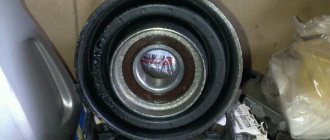
Signs of bearing damage
The primary marker of a problem is a characteristic sound that is difficult to distinguish from the sound of driving on asphalt. Therefore, you need to carefully check the condition of the wheel for characteristic signs:
- heating the wheel from the center without the smell of heated brake pads;
- strong vibrations in the steering column and body from the front wheels;
- pulling the car to the side at high speeds from the direct course;
- heavy steering control off-road;
- a clearly audible crunch when turning the wheel (audible even with the engine turned off, if the car is rolled by hand).
Even one of these signs is a reason to replace the front wheel bearing of Niva 21214. Complete destruction of the element at speed very often provokes the car to roll over. This is due to the short wheelbase of models 21213, 21214 and suspension features.
Without a special stand it is quite possible to diagnose the problem. The wheel hanging on the jack must be taken from both sides and rocked. A broken part will give significant play. Rolling and cracking sounds will also be heard. This is a clear reason for replacing the wheel bearing in Niva 21214 and 21213.
Self-replacement of a damaged element
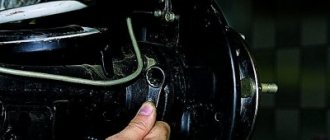
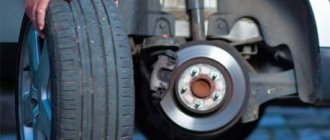
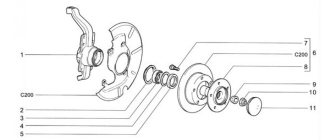
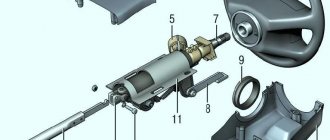
Do-it-yourself hub repair will require an inspection hole or a lift. You need to hang the front of the car to provide full access to the components. Further dismantling after removing the wheel occurs exclusively in strict sequence. Repair diagram for dismantling the front hub of Niva 2121:
- Remove the guide block and caliper. Secure it with something under the bottom of the car so as not to completely dismantle the brake.
- Remove the wheel bearing nut and take out the tapered bushing.
- Using a chisel, bend the locking nut of the front knuckle arm.
- Repeat the procedure on the rear fastener.
- Remove both nuts and the stopper plate (you will need a 19 mm wrench).
- Move the lever away from the knuckle and disconnect the brake hoses.
- Remove the fasteners and the entire fist.
- Disconnect the hub base (brake disc) from the knuckle.
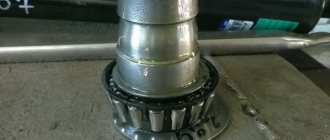
- Pull out the oil seal using a screwdriver.
- Remove the lower ring, the inner sector of the outer bearing and the cage
- Repeat the procedure with the second bearing.
- The outer ring of the second element is removed in a similar way.
Disassembly
To get to the failed seal, you will need to remove from your Chevrolet Niva all the parts that make up the right or left rear hub assembly. Only then will it be possible to remove the axle shaft.
Disassembly is carried out in this order:
- park the car on a level place;
- secure the front wheels with stoppers;
- turn off the handbrake;
- slightly loosen the nuts securing the wheel;
- lift the car with a jack;
- remove the wheel;
- clean the end of the axle shaft, which protrudes slightly beyond the dimensions of the brake disc, from dirt and rust;
- spray it with WD-40;
- unscrew a couple of bolts holding the drum (you need a 12 mm wrench);
- Move the above brake element with light hammer blows.
Please note that there are two main methods used to remove the drum. In the first case, it is squeezed out of place by screwing the above-mentioned bolts into the free holes
In the second, they use the same hammer, but using a stump of a block as a protective pad. Without this preventative measure, it is easy to damage the edge of the brake disc.
After dismantling the drum, it is advisable to once again thoroughly clean its seat from dirt and corrosion - this will make it easier to install it back.
Next, you need to remove the axle shaft. On a Chevrolet it is held in place by four bolts - they also secure the shock absorber in parallel. When the fasteners are unscrewed, the rear axle falls down, as the spring simply squeezes it out. You need to put a support under it, otherwise all the oil will spill out.
To unscrew the bolts securing the axle shaft, a 17 mm wrench is required. Be careful not to drop the spring lock washers into the brake mechanism. If growers remain there, sooner or later they will end up in the space separating the block from the drum, and this leads to a potentially dangerous failure such as a jammed wheel.
Having pulled out the bolts, with a sharp jerk towards yourself, pull out the axle shaft along with the bearing. If the node does not give in, then:
- put the wheel back;
- screw 3 nuts onto the studs;
- wiggle it a little and try to pull it off again.
The surest way is to use an inertial puller, but the vast majority of car owners simply do not have this tool.
Useful video
After assembly, the bearing clearances should be carefully adjusted. Experts recommend replacing it with a two-row modification, if possible. You will have to bore the hub for installation, but the service life of the unit increases significantly. Repairing the front hub of Niva 2121 is quite simple if you follow the diagram.
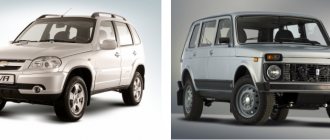
All about the Niva Chevrolet axle bearing
A car from the jeep class has all-wheel drive on all 4 wheels. This mechanism determines the presence of a rear axle
, which is designed to transmit torque from the gearbox to the driving rear wheels.
The rotation of the wheels is ensured by the presence of gears and axle shafts in the bridge. The axle shaft is connected to the wheel and sets it in motion. But why do you need an axle bearing in the axle? Because the topic of the article is called axle bearing
, it will be discussed specifically about it further.
Let's take a closer look at this mechanism in the design of the rear axle , its purpose, design (size, number, etc.), malfunctions and the replacement process.
To consolidate the abilities, a video is posted at the bottom of the material, in which you can visually study the procedure for substitution. Replacement kit for cars with abs
Important Note
And one more important note: after assembling the suspension, the final tightening of the silent blocks should only be carried out with the machine standing on the ground. This is an axiom and cannot be ignored.
Otherwise, silent blocks will last no more than a thousand kilometers
In addition, there is a torque rating for the lower axle nut. For a Niva Chevrolet it is 100–170 N. This is quite a large force and without a long lever it will not be possible to tighten the nut correctly. Good luck with the replacement and as smooth roads as possible!
Otherwise, silent blocks will last no more than a thousand kilometers. In addition, there is a torque rating for the lower axle nut. For a Niva Chevrolet it is 100–170 N. This is quite a large force and without a long lever it will not be possible to tighten the nut correctly. Good luck with the replacement and as smooth roads as possible!
Sources
- https://tuningsport.ru/catalog/pruzhiny-c-94/pruzhiny-zadney-podveski-ss20-vaz-2121-21214-komplekt-2-shtuki-3962/
- https://carfrance.ru/zamena-sajlentblokov-na-niva-chevrolet-vibor/
Purpose of the axle bearing
Bearing
located in the
rear axle
of the Chevrolet Niva, closer to the outer edge.
Like all bearings, it has the function of supporting and smoothing the torque of the rear axle
.
One part of the axle (internal) engages with the gears (has splines), and the second comes out of the bridge, and a flange, brake drums and a Chevrolet Niva wheel are attached to it. To ensure that the axis rotates smoothly and does not move inside the structure, there is a ball bearing
.
The bearing is located in a special socket in the bridge structure, where it performs its direct function. To prevent it from moving inside the bridge, there is a special rigid fixation on the axis, which is a locking sleeve. Thus, it has a double fixation. There is also an oil seal on the axle shaft, which provides a tight connection to the rear axle
.
Important! If the seal is damaged or worn, there is a direct negative impact on the bearing.
, causing the latter to fail. Therefore, it is necessary to replace the oil seal.
See:
With frequent use of the Niva
Chevrolet needs to monitor the condition of the bearing and oil seal, and if they are damaged, replace them immediately.
NIVA CLUB
International Niva Club
- List of forumsAuto - EquipmentTechnical section Lada 4x4 NivaTransmission
- Search
- Links
- Unanswered topics
- Search
- Online store "NIVA SHOP"
Active topics
Removing the axle shaft
- Go to page:
Removing the axle shaft
Post by Magellan » 12 Dec 2009, 03:07
After this, the axle shaft should come out.
Re: Removing the axle shaft
Post by muzolya » Dec 12, 2009, 04:33
Re: Removing the axle shaft
Post by MEW » Dec 12, 2009 12:59 pm
Re: Removing the axle shaft
Post by Himalaev » Dec 12, 2009, 01:17 pm
Re: Removing the axle shaft
Post by Pilot » Dec 12, 2009, 4:18 pm
Re: Removing the axle shaft
Post by ivan1 » Dec 12, 2009, 5:52 pm
Re: Removing the axle shaft
Post by muzolya » Dec 12, 2009, 07:26 pm
Colleague must disagree with you
The machine is old. The last time the axle shaft was removed. Hmmm. For a long time.
But it turned out to be effective. I think it won’t happen once in a while.
Re: Removing the axle shaft
Post by ivan1 » 12 Dec 2009, 20:06
Colleague must disagree with you
The machine is old. The last time the axle shaft was removed. Hmmm. For a long time.
But it turned out to be effective. I think it won’t happen once in a while.
Re: Removing the axle shaft
Post by muzolya » Dec 12, 2009, 8:24 pm
Likewise, the left one came out like clockwork
The car stands on trestles, large, Soviet, strong.
Re: Removing the axle shaft
Post by Pilot » Dec 13, 2009, 00:50
Re: Removing the axle shaft
Post by Vigilant Falcon » Dec 14, 2009, 11:03 pm
Re: Removing the axle shaft
Post by Pilot » Dec 15, 2009, 00:30
Re: Removing the axle shaft
Post by muzolya » Dec 15, 2009, 05:56 pm
Re: Removing the axle shaft
Post by ivan1 » Dec 15, 2009, 10:21 pm
Re: Removing the axle shaft
Post by Serg » 03 Feb 2010, 11:46
hehe, I tried this method - it didn’t help. and put the wheel on the reverse side, and kicked it, and hit it with a sledgehammer, and pulled it through the rope with a sledgehammer - zero weight
The universal tool “sledgehammer” helped, I bent the brake flap and after a couple of blows of the sledgehammer on the flange, the axle shaft very willingly popped out
but before that there was a hellish Kama Sutra for a couple of days on removing the square crap that holds the axle shaft - there was one bolt that just went sour. I had to cut this crap out with a chisel
PS: by the way, I didn’t change the brake flap afterwards, I just bent it back. True, he overdid it a little, he started hooking and hellishly warming up the drum. as a result there is a lot of smoke, a dead drum and pieces of melted silumin from the drum on the shield
I then gnawed it out of there for a loooong time, because the new drum didn’t want to get up.
Re: Removing the axle shaft
Post by longer » Mar 09, 2010, 11:37 am
This is where you need to lift the car and how tall you should be. to fit under the bridge across.
Design
Like many parts, the axle bearing
has its own design, which is characterized by important indicators:
- number;
- internal and external size;
- height.
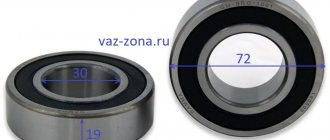
This data is necessary not only so that the bearing can be installed in the seat of the axle shaft and axle, but also so that it performs its intended functions. But it is worth noting that if one of these data is known, then the second need not be calculated. So, for example, a bearing
the axle shaft has catalog number 2121-2403080. If the product number is known, then this is enough to purchase it at a car dealership. Replacement of bearing width 23. Auto Nivag axle shaft seals for 2121, 21213,. If you need to know the dimensions, then there is data on the Internet: height and size.
If the catalog number is unknown, then after removing the axle shaft, complete measurements of the product can be taken. After the measurement you should get the following data:
- D internal = 40 mm;
- D outer = 80 mm;
- Height (thickness) = 23 mm.
To the treasury of knowledge
As in any field, there are a lot of tricks in “bearing engineering” that the average user should not know. But it’s a good idea for a service or private mechanic to have knowledge of how to check a bearing before installing it. Of course, it is impossible to check the quality of ball processing in everyday conditions, but the hardness of the clip is easy. I will not go deep into the strength of materials and list all the steels and alloys from which bearings are made. Let's take the most common options ШХ15, 18ХГТ, 20Х2Н4А. Balls, rollers and clips are made from these steels. But we are interested in something else - checking the hardness after heat treatment. All bearing parts are brought to a hardness of at least 60 units. Our measuring device is ridiculously simple and unpretentious - it’s a Soviet file. I will repeat once again - SOVIET. Aka “made in the USSR”, aka “made in USSR”. In those days, there were GOSTs, according to which everything was done, including our “measuring instruments”. The hardness of a Soviet file should be 50-55 units. Now we take the bearing and try to scrape it with a file. It’s good if there are several experimental subjects, you will feel the difference immediately. In one case there will be a characteristic cutting sound, and in the other, the file will slide. This is the minimum test that is possible before installing a “bearing of unknown quality.”
Niva repair Removing the rear axle shaft, replacing the bearing and reassembling
Help the project. Niva repair
.
Removing the rear axle shaft
,
replacing the bearing
, etc.
Failure can be determined by the characteristic sound from under the wheels, as well as by the presence of increased radial and axial play.
The axial clearance should not exceed 0.7 mm.
To determine it, you don’t need to pick up speed to hear a crackling or rumble, just turn on first gear and drive a couple of meters. A hum or crackling noise occurs when there is a lack of lubricants, which leads to the product crumbling.
If you notice an uncharacteristic noise in the rear area, you should immediately make sure that the bearings are in good condition.