Published March 29, 2018
Replacement of NIVA front brake pads.
We change the Niva brake pads ourselves https://youtu.be/bXM2A6eFKIM Replacing the rear brake pads of the Niva is not a complicated process, but it has a number of inconveniences compared to replacing the front brake pads. The first inconvenience is removing the drum and putting it back in place after replacing the pads. The drum is removed using bolts and a hammer. You can first wet the drum seat on the axle shaft (the central large hole of the drum) with WD-40. If it doesn’t help, then moisten it with brake fluid and leave it for 30 minutes (or for a day, screwing the wheel back on). Then tap the entire drum with a hammer through a plank. Tensioning the upper spring, with the pads already installed in their places, is also associated with some difficulties. I show in the video one of the ways to tighten the spring. The second method of replacing rear brake pads does not require this process to be performed in this version. The spring is tensioned until the pads are installed in place. I will show both methods, and you will choose for yourself which method will be more convenient for you to change the rear brake pads. Subscribe to my channel https://www.youtube.com/user/SamiDlyaS. Replacement of NIVA front brake pads. We change the NIVA brake pads ourselves https://youtu.be/bXM2A6eFKIM Replacing the rear brake pads of NIVA sp.1. We change the NIVA brake pads ourselves https://youtu.be/pTi_AXhGtpA hello everyone Whether or not it is necessary to change the rear brake pads, you can first look through a special inspection window, I will show you where it is I know two ways in which you can change the rear brake pads I will show both methods first people don’t often change brake pads because they have to tighten the upper spring. It’s not convenient, but I’ll show you how to easily tighten the spring. I’ll show you two ways. You can remove the brake pads in the first way, and put the brake pads back in the second way. Here’s the inspection window. plug with a screwdriver Pull out the plug and look out the window The thickness of the pad is allowed to be no less than 1.5 mm (millimeters) If less than 1.5 mm needs to be replaced Clean with a screwdriver and it will be visible On top there is a layer of iron On the bottom the material of the pad You can see Almost new pads These brake pads do not need to be changed Loosen wheel nuts Bricks under the wheels Raise the car with a jack Place a log for insurance Lower the car onto the log Remove the handbrake Check the bearings of the rear hubs Whether or not the wheel rubs against the pads. We check the setting of the hand brake. The wheel spins well. Everything is fine. We unscrew the wheel. We remove the brake drum. To do this, we unscrew these 2 bolts. The head is 12. For convenience, we put the car on the hand brake. We hit the bolts twice to loosen. Perhaps the bolts are rusted. The 2 unscrewed bolts. Screw in additional 2 bolts. can be screwed into these places Only the bolts are larger in diameter Why screw the bolts? Tighten the bolts The bolts create pressure to remove the drum This will not be enough We will knock on the back of the drum with a hammer through the wood We knock on all sides of the drum evenly Tighten the bolts and knock with a hammer I WARNING Remove the handbrake Before tightening the bolts to remove the drum Otherwise, do not remove the drum I removed the drum easily What do we see? Not 100% of the surface of the pads is visible through the window The brake pads are worn unevenly In one place they are thick, in another place they are thin The front pad is worn out more than the rear In the thinnest place 2.5 mm About 3 mm, no need to change The brake pads are in good condition I will show you how to remove brake pads On this side the pads are thicker Remove the upper spring I show you how to put the spring in place (first option) Everything is in its place Pads and spacer bar Everything is ready So that the pads don’t move apart (don’t move) We drive wooden sticks into the boards Press the pads We put them here stop We screw the bolt from the drum into this place We insert the Iron finger We hook the spring with a screwdriver We use a lever and tighten the spring To prevent it from spinning, we turn on the gear in the gearbox (in the transmission) Turn the spring to the side We hook it with a screwdriver and tighten the spring We put the spring in place Put it in place We remove the top we take out the spring, we take out the support bar, we take out the support posts from the blocks. Everything fell off. You need to pull out this handbrake lever. It came off on its own. The structure is disassembled. Pull out this lever. Replace with new pads and install everything in the reverse order. Reassemble in the reverse order. Take the rear block and insert it into the saddle. lever, install the handbrake cable, secure the block with a stand, compress the spring of the strut and twist the strut, put the lower spring on the pads, pull the left shoe into place, secure the block with its stand, put the support bar, the spring, tighten the spring. There is a nuance. New brake pads will not fit into the drum. Pistons in the old places. . The pistons have come out a lot. The pistons must be pressed inward to compress the pads. First option: compress with two pry bars. Second option: hit the pistons with a hammer through wood. Like this. When we press on the pistons, the brake fluid level rises.
How to replace brake pads on a VAZ 21213 yourself
The braking system is very important for driving safety. Therefore, it is necessary to monitor its serviceability. One of the main elements of the brake system are brake pads (BC), which, due to friction, slow down the rotation of the wheel. Naturally, over time they wear out and require replacement. You can perform the operation of replacing the TC on a Niva yourself in a garage.
https://www.youtube.com/watch?v=bXM2A6eFKIM
All elements of the car wear out to varying degrees during operation, depending on the load experienced. The wear of brake pads is influenced by many factors, so the frequency of replacement for each Niva will be different.
SUVs are used in difficult off-road conditions, so they are replaced after 15-20 kilometers. The reason for rapid wear is the nature of the road surface on which the vehicle has to drive: sand, water and dirt.
The wear and tear of the roadway depends not only on the quality of the road surface, but also on other factors:
- climatic conditions of the area where the SUV is operated;
- driver's driving style;
- quality of consumables.
The manufacturer recommends replacement after an average of 30-50 thousand. But given that wear varies, experts strongly recommend checking the brake system every 10 thousand kilometers.
When checking, you need to pay attention to the presence of creaks, other extraneous sounds, and smooth braking. When replacing, in parallel, you should check the integrity of the anthers on the guides, brake hoses, rubber covers, and the degree of wear of the brake discs
This is necessary for timely identification and elimination of faults.
The front axle bears the main load, so the front axles wear out faster than the rear ones. On average, for every rear pad replacement, there are two front pad replacements.
Any driver can understand that there is a problem with the brake pads if he pays attention to the characteristic symptoms:
- increased braking distance;
- knocking noise when braking hard;
- ineffective brake operation;
- creaking when braking;
- metal shavings on brake discs or pads.
If at least one of the signs appears, it is necessary to check the brake system and replace worn parts if the following signs of wear are found:
- cracks and delaminations of the TC are visible;
- defects in the form of chips and scratches were found on the surface of the block or lining;
- a protruding rim has formed along the edge of the disk;
- the thickness of the linings on the pads is less than the required technical specifications;
- uneven wear of the TC.
The pads must be changed in pairs: two front, two rear. When replacing the pads on only one wheel, the driver will not be able to brake effectively; the car may pull to the side when braking, which threatens to create an emergency situation on the road. The thickness of the overlay is measured using a caliper. The minimum thickness allowed is 1.5 mm.
To carry out the replacement you will need the following tools:
- jack;
- wheel wrench;
- a set of keys;
- pliers;
- gas wrench or sliding pliers;
- flat blade screwdriver;
- hammer;
- mounting blade;
- support post;
- calipers.
Naturally you need to buy new brake pads. It is advisable to have WD-40 penetrating fluid to relieve stuck fasteners.
Changing the pads of the front wheel pair
To make it convenient to work, we place the SUV on a flat, horizontal plane. We place wheel chocks under the rear wheels and set the handbrake. Before dismantling work, we treat the threaded connections with WD-40. We perform the replacement according to the following algorithm:
- We tear off the wheel mounting bolts with a spray bottle. Let's jack up the side of the car on which we will carry out the replacement. We install the car on a support stand for safety.
- We unscrew all the bolts and remove the wheel.
- Using pliers, pull out the cotter pin of the pressure lever (PR) of the lower axle.
Removing and replacing rear brake pads Niva Chevrolet
The principle of operation of the rear and front pads is to bring the wheel to a stationary state, as it is also called sedentary (during slow braking). The only difference is the design of the front and rear brake systems. Rear brakes are used to manually brake a vehicle.
See:
Removing the pads is done in a similar way with the front wheels. The pads are designed in an arc shape and are replaced in pairs. First, the brake drum is removed, then we measure its internal diameter, which must not be less than 201 mm. The block is removed by removing the tension springs from above and below using a screwdriver. The earring is removed, which serves as a gap adjuster. The cable ends are disconnected and the tension spring is removed. Next, we remove the old worn pads and replace them with new ones. Reassembly of the rear brake pads is carried out similarly to disassembly in reverse order. The brake system of the rear wheels does not require bleeding. It is only necessary to adjust the cable tension and thereby adjust the handbrake lever. To find out more about setting the handbrake, there is an option in the “Chevrolet Niva Handbrake” section.
Replacing the rear brake pads of a Volkswagen Polo sedan.
Replacement
brake pads on all four wheels of a Chevrolet
Niva
will not take more than 4 hours. Only now will you become completely confident in your SUV, and it will never let you down on any road.
Do you still think that diagnosing a car is difficult?
If you are interested in this issue, then you are interested in doing something in the car yourself and really saving money, since you already know that:
- Service stations charge a lot of money for simple computer diagnostics
- To find out the error you need to go to specialists
- The services use simple impact wrenches, but you can’t find a good specialist
And you are tired of throwing money away, and driving around the service station is constantly out of the question, then you need a simple CAR SCANNER ELM327, which connects to any car and through a regular smartphone you will always find the problem, turn off CHECK and save a lot of money.
Finally
We discussed how you can install an HTD on a Niva. Such a solution will significantly improve the performance of the braking system, making it safer and more efficient. At the same time, to carry out this work you need to have a good understanding of the operating features of the vehicle. If you do not have the necessary knowledge and skills, you should turn to professionals, because if you damage your brakes, you may find yourself in an unexpected situation on the road. Which is fraught with serious consequences.
Watch the video of installing rear disc brakes on Niva 2121:
Niva front brake cylinder, problem solving
Disassembled cylinder and Seiken lubricant The first problem was solved in a simple way. Complete disassembly of the unit, washing and reassembly with lubricant designed to work with rubber seals and brake fluid. My friend helped, who has been repairing hydraulic systems all his life, from loaders to industrial presses. He gave me a tube of glamorous pink lubricant, made in Japan. On the Internet it is known under the Toyota brand, although in fact it is made by Seiken. There is also a slightly cheaper analogue, the German trendsetter in brakes, the ATE brand. The cylinders that are in the price list are additionally treated with just these lubricants, depending on their availability. On forums I often came across the opinion that it is enough to apply lubricant under the boot and everything will be fine. WILL NOT BE! You have to disassemble the entire cylinder to get to the O-ring, and nothing else. The lubricant will not get there naturally. The problem with rubber bands can be solved by installing a repair kit. Several companies produce it for our cylinders, but this will be the subject of the second part of the article.
How to change rear pads on a Chevrolet Cruze
We replace the pads in case of maximum permissible wear of their linings. Our step-by-step illustrated instructions will help the owner of a Chevrolet Cruze cope with this operation.
The Chevrolet Cruze maintenance regulations do not limit the service life of the rear wheel brake pads, however, the pads are replaced in case of maximum permissible wear of their linings or when replacing the rear wheel brake disc, as well as when the linings are oily or have deep grooves or cracks on them and chips, in case of detachment of the linings from the base of the pads. The inner pads are equipped with acoustic wear indicators that begin to make a grinding noise during braking when the pad wear approaches the maximum allowable level. If you hear a grinding noise when braking your car, it’s time to change the pads.
Attention! The brake pads of the rear wheels must be replaced only as a set - all four brake pads. Replacing the pads of only one brake mechanism can lead to the car pulling to the side when braking.
We show how to replace the pads on the brake mechanism of the left wheel; we replace the pads on the brake mechanism of the right wheel in the same way.
Remove the rear wheel and place the car on a factory-made stand.
2290-17-05-01
Using a 13mm wrench, rotate the anti-vibration weight of the brake mechanism counterclockwise using the hexagon, holding the lower guide pin of the caliper with a 18mm wrench.
Remove the anti-vibration weight.
2290-17-05-03
Using a 10mm spanner, unscrew the bolt securing the caliper to the upper guide pin, holding the finger by the hexagon with a 18mm spanner.
2290-17-05-04
We move the caliper away from the pad guide without disconnecting the brake hose and the parking brake cable from it.
We place the caliper on a spacer to secure the pad guide.
Using the blade of a screwdriver, we “recess” the retainer on the lower pressure plate of the pads.
Remove the outer brake pad from the pad guide.
Similarly, remove the inner brake pad from the shoe guide.
2290-17-05-08
Before installing new pads, remove the upper and lower pressure plates from the pad guide.
We clean the brake mechanism parts from dirt and corrosion, especially the brake pad pressure plates and their seats in the pad guide. It is prohibited to use gasoline and diesel fuel to clean brake mechanisms. After inserting the pressure plates into the pad guide, we install new brake pads. When installing the inner pad, it must be oriented so that the acoustic wear indicator is located at the top of the pad. Before installing the caliper, it is necessary to move the piston as much as possible inside the cylinder.
2290-17-05-09
We insert pliers with narrow jaws into the piston sockets and turn it clockwise, while simultaneously pressing on the piston.
We inspect the piston boot; if the boot is damaged, replace it. Before installing the caliper, you must also check the condition of the guide pins and their protective covers.
We remove the upper guide pin of the caliper from the hole in the pad guide.
Remove the rubber corrugated cover from the finger.
2290-17-05-12
Similarly, we remove the lower guide pin (with a plastic anti-squeak bushing on the pin rod) from the hole in the pad guide and remove the rubber corrugated cover from it.
We inspect the rubber covers of the guide pins and if the covers are damaged - cracks, tears, loss of rubber elasticity - we replace them with new ones. Having installed new protective covers for the fingers, apply a layer of heat-resistant plastic grease to the pin rods. We insert the fingers into the holes in the pad guide and install the caliper. Tighten the caliper mounting bolt and anti-vibration weight to a torque of 28 Nm. Similarly, we replace the brake pads of the brake mechanism of the right rear wheel. After replacing the pads, press the brake pedal several times to set the gaps between the pads and discs. We check the level of working fluid in the hydraulic reservoir of the brakes and clutch and, if necessary, bring it to normal.
[Those
Removing a soured brake drum VAZ 2123 / Russian crazy service car
In this video I show how to remove
drum
soured on the axle shaft . Special pullers couldn't cope with this.
Having learned from the “bitter” experience of the previous 10, having driven the tires from the passenger compartment, the very first thing I did was remove the drums. I coated the seats with graphite. Such questions no longer arise! ! ! and also loosened all the nuts on the brake pipes, including the ABS unit, one by one. made it possible to lubricate the brake nut contact.
How to remove a brake drum on a Chevrolet Niva.
To remove the drums, try taking vinegar essence into a syringe and carefully saturate the contact area between the drum and the axle shaft through a needle. concentrated essence will eat up corrosion. See here www.autoprospect.ru/chevr…anizmy-zadnikh-koles.html
Trying to knock down a stuck drum with a sledgehammer and a metal spacer leads to deformation of the aluminum edge and even chipping. On the old woman 2121, this method left my drums as if they had been gnawed. Gray as advised and lightly tap on a wooden block in a circle. First of all, tap the area where the axle shaft is stuck and then tap along the edge along the wheel protection from under the car. When you put it in place, apply graphite lubricant to the mating drum - axle shaft. Once again it will be easier.
The metal spacer must be installed correctly, then the edges will remain intact.
A long time ago I removed the drums by tapping them through a piece of wood. First, tap on the side of the wheel, then in a circle and you have to get off. There are also pullers with 3 claws and press the center - their price is 350-500 rubles, you just need to choose the right size
- Home
- Auto garage
- How to Remove the Rear Brake Drum Niva Chevrolet
We have a Chevrolet Niva car, produced in 2005, with a mileage of 137 thousand km, undergoing scheduled repairs, which requires changing the brake pads of the rear wheels, drums and cylinders. We will show you how to do this on your own, without resorting to the help of professionals.
It looks like the pad on the rear left wheel has been torn off, there is a grinding noise when braking, and when reverse gear is engaged, the wheel jams and then stalls. Therefore, it was decided to immediately lift and change the pads, drums and cylinders on both sides. Later we will bleed the brakes using a vacuum.
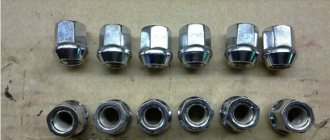
Using a 12mm socket, unscrew the drum mounts:
Then we screw in two bolts:
It really didn’t work out for us, all the threads remained on the bolts, it was completely soured, so a hammer will help you, because we will eventually have to change the drum anyway. This situation occurs when, during replacement, the fasteners are not coated with copper grease; I believe that you will not save money in this matter!
how to remove the rear brake drum on a Chevrolet Niva
After completing the work, you must press the brake pedal firmly several times so that the system sets the necessary clearances and adjusts the position of the brake pads.
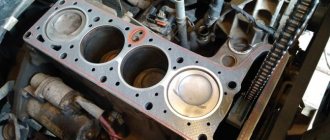
Remove the two bolts; the photo shows one securing the brake drum to the axle shaft. The car manufacturer recommends checking the pads after mileage. Installation of new pads and assembly is carried out in reverse order.
If the results are different from each other, then the drum is oval in shape. Please note that as the pistons are pressed into the cylinders, the brake fluid level in the master cylinder reservoir rises.
Remove the two bolts; the photo shows one securing the brake drum to the axle shaft.
Remove the drum from the axle shaft with light blows of a hammer. If the drum cannot be removed by hand, knock it down with a hammer using a wooden block, or press it by evenly screwing the bolts into the two threaded holes of the drum.
When installing the old drum, use a file to remove the collar on the working surface of the drum that has formed as a result of wear. Install the drum in the reverse order of removal.
First, clean the axle shaft seat from corrosion, lubricate it with graphite grease or LSC grease, and bring the pads together using two mounting blades. The ability to change consumable parts and independently perform diagnostics increases the safety of the driver and passengers and makes the trip safer.
How to remove the brake drum. (Method No. 2)
The Chevrolet Niva has drum-type brakes on the rear axle. The main component that needs to be replaced periodically are the brake pads. The car manufacturer recommends checking the pads after mileage.
But do not forget that, first of all, these parameters depend on the driving style and operating conditions of the car. On roads with poor surfaces, you tend to have to slow down more often, which leads to faster pad wear. Mainly the outer lining suffers, as it wears out much faster.
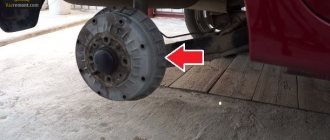
To monitor its condition, there is a special window on the drum through which you can see the level of wear.
Contact us
The car can be used if the thickness of the lining is more than 2 millimeters. Otherwise, it is necessary to replace all linings on the rear axle. All 4 are replaced, and in this case the level of wear of the others does not matter.
If you partially replace the brake linings, this will lead to a deterioration in the driving performance of the car and problems with the operation of the braking system. When braking, the car will move away from the trajectory.
How to tension the top spring?
Install new pads in reverse order. The hardest part will be tightening the top spring. To do this, assemble the entire mechanism, put a spring on one of the pads and install a stump under the hub, screw in the drum mounting bolt and place the metal tube vertically as follows:
To secure the pads, clamp them using wooden wedges.
Now insert a screwdriver and tighten the spring as follows:
To make the spring put on, you can push it with your fingers towards the hole. All that remains is to put the drum in place and assemble it.
This is how to change the rear pads on Niva Chevrolet and Niva Travel.
Chevrolet Niva brake system repair
Replacement of front and rear brake pads. 1600 RUR, including spare parts for 1 hour Call
Brake system design
Niva cars use a hydraulic brake system with two circuits operating in parallel. One is connected to the working cylinders of both front and rear wheels, the second - exclusively to the front ones. If one of the circuits fails, braking occurs with less efficiency.
A feature of Chevrolet Niva cars is the diagonal connection of circuits. One is responsible for braking the left front and right rear wheels, the second - for the right front and left rear wheels. This type of braking system is safer.
Among the main components responsible for braking efficiency are the following:• brake wheel cylinders;• vacuum booster;• rear brake pressure regulator;• brake mechanisms, including pads, calipers, discs, drums;• brake fluid level sensor;• pipelines .
Failure of one of these components may result in reduced braking performance.
The vacuum booster reduces the force on the brake pedal required to activate the system. The principle of its operation is to use the vacuum that occurs in the engine intake manifold.
The pressure regulator allows you to reduce the pressure in the rear cylinders at the moment of least contact of the wheels with the road. As the load increases, the pressure increases. This scheme helps prevent skidding when braking.
Niva cars use front disc and rear drum brakes. When warping and wear occur, both discs and drums can be ground to certain sizes in order to increase service life.
Basic work to restore the performance of the brake system
The most worn parts are the brake pads. The pads are replaced at certain intervals depending on the operating modes and the quality of the parts themselves.
Less often there is a need to replace brake discs, and even less often - drums. When parts become warped, a beating sensation is felt on the pedal during braking. In this case, you will need to grind the damaged surface or replace the part.
Not the most reliable unit in Niva is the so-called “sorcerer”, or brake force distributor. Usually, after 2-3 years of operation, you can forget about its normal operation. The mechanism oxidizes and the rear brakes may become completely ineffective. To solve the problem, the distributor can be replaced with a new one or removed altogether, obtaining equal braking forces on both axles. Working cylinders, as a rule, last quite a long time. However, due to corrosion or contamination, the cylinder may stick or jam. In this case, the pads will not be pressed.
If the brake pedal travels down or increases, it is necessary to check the tightness of the pipelines and both circuits in general. Also, brake fluid leaks can be a consequence of unsuitable seals on the working cylinders.
If the brake pedal becomes very hard to press, there may be a problem with the vacuum booster. In this case, it is necessary to check the tightness of the hoses and the amplifier itself. If necessary, replace what is faulty.
After repair work, the brake system must be bled to check for the presence and removal of air. Do not forget that the brake system is one of the most important components in any car. Stopping the vehicle in a timely manner is the key to the safety of the driver and passengers, so the brakes must be constantly maintained in working condition.
Substitutes
| vendor code | Cost in rub. | vendor code | Cost in rub. |
| Chevrolet Niva BOSCH 0986478746 | from 1500 | PATRON PBD1725 | —/— |
| TRI-DF 254 | —/— | FERODO DDF092 | —/— |
| TRW DF1725 | —/— | ROTINGER RT 2798 | —/— |
| TEXTAR 92024487 | —/— | HELLA 8DD355100381 | —/— |
| BOSCH RA1372785 | from 1700 | GLOBER RA16003411 | —/— |
| LPR RA626584 | —/— | BREMBO RA1782407 | —/— |
| TRW RA2416674 | —/— | TRW RA2416835 | —/— |
Brake discs with notches and through holes are not taken into account, since they are not in great demand among Chevrolet Niva owners.
| vendor code | Cost in rub. | vendor code | Cost in rub. |
| BOSCH 0986478746 | from 2200 per set | TRW DF1725 | —/— |
| HELLA 8DD 355 100-381 | —/— | PAGID 51702 | —/— |
| BOSCH 0 986 479 904 | —/— | TEXTAR 92096332 | —/— |
| GIRLING 6017253 | —/— | BRAKE ENGINEERING DI839391 | —/— |
| COMLINE ADC2103 | —/— | BORG & BECK BBD4692 | —/— |
| NIBK RN3598 | —/— | TRI-DF 365 | —/— |
| GIRLING 6017487 | —/— | GIRLING 6017615 | —/— |
Replacing rear brake pads
The Chevrolet Niva car is highly reliable and durable. One of the important advantages of this car is the ability to make minor repairs yourself, without visiting a service station.
One of these components is the car’s braking system. The ability to change consumable parts and independently perform diagnostics increases the safety of the driver and passengers and makes the trip safer.
The Chevrolet Niva has drum-type brakes on the rear axle. The main component that needs to be replaced periodically are the brake pads. The car manufacturer recommends checking the pads after 20,000 miles. Replacement is carried out after 30,000 kilometers.
But do not forget that, first of all, these parameters depend on the driving style and operating conditions of the car. On roads with poor surfaces, you tend to have to slow down more often, which leads to faster pad wear. Mainly the outer lining suffers, as it wears out much faster. To monitor its condition, there is a special window on the drum through which you can see the level of wear.
The car can be used if the thickness of the lining is more than 2 millimeters. Otherwise, it is necessary to replace all linings on the rear axle. All 4 are replaced, and in this case the level of wear of the others does not matter.
If you partially replace the brake linings, this will lead to a deterioration in the driving performance of the car and problems with the operation of the braking system. When braking, the car will move away from the trajectory.
To replace brake pads in a field, you must place the car on a flat surface. After this, you need to put stops under the front wheels to prevent them from rolling. The vehicle must be released from the parking brake.
Next, you need to slightly loosen the wheel bolts, lift the car with a jack and remove the wheel.
For further actions, you will need a key size 13. Use it to loosen the parking brake cable. To do this, loosen the nut and locknut.
After this, using a 12mm wrench, unscrew the bolts holding the brake drum.
If the car was driven in winter, a problem such as drum sticking may occur. To fix this problem, you need to tap the drum around the circumference using a wooden or rubber mallet. If you don't have a mallet, you can use a regular hammer. But the blows must be delivered through a wooden block or piece of rubber.
Attention! The use of lubricants is strictly prohibited. This can damage the car's braking system.
After the drum is removed, it is carefully inspected for damage. Sometimes, when using a car, cracks, grooves or chips may appear on it. If there are defects, the drum must be replaced.
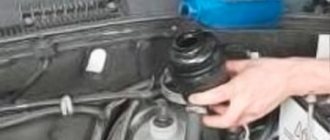
Before removing the Chevrolet Niva brake pads, you need to use two levers to press the pistons into the wheel cylinder. This is necessary to install new brake pads.
The garter spring and spacer bar are removed next.
When removing, be careful because a spring that pops out can hurt your hands.
Then, using pliers, you need to unscrew the outer cup until the slots on it line up with certain protrusions on the stand.
These parts are quite small; it is better to use a separate container for storing them. If there is rust or dust on the surface, it must be cleaned immediately.
Now you can carefully move the front pad to remove the lower spring.
In a similar way, the rear block is removed and the cable that controls the parking brake is disconnected.
Replacing rear brake pads on a Niva Chevrolet usually does not take much time. Installation of new pads and assembly is carried out in reverse order.
After completing the work, you must press the brake pedal firmly several times so that the system sets the necessary clearances and adjusts the position of the brake pads. Also, after replacement, it is recommended to maintain the speed limit and avoid increased braking efforts.
Required tools:
- balloon;
- jack;
- flat screwdriver;
- suitable keys for “13” and “17”;
- support stand;
- calipers;
- penetrating fluid WD-40;
- new brake pads for VAZ 2115.
Brake pads on a VAZ 2115 should be replaced in pairs.
The algorithm for replacing brake pads on a VAZ 2115 is as follows:
- Place the car on a flat surface, secure the wheels with wheel chocks, and tighten the handbrake. Before disassembling, you need to treat all connections with WD-40.
- Remove the wheel bolts before jacking up the car. Otherwise, it will be more difficult to do this, and there will be a possibility of the car falling during sudden jerks.
- Jack up the side from which the pads will be replaced. Install a stop that will protect you in case of sudden failure of the jack.
- Unscrew the mounting bolts and remove the wheel.
- Clean the brake mechanism with water and detergent and dry it.
How to replace brake pads on a VAZ 2115
Be careful!
You should not wash the part with gasoline, diesel fuel or solvent, since then you will have to replace the rubber seals and anthers.
In addition, before replacing the brake pads, you need to check their wear using a caliper (install it in the hole in the brake caliper). If the thickness of the friction linings (not pads) is less than 1.5 millimeters, the pads need to be replaced.
- Release the brake hose from the bracket located on the shock absorber strut.
Do-it-yourself replacement of brake pads on a VAZ 2115
Also check out
- Use a flat-head screwdriver to remove the columns from the brake disc.
How to replace front brake pads on a VAZ 2115 at home
- Bend back the locking plate of the pin that serves as a caliper guide on the lower bolt. Unscrew the bolt, while holding the pin by the hexagonal part to avoid turning it.
Self-replacement of brake pads on a VAZ 2115
Self-replacement of brake pads on a VAZ 2115
- Raise the brake caliper and secure it.
Correct replacement of VAZ 2115 brake pads on your own
Remove old pads. Before installing new ones, use a caliper to measure the thickness of the brake disc at 4 opposite points. The minimum thickness, as mentioned earlier, is 10.8 millimeters. If necessary, replace the brake disc. Clean all mechanisms and parts of the brake mechanism, especially carefully inspect the seats of the brake pads. The accumulation of dirt in them can lead to misalignment and subsequent jamming of the pads, their uneven wear
If the removed pin is faulty, it is important to apply graphite lubricant to its surface before installing a new one. Sometimes it is necessary for the piston to be pressed into the caliper, since when the pads are worn heavily, it will come out, making it difficult to install new brake pads
You need to be careful with the boot and piston seals
After this, check the brake fluid level. If it is high, when the piston is pressed in, liquid will flow out of the expansion tank of the GTZ. You can solve the problem using a syringe; to do this, unscrew the cap and pull out several cubes of TJ with the syringe. At the end of the process, pour it back. Proceed with installing new brake pads. When installing them, you need to be careful about the location of the pressure springs. Their position is correct if they are parallel to the top edge of the pads.
Correct replacement of VAZ 2115 brake pads on your own
- Reinstall the brake caliper bracket.
Replacing brake pads on a VAZ 2115 instructions
- Install the guide pin bolt and tighten it. It is better to use a torque wrench for this (tighten with a torque of 30–40 N*m).
- Use a screwdriver to bend the locking plate. This will prevent the bolt from turning spontaneously.
- Return the wheel to its place and tighten the mounting bolts.
Perform similar steps on the other side of the car.
Before driving, depress the brake pedal several times to bring the brake pistons into working position.
In addition, it is important to top up the brake fluid
At first, squeaking may occur due to the grinding of the pads to the brake disc. After some time, these sounds will disappear.
Algorithm for replacing a VAZ 2115 radiator If the engine overheats greatly, a major overhaul and large cash injections will be required. To prevent this, you need to monitor the coolant level...
Original auto parts
The part itself consists of a metal base and a ceramic or synthetic lining. Due to increased friction, components must be fire resistant and wear resistant. There are both disc and drum variations of the systems. The pads in both cases differ in shape and method of fastening. As a rule, the drum version is rarely used, and only on the rear wheels. The LADA Sport kit will cost you about 650 rubles. It already has all four parts, you don’t have to buy anything else. They have a width of 8 millimeters and a length of 11 cm. A quiet and high-quality replacement option. Don't forget to check that the article numbers match one of the ones below:
- 2108-3501080;
- 21080350180083;
- 2108-3501800-83.
https://www.youtube.com/watch?v=ytaboutru
AvtoVAZ itself offers a similar solution. VAZ-2108 brake pads are suitable for most VAZ car models and cost about 480 rubles. In particular, they can be installed on VAZ 211213, VAZ 2121. The set consists of two front and two rear pads.
Check that the items and dimensions on the box are correct. If the barcodes are poorly printed, the box does not match the image in the catalog - most likely, this is a fake.
Analogs
| Brand name | vendor code | Price, rub.) |
| LYNXauto | BD4602 | 860 |
| Ferodo | FDB195 | 1140 |
| Delphi | LP189 | 870 |
| HI-Q | SP1168 | 460 |
| TRW | GDB265M | 570 |
There is a large selection of similar parts, so choosing the ones you need won’t be difficult.
The main thing is to pay attention to the article number. This will prevent you from purchasing a low quality fake.
Also, fake parts do not have markings, or they are poorly printed on the products themselves.
Also interesting: How to disable abs on a Chevrolet Niva
| Brand name | vendor code | Price, rub.) |
| Bosch | 1987475191 | 312 |
| Rosdot | 000006237 | 480 |
| Pilenga | BS-T001 | 560 |
| Fenox | BP50001C3 | 670 |
| "Start" | 361278J,MSK026 | 520 |
The minimum thickness of the brake pad linings should be 1.5 millimeters. To assess the condition of parts without removing them, you can use the inspection window. It is located in the brake shield.