1200 rub. for the photo report
We pay for photo reports on car repairs. Earnings from 10,000 rubles/month.
Write:
The term breakdown of an ignition coil or spark plug tip means a breakdown in the weakest point of the housing or wire insulation due to a decrease in resistance, occurring in short periods of time. This is mechanical damage that leads to the appearance of cracks or melting. On the surface of the case, the breakdown site appears as black, burnt-out dots, longitudinal tracks or white cracks. Such spark piercing areas are especially dangerous in humid weather. This malfunction leads not only to failure of the mixture to ignite, but also to complete failure of the ignition module.
Often such places are not difficult to notice visually, but sometimes it is necessary to check the ignition coil, not with a multimeter or oscilloscope, but with a simple device made of two wires. When a damaged area is identified, the part is usually completely replaced, although sometimes it is possible to delay the replacement using electrical tape, sealant or epoxy glue.
What is ignition coil breakdown and its causes?
Let's take a brief look at what coil breakdown is, what it affects, and what it looks like visually. First of all, it should be recalled that the coil itself is a transformer that has two windings (primary and secondary), isolated from each other. The definition of breakdown is a physical phenomenon when, due to damage to the primary and/or secondary windings of the coil, part of the electrical energy falls not on the spark plug, but on the housing. This leads to the fact that the spark plug does not work at full power, and accordingly, the engine begins to “trouble” and its dynamics are lost.
Ignition coil device
There can be many reasons for the breakdown of the ignition coil - damage to the insulation of one or both windings, damage to the tip body, damage to its rubber seal (due to which water gets inside, through which electricity “sews”), the presence of dirt on the body (similar to water, current passes through it), damage (oxidation) of the electrode in the tip. However, most often the problem lies in the “wired” insulator, and therefore, to eliminate the problem, this place must be localized and insulated.
An interesting reason for the failure of ignition coil tips is the fact that when replacing a spark plug, in some cases, car owners, through carelessness or inexperience, can tear their waterproofing. This can lead to moisture getting under them and problems with engine operation. The opposite case is that when the car owner tightens the top nuts of the spark plug cups too tightly, there is a risk that engine oil from the engine will begin to penetrate into the plug housing. And this oil is harmful to the rubber from which the reel tips are made.
Also, the reason that spark breakdown occurs outside the cylinder is incorrectly set gaps on the spark plugs. This is especially true if the gap is increased. Naturally, the spark in this case has a detrimental effect on both the spark plug body and the rubber tip of the ignition coil.
Symptoms of a faulty ignition coil
Signs of a malfunction of the ignition coil are that the engine periodically “trips” (triggering is especially important in rainy weather, and when starting the engine “in cold weather”), “failures” occur when accelerating the car, when visually inspecting the coil, “paths” of electrical breakdown are observed, burning of contacts, signs of thermal overheating, the presence of a large amount of dirt and debris in the coil body and other, smaller faults. The most common cause of coil malfunction is a break in its primary or secondary windings. In some cases, their insulation is simply damaged. At the initial stage, the coil will work more or less normally, but over time the problems will worsen and the symptoms described above will appear to a greater extent.
There are several typical signs of an ignition coil breakdown. It’s worth mentioning right away that the malfunctions listed below can be caused by other reasons, so diagnostics should still be carried out comprehensively, including checking the condition of the ignition coils. Thus, symptoms of breakdown can be divided into two types - behavioral and visual. Behavioral ones include:
- The engine begins to "trouble". And over time, the situation gets worse, that is, the “tweaking” is expressed more and more clearly, the power and dynamics of the engine are lost.
- When trying to accelerate quickly, a “failure” occurs, and when idling, the engine speed does not increase sharply. There is also a loss of power under load (when transporting heavy loads, driving uphill, and so on).
- “Tripping” of the engine more often occurs in rainy (humid) weather and when starting the engine “cold” (especially typical for low ambient temperatures).
- In some cases (on older cars), the smell of unburned gasoline may appear in the cabin. On newer cars, a similar situation may occur when, instead of more or less clean exhaust gases, the smell of unburned gasoline is added to them.
When dismantling the ignition coil if it malfunctions, you can observe visual signs that it has completely or partially failed. So, these include:
- The presence of “breakdown tracks” on the coil body. That is, characteristic dark stripes along which electricity “strikes”. In some particularly “neglected” cases, scale occurs on the tracks.
- Change (turbidity, blackening) in the color of the dielectric on the ignition coil body.
- Darkening of electrical contacts and connectors resulting from their burning.
- Traces of overheating on the coil body. Usually they are expressed in some kind of “drips” or changes in the geometry of the body in some places. In “severe” cases, they may have a burning smell.
- High contamination on the coil body. Especially near electrical contacts. The fact is that electrical breakdown can occur precisely on the surface of dust or dirt. Therefore, it is advisable to prevent such a state.
The main sign of a coil malfunction is the lack of ignition of the fuel mixture. However, this situation does not always arise, since in certain cases part of the electrical energy still goes to the candle, and not just to the body. In this case, it is necessary to conduct additional diagnostics.
Well, on modern cars, in the event of a breakdown of the ignition coil, the electronic engine control unit (ECU) will notify the driver about this by activating the Check Engine lamp on the dashboard (and a misfire diagnostic code). However, it can also light up due to other faults, so this requires additional diagnostics using software and hardware.
The symptoms of malfunction described above are relevant if the engine has individual ignition coils. If the design provides for the installation of one coil, common to all cylinders, then the engine will stall completely (this, in fact, is one of the reasons why several individual modules are installed on modern cars).
We carry out the adjustment ourselves
- The first step is to install the cylinder in the correct position. Installation is carried out so that the mark on the pulley is exactly at 0 degrees.
- Set how the slider is positioned. It should be aimed at the first pin in the cylinder.
- Use a strobe light and make sure the ignition is working properly.
- Make the electrical connections in the battery: minus to ground, plus to plus.
- The sensor must be connected to the high-voltage wire on the cylinder. The mark should connect to the crankshaft pulley.
- Start the engine at low speed (up to 800 rpm). Use a stroboscope to illuminate the pulley, and if the mark coincides with the middle mark, then the ignition is set correctly.
- Otherwise, the engine should be turned off and the meter should be loosened. In order to decrease the angle, turn the sensor clockwise; to increase it, turn it counterclockwise. Record and test the calibration again with the ignition on.
- Next, you should perform manipulations with the distribution sensor. Open the lid. Match the stator and rotor mark.
- Start the engine, bring the temperature to 75-80 degrees. When the speed is 50 km/h, sharply press the gas pedal.
- If the ignition was installed correctly, a short-term detonation will occur when you press the gas.
Then there are two possible developments: early and late ignition. Let's consider solutions for both cases:
- In the case of late ignition, when there is no detonation, you should change the position of the sensor clockwise.
- In the case of early ignition, when detonation lasts longer than necessary, the sensor is rotated counterclockwise.
Niva 21213 can be subject to adjustment of the starting system by the gap at the edges of the valves, if the carburetor is removed, or by the crankshaft speed directly on the car. In the first case, the gap at the location of the lower edge (in the direction of air movement) from the throttle valve is set to a width of 1.1 mm.
It is adjusted with a screw that has a 0.7 cm hexagon on the head and a slot from the shank. This operation is carried out with the cam lever turned counterclockwise from the starting system control (all the way). In the same position, the gap at the lower edge of the air damper is set to 3 mm using a screw in the cover from the diaphragm mechanism in the starting system (you need to loosen the lock nut).
The principle of powering a carburetor engine Adjusting the Niva starting system directly in the car saves time: You need to remove the air filter from the engine, pull the control lever towards you from the air damper, and start the engine. When the air damper is forced to open (by touching a flat screwdriver to a third of its full angle of rotation) using a screw (next to the lever on the axis from the throttle valve from the first chamber), the initial rotation speed is set to 2.08.mar.0 thousand.
revolutions per minute (on a warm engine). Remove the screwdriver, lower the air damper and, using the screw stop (next to the diaphragm), set the frequency to be 100 rpm lower than the original one (you need to select the appropriate position of the air damper). The screw can then be secured using a locknut.
If you have a gas analyzer, then the carburetor adjustment in the starting system part can be done based on the amount of CO (carbon monoxide) in the exhaust gases. If, with the choke control lever fully extended, the gas rate is 8%, then everything is in order. If there is less gas than this value, then the screw on the cover of the diaphragm mechanism is tightened; if there is more, it is unscrewed and repeated measurements are taken.
It is necessary to adjust the idle speed of the Niva 2121 so that there is less carbon monoxide in the exhaust gases and so that the engine runs stably. At service stations, such work is carried out with gas analyzers on the MV. In the garage, adjustments can be made using the tachometer.
Adjusting the device For these purposes, on a warm engine, pierce the plastic plug with a screwdriver, then the quality screw is rotated in different directions until the maximum idle speed is reached. Then, using the quantity screw (has a ribbed plastic handle), you need to set an increased speed (50-70 rpm.
How to check a coil for breakdown
You can check for breakdown of the ignition coil in one of 5 ways, but as a rule, the average car owner has the opportunity to use only three of them. The first is a visual inspection, because often the breakdown site is visible to the eye; the second is a check with a multimeter, and the third, and the most reliable quick method, if nothing is visually noticeable, is to use a simple ignition system tester (it’s easy to do it yourself).
Ignition system diagnostics
Recommendations for diagnosing the ignition system (spark plugs, wires, coils, module). Instructions on how to check the ignition units of a car with your own hands Read more
To check the operation of the ignition system, first of all, it makes sense to use a program to read errors from the ECU. Usually in such cases it shows errors from the P0300 group, indicating misfire in one of the cylinders. However, please note that in this case, errors can be caused not only by faulty coils or spark plug tips. Therefore, in order to make sure that the fault is with one of them, it makes sense to move the problem unit to another cylinder, erase errors from the ECU memory and carry out diagnostics again.
If the problem is in the coil (we are talking about an individual coil), then the situation with errors will repeat, but indicating a different cylinder. True, when this is precisely a breakdown of the coil, and such that gaps appear, then you can already understand by the vibration of the engine, see with your eye a broken insulator track, or even hear a characteristic crackling sound with your ear. Sometimes at night, in addition to a crackling sound, you can also see a spark appearing.
Visual inspection
The next way to determine a breakdown of the ignition coil is to dismantle it and visually inspect it. As practice shows, on the coil body it is usually not difficult to find the very “path” of breakdown along which the spark “sews”. Or you should pay attention to chips, potholes, and geometry violations in the reel body that were not there before.
Measuring parameters
There are two mandatory methods for checking the condition of the ignition coil - checking for spark and checking the insulation resistance of both windings (low and high voltage). To measure the parameters, you will need a working spark plug and a multimeter with the ability to measure insulation resistance. But the most reliable way is to use a spark generation tester, only with a slight modification, so that you can move the conductor along the coil body and look for the weak point of the insulation that breaks through.
Homemade spark tester
The most interesting and reliable method for checking the breakdown of the ignition coil is to use a special homemade probe. It helps when the defect is not visible visually, checking the resistance of the windings did not reveal the problem, but there is no way to use an oscilloscope. To make a spark tester you will need:
- medical disposable 20 cc syringe;
- two pieces of flexible copper wire (PV3 or similar) with a cross-sectional area of 1.5...2.5 mm², each about half a meter long;
- small crocodile mount;
- a known good spark plug (you can take a working used one);
- a piece of heat shrink with a diameter slightly larger than the total diameter of the existing copper wire;
- a small piece of flexible wire;
- electric soldering iron;
- manual or electric hacksaw (grinder);
- a heat gun with silicone pre-charged into it;
- a screwdriver or an electric drill with a drill with a diameter of 3...4 mm.
- assembly knife.
The manufacturing process sequence consists of the following steps:
- Using a mounting knife, you need to remove the “nose” from the syringe, where the needle is put on.
- Using a hand saw or grinder, it is necessary to cut the thread on the candle in such a way as to remove the part of the body on which this thread is applied. As a result, only the electrode will remain at the bottom of the spark plug.
- In the upper part of the syringe body, it is necessary to make a hole of such a diameter that a pre-processed spark plug can be inserted there.
- Using a heat gun, solder the junction of the candle and the body of the plastic syringe along the ring. Do this carefully to make good hydraulic and electrical insulation.
- The syringe piston in its front and rear parts must be drilled using a screwdriver.
- It is necessary to insert two previously prepared pieces of flexible copper wire into the drilled hole in the lower part. To the opposite end of one of them you need to solder the prepared crocodile mount using a soldering iron. The opposite end of the second wire needs to be lightly stripped (about 1 cm or less).
- You need to insert a prepared metal wire into a similar hole in the upper part.
- Approximately in the middle of the piston, connect the copper wires and wires together into a single contact (solder).
- The junction of the wire with the wire must be soldered using a heat gun for mechanical strength and reliability of contact.
- Insert the piston back into the syringe body so that the wire at the top of the piston is at some distance from the spark plug electrode (the distance will be adjusted later).
How to determine ignition coil breakdown with a spark tester
After a homemade tester has been made to find the location of the penetration, the procedure itself must be performed according to the following algorithm:
Finding a breakdown using a homemade tester
- Connect the ignition coil being tested to the spark plug in the tester you made.
- Disconnect the connector at the corresponding injector (where the coil was disconnected) so that fuel does not flood the spark plug well during testing.
- Connect the wire with an alligator clip to the negative terminal of the battery or simply to ground.
- Set the gap in the syringe to about 1.2 mm.
- Start the engine. After this, a spark will appear in the syringe body between the spark and the wire.
- The stripped end of the second wire (connected in parallel) must be moved along the coil body. If there is a penetration on it, then a spark will appear between the body and the end of the wire, which can be clearly seen. This makes it possible not only to verify its presence, but also to determine the location of its occurrence for further troubleshooting.
- Repeat for all coils in turn, not forgetting to disconnect and connect the corresponding fuel injectors.
The verification method is simple and universal. With its help, you can not only find the place where the spark “sews” across the body, but also determine the general operating condition of the ignition coil itself.
This is done by adjusting the gap between the spark plug electrode and the wire on the syringe plunger. At the initial stage, a minimum gap is set with a value of about 1.2 mm and gradually increases. The value of the gap at which the spark disappears depends on the engine size, the type and condition of the ignition system and other factors. On average, for engines with a volume of about 2 liters or less, the distance at which the spark should disappear is about 12 mm, but this is conditional. In general, when checking all individual ignition coils, you can simply compare their operation with each other and identify the faulty element, if present.
Selection of BSZ
When purchasing a new BSZ, you should pay attention to the presence of the components of the entire kit. The factory kit should contain:
- Distributor (main distributor). The code for engines 1.5 and 1.6 is 38.37061. For 1.3 engines, the number will be 38.3706–01, because the height of the 1.3 engine block is lower and the distributor shaft is shorter.
- Switch number 36.3734 or 3620.3734.
- High voltage coil (reel). Marking 27.3705
- Thin wires with connectors.
In appearance, the BSZ kit for the VAZ 2121 NIVA is very similar. But it’s better not to install this kit on a VAZ 2107 or a VAZ 2106, because the characteristics of the “six” and “seven” are very different from the “Niva”. Distributor brands for Niva: 3810.3706 or 38.3706–10.
The best manufacturer of electronic ignition systems for old VAZ cars is. The production capacity base is located in the city of Stary Oskol. According to reviews from car owners of classic BSZ SOATE models, this is an excellent option.
The best manufacturer of electronic ignition systems for old VAZ cars is. The production capacity base is located in the city of Stary Oskol. According to reviews from car owners of classic BSZ SOATE models, this is an excellent option.
How to fix a breakdown
As for the question of how to fix a breakdown, there are two options - fast (“field”) and slow (“garage”). In the latter case, everything is simple - it is advisable to completely change the coil, especially if the breakdown is significant. As for quick repairs, either electrical tape or glue is used for this.
Isolating a damaged coil
The most interesting question for car owners in this context is how to eliminate a breakdown of the injection ignition coil? In the simplest case, that is, if there is a small spark breakdown on the body (and this is the most common type of breakdown), after localizing this place you need to use insulating materials (insulating tape, heat shrink, sealant, epoxy glue or similar means, in some In cases, even nail polish is used, but the polish should only be colorless, without any paints or additives), and isolate the place (path) of the breakdown. It is impossible to give universal advice; it all depends on the specific situation.
When performing repairs, it is necessary to clean and degrease the area of electrical breakdown before applying a protective insulating layer to it. This will increase the resistance value of the resulting insulation. If, when the insulation is damaged and there is a breakdown, liquid appears in the coil (usually from a damaged seal), then it makes sense to additionally use dielectric grease.
Well, in the most severe case, you can, of course, install a new coil. It can be original or not - it depends on the price. Many car owners are saved by the so-called “dismantling shops”, that is, places where you can buy spare parts from disassembled cars. They are cheaper there and you can easily find high-quality components.
Finally, a few words about preventive measures that will allow you to get rid of troubles and operate the reel for a very long time and without problems. The simplest measure in this context is to use heat shrink of a suitable (large) diameter, which must be applied to the surface of the tip of the ignition coil. The procedure is simple, the main thing is to choose heat shrink of the appropriate size and diameter, and also have a hair dryer (preferably a construction hair dryer) or some kind of gas burner on hand. However, before applying heat shrink, do not forget to clean and degrease the working surface of the tip. This procedure can also be used not as a preventive measure, but rather as a repair measure.
Also, for prevention, it is advisable to keep the coil housing, and other engine elements, clean so that there is no “sparking” through dirt and dust. And when replacing spark plugs, always use dielectric grease for spark plugs.
The ignition module (IM) of the Niva-Chevrolet car is highly reliable and, most often, provides sparking over many tens of thousands of kilometers. However, if it fails, it is difficult to diagnose due to the lack of obvious signs. The decent cost of a module does not always allow it to be replaced with a new one, which is called “blindly”. First you need to reliably verify that the old one is faulty. Read the article about how to check the ignition module of a Niva-Chevrolet.
Briefly about the design
The main purpose of any MZ is to convert a low-voltage signal into a high voltage sufficient for normal sparking in the cylinders. Therefore, structurally, the Niva-Chevrolet ignition module is a pulse transformer. A signal from the electronic control unit (ECU) is supplied to its input, and a voltage of about 20 - 30 kV is removed from the output. The module has a connector for connecting the low-voltage part and four sockets into which the so-called armored wires are inserted.
High voltage is supplied to two cylinders at once. In this case, 90% of the energy is spent on the formation of a spark where the compression stroke ends. The working mixture in it is under high pressure, which means it has high conductivity. Thus, the module consists of two independent ignition coils.
The procedure for connecting high-voltage wires Niva Chevrolet
1.4. Chevrolet Niva engine ignition system (controller M7.9.7)
The ignition system (Fig. 1.4-01) uses a 4-lead ignition coil, which is a block of two 2-lead ignition coils. The ignition system has no moving parts and therefore requires no maintenance or adjustment, with the exception of the spark plugs.
Fig, 1.4-01. Ignition system: 1 - battery; 2 - main relay; 3 — ignition switch; 4 — spark plugs; 5 - ignition coil; 0 - controller; 7 — crankshaft position sensor; 8 - master disk
The current in the primary windings of the ignition coils is controlled by a controller that uses information about the engine operating mode received from the sensors of the engine control system. To switch the primary windings of the ignition coils, the controller uses two powerful transistor valves (Fig. 1.4-01).
The ignition system uses a spark distribution method called the “idle spark” method. The engine cylinders are combined in pairs 1-4 and 2-3, and sparking occurs simultaneously in two cylinders: in the cylinder in which the compression stroke ends (working spark), and in the cylinder in which the exhaust stroke occurs (idle spark).
Due to the constant direction of current in the primary and secondary windings, the sparking current of one spark plug always flows from the central electrode to the side electrode, and the second - from the side to the central one.
Chevrolet Niva engine ignition coil (controller M7.9.7)
The four-terminal ignition coil (Fig. 1.4-02 and 1.4-03) has the following three circuits (see Fig. 1.4-01):
Primary winding power circuit
The vehicle's electrical system voltage is supplied from the ignition switch to contact “15” of the ignition coil.
Circuit of the primary winding of the ignition coil of cylinders 1 and 4, contact “lb”
The controller switches to ground the circuit of the primary winding of the ignition coil, which supplies high voltage to the spark plugs of cylinders 1.4.
Circuit of the primary winding of the ignition coil of cylinders 2 and 3, contact “1a”
The controller switches to ground the circuit of the primary winding of the ignition coil, which supplies high voltage to the spark plugs of cylinders 2 and 3.
If any element of the 4-terminal ignition coil malfunctions, the entire assembly must be replaced.
Removing the ignition coil 1. Turn off the ignition.
2. Disconnect the wiring harness block from the ignition coil.
3. Disconnect the high-voltage wiring harness.
4. Remove the ignition coil by unscrewing the mounting bolts.
ATTENTION. Dismantling of high-voltage wires should only be done using the protective cap.
Installing the ignition coil
1. Install the ignition coil on the bracket on the engine and secure with bolts, tightening to a torque of 9.6. 15.4 N • m.
2. Connect the spark plug wires.
3. Connect the high-voltage wire harness to the coil leads and spark plugs.
Dampening detonation of a Chevrolet Niva engine (controller M7.9.7)
To prevent damage to internal engine parts due to prolonged detonation, the ECM adjusts the ignition timing.
To detect detonation, the system is equipped with a knock sensor, see section 1.1.
The controller analyzes the signal from this sensor and, when detonation is detected, which is characterized by an increase in the amplitude of engine vibrations in a certain frequency range, it adjusts the ignition timing using a special algorithm*
Adjustment of the ignition timing to dampen detonation is carried out individually for the cylinders, i.e. it is determined in which cylinder detonation occurs, and the ignition timing is reduced only for this cylinder*
In the event of a malfunction of the knock sensor, the corresponding malfunction code is entered into the controller’s memory and the malfunction indicator turns on* In addition, the controller, depending on the engine operating mode, sets a reduced ignition timing, which eliminates the occurrence of detonation.
Where is the Ministry of Health located?
The location of the Niva-Chevrolet ignition module was not chosen very well. It is attached to the bottom of the cylinder block. Thus, the module is exposed to two negative factors at once:
- Corrosion. This is facilitated by the low location. During operation, moisture often gets into the MH.
- High temperature. Mounting the module on the cylinder block forces it to operate at temperatures close to 100 degrees.
The second factor is the most critical for MH. The manufacturer guarantees normal operation of the device up to 120 C°. This kind of temperature under the hood is rare. But constant exposure, even to lower values, significantly reduces the service life of the MH. Therefore, conscientious owners move the module to a place with more benign conditions. Most often, on the partition of the engine compartment.
Varieties
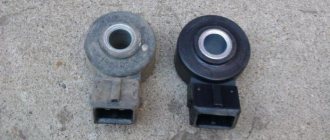
During its production, Shniva was equipped with two types of modules.
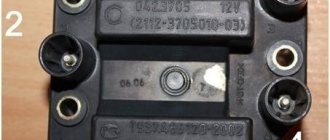
- MZ from a VAZ 2112 car. Installed until 2006. It includes a spark control system.
- The module is from a VAZ 2111. It is controlled by signals from the ECU, therefore, in essence, it is a regular ignition coil.
Please note that the modules are not interchangeable. This is due to their different designs. You can determine which ignition module on a Niva-Chevrolet by its appearance. The old one has large dimensions and weight, and most importantly, unlike the new one, there are not three, but four contacts on the primary winding connector. At the same time, the process of checking the Niva-Chevrolet ignition module will be considered using the example of a new module.
Useful video
The most correct method (not the “poke method”). Remove the valve cover and turn the crankshaft until the mark on the camshaft coincides with the casting at the top (mark on the inside of the sprocket). Set the mark on the crankshaft 9 degrees earlier than the long mark (TDC). The nearest short mark is -5g, the second -10g. That is, the mark on the pulley will be almost on the farthest short mark, slightly shifted towards the first short mark.
Place the distributor in place so that the slider is directed towards the FOURTH cylinder (according to the inscriptions on the distributor cover). In this case, the latches should be approximately parallel to the motor. Lightly press the distributor with the nut, but so that it can be turned by hand. Place the cover and the wire with the grounded spark plug on the terminal of the fourth cylinder, also put the wire on the coil and on the central terminal (do not forget about the Hall sensor).
Symptoms of a problem
As already mentioned, symptoms of a faulty ignition module are also typical for many other components of the car. There are almost no signs that directly indicate MH. This significantly complicates repairs. However, with experience, conclusions about a malfunction of the Chevrolet Niva ignition module can be drawn from the following symptoms.
- Two cylinders are not firing at once. This is the only sign that, although not always, indicates MH. The likelihood of this increases if cylinders 1 and 4 or cylinders 2 and 3 are not working at the same time.
- Idle speed “floats”.
- Diagnostics shows misfires in all cylinders.
- As the engine warms up, its power drops and interruptions appear.
- The CHECK ENGIN alarm comes on.
It should be noted that a complete failure of the motor, in which the engine does not start at all, happens very rarely. Basically, this symptom of a malfunction of the Niva-Chevrolet ignition module indicates damage to the low-voltage part of the wiring.
Admiralteyskaya Embankment
Time - 14:25
A walk along the embankment in St. Petersburg is a separate adventure. Here you will see not only a lot of pleasure boats, but also other interesting things. For example, the Kunst Chamber building on the other side, the Palace Bridge, lion figurines on the pier. The Tsar Carpenter monument deserves special mention.
This is another monument to the founder of St. Petersburg, Peter I, who, as you know, was a jack of all trades. A walk along the Admiralteyskaya Embankment ends at the Palace Bridge. We turn right and wait for any bus or trolleybus that will take us to Anichkov Bridge (Liteiny Prospekt stop
Notice
: Undefined variable: text_alt_photo in /var/www/ticketstour.ru/catalog/view/theme/theme_ticketstour/template/product/product_card.tpl
on line
29
English
Bus tour “CITY SIGHTSEEING” around St. Petersburg
Bus sightseeing tour of St. Petersburg on a red double-decker bus using the “hop on - hop off” system
- Saint Isaac's Cathedral
- 1 hour 30 minutes 8,894
from 800
Book
Nearest 06/16/2020 10:00
Notice
: Undefined variable: text_alt_photo in /var/www/ticketstour.ru/catalog/view/theme/theme_ticketstour/template/product/product_card.tpl
on line
29
Sightseeing tour of St. Petersburg
Bus tour of the main attractions of St. Petersburg
- m. Gostiny Dvor
- 1 hour 30 minutes 6,057
from 275
Book
Nearest 06/11/2020 17:45
Notice
: Undefined variable: text_alt_photo in /var/www/ticketstour.ru/catalog/view/theme/theme_ticketstour/template/product/product_card.tpl
on line
29
Sightseeing tour of St. Petersburg with a visit to the Hermitage
Sightseeing bus tour of St. Petersburg with a visit to the State Hermitage Museum
- m. Gostiny Dvor
- 3 hours 5 405
from 500
Book
Nearest 07/02/2020 10:00
Causes of damage
Most often, the Niva-Chevrolet ignition module fails due to overheating caused by its poor location in the engine compartment. This simply leads to a break in the secondary winding of the pulse transformer. However, this can happen for other reasons, namely:
- use of faulty high-voltage wires;
- use of spark plugs other than those recommended by the manufacturer;
- checking the spark by shorting the armored wire to the car body;
- manufacturing defects.
Thus, one of the main reasons for module failure is the notorious “human factor”. The reason for this is incorrect diagnosis and operation of the MH. Test methods that are acceptable for the ignition coil of a carburetor engine are most often not suitable for modern modules and will most likely cause failure.
Main causes of malfunctions.
Mostly, malfunctions occur due to damage to the winding. Since high voltage current is generated in it, over time, when using low-quality materials, damage to the wire sheath, breakage or rupture of turns may occur. This can happen for several reasons:
- Use of faulty high-voltage wires.
- Spark plugs that do not match the vehicle parameters are used.
- Solder failure due to high motor vibration
- Moisture getting inside the case
- Condensation Formation
So, for example, if there is damage in the armor wires, then the coil impulse is not fully used, and it looks for another output, as a result of which it breaks through the secondary winding, where the wire cross-section is lower.
This problem manifests itself gradually, since the coils begin to fail gradually and one of them will continue to work for some time. Therefore, if the following symptoms appear, you must immediately check the functionality of the module:
- the engine has difficulty gaining operating speed
- floating idle
- the engine is running rough - there is no spark in one of the cylinders
- jerking while driving
These reasons may be associated with other breakdowns, but when conducting diagnostics, one should not forget about the Niva Chevrolet ignition module. If you suspect the functionality of a component, you must check the device. Diagnostics begins with checking the power contacts. They may be oxidized or the wiring may be broken. If this does not bring results, then you need to dismantle it to check it using additional instruments.
Module replacement
How to remove and connection procedure:
The ignition module (IM) is an electrical device whose main task is to generate high voltage current and subsequently transmit it to the spark plugs. High-voltage wires are used to connect the MH and spark plugs. MZ made it possible to abandon the traditional distributor and ignition coil. The ignition system does not require maintenance due to the absence of adjustments and moving parts.
The principle of operation of the ignition module VAZ 21214
The MH control is performed by the Electronic Control Unit, which supplies current to the coil windings. After which a high voltage is generated (according to the law of induction) and at the required moment it is supplied to the spark plug. MZ consists of two ignition coils, two switches, four outputs to high-voltage wires and a plastic case. The ignition system uses the “Cold Spark” method - each coil is connected to two cylinders: the first - the first and fourth cylinders, the second coil - the second and third cylinders.
Symptoms of a problem
Four signs of malfunctioning MH: Loss of power; Dips during acceleration; Cylinders 1-4 or 2-3 do not work; Unstable idle.
How to find the ignition module?
To find the MH, you need to find high-voltage wires, because one end of the explosive wire goes to the spark plugs, and the other to the ignition module.
Connecting explosive wires to the ignition module
In the process of connecting high-voltage wires to the MZ VAZ 21214, a certain order must be followed. If the module is held strictly in front of you, the connection will be made as follows: the first cylinder is connected to the lower left terminal, the second is connected to the upper left terminal, the third to the upper right terminal, and the fourth to the lower right terminal.
The cost of the ignition module for VAZ 21214
The approximate cost is from 650 to 1100 rubles.
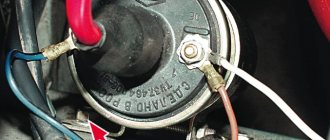
The ignition coil on a VAZ 2121 and Niva 2131 is removed for replacement in case of failure. The coil cannot be repaired and must be replaced. To carry out repair work, you will need a standard set of tools, after which, if you have everything necessary, do the following sequence of actions:
Open the hood. The work is carried out with the ignition turned off; you can also disconnect the minus terminal from the battery.
- Disconnect the central high-voltage wire from the coil by removing its rubber cap and pulling the wire toward you.
- Next, using an eight-mm wrench, unscrew the two nuts securing the tips of the low-voltage supply wires to the coil studs and remove them together with the washers.
Now you can remove the coil. To do this, use a ten-point socket to unscrew the two nuts securing the coil bracket to the body studs and remove it.
At this point, the repair work on removing and replacing the ignition coil on the VAZ 2121 and Niva 2131 has been completed. Replace it or make any other repairs, after which we carry out the installation in the reverse order.
ATTENTION! The electronic catalog of spare parts intended for reference purposes only! Our company does not sell all spare parts presented in this list. If there is a “Cost” link in the right column, these spare parts are on active sale
Availability in warehouses for details and prices, see the product card. If there is no “Cost” link in the right column, we do not sell such parts and do not accept orders for them.
If there is a “Cost” link in the right column, these spare parts are on active sale. Availability in warehouses for details and prices, see the product card. If there is no “Cost” link in the right column, we do not sell such parts and do not accept orders for them.
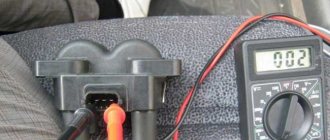
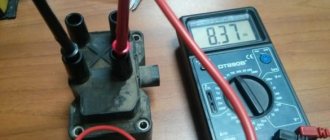
Checking with a multimeter
- The check is carried out on the removed device and begins with inspecting the condition of the terminals to which the high-voltage wires are connected.
- The probe is installed on pin D, the black one is shorted to ground. In 20V voltmeter mode, the device should show 12 volts.
- Then we switch the device to resistance measurement mode, and install the red and black probes on contact D and ground, respectively. A normally operating device should have a reading of less than 1 ohm.
- We check contacts A and B one by one. The device is switched back to voltmeter mode and readings are taken. If they are no more than 0.3V, then the device is considered working.
If any measurements show deviations from the norm, then the device is considered faulty. The continuity of the circuit should be checked.
Transferring a part
When the car is frequently used off-road, some car owners try to move the module as high as possible so that as little moisture gets on it as possible. Also, changing the location allows you to avoid overheating, which shortens the service life of the device. This is especially true when operating in difficult conditions, when the engine operates at high speeds, while the travel speed is low and, as a result, the interior ventilation is insufficient.
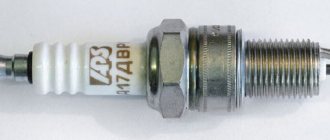
Spark plug.
On the Niva Chevrolet, the spark plugs are closely related to the previous device. And if they malfunction, all the same problems as described above are possible. Spark plugs fail especially often in winter. This is due to the fact that the car is not used so often and mainly for short trips. Due to the low ambient temperature, the candles do not warm up to the maximum temperature at which they self-clean from carbon deposits.
If problems occur, it is necessary to replace the spark plugs in a timely manner so that this does not affect the performance of other system components. Spark plugs for the Chevrolet Niva must be purchased specially for eight-valve injection engines. When purchasing, you should pay attention to the gap between the electrodes. It should be no more than 1.5 mm. If this distance is greater, this will affect the duration of the candle.
Electrical wiring Niva 21213: features of unification
The VAZ 21213 is the successor to the VAZ 2121 Niva, and was launched into production in 1994. The addition of a “C” in the index marked a new era of the off-road version of the car, although most of the parts were used from the entire model range of the Togliatti Automobile Plant.
In particular, the car received:
- Power unit from VAZ 2106 with volume increased to 1.7 liters;
- Two-chamber Solex carburetor;
- Contactless ignition system on a microcontroller;
- 5-speed gearbox (modified from VAZ 2121).
For reference: cars of the Niva family have become popular in many countries. A promotional video about their unique off-road qualities, like the cars themselves, can be found in Japan, Brazil, Chile and even Australia.
Candle making options:
To increase productivity when creating these products, some technological features are used, which in theory can increase productivity, and as a result, the highest quality fuel combustion:
- Platinum coating. Allows you to increase the service life up to 50 thousand kilometers due to the fact that the surface becomes more resistant to the combustion products of the fuel mixture.
- Multi-contact spark plugs. Typically used in cars that are operated in regions with predominantly low temperatures. Such products make it possible to improve the starting of a cold car in the morning. In summer, it is recommended to replace them with regular ones.