Lada Granta. Installation of LED daytime running lights on Lada Granta
- January 11, 2016 11:30:17
- Reviews:
daytime running light lamp is combined with the dimensions.
The base is a regular 4 pin w21/5w. 21 W – running lights, 5 W – dimensions. It seems like install an LED lamp of that size and that’s it. But no... AvtoVAZ loves to come up with the best schemes and extraordinary solutions. It's the same thing this time. The pinout on a regular base is quite unusual. Therefore, if you install a regular LED lamp , then the following options are likely: either the running light (or dimensions) will not work, or it will start to smoke..
There are several options for solving this problem for us.
Option 3. The most barbaric. Drill out the entire base from the standard Granta connector. Glue the light bulb there tightly and either solder the wires because it is necessary, or purchase an additional connector and solder it to it.
The surest option is the introduction of special non-polar LED lamps . This means that no matter how “+” and “-” are supplied, the electronics inside the lamp will determine how to supply power to the chips.
Rate it! Luminous flux - 720 Lm (halogen close-light lamp gives a flux of 1200 Lm) Chips - South American production CREE, 6 pcs Multi voltage from 12 to 24 V Non-polar Declared service life of more than 30,000 hours.
The photo shows the fuse for daytime running lights on a Lada Granta . When testing and selecting LED lamps, it often burns out.
For comparison. One headlight of the Lada Granta car has an LED DRL , the other has a regular lamp.
And now what it looks like in the darkness. The difference is obvious!
LED running lights and low beams on. Well, in general, the low and high beams also need to be changed to LED lamps. For example, for these – LED CARS H4 HI/LO 3600 LM
Source: audio-alarm.ru
Switching on through dimensions or low beam
The second version of the DRL connection diagram involves using the power circuit of the side light bulb. To do this, the positive wire from the running lights is directly connected to the “+” from the battery. In turn, the negative wire is connected to the “+” of the side light, which is currently electrically neutral. As a result, the following current flow path is formed: from the “+” of the battery through the LEDs to the size, and then through the light bulb to the body, which serves as the minus of the entire circuit. Due to the low current consumption (tens of mA), the LEDs begin to glow, and the lamp spiral remains extinguished. If the driver turns on the side lights, then +12 V appears on the positive side of the side lights, the potentials on the DRL wires are equalized and the LEDs go out. The circuit goes into normal mode, that is, current flows through the side light bulbs.
This circuit solution has several disadvantages:
- running lights remain on when the engine is turned off, which is contrary to current regulations;
- the circuit will not work if LEDs are also installed in the dimensions;
- the circuit will not work correctly if the DRLs contain powerful SMD LEDs, the rated current of which is comparable to the current of a light bulb;
- For safety reasons, an additional fuse must be installed.
DRL Lada Granta
Making DRLs with your own hands for the Lada Granta
Daytime running lights (or DRLs for short) serve to increase the level of safety on the roads during daylight hours. LEDs with good mounting are usually used as light sources for running lights. If the vehicle does not have DRLs provided by the manufacturer, low-beam headlights or fog lights are used. But in this case, the car is the least noticeable, because both of them are configured to illuminate the road surface, and this is a fundamental difference. In addition, low beam and PTF consume more energy, and, as a result, gasoline consumption also increases. Therefore, it makes sense for owners of such cars to think about buying DRLs or creating DRLs with their own hands from LEDs.
Let us consider, as an example, the possibility of installing LED DRLs for a car such as the Lada Granta. The manufacturer provides daytime running lights combined with the dimensions. But in order to save money, Grant received incandescent lamps as a light source. The most common option for upgrading DRLs with your own hands is to purchase conventional LED-based lamps, as in the figure below. With their contacts they are just approaching regular positions.
As practice shows, the only difficulty that Lada Granta owners encounter when installing such lamps is the correct determination of polarity, so the main thing is to correctly install the LED lamp on the Granta.
Oh, this is how Granta looks with LED DRLs.
First you need to decide: how many LEDs to use and what power? There is a 12 V power supply from the battery - which means you can turn on no more than 4 diodes one by one. At a theoretical level, you can turn on several parallel chains of four, but in this case 4 per DRL headlight will be enough (or maybe even 3, if with a good lm/W ratio). To provide the required luminous intensity (according to standards, it must be from 400 to 800 Cd), the power of the LEDs must be approximately 1...1.2 W.
It is recommended to purchase LEDs from one of the recognized manufacturers, already mounted on an aluminum board. For example, DRLs on Gree LEDs (XP series or the most economical XTE, XBD series are suitable), OSRAM (Oslon series), you can also pay attention to LEDs from Korean manufacturers, they are usually cheaper than Samsung and Seoul Semiconductor series similar in features indicated above.
The diodes must certainly be on a duralumin board, because They are not adapted for manual installation and it will not be possible to install them with your own hands without damaging them. LEDs from an unknown Chinese manufacturer may turn out to be half the cost, but they will almost certainly shine twice as bad, so it’s not worth the risk.
Next you need to take care of the secondary optics, which should be selected in accordance with the type of LED. The angle should be about 20˚ in the vertical plane and about 40˚ in the horizontal. A more suitable lens for the XPE LED is CA11052_TINA2-O (LEDIL).
The next step is manufacturing the radiator housing.
You can create it with your own hands either from a ribbed radiator profile or from a regular U-shaped one. In the 2nd case, the overall dimensions will be larger, but the filling (LED module with lenses) can be recessed inside. In our case, the area of the diffused surface must be at least 100 cm 2, and certain profile dimensions will depend on the installation location of the headlight, the size of the LED modules and lenses.
It is better to secure the LED module on the radiator with screws or rivets, because Thermally conductive adhesive may not withstand such formidable implementation criteria and there is a risk of losing the LEDs somewhere along the way. The lenses are attached using holders that come with them and have double-sided tape on the base. Because of the reasons indicated above, it is recommended that after installing the lenses, additionally secure them with transparent silicone sealant, covering the perimeter. It’s better to fill the entire module with sealant, so that only the lenses above the surface remain, then you don’t need to solve anything else for moisture protection and there will be no need for protective glass. The main thing is not to forget to remove the power wires.
We come up with a method for attaching the running lights to the car - here are ready-made DRLs made from LEDs with your own hands!
It is imperative to connect the headlight to the power supply through a limiting resistor, the value of which will first need to be calculated at a theoretical level, and then actually checked.
If the voltage on a charged battery is 12.6 V, the voltage drop across one LED (according to the manufacturer) is 3 V, then to ensure one-watt mode you will need a resistor with a nominal value of 1.5 Ohms and a power of at least 2 W.
You can connect the DRL to the car’s network using different methods, depending on the required method of operation and the brand of the machine. In any case, you can create all this with your own hands using the diagram.
Connecting DRL from the handbrake of Lada Granta (photo guide)
I have long wanted to create DRLs from the handbrake on Grant. I took relevant information on connection from various sources, including on the Lada Granta forum. On the Granta in the Norma configuration, the DRLs light up from the ignition. At the moment, when the handbrake is raised, the DRLs do not light up; when the handbrake is lowered, the DRLs light up. I took a socket for a relay with mounting in a mounting block 10r, a regular 5-pin NC (Normally Closed) relay 50r, wires, auto blade terminals (socket/mother), 3 diodes FR207 - Pulse diode 2A 1000V 1.70r for 1 piece (instead of a diode FR207 you can use a 1N4007 1A 1000V diode, but the 1N4007 has a narrow leg and bends), a soldering iron, heat shrink, and electrical tape.
relay block with mounting in mounting block 2110
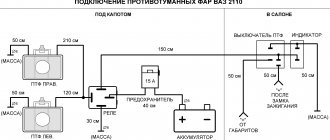
Connection diagram for DRL via handbrake of Lada Granta
GOST requirements for installing DRLs
According to GOST R 41.48-2004, do-it-yourself installation and connection of navigation lights must be carried out strictly in accordance with the following requirements:
- A distance of 600 mm must be maintained from the edge of the car body to the DRLs. It is allowed to reduce this indicator to 400 mm, but only if the overall width of the machine is less than 1.3 m (clause 6.19.4.1).
- The distance from the ground level to the light elements should be in the range from 250 mm to 1500 mm (clause 6.19.4.2).
- DRLs must be forward-facing and installed on the front of the vehicle (clause 6.19.4.3).
- A certain geometric appearance is maintained. According to paragraph 6.19.5, the horizontal angle beta should be 20 degrees inward and outward, and alpha should be 10 degrees downward from the horizontal and upward.
At the same time, a specific connection diagram for running lights is not reflected in GOST in any way, so here you are free to make a decision yourself. However, there is a small nuance. Installing running lights in accordance with GOST also implies automatically turning on the DRLs together with the car engine and turning them off when the headlights are working. The only exception is turning on the high beam headlights for a few seconds to signal other drivers.
Based on these requirements, the choice of navigation lights must be approached carefully.
Selection of LED lamps for DRL Lada Granta
Car : Lada Granta. Asks : Maxim Rastyagaev. Question : I would like to install LED lights in the DRLs on the Lada Granta, is it worth it?
I bought LED lights in the DRL on Granta from the store. The merchant said that a lot of people do exactly this.
Pros of DRL:
- The diode has a longer service life
- brightness and visibility are better.
In general, there are only advantages. But when I left the store, one guy said that there was probably an error that would be displayed on the device panel. Because the car will think that the filament is faulty, because the diode consumes less electrical energy. Is this so, and is the game worth the candle? I can still return the lamps to the store, I haven’t opened the packaging.
Lada Granta Standard+ “Basin” › Logbook › LED DRLs+dimensions. Lada-Granta.
Some time ago the DRL light died again.
And after studying the market, I was horrified. They are asking 120 rubles for one lamp! For me, this is an excess, especially considering the fact that DRL lamps are used (and lit) quite often. Therefore, I decided to switch to diode lighting (beautiful, bright, economical, durable (room for sarcasm) and discovered that you can buy an LED corn lamp with the required T20 base for only 200 rubles. In a normal store in the city (even with a guarantee).
The difference from 120 for a regular lamp is ridiculous. But here a problem arose, namely our non-standard pinout. This is what she looks like. They say that the old “Americans” had something similar.
In the store, on the market and in other places, lamps with the following pinouts are available:
Exit? Order lamps from China. Ebay or something similar. I found a seller and ordered it. And here they are:
But it wouldn’t be the Chinese if they sent everything as expected.
