How to properly disassemble a side rear view mirror?
A rear view mirror is necessary for every car. They are not the same on different car models, but they perform a single function - they broaden the driver’s horizons.
Unfortunately, a frequent problem is the breakdown of these elements of the car. This part of the car is most vulnerable in a parking lot. Any “neighbor” can accidentally knock over a mirror. Unfortunately, in the event of a breakdown of this kind, there is only one way out - remove the damaged part and install a new one in its place. However, such a sad situation is not the only reason to change the mirror. This skill will also be required when repainting a car or if the mirror surface is scratched or cracked.
Side rearview mirror
Removing the mirror
First we dismantle.
Naturally, it will be more convenient to disassemble the mirror removed from the car, so it should be removed. What is needed for this?
Removing a power mirror. First, you need to remove the mirror adjuster locking bracket, unscrew the three screws that secure the mirror to the door frame, and then remove the mirror itself.
Removing the electric mirror. The first thing to do is disconnect the negative terminal from the battery. Next, you need to disconnect the block from the electric drive wires, unscrew the three screws securing the mirror to the door and remove it.
First way
Using a curved object or screwdriver, flip the mirror over by gently pressing down on the inside. Trying to turn the mirror over from the edge may damage it. Some motorists use a variety of objects to remove the mirror element. It could even be all kinds of kitchen spatulas. Some wrap the edge of the spatula with electrical tape to avoid damaging, or rather, scratching the surface of the mirror. Others use a single hard blade. to fix the gap, and the other is softer to insert it into the formed groove.
Reasons for replacement and the process itself
Replacing a mirror on a Lada Kalina may be required in the following cases:
- if the mirror element is damaged due to impact or temperature change;
- if desired, improve the car;
- in the absence of a “part” (as a result of theft).
How to change a mirror yourself, and what is needed for this? With a little skill, the job can be done without difficulty. The main thing to consider is that dismantling and installing it yourself requires caution. This will avoid breaking the new element and damaging the car body.
When removing an element, you must turn it out to the maximum. This process will be indicated by the gap formed between the part and its body. In this matter, the main thing is not to damage the element motors. The structure itself is carefully unscrewed using a Phillips screwdriver.
It needs to be unscrewed from the car body and disconnected. This closes the question of how to disassemble a mirror. The next stage involves the installation of a new element.
The mirror element itself is located in the center, where it is safely secured with latches. The main thing is that it is secured correctly. To do this, you need to apply force and press on the part itself. Then the side element is screwed to the car body.
The process is not complicated, the main thing is not to damage the lining on the Kalina mirrors and not to spoil the mirror element itself.
DIY car repair and maintenance
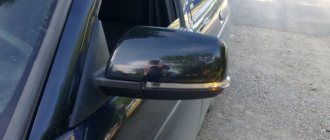
The exterior rear view mirror on the Lada Kalina is designed and dismantled very simply and conveniently, like everything on this model of a domestic car (in my opinion, the best in terms of price-quality ratio).
This particular mirror is suitable for both Tens and Priora. As we can see in the photo above, the mirror mounting principle is the same as on other Ladas, with one small difference. The side mirror is attached to three self-tapping screws using a shaped screwdriver (see photo above).
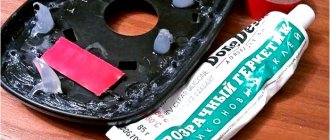
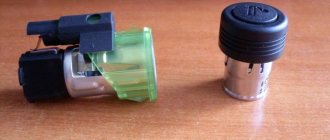
The side mirror itself (in this case, simple, without a turn signal repeater, with manual adjustment) consists of two parts. The main part (the mirror itself) and the protective cover. Connect these parts carefully and accurately by aligning the grooves on the mirror and the inserts on the lid and press it. It should click into place.
Video
How to disassemble the side mirror on a VAZ 2110, see the following video:
Hello everyone, today there will be an article on replacing the mirror element of the exterior mirror on Kalina. Not long ago there was a comment on one post with a request to publish similar material, and now - I finally managed to make a visual aid for this repair.
So, we don’t need practically anything from a tool, a maximum of two screwdrivers: with a flat blade and with a cross-shaped blade. In principle, you can do this without removing the mirror from the car, but of course it’s more convenient to work with it removed.
DIY car repair and maintenance
The outside rear view mirror on the Lada Kalina is designed and dismantled very simply and conveniently, like everything on this model of a domestic car (in my opinion, the best in terms of price-quality ratio).
This particular mirror is suitable for both Tens and Priora. As we can see in the photo above, the mirror mounting principle is the same as on other Ladas, with one small difference. The side mirror is attached to three self-tapping screws using a shaped screwdriver (see photo above).
The side mirror itself (in this case, simple, without a turn signal repeater, with manual adjustment) consists of two parts. The main part (the mirror itself) and the protective cover. Connect these parts carefully and accurately by aligning the grooves on the mirror and the inserts on the lid and press it. It should click into place.
Next, lean the mirror on the outside of the door so that all three guides and the cable connection fall into place (photo above). Then, screw in and tighten the three screws. Make sure that the mirror on the outside of the door is level and properly positioned.
And now, that same “one small difference” - instead of the Zhiguli plastic nut that we screw onto the connection of the control cables, here it is attached to the same Zhiguli corkscrew, which on the classics secures the door lock cylinder. And finally, put on the plastic panel so that the adjustment lever fits into the rubber frame, lean the panel against the two guides in the corresponding holes and press it.
Mirror for Kalina, price 3000 rubles (with mechanical adjustment and without repeater)
Only the best answers. Below watch the video about the mirror of the Viburnum vases and express your opinion about it in the comments to the article.
Video quality: TC
The video was uploaded to the admin from the user Avdey: for immediate viewing on the portal.
To give the correct answer to the question Mirror vases viburnum, you need to watch the video. After viewing, you will not need to seek help from specialists. Detailed instructions will help you solve your problems. Enjoy watching.
Humor on the topic: - Dear, who is this naked man on your desktop? What are you, gay?! - Kick this fool out of the operating room.
Tool:
- Medium flat screwdriver
- Medium Phillips screwdriver
- Pliers
Parts and consumables:
Note:
The work is shown on the left outside mirror. Removing the right mirror is similar.
1. Use a flat-head screwdriver to pry off the exterior mirror trim.
2. We remove the lining.
3. Using pliers, remove the locking bracket of the ball joint housing of the handle rod.
4. Using a Phillips screwdriver, unscrew the three screws securing the mirror.
5. We remove the mirror along with the cables and the ball joint.
6. Install the outside mirror in the reverse order.
The article is missing:
- Photo of the instrument
- Photos of parts and consumables
- High-quality photos of repairs
Reasons for replacement and the process itself
- if the mirror element is damaged due to impact or temperature change;
- if desired, improve the car;
- in the absence of a “part” (as a result of theft).
How to change a mirror yourself, and what is needed for this? With a little skill, the job can be done without difficulty. The main thing to consider is that dismantling and installing it yourself requires caution. This will avoid breaking the new element and damaging the car body.
When removing an element, you must turn it out to the maximum. This process will be indicated by the gap formed between the part and its body. In this matter, the main thing is not to damage the element motors. The structure itself is carefully unscrewed using a Phillips screwdriver.
It needs to be unscrewed from the car body and disconnected. This closes the question of how to disassemble a mirror. The next stage involves the installation of a new element.
The mirror element itself is located in the center, where it is safely secured with latches. The main thing is that it is secured correctly. To do this, you need to apply force and press on the part itself. Then the side element is screwed to the car body.
The process is not complicated, the main thing is not to damage the lining on the Kalina mirrors and not to spoil the mirror element itself.
Installation of heated mirrors on Kalina
Let's take a closer look at the second method:
Replacing a mirror on Kalina
To remove the mirror on Kalina you will need a couple of screwdrivers. First you need to unhook 8 clips. Then, carefully bending the mirror, gradually unfasten its clamps in a circle, without breaking off the 4 guides.
Connecting heated mirrors on Kalina
Remove door trims. Having snapped off the rear plastic trim on the mirrors, we lay two wires from the side mirror housing into the corrugation between the doors and the car body. To avoid the hassle of pulling wires through the block, you can simply drill holes in it. We connect the first wire to the body in the cabin (the ground on the door is not reliable). A +12V is connected using any of the following diagrams: Connecting heated mirrors to a separate button:
Connecting heated mirrors together with heated rear window: We solder wires from the mirrors through the 10A fuse to the wire connected to pin 5 of relay K10.
Removing the outer and inner rear view mirrors
Rear view mirrors are an integral part of the car. Even those drivers who have equipped their “swallow” with a monitor or camera cannot do without mirrors. Therefore, keeping them in good condition is the primary task of every car owner. Before moving on to the procedure for dismantling the mirrors, we will list the tools that we will need for the job.
Tools required for dismantling
- Phillips screwdriver;
- flat blade screwdriver.
How to make a worthy choice?
Exterior mirrors are one of the most popular and essential parts of a car. Without them, it is impossible to monitor the situation and move along a busy highway. Side-view mirrors often require replacement, due to their high “trauma” during movement.
Before work, you need to choose the best option for the mirror part. This could be a similar or more advanced mirror for Kalina. If difficulties arise when choosing, you need to familiarize yourself with the basic adjustment mechanisms.
The following types of mirrors are distinguished:
Ease of use depends on the choice of mechanism. The hinge type mirror element is the simplest. Many modern cars do not have it.
Lever control is based on a joystick or lever, which is located inside the cabin, and it is connected to the side part using a thin cable.
The electric mirror element is a modern mechanism. It is found in new cars and is equipped with a lot of additional features. Its use means comfort and safety.
Main advantages of the electric mechanism:
Heated mirrors are modern developments that simplify the life of every motorist. Increased visibility allows you to better navigate city roads. This option reduces the likelihood of an accident by increasing the chances of noticing a dangerous moment. Finally, the clarity and appearance of this item is much better than the stock part.
The anti-reflective coating on the mirror on the viburnum allows you to reflect the sun and bright lights. The anti-dazzle effect maintains good visibility while driving.
Heated mirrors are a convenient option. Thanks to it, there is no need to scrape snow and ice from the glass. This is a very nice and convenient addition. Finally, a built-in signal repeater. This element of the Lada Kalina mirror allows you to notify all road users about upcoming maneuvers. This makes driving easier and safer.
When choosing the optimal mirror element for the Lada Kalina, you must take into account personal preferences. Naturally, we should not forget about convenience and safety.
DIY car repair and maintenance
The exterior rear view mirror on the Lada Kalina is designed and dismantled very simply and conveniently, like everything on this model of a domestic car (in my opinion, the best in terms of price-quality ratio).
This particular mirror is suitable for both Tens and Priora. As we can see in the photo above, the mirror mounting principle is the same as on other Ladas, with one small difference. The side mirror is attached to three self-tapping screws using a shaped screwdriver (see photo above).
The side mirror itself (in this case, simple, without a turn signal repeater, with manual adjustment) consists of two parts. The main part (the mirror itself) and the protective cover. Connect these parts carefully and accurately by aligning the grooves on the mirror and the inserts on the lid and press it. It should click into place.
Next, lean the mirror on the outside of the door so that all three guides and the cable connection fall into place (photo above). Then, screw in and tighten the three screws. Make sure that the mirror on the outside of the door is level and properly positioned.
And now, that same “one small difference” - instead of the Zhiguli plastic nut that we screw onto the connection of the control cables, here it is attached to the same Zhiguli corkscrew, which on the classics secures the door lock cylinder. And finally, put on the plastic panel so that the adjustment lever fits into the rubber frame, lean the panel against the two guides in the corresponding holes and press it.
Mirror for Kalina, price 3000 rubles (with mechanical adjustment and without repeater)
Only the best answers. Below watch the video about the mirror of the Viburnum vases and express your opinion about it in the comments to the article.
Video quality: TC
The video was uploaded to the admin from the user Avdey: for immediate viewing on the portal.
To give the correct answer to the question Mirror vases viburnum, you need to watch the video. After viewing, you will not need to seek help from specialists. Detailed instructions will help you solve your problems. Enjoy watching.
Humor on the topic: - Dear, who is this naked man on your desktop? What are you, gay?! - Kick this fool out of the operating room.
Tool:
- Medium flat screwdriver
- Medium Phillips screwdriver
- Pliers
Parts and consumables:
Note:
The work is shown on the left outside mirror. Removing the right mirror is similar.
1. Use a flat-head screwdriver to pry off the exterior mirror trim.
2. We remove the lining.
3. Using pliers, remove the locking bracket of the ball joint housing of the handle rod.
4. Using a Phillips screwdriver, unscrew the three screws securing the mirror.
5. We remove the mirror along with the cables and the ball joint.
6. Install the outside mirror in the reverse order.
The article is missing:
- Photo of the instrument
- Photos of parts and consumables
- High-quality photos of repairs
Repair of the side rear view mirror or disassembly instructions (photo)
, which is attached with 3 pistons to the door itself. Next, use a cross-head screwdriver to unscrew 3 screws.
and the mirror ends up in your hands
Next comes the analysis of the mirror itself. To begin, remove the mirror element; to do this, pry it up on one side with your fingers and, using force, remove it (it is difficult to remove)
Here's a view of the inside of the mirror
(Here you can see the ends of the cables of different colors and one is missing), but here is the mirror element
Repair of side mirrors Lada Kalina
How to remove and disassemble a side mirror
by car Lada
Kalina
.
Replacing the mirror element on the exterior rear view mirror of Kalinas, Grants and Prioras
Video review on self- replacement
mirror element on the outside rear view mirror of such vehicles.
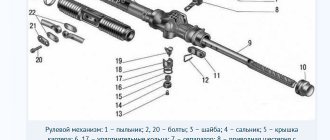
An autopsy showed that one of the cables with which the mirror element . mirror was found and it was decided to replace the cable. Unscrew the 4 screws that secure the turntable to which the mirror element is attached
and we see a torn cable
Unscrew 3 more screws securing the mirror housing to the base
Remove the boot seal
remove the adjustment lever
The cables are marked by color: red, blue, yellow. Visually we find the torn one and take it out. We take the same color from the donor and put it in its place, it is more convenient to insert it first into the turntable, then using a pliers into the adjustment lever. After assembly, I broke another cable and decided to replace everything.
Assembly is carried out in reverse order. This way I saved some money on the mirror.
Replacing mirror elements may be required for the following reasons:
1. The mirror element cracked due to impact or temperature changes
2. Replacing a regular mirror element with a heated mirror element
3. Mirror elements from the car were stolen.
The question arises: How to replace the mirror element? What is the technology and how to remove the mirror element yourself, without being a car service specialist. With little skills this is not difficult.
Basic knowledge
You won't be able to neglect the tuning process if you understand the purpose of proper tuning - reducing blind spots. A dead zone is a space on the side, behind or in front of the car, which, during a natural driving position, is hidden from the driver’s eyes and is not displayed in the rear-view mirrors. Controlling blind spots is especially important when changing lanes in heavy traffic. When another vehicle is in the blind spot, this means that it has not yet appeared in the field of peripheral vision, but is no longer visible in the reflectors.
Since reflective elements in a car are always installed at an angle, and are often convex in shape, the degree of reflected objects depends on the distance to the mirror element and the viewing angle. That is why the setup begins with setting the correct position of the driver's seat and taking your usual driving position.
Is the stereotype true?
You need to configure mirrors according to the principle - reflections should not duplicate the same information, but complement each other.
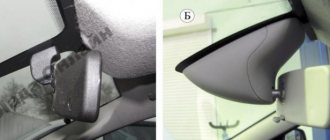
In the left corner it is clearly demonstrated that the incorrectly adjusted right mirror element shows the position of the car, which is clearly visible in the central reflector. The Community of Automotive Engineers came to this answer to the question: “how to adjust mirrors in a car” back in 1995 experimentally. It is worth recognizing that this method of adjustment goes against the usual recommendations of experienced drivers. The latter recommend adjusting the mirrors in the car so that the convexity of the rear of the car is displayed in the near corner. This position of the rear view mirrors has a right to life, but only in the case of drivers who do not feel the dimensions of their car. The unusual setting not only makes it difficult to reverse and park, but also prevents a novice driver from quickly developing a road situation in his head.
The photo clearly demonstrates the effectiveness of the mirror position, which is unusual for most drivers. With the traditional setup of fig.2, we see that the red car has left the driver's field of vision and is in the blind spot. An incorrectly adjusted reflector fig.5 displays a green car, which is unnecessary, since it is visible in the central mirror. When configured correctly, there is no blind spot on the left side of the driver, and a green car appears in the right side mirror as soon as it disappears from the central reflector.
To adjust, you need to place the car among static objects according to a pattern close to the images. To be able to double-check the correctness of the settings and remember the approximate position of the mirrors, so that later they can easily reproduce it.
Balance, useful tips
In some cars, getting rid of blind spots is extremely difficult or even impossible. Fortunately, there are not many such cars. It is worth recognizing that reflectors set in the described position can in some cases make driving difficult. Therefore you can:
- if necessary, immediately before parallel parking or driving in reverse, install a rear-view mirror on the side (in the traditional way). A slight downward slope will help you see the curb better. Never make adjustments while moving! Therefore, immediately after parking, you need to re-adjust the mirrors, since then in a hurry you can simply forget about it;
- When reversing, when you are sure that there are no obstacles on the right side, you can only navigate by the mirror closest to you. It’s more convenient to move this way, and in addition, later from the parking position you will have to reconfigure only one reflector;
- install additional side reflectors that will be aimed at blind spots.
Now you know how to properly adjust your car mirrors.
Video: Replacing the Rear View Mirror of Lada Kalina
For disassembly you need to take:
Add a few skilled hands to this toolkit and everything will work just fine.
As you know, rear and interior mirrors are removed in various ways.
Work in the salon
Let's start with the interior design. A lot here depends on what kind of machine you are working with.
Car manufacturers use different mounting systems. So base it on your specific situation. For example, such cars use different fastenings, such as:
- Deo Lanos;
- VAZ 2110;
- Chevrolet Niva;
- Ford Focus;
- Renault Logan;
- Chevrolet Cruze;
- Lada Prior;
- Lada Kalina;
- Hyundai Solaris and much more.
However, owners of inexpensive cars mostly do this work themselves.
And here you can quickly encounter glue and suction pumps or bolts and screws. These are the most common installation methods.
Domestic cars are mainly driven by bolts. Therefore, it will be easy to remove the structure. The cover is removed, the key is removed, and the equipment is unscrewed.
timing belt
A terrible problem that occurs with viburnum is a broken timing belt. It is impossible not to notice this problem. It doesn’t happen that you start the car in the morning and the belt is broken.
No, the belt breaks while moving and nothing good can happen here. The valves meet the pistons and bend them, and the entire piston can often break apart, which can lead to expensive repairs.
These are all 16 valve engines; eight valve engines do not have such consequences, because the pistons have recesses for the valves, and it is these recesses that help avoid collisions between the valves and the pistons.
No one is safe from a belt rupture, just check it more often, then you can notice the threat of a rupture and replace the belt that threatens to break in time. There is also an option to install pistons with grooves in a 16-valve engine, this will also help avoid serious consequences if the belt breaks.
Another problem - the pulley turned. Occasionally it happens that it turns over two or three teeth, because of this the sensor shows the wrong phase and the engine does not start. You need to remove the belt and check whether the mark on the pulley and the rear cover of the timing belt matches.
If not, then you need to turn the pulley (in rotation) until the marks match. The work is troublesome, you need to disassemble a lot of things to get where you need to, you also need to keep track of the marks on the camshaft and crankshaft, in general there is a lot of fuss.