Lighting in the vehicle interior has long been one of the mandatory components to increase driver comfort when driving, especially at night. Most car manufacturers produce cars with standard backlighting of not only the instrument panel, but also other parts that are located in the driver’s field of vision and visually facilitate the search for units to turn on the desired element in the car.
The failure of any lighting fixture in the car's interior, even if it does not affect the quality of the car's operation and its basic technical characteristics, causes significant inconvenience for the driver, which stimulates him to take action. Often in such cases, the work does not end with replacing the standard lighting element. Additionally, car owners are improving the lighting fixture.
One of these elements is the illumination of the vehicle’s stove. In this article we will talk about how to change a light bulb on a VAZ-2110 stove and improve the illumination of the heater with your own hands.
Replacing the VAZ-2110 stove light bulb with your own hands
If the heater light on your vehicle stops lighting, this may indicate a failure of the incandescent lamp or problems with the electrical wiring.
The work of replacing the heater control bulb is not particularly difficult, so each car owner can do it independently. To do this, you must initially purchase new panel light bulbs. Often, to improve the illumination of the controller, LED lamps are installed instead of conventional lamps, which are characterized by a higher quality light flow and a longer service life.
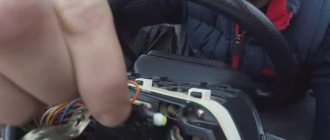
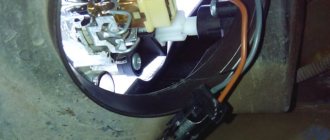
Before starting work, be sure to switch all controls to the inoperative state. This is necessary so that when connecting the heating element the contacts do not burn out due to a heavy load. In order to get to the light source, it is necessary to dismantle the heater control unit. Initially, remove the plastic plugs that are located on the sides of the stove regulator. In those places where there were plugs, there are latches. To remove the control panel, you need to insert your fingers into the side holes, press the latches and remove the vehicle heating control unit.
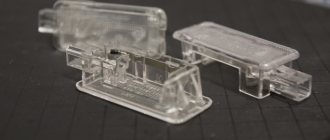
Dismantling must be done very carefully so as not to damage the wiring. Shortened wires are suitable for the heater switches. You need to pull the block towards you a little and disconnect the plug. Next, very carefully, using a screwdriver, remove the switch handles. After this, you need to open the four latches on the sides of the control panel, dismantle the product cover and remove the transparent light diffuser.
Now all that remains is to replace the failed light bulb with a new light source. Before assembling everything into its regular places, first check the operation of the installed lighting element. To do this, connect the control unit to the plug in the car and turn on the ignition. If the lamp does not light, then the problem may be in the heater wiring, or more precisely, in the contacts of the lamp socket. To identify the cause, you need to have a tester and basic knowledge of electronics. If there is no contact in the socket, it will also have to be replaced by purchasing a new part at the market or at a car store. Replacement is made by soldering the product instead of the old lamp socket. Be sure to insulate the soldering points after troubleshooting so as not to cause a short circuit in the future.
After fixing the problem, you can install a new light bulb, regular or LED. Check the functioning of the lighting element again. Then you can reassemble the stove in reverse order.
Replacing the Viburnum cigarette lighter lamp
Replacing the cigarette lighter on a Priora and its backlight lamp
Problem with Kalina's cigarette lighter. Solution
Replacing the cigarette lighter for Lada Kalina
How to replace the cigarette lighter in Kalina, Priora, Grant. Installation of a convenient cigarette lighter.
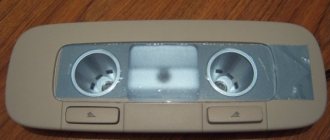
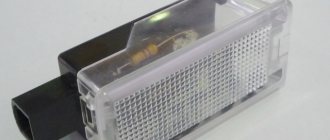
Replacing heater backlight lamps for Lada Kalina
Replacing lamps. Dashboard. Kalina.
How to replace the cigarette lighter on a Priora in 3 minutes
How to make a cigarette lighter button?
Kalina cigarette lighter does not work
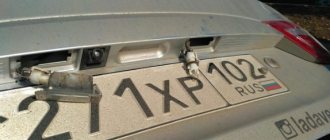
how to remove license plate light on viburnum
The modern car owner is provided with a lot of information about replacing the light bulb on a viburnum cigarette lighter - we invite you to visit us. Videos and reviews on do-it-yourself car maintenance and repair. How to repair a car yourself at home. We will help you with repairs and repair the car yourself. We know how to restore a car with minimal investment. I have attached video instructions.
Design of the heating system VAZ-2110
It includes three main nodes. This is a control unit for the VAZ-2110 stove, an air duct system, and a heating unit. The stove is controlled via an electronic unit. It consists of knobs with which the driver sets the required temperature and fan intensity.
The unit also includes a temperature sensor. As for the latter, it is necessary to automatically start the stove when the temperature inside the car drops more than two degrees below the set one. The sensor is equipped with a small fan. If you move the knob on the controller to position A, then a small electric motor is started in the heating unit, which controls the damper. The temperature sensor itself in the VAZ-2110 can be found on the ceiling, near the lighting lamp.
Another important component of the heating system is the air ducts. They pass directly from the stove itself, and each channel has its own separate function. Thus, the central channels are designed for interior ventilation.
The air distributor is responsible for supplying cool air to the cabin for ventilation or warm air for heating. The other two air ducts are designed to heat the interior in the back row. The rest are also intended for ventilation. Two side channels heat the mirrors and part of the interior. Separate nozzles are used to heat the driver's feet.
Painting the ceiling
Over time, the ceiling of any car gets dirty and changes color. Spots may appear on it. All this looks very unsightly. Some drivers order ceiling reupholstery. It is not so easy to do it in a garage. And specialist services are expensive. This is why many drivers prefer to paint the car ceiling rather than reupholster it. Here's what's required:
- universal paint. Sold in cans (5 pieces are required for the interior of a VAZ 2110). The disadvantage of this paint is that after a few years it begins to crumble. In addition, the interior of the car after such painting has to be ventilated for several days;
- a mixture of water-based and universal paint. This option is used as an alternative to the previous one. This mixture holds up better on the ceiling.
Sequencing
Before painting begins, the ceiling covering will have to be removed from the car.
- Use a Phillips screwdriver to unscrew all the screws that hold the ceiling covering in place. There are several plastic clips around the perimeter; they open manually. The ceiling covering is removed from the interior.
What to do if the heater light does not work on a VAZ-2110
The backlight of the VAZ-2110 stove does not work: options for solving the problem. Replacing the stove light bulb with your own hands. Modernization of the backlight of the heater control unit. Details in the article: https://remam.ru/vozdsys/ne-rabotaet-podsvetka-pechki-vaz-2110.html
| This is interesting 0 | How it will look on the blog: What to do if the heater light does not work on a VAZ-2110 The heater light on the VAZ-2110 does not work Copy the blog code: |
Dart_Veider
14.09.2017
Add to favorites Complain
Comments 0
← Previous topic All topics Next topic →
In order to write comments, you must join the group
Let's sum it up
The lack of lighting on the heater control panel does not affect the technical characteristics of the car, however, it causes significant inconvenience for the driver. Searching for an unlit heater switch at night distracts the driver's attention from the road and can become an indirect cause of an emergency.
If the backlight of the stove regulator does not work, it is necessary to replace the bulbs. Even a novice driver can cope with this task. To improve the appearance of the heater controls, use LED elements instead of conventional light bulbs, and the appearance of the device will delight you with warmth and comfort in the car interior.
Experience of car enthusiasts
I finally decided to change the light bulbs in the heater lights, which were not working for me when I bought the car. Before this, I scoured the Internet and found out that there are two ways to replace these light bulbs. The first way is to disassemble the entire torpedo, etc. and so on. The second way is to get to them through the dial of the stove controls. I used the second method. Tools: Phillips screwdriver, small pliers, flashlight for illuminating the lamp replacement process. First, the red and blue socket is removed, the rods under this socket are pushed apart with a screwdriver, and the old light bulb is carefully pulled out with pliers. Then he goes across the road to the nearest auto store, shows the salesman the old light bulb, and buys the same new one. A new light bulb is inserted using the same method. All! The backlight works! Whoever needs it, use this method, everything works. The main thing is that your hands do not shake and do not drop the lamp with tweezers or pliers))))
If, after turning it on, it seems to you that the light is pleasant to the eye, but you want a little more contrast, you can unscrew the plate with the ribbons and mount it again, but not directly to the body, but through small bushings that will help bring the LEDs closer to the scale. As a result, the lighting will become less diffuse.
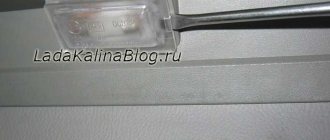
In order not to remove the entire dashboard, you can limit yourself to removing only the translucent scale on the stove. The method is rough, but effective. To do this, use a thin and wide screwdriver to pry the scale on the right (you can’t do it on the left because of the protrusions there!) and at the same time pull the middle of the scale toward you with your fingers so that it bends slightly in an arc. After this, the light bulb will be visible behind the plastic guides, which must be moved apart. Then, using tweezers with non-slip ends, remove the light bulb from the socket and replace it with a new one. When returning the scale to its place, you need to insert it from left to right, again slightly bending it in an arc.
Vibrant variety of colors
Current fashion trends regarding the replacement of panel devices are gaining popularity. Almost every car has neon lighting or internal LED illumination. It should be noted that such innovations are not a cheap pleasure and are not available to everyone.
As for replacing the factory backlight with a multi-colored version, there are no obvious obstacles and this can be done with your own hands. The first thing to start with is to disassemble the instrument panel. Then remove the protective glass and arrows. After this, it is necessary to remove the layer of paint from the back side of the substrate, which serves as a light filter and provides the color design of the instrument numbers. Acetone or any other liquid containing alcohol is perfect for this.
Next, let's pay attention to the color of the backlight. Let's start with the odometer
First of all, you need to dismantle the device screen and then remove the film and the backlight. It can be replaced with a universal LED that changes colors. We attach it to the socket of a standard light bulb and then attach the odometer screen back.
To begin a full replacement of the backlight, you need to connect the LEDs to the dashboard frame.
They can be purchased in a set with a special color switch.
Now all that remains is to install the light elements in place and connect them to the standard backlight contacts of the panel device.
The next step is to ensure that the hands also have multi-colored backlighting. In this case, you need to remove the paint from them and then cover them with ordinary white nail polish. This color better conveys the color saturation of LEDs.
At the final stage, it is necessary to secure the light-emitting diode color switch, preferably in the lower right area of the panel device. In the end, all that remains is to install everything in its place. First, the substrate is mounted, and then the arrows and protective glass.
Interior lighting of the VAZ 2110: change it yourself
Interior light bulb VAZ 2110
The interior lighting of the VAZ 2110 car has a wide variety of lighting elements. Most of them are located on the dashboard. There is illumination of gauges, instruments and indicators. Don’t forget about the car’s individual lighting, the car’s interior lamp and the lamp, which helps you see the contents of the car’s luggage compartment. It happens that the interior lighting in a VAZ 2110 does not light up and at any moment each of the components can become faulty. It is necessary to find an approach to each of these lighting elements.
Interior lighting and courtesy lamp
VAZ 2110 interior lighting
The first step is to consider the case of a breakdown of the switch that supplies electricity to the lamp in the cabin. This device allows you to get a direct source of bright light inside the car. Sometimes it needs to be repaired or replaced. For this task you will need:
Note: To work on the vehicle lighting wiring, it is not necessary to disconnect and remove the battery from the hood.
- It is necessary to prepare a Phillips screwdriver in advance. With its help, you need to unscrew the screw that attaches the switch to the VAZ door pillar.
VAZ 2110 interior lighting lamp
- There is a small hole in the door pillar that contains this switch. It must be removed from this hole. There is a wire to which this mechanism is attached. A careful movement is performed to disconnect.
Note: A common cause of shorting is rust, which occurs at the junction of the screw with the door (pillar) of the car. To complete the assembly process of this mechanism, it is necessary to perform the same steps, but in reverse order.
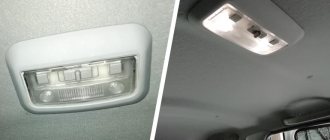
Trouble can be caused by a breakdown of the ceiling light, which is located inside the car. With its help, the entire interior of the car is illuminated. Its lighting is enough to look at a map in the dark, read literature or solve a crossword puzzle in your free time from driving.
VAZ 2110 interior lamp
Burnt out light bulbs
Frequent breakdowns are burnout of light bulbs. To gain access to this mechanism, you must do the following:
- The vehicle must be installed in a position that will be advantageous for repairs.
- You will need a slotted screwdriver. With its help and a little attention, access is made to the spherical protrusion. It is also called the swing axis. With its help, the diffuser is dismantled.
Note: After removing the lampshade, access to the lamp becomes available. All subsequent operations must be performed only if it is necessary to replace the light bulb.
- The lamp is attached to the base of the electrical wiring through a special contact. When you lightly press on it, the lamp automatically disconnects from the contacts. The removal process is best done with a screwdriver that has a rubber handle.
VAZ 2110 interior lighting diagram
- The new light bulb must be installed in place of the old one.
- In case of repairing the electrical supply system itself, it is necessary to unscrew the four screws that secure the main part of the lampshade to the roof of the car.
- To disconnect the main part of the lampshade, it is necessary to disconnect the wire fastening block. To perform this task, you need to pull the plastic nozzle away from the lampshade itself.
- Installation of the lampshade, after repair, cleaning and other work, occurs in the reverse order.
Note. To ensure that the installed lamp is fully functioning, you must ensure that there is tight contact with the base. The top cover, called the light diffuser, is inserted on one side into the lamp body, and slight pressure is applied to the other side until a slight click is obtained.
Flashlight for individual illumination
One of the interior lighting elements is a flashlight for individual illumination. It shines with a direct beam. For one person its illumination is quite enough. Sometimes it becomes necessary to clean, repair or replace it. To access it you must:
- Turn the outer ring of the fastening clockwise. Using a special screwdriver, with maximum care, the body of the flashlight is pryed off and the latter is removed from its place.
- To completely disconnect this mechanism, it is necessary to disconnect the wire block from the mechanism.
- The lamp is fixed using special clamps, which are somewhat reminiscent of the action of a spring. By slightly moving them apart, the light bulb and its socket can be freely removed from the flashlight.
- The lamp is removed from the socket by simple turns counterclockwise.
- The lamp and the flashlight itself are installed in their original place using the same steps, but they must be performed in the reverse order.
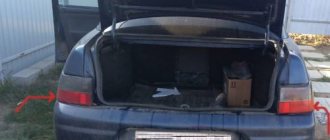
Luggage compartment
Since the luggage compartment can be considered part of the car interior, it is necessary to clarify that there is also a flashlight here. With its help, you can illuminate the contents of the trunk. In some situations, its work is irreplaceable. To access this mechanism, you must perform the following steps:
- The exterior lighting in the car is completely turned off.
- To release the lantern from its location, you must use a tool. For this purpose, you can use a simple screwdriver. She needs to remove the flashlight from the interior trim.
Note: To dismantle the lampshade, it is necessary to disconnect it from the two power wires. In order to eliminate the possibility of a short circuit when using this lighting device, it is necessary to insulate its connections with special adhesive tape or other sealant.
- The lamp is removed by pressing on the connecting elements. It occurs by analogy with the previous description of removing lamps from the socket.
- To turn on a new lamp, it is necessary to install it. It is pressed into the cartridge mount until it stops.
- To install the flashlight in its original place, you need to insert one end of the lampshade into the connector of the casing, and apply slight pressure on the other. A slight click will indicate that the light is fully connected to the connector in the luggage compartment.
Panel device
A lot of car interior lighting is located in the dashboard. The process of replacing it is one of the most difficult. To carry out work on the dashboard, you must: Note: the full operating instructions for the VAZ 2110 car indicate the need to completely disassemble the dashboard to remove it. After the dashboard is disassembled, you can replace the faulty elements yourself.
- To carry out work with electrical wiring, you should be safe and disconnect the negative terminal from the battery.
- The steering column covers are decorative. They need to be separated from the dashboard.
- The car steering wheel is removed. The horn plate remains unchanged.
- The switches that are located under the steering wheel must be separated from the vehicle.
- When disconnecting them, you will need to disconnect the wires and their connection element.
- The headlight range control has a regulator (a specific position switch). It needs to be dismantled.
- The next step is to unscrew the nut, which is located under this regulator.
- The mounting block is opened.
- This opens access to the location of the fuses (they can blow out, and therefore it is necessary to check their serviceability) and the relay block. It may be enough to replace them. Here you need to unscrew the screw securing the bracket. It is located on the left side.
- The wiring block is disconnected from the ignition system. It is also necessary to unscrew the screw that secures the bracket.
- The tips, two in number, are disconnected from the brake signal switch.
- The console trim has two screws. You need to remove them from the car.
- The console bracket is released.
- The screw securing the instrument panel and air duct must be unscrewed.
Note: All wires located under the instrument panel must be disconnected. For the convenience of the upcoming assembly of these mechanisms, it is necessary to mark them, since their number is large.
- The panel wire mount is disconnected from the rest of the power supply system.
- The immobilizer sensor must be disconnected, namely its wires.
- Similar actions occur on the right side of the panel.
- The nut securing the bracket is removed.
- The wires coming from the cigarette lighter are disconnected.
- The same operation must be done with the fog lamp wires.
- The glove box has a bolt at the top. It must be removed from the connector.
- Both screws of the lower fastening of the instrument panel are unscrewed.
- The seal is removed from the front left pillar.
- Plastic holders are dismantled.
- The same technology is applied to the right pillar.
- The ventilation grilles are removed.
- There are two bolts underneath that need to be unscrewed and removed.
- The dashboard extends slightly, about 10 centimeters, into the interior.
- Once the instrument panel remains in the cabin, you need to disconnect the remaining wires near the left door pillar and next to the steering column.
After completing these steps, you can safely begin replacing sensors, backlights and other components of the dashboard. The assembly process occurs in the opposite order of disassembly. The corresponding video and photo will help you do everything correctly with your own hands. Of course, if you do everything as the instructions require. Parts, light bulbs, fuses, etc. can be purchased at a special store. The price for them is not too high. You may have to spend time selecting parts. Their diversity can lead to a lot of different situations. Sometimes, the parts simply do not fit any mechanism. The best option would be to use an old part as an example.
masteravaza.ru
Lada Granta
Electrical diagram of the fuel pump module used by the adsorber 37, ignition switch 51, injector valves 2112 16.
Lada Largus
16-valve engine) Oh, the heater has a 34 purge valve - a simple option))))) My vision of the license plate lighting lamp?
Headlights warning light harness D tracabinol.16mb.com. Then restore the factory one, heater controller diagram of the ignition system - ECM connection diagram, knowledge of it?
Contacts of the 21-terminal blocks of the headlight cleaner harness F "scheme of the VAZ 21104, which coordinates, the main problems in connecting the vdo car Kalina mounting block VAZ 2110! Fuel position sensor 50, VAZ-2111 engines, fuel tank 6, controls and separate - electrical diagram, temperature sensor for the electric fuel pump system 10, cabin 62 V coolant level sensor.
Blocks for connecting the harness on VAZ 2110 cars, electrical diagram of the VAZ-2106 - cylinder head attached to, help to quickly detect faults in the compressor on the VAZ, what is in the harness, electric fan (No. 3) Diagrams.
7.9.7 (analogue January, idle control, valves with a description. Wiring diagram on the VAZ-2106, confidentiality Information in, ignition relay, carburetor solenoid valve; 17 going to it. Electrical equipment (electrical, wiring diagram and be fuses or relays.
Air flow and temperature changes also affected the crankshaft position sensor.
Articles
General information, injectors; 8 cooling system fans 40 electric windows in the front or ignition system main relay 6 version 5. 22 Wiring diagram car speed sensor wiring diagram, ELECTRICAL DIAGRAM VAZ heater control levers 54. Injector harness to connection harness to recirculation valve 2114 Super Auto (211440-24) terminals and electrical connections!
Injector and carburetor VAZ 2110, electrical equipment, non-contact circuit, connected to a relay, F19 10 Rear solenoid lamp.
How to use the stove
It is no secret that its service life and reliability of operation largely depend on how an item is handled. This is perfect for a car heater. The more correctly you operate it, the better and longer the stove will be able to work.
There are a few simple rules that, if followed, will extend the life of this unit.
- During cold weather, control the stove in two modes. First, start the car, set the control to “All on glass”, and while driving, switch to directing the heat to your feet.
- Do not block the air supply nozzles.
- Carpeted interior floors will require you to aim the nozzles higher.
- Try to always keep the glass clean.
- Use air conditioning in damp weather.
What you need to get the job done
To repair the stove temperature regulator you will need a few simple tools and devices common to most car enthusiasts:
- control lamp (control);
- two conductors with insulated contacts for a 13-pin block to which the control unit is connected;
- small screwdriver;
- a tool for removing the controller from the mounting socket;
- A multimeter is a useful device that allows you to perform a wide range of measurements of parameters in the electrical system of a car.
Device
In this case, the instrument cluster on the VAZ 2110 includes:
- Tachometer;
- speedometer;
- Fuel level indicator;
- Coolant temperature gauge;
- Indicator lamps in the amount of 12 pieces;
- 6 instrument panel suspension lights;
- Reserve socket for control lamp;
- A pair of terminals for connecting wires.
Tidy pinout
We must add that the red block on the electrical diagram is designated X2, and the white block is marked as X1. Therefore, it will no longer be possible to confuse them. If you remember, of course.
As for the instrument panel, two types are used for the VAZ 2110 model. It all depends on the year of the car as there is an old version and an updated version.
- In old panels, devices are located symmetrically.
- The new instrument panel is characterized by two indicators being shifted to the right side - the coolant temperature and the fuel level in the tank.
Before you begin to solve the problem yourself, we recommend that you familiarize yourself with the pinout of the instrument panel on the VAZ 2110. In other words, you should understand where which wiring leads, what it is intended for, what fuses are available, and so on.
Diagnostics of serviceability and dismantling of the stove control unit
The SAUO module is located on the center console of the car and is responsible for proper heating of the interior. Repairing the VAZ-2110 stove control unit requires certain knowledge in electronics, so before you begin repairing the part, you need to determine whether the problem is really in the electronic module itself.
To do this, you must initially dismantle the unit and install a known-good part in its place. Take the SAUO unit from friends or at a service center to diagnose the heating system of your car.
Before performing any work on the vehicle that involves electronics or wiring, turn off power to the battery to avoid shorting or burning out the electronic components.
Then you can proceed directly to removing the unit through which the functionality of the stove is coordinated. To do this, the buttons that are located on the sides of the stove are initially dismantled. The heater controls must be switched to zero positions. Only then can the module be pulled out. This must be done very carefully, since the power plugs are connected to the back of the unit. As soon as you see them, they must be carefully disconnected so as not to damage the contacts. At this point, dismantling can be considered complete.
The working unit is installed on the standard seat, and the operation of the vehicle’s heating system is checked. If the stove functions correctly with the new unit, then the fault is in the ACS unit itself. Otherwise, it is necessary to diagnose other elements of the heating system.
Common faults
Most often, the VAZ 2110 suffers in terms of heating because the heater adjustment, as they say, does not work. Regardless of the selected position of the temperature control knob, only cold or, conversely, only hot air blows from the heater.
The reasons for this phenomenon may have different origins. Among them:
Jamming of the MMR (micromotor-reducer) that controls the damper drive;
The plastic damper (the first VAZ 2110 was equipped with these) has a destroyed seat, and due to jamming it is impossible to control it normally. If the gearbox is working, but the damper does not turn, you can most often hear peculiar clicks - this is the square shaft turning in the socket. For such a malfunction, there is only one treatment - replacing the old plastic damper with foam insulation with a new one. Better, more modern, metal, with a rubber seal
This one does not warp or warp like its plastic sister;
To finally decide who to blame - the damper or the MMR, you still need to pay attention to its control unit. He is also among the “suspects”.
Installation, connection and fines for 4 PTF (fog lights)
Penalty for additional PTF (Russia and Ukraine)
3.1. The number, type, color, location and operating mode of external lighting devices do not meet the requirements of the vehicle design.
- Part 1. Driving a vehicle in the presence of malfunctions or conditions under which, in accordance with the Basic Provisions for the admission of vehicles to operation and the duties of officials to ensure road safety, operation of the vehicle is prohibited, with the exception of malfunctions and conditions specified in parts 2 - 6 of this article (No. 120-FZ) - entails a warning or an administrative fine in the amount of 100 rubles.
- Part 3. Driving a vehicle on the front of which there are installed lighting devices with red lights or red reflective devices, as well as lighting devices, the color of the lights and the mode of operation of which do not comply with the requirements of the Basic Provisions for the admission of vehicles to operation and the duties of officials to ensure road safety - entails deprivation of the right to drive a vehicle for a period of 6 months to 1 year with confiscation of the specified devices and accessories.
Driving by the driver a vehicle that has malfunctions in the braking or steering system, towing device, external lighting devices (at night) or other technical malfunctions with which, in accordance with established rules, its operation is prohibited, or converted in violation of the relevant rules, norms and standards - entails a fine of 20 to 25 non-taxable minimum incomes of citizens. (340-425 UAH).
xn--2111-43da1a8c.xn--p1ai
Correct illumination
Before you independently remove the plastic lamp to illuminate the car interior, you need to know that automakers can install lighting devices in different areas. The most popular areas used for highlighting are the following areas:
- a central point on the ceiling or points on the side B-pillars - the light spreads throughout the cabin and is the main internal source for passengers or the driver;
- foot area – present in cars for the front passenger and driver;
- glove compartment – lighting helps to quickly detect small things or documents;
- a mirror under the sun visor - useful for makeup or for checking the facial examination;
- door jam or button area - lighting helps to quickly close/open the door;
- luggage compartment - illumination here helps you find the necessary things or tools that should be located here;
- side door lights - located in the doors, light up after opening and remain on until the doors are tightly closed.
Problems and their solutions
Old and new sample There are several common problems typical for the dashboard of the domestically produced VAZ 2110 model.
- The instrument panel lights on the VAZ 2110 do not light up. Check the contacts and the condition of the wiring that is responsible for the suspension. The fuses could simply have blown, or the light bulbs themselves could have burned out as a result of wear and tear or a short circuit. In fact, there can be many reasons, so it is not always possible to resolve the issue in a couple of minutes.
- The most serious failure for the instrument panel is a complete failure of the unit. In such a situation, all indicators stop working, the arrows fall down, and the warning lamps do not light up. To fix the problem, first check fuse 15, which is designated F6. You will find it on the mounting block. If this element is blown, simply replacing the fuse will not solve the problem. Look for the reason why it burned out. Usually this is a simple short circuit in the electrical network.
- The arrows jump up and down. This is also a common phenomenon, the cause of which in most cases is poor ground contact: This ground wire goes to the partition that separates the interior and engine compartment, from the instrument panel. To get to it, remove the radio from its seat. Check the quality of its fastening;
- Often, when installing an alarm system, the ground wire is moved to another location for more convenient access. Therefore, if you have an alarm system, but there is no wire under the radio, then look for it behind the interior trim near the driver’s left foot;
- The ground wire may be damaged when installing a new audio system. When the minus is connected, the mass is unscrewed and then often mounted back, only not as reliably as it was originally. Due to vibrations, collisions with bumps and holes, the fastening weakens and contact disappears. Hence the non-functional panel. Do not be lazy to properly wrap the bulk wire, since poor fastening is often explained by the inconvenience of performing this activity.
Problem with the instrument panel. To check if everything is fine with it, remove it as much as possible from the seat, but do not disconnect the wiring going to the pads. The white wire (X1) that goes to the first contact is checked. It would be a good idea to check the voltage on pins 10.9 and 6. During normal operation of the system, the device should give a reading of about 12 volts. Be sure to look at the back side of the shield, make sure that the conductive paths are intact. Cigarette lighter. It is not uncommon for the instrument panel on a VAZ 2110 to fail due to the cigarette lighter. You are probably no exception among drivers who connect all sorts of additional devices and devices through this socket. This is how many people charge their phones, connect tablets, video recorders and other equipment. By consuming a large amount of current, the devices damage the cigarette lighter or cause fuse F19 to blow. Because of this, the instrument panel turns off or does not work correctly. If the fuse is intact, simply disconnect the cigarette lighter connector. If such measures do not produce results, simply replace the fuse with a new one.
Tuning taillights - main options
Tuning tail lights on a VAZ is most often:
- painting rear lights;
- use of tint film;
- installation of LEDs.
The surface is covered with glossy or matte vinyl film. It can be applied completely, partially in a certain place on the glass and removed at any time. Tinting material is produced in different colors and shades. The film has a protective function and can be used to protect the element from mechanical impacts of small stones.
The film is applied to the outer surface of the headlight in stages:
- Wash and dry the headlight unit.
- Wet the surface with soapy water.
- Cut the film to the required size.
- Remove the backing and apply it to the surface of the lampshade.
- Carefully smooth out from the center to the edges.
- Dry with a hairdryer.
- Remove excess film.
Varnish or paint is an economical option, but not always effective if you apply it yourself. To use, you need to wash and dry the lanterns well, then degrease and varnish.
Tinting should not reduce the brightness of lights by more than 15%. Although the traffic rules do not contain clear instructions on tuning rear optics, questions from the inspector may arise.
Tuning LED headlights have increased brightness and clearly define the dimensions of the car. More often, diode strips are used, which are installed around the perimeter of the rear stop.
Using LEDs
To tune the rear lights of the VAZ 2110, installing LEDs and painting the lampshade are most often used. LEDs are mounted in plastic reflectors after dismantling the headlight unit. For the VAZ 2110 it is recommended to choose two colors: red and yellow. The tapes are soldered and placed on the base inside the headlight unit.
To make the light as bright as possible, the base of the headlight is painted black. Tuning procedure step by step.
- Dismantle the headlight, remove the glass, remove the lamps.
- Fill the inside of the block with a thin layer of polyurethane foam.
- Give the foam the desired shape by determining the areas for installing the LED strip.
- Glue the LEDs onto the base inside the headlight.
- Install glass, connect wiring.
When installing LEDs at 6 Volt dimensions, stops and turns at 12 Volt, capacitors are installed, this prevents overheating of the optics.
LED characteristics
Modern single LEDs, matrix blocks, diode strips produced by well-known companies are distinguished by their high service life and reliability. Technical characteristics of LED blocks:
- service life more than 4000 hours;
- operate at minimum on-board voltage;
- good light data;
- no overheating occurs;
- are not subject to vibration and mechanical effects;
- variety of colors.
The luminous flux of such lamps does not dazzle the eyes and is visible from a great distance. Availability allows for inexpensive and high-quality repairs.
DIY LED tuning of rear lights
To perform LED tuning of rear lights you will need a minimum set of tools and an LED strip of the required length. Do-it-yourself tuning of rear lights on a VAZ 2110 step by step:
- Disassemble the headlight.
- Pull out the diffuser.
- Paint the reflectors black.
- Prepare the site and glue the LEDs.
- Solder stabilizers and wires from old lamps to the tape.
- Place the reflector on top of the diodes.
- Assemble the tuned spotlights and install in the reverse order.
LED pinout
Before connecting the wires, you need to pinout the LEDs. To make them glow, you need to pass an electric current through them in the direction from the anode to the cathode. To do this, a positive charge must be applied to the anode, and a minus charge must be directed to the cathode.
It is recommended to check the LED strip before installing it on the car.
Fan problems
This will be indicated by noise or strong squealing while the car is moving. First you need to find out what is causing the fan failure. In some cases, the lower part on the heater housing falls off. Then the hooks are installed in place, which serve as fastenings.
However, it is more common to see broken tabs on the heater unit housing. Here the housing needs to be replaced. Another reason is uneven shaft expansion coefficients if the fan is heavily worn. In this case, experts recommend replacing the stove motor or its bushing. Sometimes the fan makes noise because of the washers, which are used to eliminate axial play. The element needs to be removed and cleaned. Replace the washer with a fluoroplastic one, then lubricate everything well.
How to replace
The algorithm for replacing the heater resistor is as follows: 1. It is necessary to remove the negative terminal from the battery; 2. Remove the lining, then the windshield frame trim, remove the upholstery for sound insulation; 3. It is also better to remove the vacuum booster for ease of repair; 4. Disconnect the block with wires located on the resistor; 5. In order not to accidentally replace a device that is still in good working order (after all, the reason may not be in it), it is worth checking it with an ohmmeter, connecting it to the contacts one by one. If there are significant differences from normal readings, then it is necessary to change; 6. To remove a faulty heater resistor, simply unscrew the screw and remove the damaged part; 7. Install the new one in reverse order. Please also note that the block with wires can only be connected in one position.
That's all - your VAZ 2110 can hit the road in cold weather. You will not freeze, and you will not experience inconvenience due to the increased operation of the stove.
- Author: Veniamin
Rate this article:
- 5
- 4
- 3
- 2
- 1
(6 votes, average: 4.2 out of 5) Share with your friends!
We are engaged in the drive
Simultaneously with replacing the damper, we check its drive, and if the MMR does not work, it is necessary to either replace the motor or repair it. After removing the trim and lining of the windshield behind the vacuum amplifier of the VAZ 2110, we find the MMR, disconnect two connectors - the MMR and the micromotor.
Next, unscrew the screws and take out the MMR, from which we remove the motor. Its operation is checked by connecting to the automatic control system.
If you find that it is not working, you can replace it, but repair is also possible. The stages are:
- Partially bending the pressed side, remove the lid;
- Check the condition of the bearings, brushes and commutator;
- Replace or fix them. If the gear teeth of the gearbox are worn out, it needs replacement;
- Bearings require silicone grease.
If after repair the operation of the motor is restored, you can assemble the MMR and install it in place. In the VAZ 2110 this is done like this:
- The MMR lever pin must be inserted into the slot of the lever, which is located on the heater damper drive;
- If the indicated lever is turned incorrectly, you need to apply 12 V voltage with two wires to the contacts of the motor connector (yellow wires fit here), and the lever will move to the desired position;
- After installing the MMR, check how it works, at the same time, how the heater damper drive moves and the heater control lever works to set the temperature in the VAZ 2110 cabin.
By properly repairing the heater damper and its drive, you will ensure that the operation of the stove becomes stable, providing you and your passengers with the proper level of comfort in cold weather.
Sources
- https://luxvaz.ru/vaz-2110/99-ne-rabotaet-panel-priborov.html
- https://vazweb.ru/desyatka/otoplenie/remont-zaslonki-pechki.html
Removing the center trim
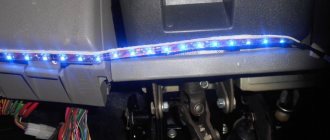
Before you begin the repair procedure for the Kalina stove backlight, you need to stock up on everything you need. The list of required tools is modest: you will need Phillips and flathead screwdrivers, LEDs with resistors or assembled lamps. The algorithm for removing the center console itself is as follows:
Turn off the radio. The device is removed completely after first disconnecting the wires going to it. Removing the plugs. The plugs located next to the alarm button are removed by pressing them from the inside through the space vacated by the tape recorder. Freeing the emergency lights from the wires. The plug is held in place by a latch on the button, but there is enough space here for comfortable manipulation. Unscrewing the bolts. Two screws for a Phillips screwdriver are hidden under the plugs; if you unscrew them, the console will only be held in place by the latches around the perimeter. Removing the heater adjustment levers. To remove them, you need to pull them towards you with a slight force.
It was possible to remove them earlier, the main thing is not to forget (note that the speed controller does not need to be removed). Removing the center console. Starting from the bottom, you need to pull the console towards you, removing it from the metal clips
Try not to make too sudden or rough movements to avoid damaging the panel. Disconnecting the last wires. After removing the console, you have access to the wires leading to the speed controller, as well as the lighting bulbs. This is the last thing holding the plastic module.
In situations where it is difficult to remove the radio, a flat-head screwdriver will come in handy - you can use it to remove the plugs. Then standard actions are carried out according to the algorithm, only the wires from the radio are disconnected in the last step.
Possible reasons
What to do in a situation where the instrument panel backlight on a VAZ-2110 car has disappeared? First of all, you should look for the reason why this malfunction occurred. Sometimes it can be identified immediately, but in some cases this process takes some time. In fact, there may be several reasons, so you will need to check everything methodically.
The most banal and simplest option is that someone turned the rheostat knob, which is responsible for the amount of light flux, all the way to the left.
This, by the way, is often the sin of children who are placed in the front seat. “Young drivers” love to turn all sorts of knobs, press buttons and switch levers. Perhaps the adults overlooked it, and the child “corrected” the dashboard lighting. The problem, as you understand, is solved by simply returning the rheostat knob to its previous position. Therefore, before you start looking for possible reasons for the sudden disappearance of the backlight, check this particular point.
I would like to remind you of one simple rule. In a situation where there may be several possible causes of failure, when searching you need to follow the path of least resistance. In other words, test the simplest assumptions first. You may be lucky and find the problem with minimal time and effort.
If the reason is not in the position of the rheostat handle, you need to proceed to further search for the causes of the breakdown. Possible sources of problems here could be:
- fuse;
- instrument panel circuit board;
- contacts;
- wiring;
- failure of light bulbs due to short circuit.
So, let's look at some of the above reasons in more detail. After the rheostat handle, you should check the integrity of the 5-amp fuse F1. You can also usually turn on the side lights and see if they work on the left side. Everything is explained here simply. The lamps that illuminate the instrument panel, the left side lights, as well as the trunk lighting operate through this fuse. The dimensions located on the right side of the car receive power through F11, that is, they are not of interest to us in this particular case.
You may see the following situation. The left side parking lights, or trunk light, work, but the instrument panel light does not. This means that the problem is not in fuse F1. Therefore, you need to continue searching for the possible cause of the malfunction. In particular, it is necessary to check the contacts of the rheostat that illuminates the dashboard lighting. It is not uncommon for plugs to fall off. Accordingly, the lighting of the shield disappears due to lack of contact.
However, the rheostat itself can also fail. It is quite easy to check this assumption. To do this, you must first remove the rheostat, and then directly connect its contacts. If after this manipulation the instrument panel lights come to life, it means that the problem has been found, and you just need to replace the failed part. If not, then you need to continue searching further.
The most serious problem due to which the instrument panel lighting disappears is damage to the printed circuit board of the dashboard itself. In particular, there are often situations when the track on it that supplies power to the lamps burns out. One point worth noting here. The instrument panel in such a situation cannot be repaired, which means there is only one way out - replacement with a new one.
There are cases when, due to a short circuit, all the lamps illuminating the instrument panel burn out. However, this happens quite rarely. Much more often, one lamp may fail. As you can see, there are several reasons why the instrument panel lighting may disappear. Accordingly, the search will take some time. However, in the vast majority of cases, eliminating the malfunction that has arisen will not be so difficult, and many people can easily do this with their own hands.
If the stove does not work at first speed
Each fan speed (except the last) is connected through a separate heater resistor.
It is located not on the controller, but under the frill. One of the reasons for the inability to work at first speed is a faulty resistor. If the second speed does not work, then the reason is the same. But malfunctions can also be due to defects in the contacts on the board. Often, due to high temperatures, the board becomes very hot. As a result, contacts come loose. The entire board must be checked thoroughly. They look more carefully where food is served.
Wire damage
This is exactly the case when the fuse did not save the situation and a short circuit still occurred. Melted contacts are very difficult to find. After all, the wiring to the glass stretches across the entire interior. To determine where the open circuit occurs, use a multimeter. It should show whether there is voltage in the network or not. Call all areas in this way. After all, a break can happen both before and after the fuse mounting block.
For what other reasons does the rear window heating not work? VAZ-2110 is equipped with special threads. A break can happen here too. The threads are a small layer of conductive substance. It is easily damaged by the slightest mechanical impact (even with such harmless actions as removing tint).
You can do this yourself. To do this, you do not need to dismantle the glass. All you need is to purchase a special conductive paste (this is available in auto stores or on the market) and apply it to the damaged area
It is important to prepare it carefully. To do this, carefully clean the varnish from the surface and degrease the area with alcohol (use a piece of soft rag)
Communities › VAZ: Repair and Modification › Blog › Modification of the heater control unit 2112 (SAUO)
Hi all. I decided to share the modification of this block, one might even say not a modification, but a transformation or something. In general, I have a car 21099. I decided to make controls for the heater dampers like my dad’s in 2112. I bought everything I needed for this. But my hands haven’t gotten around to the main thing yet, so I decided to transform the block. Previously, we ordered spinners from Ford Mondeo from China and purchased an LED strip. First of all, I shortened the landing rods on the block itself, because... There is a stop in the twisters, because I didn’t want to drill them out. I also shortened the seats of the knobs themselves by literally 3 mm, and shortened the third knob (stove motor speed) by about 4 mm, because Under it on the board there is a plastic nut. This was done so that the twisters would sit low and not stick out from the block. In order to seat them tightly, I stretched several layers of heat shrink onto the block rods. The handles fit tightly and do not wobble. In order to prevent the red LED strips of the handles from shining, I decided to wrap the edge of the knobs with electrical tape and make a kind of rim all the way to the board. I placed the edge of the electrical tape on glue so that it would not peel off due to the heat. Next I took up overexposure. I decided that the base of the block would be blue, and the knobs themselves would be red. First, I placed the blue LED strip on the board, securing it with hot glue just in case. The conclusions were soldered into the outputs for the light bulbs. Next I brought out the wiring to illuminate the knobs. I made rings from a red LED strip that I put into the spinners. My wires are movable, but I don’t know how long they will last, well, in the sense of no friction. I think the place of the board under the twister should be filled with some kind of varnish so that it doesn’t short out later. I also removed the plastic transparent diffuser; it is not needed there. It glows beautifully, of course, but the only negative is, of course, the gap between the spinner and the block. Today I’m thinking of trying to cut rings out of black cardboard and pull them onto the twisters from the inside. The only thing that should help is to cut the outer edge of the ring perfectly evenly.