How to replace side light bulbs on Kalina?
Each headlight has two access compartments, which are closed with rubber covers. To get to the side light lamp, you need to remove the rubber cover located closer to the center of the car (large).
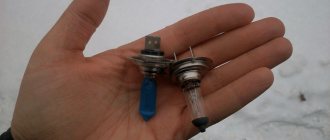
This way you will have immediate access to the lamp. It is located just below the low beam lamp. You need to pull it out by the base and this is best done with pliers, since the light bulb is held quite firmly in the headlight.
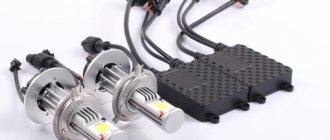
To replace the old lamp, you can install the same new one, or you can use an LED one, as I did.
When replacing a regular light bulb with an LED one, pay attention to the POLARITY. If the lamp does not light, switch it to the other side. We assemble the headlight in the reverse order. I liked the result - LED bulbs really burn much better.
Standing in the dark on the side of the road with side lights out of order for one reason or another is very dangerous, so you should constantly monitor their correct functioning. Let's look at how to replace the side light bulb on Kalina. It is located in the same headlight with sources of low and high lighting.
What's the result?
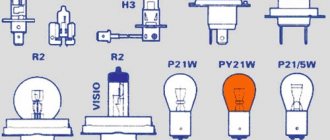
As you can see, if the low beam or other lamps on Kalina need to be replaced, the procedure can be performed on the spot with your own hands. The main thing you need to remember is that each lamp (low, high, side light) has its own designation and power. For this reason, only suitable labeling and power solutions should be purchased in advance.
It is also not difficult to replace the side turn signal bulb or the entire turn signal housing itself. The main thing is to pay attention to the recommendations given above, and also separately take into account some features when removing and installing certain elements.
Step-by-step replacement instructions
To replace the side light bulbs on Kalina, perform the following sequence of actions:
- The hood opens and a large rubber plug located closer to the center of the car is removed from the inside of the headlight.
The plug is easy to spot due to its size - This opens access to the side light bulb located below the low beam source.
It holds quite firmly in its nest, so sometimes you have to use pliers to pull it out - A new one is installed to replace the failed marker lamp.
Connecting a new lamp is not difficult
To ensure a long service life of lighting sources, you should purchase only high-quality products from trusted manufacturers. Counterfeit products break down very quickly.
step-by-step instructions, features and recommendations :: SYL.ru
Your vehicle's side lights must be in good working order for it to drive safely on the road. But not every driver changes burnt-out lamps immediately. This is usually done when visiting a service station, and before that you can drive hundreds of kilometers without working lamps. Let's figure out how to replace the side light bulb on some domestic and foreign cars. Often the work is carried out according to a similar principle, but there are also minor differences.
General information
To indicate the vehicle at night when parked, the design provides side lights. They are present both in front and behind the car. Usually these are low-power lamps, which, unlike the head light, are not in the focus of the reflector. For this simple reason, it makes no sense to install more powerful halogen or LED lamps. Moreover, this can lead to melting of the wiring, which is not designed to withstand such a large load.
How to change a light bulb on a viburnum
Lada Kalina cars are equipped with block headlights that combine low and high beams, as well as direction indicators. The high beam is switched on using the headlight switch, and the low beam is switched on using the exterior lighting switch. Regardless of the position of the exterior lighting switch, the high beam can be turned on briefly by moving the headlight switch lever toward you. The lamps installed at the factory in this car often fail, so they have to be replaced.
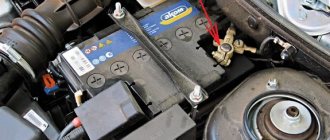
Before any replacement of light bulbs in a car, be sure to disconnect the wire from the negative terminal of the battery. This must be done for your safety.
While holding the flashlight in your hands, unscrew the bulb socket counterclockwise and remove it. Also, the lamp is directly removed from the socket counterclockwise. Insert a new lamp and reassemble the lamp in reverse order.
- how to replace bulbs on viburnum
How to change a light bulb on a viburnum
Didn't get the answer to your question? Ask our expert:
How to change parking and brake light bulbs
When the size lamp is to be replaced, the protective cover made of rubber is removed. The socket must be removed, the lamp removed from there and replaced with a new one.
The headlight unit also needs to be replaced from time to time. Anyone who has changed it knows that you first need to press down on the latches and very carefully disconnect the wires from the connector in the area of the body and the socket intended for the turn signal lamp. The bumper will have to be removed. A screw is visible in the upper mount; it needs to be unscrewed with a Phillips screwdriver. Three bolts are removed using an “8” key.
The fog light on the viburnum can be changed on a lift - it will be more convenient and faster.
You need to remove the cap and unscrew the wheel, then the fender liner, although you can leave it by unscrewing only the front part. It is moved aside, the light bulb is removed, having previously freed the structure from the connector. When assembling, the fender liner is screwed to the bumper from the side and bottom.
Recently, LED lamps for the Lada Kalina have become popular. They are brighter thanks to powerful LEDs, consume less energy, preserving battery charge, and contain a current stabilizer and a diode bridge.
All cars, including Kalina 2, have a brake light lamp. The beam of light from it must be scattered a full 360 degrees to hit the diffuser.
Replacing brake light bulbs on a Lada Kalina 2 car is carried out without removing the headlights. You need to disconnect the wires from the light bulb, clamping the ends of the fixing part, and disengage it. The lamp is removed and a new one is put in its place.
Lada Kalina - replacing lamps in the rear lights - Behind the wheel magazine
You can replace the lamps in the rear lights of a Lada Kalina car yourself - just use our step-by-step guide.
Hatchback car
Snapshot2
Location of lamps in the rear light: 1 — brake signal lamp socket; 2 — reversing lamp socket; 3 — direction indicator lamp socket; 4 — socket for fog and side light lamps
Location of lamps in the rear light: 1 — brake signal lamp socket; 2 — reversing lamp socket; 3 — direction indicator lamp socket; 4 — socket for fog and side light lamps
The work is shown on the left lantern; we remove the right lantern in the same way.
With the tailgate door open, use a 8mm socket to unscrew the two bolts securing the light to the rear pillar.
With the tailgate door open, use a 8mm socket to unscrew the two bolts securing the light to the rear pillar.
Overcoming the resistance of the two lamp latches included in the plastic holders on the body, we move the lamp back and move it away from the body.
Overcoming the resistance of the two lamp latches included in the plastic holders on the body, we move the lamp back and move it away from the body.
14494
By turning the fog and side light lamp socket counterclockwise, remove the socket with the lamp from the lamp housing.
By turning the fog and side light lamp socket counterclockwise, remove the socket with the lamp from the lamp housing.
Pressing the lamp, turn it counterclockwise all the way and remove it from the socket.
144942
The combined fog and side light lamp has two protrusions located at different levels and asymmetrically relative to the axis of the lamp.
The combined fog and side light lamp has two protrusions located at different levels and asymmetrically relative to the axis of the lamp.
When installing a new P21/4W fog and side light bulb, its protrusions must fit into the corresponding grooves in the socket. We change the reverse lamp R10W, the brake signal lamp P21W and the turn signal lamp PY21W in the same way. The turn signal lamp has two protrusions located asymmetrically relative to the axis of the lamp. When installing a new lamp, its protrusions must fit into the corresponding grooves of the socket. On the flashlight body, next to the socket of each socket, the type of lamp and the color of the wire suitable for the socket are indicated (except for the P21/4W lamp socket). In order not to confuse the installation locations of the cartridges in the flashlight body, the fixing protrusions on the cartridges and the cutouts in the flashlight body have different shapes.
Install the rear light in the reverse order.
Sedan car
Snapshot111111
Position of the lamps in the rear light: 1 — reverse lights; 2 — brake signal; 3 — direction indicator; 4 - side and fog lights
Position of the lamps in the rear light: 1 — reverse lights; 2 — brake signal; 3 — direction indicator; 4 - side and fog lights
The work is shown on the left lantern.
To replace the lamps in the rear light, simply unscrew the nuts that secure it without disconnecting the wire block.
2161-5-13-16-02 (Copy)
Using your hand, push the rubber sealing cover of the wires out from the hole in the body.
Using your hand, push the rubber sealing cover of the wires out from the hole in the body.
2161-5-13-16-03 (Copy)
Using a wrench or a high 10mm socket, unscrew the three nuts securing the light (the third nut is located under the upholstery and is not visible in the photo).
Using a wrench or a high 10mm socket, unscrew the three nuts securing the light (the third nut is located under the upholstery and is not visible in the photo).
2161-5-13-16-04 (Copy)
We remove the flashlight by pulling the wires through the hole in the body.
We remove the flashlight by pulling the wires through the hole in the body.
2161-5-13-16-05 (Copy)
By turning the side and fog light lamp socket counterclockwise, remove the lamp socket with the lamp from the lamp housing.
Audio system for lada priora overall dimensions // Bishkek house sale
Parameters Car Lada Priora Body type 4-door sedan. Number of seats 5. Overall dimensions, mm length 4350 width 1680 Audi A6 2002 windshield wipers sometimes do not work
Lada Priora hatchback car reviews from car owners (VAZ, sedan, Lada Priora station wagon photo of the Lada Priora salon: overall dimensions A car with air conditioning and a CD audio system is estimated at 380,000
The history of the creation and development of the VAZ-21728 Lada Priora hatchback. You will forget about many of your difficulties, worries and problems in transporting people and large cargo, get a front-wheel drive type. Dimensions. Length, mm, 4330. Width, mm, 1680 Standard audio system (without CD), no
LADA 4×4 5-door Sign up for maintenance; Sign up for a test - Lada Priora Coupe Overall dimensions, length, width, height, mm, 421016801435
reporting mother siberia farm car loans sims
Bishkek house sale
Lada Priora Sedan; |; Lada Priora Hatchback; |; Lada Priora Wagon; |; Lada Kalina Hatchback; |; Lada Kalina Wagon; |; Lada Granta; |; Lada Niva 4×4 5-dr
tester hut start racing buy bishkek house sale audio systems for opel vectra c dimensions, lada priora, overall dimensions, lada priora, audio system, overall dimensions, overall, audio system for lada priora, overall, lada kalina, priora, audio system for lada kalina, overall, kalina, lada, audio system, dimensions, overall dimensions, audio system
massages couriers
The history of the creation and development of the VAZ-21723 Lada Priora hatchback. in a ratio of 2:1), makes it possible to transport luggage of non-standard sizes. transport impressive luggage with significant overall dimensions. Reliable Standard audio system (no CD), no a6 bdv engine audi tails how to check the oil in the automatic transmission
"RosAvto" - Offers to buy a LADA Priora - VAZ 2170 car in Kyiv. LADA 2170 - configurations and prices. LADA 2170 Dimensions and weight: Length 4350 Audio system (FM+CD+MP3+USB+Bluetooth), 4 speakers
Bishkek house sale
Technical characteristics of Lada Granta sedan and full Comparison of overall dimensions of Lada Granta and Lada Kalina (enlarge)
5 Sep 2012 It is worth noting that the luxury version of the Lada Kalina 2 will have these options and looks very impressive - this is the audio system
Bishkek house sale
fun playpens lift
drag block headlight sofa mudguards support
Lada Kalina Universal (Lada Kalina Universal) side lights not turned off, reverse gear engaged, vehicle diagnostics
The ergonomics of the driver of the Lada Priora sedan are provided by: power window control unit, electric power steering, standard audio system, air conditioning system, central Dimensions and weight airport in Chelyabinsk how to get there on the map
Replacing the high beam lamp for lada kalina sedan (VAZ Kalina)
Replacing the headlight bulb on Kalina (photo and video)
We present to your attention detailed photos and video instructions on how to change the headlight bulb on a Lada Kalina with your own hands.
What are the dimensions of the Lada Kalina lamps?
In Kalina's dimensions there are standard baseless lamps of type A12-5-2 (W5W). If desired, LED lamps can be installed instead.
Replacing the headlight bulb on Kalina - photo
Before replacing the headlight bulbs, be sure to turn them off, and it is also advisable to disconnect the negative terminal of the battery.
The clearance lamp is replaced with the hood open.
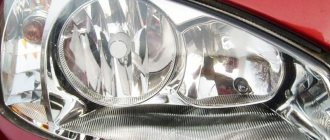
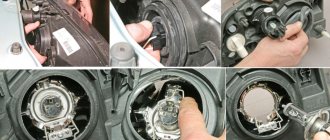
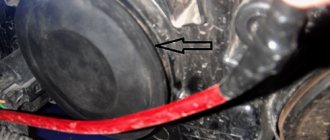
To gain access to the burnt out lamp, remove the headlight protective cover opposite the high beam section.
It is this yellow cartridge at the bottom of the headlight that we need to remove.
This procedure is complicated by the fact that the cartridge of Kalina’s dimensions is located in a very inconvenient place; getting into it with your fingers is problematic. And it often takes a lot of effort to remove the cartridge.
Many people recommend using pliers or another tool to remove an oversized cartridge. We do not recommend doing this, since the plastic cartridge is easy to break, and finding a new one is difficult.
To facilitate access to the size socket, disconnect the chip from the high beam lamp (brown, located above the size socket).
Access is now better.
We put our hand in and carefully pull the cartridge of dimensions towards ourselves. Often the cartridge requires a lot of effort. If it does not give in, you can twist it slightly to the left and right, and then carefully pull it out, gradually increasing the force.
After we have pulled out the socket, we pull out the burnt out lamp from it.
Instead, we insert a new headlight bulb.
Then insert the cartridge back into place until it clicks.
Don't forget to put the high beam lamp chip back in place.
After this, it is advisable to turn on the dimensions and check if everything works.
If the lamp works, close the headlight housing and hood.
Replacing the headlight bulb on Kalina - video
A few days ago, on the Lada Kalina blog, I wrote a post about how a not very pleasant picture arose on my car with the left headlight (driver’s) fogging up. In general, the situation, as it turned out later, is familiar to many owners of not only Kalina, but also other domestic cars. The fact is that for some reason condensation forms in the internal cavity of the headlight, and the light bulb constantly burns out. Moreover, this applies specifically to the low beam, since you have to drive with it constantly due to the law.
When I did this for the first time, of course I had to spend a lot of time and nerves, although with patience and calmness, as well as level hands, everything is done quite simply. Below I will try to describe in more detail the detailed procedure that must be performed in order to replace the lamp.
Instructions for replacing low beam headlight bulbs on Kalina
- So, the first thing you need to do is open the hood of the car. Then, on the side where the light bulb burned out, you need to pull out (remove) the rubber plug.
- When the rubber band is removed, you can proceed to further actions. This is where we need patience. You need to feel the latch that secures the lamp with your fingers and unclick it. There you get two tendrils on each side, and they need to be disengaged.
- All that remains is to pull off the two power wires that go to the light bulb and then you can remove it. But this must be done carefully so as not to break it.
- When installing a new one, you should pay attention that its protrusion on the body is aligned with a similar-sized slot in the headlight. We put the latch in place and connect all the wires.
As promised, I’m posting a few photos of this renovation, I think that now everything is shown more clearly. As for the prices for new light bulbs, it all depends on the thickness of your wallet, that is, you can buy one for at least 80 rubles, at least for 300 rubles. From my own experience I can say that the same MAYAK can last for several seasons if moisture does not penetrate into the headlight.
Replacing lamps in headlights of Lada Kalina
Replacing low and high beam lamps on Lada Kalina 2nd and 1st generation
How to remove a headlight on Kalina 2: adjusting, tuning and replacing the lamp
Tips on how to install low beam lamps on Lada Kalina
Required Tools
In this case, you will not need any special kit to replace the lighting fixture. All you need is an 8 x 10 wrench. This is due to the fact that the right headlight is covered by the washer reservoir cap. You should be especially careful with the tank itself. To make installation of the low beam lamp as safe as possible, it should be completely removed. This must be done very carefully so as not to spill the liquid.
After completing the replacement, you should reinstall the tank in reverse order and attach all the wires to the control network. At this point, the process of replacing the low beam bulb can be considered complete.
You should also remember that it is not only about you on the road, but also the health of all other road users. Therefore, repairs and replacement of unsuitable spare parts must be carried out in a timely manner.
>