The Chevrolet Niva is a domestically produced SUV that has an elegant body design and excellent performance characteristics. This car is ideal for driving on domestic roads. It will feel great both on asphalt and on dirt roads or in areas where there is no surface at all.
Since the car is capable of driving off-road, it is noted that its front part can often be damaged. The headlights are the first to suffer. They can be damaged either from mechanical stress, or the light bulb may simply burn out.
Lamp selection
First of all, it must have the following qualities:
- comfortable and bright light
- long service life
- favorable price
You should also pay attention to the manufacturer. Products from a well-known brand may be more expensive, but they will use high-quality materials.
You should also not pay attention to lamps with increased functionality, for example, the most durable ones - this is usually achieved by reducing the brightness, which can be unsafe in the dark.
Replacement
Replacing the low beam lamp on a Chevrolet Niva can be done by service station specialists, but this procedure is quite simple, so many car owners do it themselves.
To do this you will need a standard set of tools and materials:
- key for 10
- flashlight
- small mirror
- rags
- bulb H1
- gloves
Need to get an old lamp
When installing a new lamp, do not hold it by the glass. It is necessary to use gloves and carry it by holding it by the base. If marks accidentally appear on the lamp while working, you need to remove them with a clean cloth.
When installing, you need to pay attention to the position of the lamp. It must fit into a special groove in order to be at the desired point under the diffuser.
- Then the new one is pressed with a clamp and the contacts are installed in place.
- Then close the protective cover and proceed to installation on the other side
Source: https://djeeprus.ru/shevrole-niva/elektrooborudovanie/zamena-lampy-blizhnego-sveta-na-shevrole-niva
Main conclusions
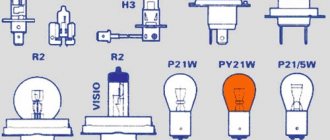
On a Chevrolet Niva car, the low beam headlights use a standard H7 12V/55W lamp. It has one filament and is installed in the corresponding block. When choosing a new copy to replace a burnt-out one, you need to pay attention first of all to its type and lighting characteristics. Based on the type of light source, they are divided into the following modifications:
- Incandescent light bulbs.
- Standard halogens.
- Halogen with quartz bulb.
- Xenon.
- Light-emitting diode.
- Gas discharge on sodium.
It is better to give preference to halogen ones, since they have a minimal price, good luminosity and flux density and do not require the installation of additional equipment when replacing. In addition to the burnt-out lamp itself, the reason why the low beam on a Chevrolet Niva stopped working could be a fuse and problems with the on-board wiring.
If you have additional information about choosing and replacing low beam lamps on a Chevy or simply want to share useful knowledge, be sure to write in the comments.
Periodic failure of light bulbs in car lighting devices is common, and such a malfunction can be eliminated without the services of a specialist. In this article we will look at how to independently replace the low beam lamp on a Chevrolet Niva.
Replacing low beam lamps Niva Chevrolet
Replacing low beam lamps in a Chevrolet Niva is not a complicated process that even a novice car enthusiast can handle. The first generation Chevrolet Niva (2123) had headlights without lenses until 2009, and since 2009, after restyling, lensed optics began to be installed, but the low beam lamps are the same in different types of headlights.
What kind of lamp is in the low beam of a Chevrolet Niva
As we already wrote above, from 2002 to 2009 lamps without lenses were installed, and from 2009 they began to be installed with lenses. Low beam lamp H7 12v/55W . You can buy a lamp at any car store, as it is used on many cars in low beam. This is not a rare lamp like the PSX24W for Logan's PTF.
When choosing lamps, we recommend choosing standard lamps recommended from the factory. We do not recommend installing 100W lamps. Yes, the light from them will be a little brighter, but they will put an extra load on the generator and car wiring.
Selecting lamps for low beam
So, we choose between standard lamps and lamps with increased brightness or service life.
- DiaLUCH H7-12- 55 12557 from 90 RUR (China)
- LIGHTHOUSE H7-12- 55 52720 from 80 RUR (China)
- VOSKHOD H7-12-55 80517 from 75 RUR (China)
- PHILIPS H7-12-55 +30% Vision 12972PRC1 from 240 RUR (Germany)
- KOITO H7-12- 55 W Other Brand 0701 from 320 RUR (Japan)
- GE H7-12-55 58520U from 170 RUR (Hungary)
- NARVA H7-12-55 48328C1 from 160 RUR (Germany)
- OSRAM H7-12-55 64210 from 180 RUR (Germany)
- BOSCH H7-12-55 Pure Light 1987302071 from 170 RUR (Germany)
- EVO H7-12-55 VISTAS 3200K 93367 from 120 RUR (China)
- AVS H7-12-55 Vegas A78143S from 90 RUR (China)
Choosing a light bulb: what points to pay attention to
In addition to the type of device of the lighting element, you should focus on certain of its characteristics. The most significant parameter is power
For the most part, it directly depends on the operating characteristics of the lighting device.
So, in addition to the power, its cost also depends on the operating principle of the light bulb. The most affordable are halogen elements, the most expensive are LED and xenon.
It’s time to note that halogens, while being cheaper, also have some other advantages:
- excellent penetrating light susceptibility (they shine much better than others in inclement weather);
- there is no need to dismantle auxiliary equipment, in comparison with xenon and LED (it is easy to replace the light bulb without outside help).
Therefore, despite the lower intensity/brightness and yellowish tone, halogens are more common.
Note. There are halogen devices on sale that provide bluish and white light and are close to xenon.
Replacing low beam lamps on a Chevrolet Niva — Chevrolet Niva, 1.8 l., 2011 on DRIVE2
Hi all!
Yesterday the left low beam bulb burned out. Yes, left again. I don’t know why this happened, but the left lamp is always the first to go out. I always change both at once.
Not because I’m a bourgeois, but so as not to have to explain to the traffic police later “why my headlights are shining differently,” and not have to poke around again, proving that I didn’t “do anything illegal” there.
In addition, the second lamp also has a damaged filament and will not last long anyway.
So I change both. Last time it was Osram Night Breaker. As in the picture below. No complaints, except for the price of 1,700 rubles. They lasted for 2 years despite the fact that I did not install separate running lights.
I always turn on the low beams. I can also note that they shine with white light, which creates a certain comfort when driving at night. Well, the declared brightness of 120% seems to be fulfilled, although this is only “by eye”.
I did not measure with instruments.
Osram Night Breaker
This time I could have bought them too, but I found others on sale: Philips Racing Vision with a declared brightness of 150%. It’s not that I’m a fan of brightness, but it’s always nice when the headlights shine well, it’s easier on the eyes.
They say that this makes the lamps have a shorter lifespan, but judging by the Osrams, they lasted 2 years. I can’t say that the original lamps worked longer. Price for Philips = 1400 rubles.
Let's see how they shine and how long they last.
They look like this:
Full size
Philips Racer Vision
Full size
Philips Racer Vision
For those who are just studying the design of the Chevrolet Niva, I will say that replacing lamps is elementary. No trip to service required.
Remove the rubber boots from the back of the headlights (it’s impossible to make a mistake there), remove the terminals from the lamp (remember the colors of the wires, they are different), press the spring down and to the side and the lamp snaps off. Put the new one back in the same way (do not touch the glass! so as not to get it dirty).
It is inserted into the socket in the only correct way. There is a special “tongue” for this. Don't get confused. Then you snap it on. Put on the wiring. Close the anthers. To replace the right headlight, you will need to unfasten it for a while and move the barrel with the washer. Nothing complicated.
But you will be sure that you will have exactly your good, expensive lamps. And sometimes it happens that at the service they put not what you brought, but something “other”...
Thank you for your attention!
Issue price: 1,400 ₽
Source: https://www.drive2.ru/l/466403762605392753/
Tail lights
Light tuning must be done very carefully so as not to be prohibited and not to violate traffic rules. When purchasing sidelights, you can also switch to new samples; they can be a more uniform color, yellow or white. The sidelights (headlights) on the Niva 21214 are also easy to change yourself. It is better to install sidelights on the Niva in a single color. Niva sidelights last quite a long time. Tail lights when driving a Niva are also subject to less damage and have a long wear life.
Low beam lamps for Niva Chevrolet: instructions for selection and replacement
A burnt-out lamp is one of the main reasons why the low-beam headlights stopped working on a Chevrolet Niva. Let's consider which light bulbs are standardly installed on a car of this model, how to choose the right replacement for them, what to look for when choosing and how to install it yourself, as well as what other reasons can lead to this malfunction.
What kind of lamps are in the low beam of a Chevrolet Niva
In the low beam headlights on a Chevrolet Niva, regardless of the year of manufacture, a single-filament lamp of type H7 12V/55W is installed as standard. This is a universal incandescent light bulb designed for installation in the advisory module of the block section of the head optics of the car. You can buy it at almost any specialized auto store.
Note! You should not choose lamps that are more powerful than those installed standardly (55 watts), as this will lead to overload of the generator and the car's wiring system and their rapid failure.
Lamp selection
When choosing a lamp for reinstallation in the low-beam headlights on a Chevy, you must first of all be guided by its type and lighting performance indicators. Let's look at them in more detail.
Type
For head optics of modern cars, there are two types of lamps - single-H7 and double-filament H4. On Chevrolet Niva of both the first and second generations, only light sources of the first type are installed.
Different headlight modules are responsible for low and high beam lighting. At the same time, the service life of the lamps is approximately the same. Therefore, it is better to purchase them as a set at once - for the left and right sides.
In addition, this is necessary for their lighting compatibility.
What to look for when choosing
The most important parameter influencing the choice of low beam lamps on a Chevrolet Niva is the strength of the luminous flux. Its value directly depends on the type of lighting device.
| View | Power, lumen/watt |
| Incandescent lamp | 11-12 |
| Standard halogen | 15 |
| Halogen lamp with quartz bulb | 25 |
| Xenon with arc | 90 |
| Ice source | 130 |
| Sodium gas discharge | 200 |
Naturally, the price of each type of low beam lamp also differs from its analogue. The cheapest is halogen, and the most expensive are LED and xenon.
Halogen lamps for Chevrolet Niva are ideal as an alternative to replacing the standard installed ones, not only because of their low cost, but also due to their good luminous flux density (which is important in bad weather) and ease of installation. A halogen lamp is installed in the same way as a regular light bulb; on the other hand, xenon requires the installation of an ignition unit, and the LED requires a special optical system.
Instructions for self-replacement
You can replace the low beam lamp on a Chevrolet Niva as quickly and technically competently as possible by following the following instructions:
- Open the engine compartment and disconnect the terminals from the battery.
- For convenience, when working with the left headlight, you can completely remove the battery, and from the right - the windshield washer system tank.
- Remove the wire clip above the headlight compartment.
- When the casing is removed, you need to disconnect the block with wiring from the base part.
- Then you should remove the latch holding the base in the headlight (squeeze it with your fingers and pull it out).
- Replace the old lamp with a new one.
- Next you need to install all the elements in reverse order.
- After connecting the battery, check the serviceability of the installed light source.
Replacing the fuel pump mesh
The situation becomes most tense at the moment of intense intensity. Signs of a malfunction In the arsenal of automotive tools of any caring driver there should be, along with the keys, a tester, even if in the form of a simple warning lamp and two wires.
Accordingly, all attempts to start the engine in this case will not be successful. In any unclear situation, remove the terminal. Very useful advice, by the way! The driver will be very lucky if a very simple method helps, which should be taken first.
To do this, remove the terminal from the battery for a while, and then put it back in and secure it. Perhaps the fuel pump will start working again.
Checking the power supply at the fuel pump terminals Well, if this does not happen, continue to look for the fault. Why do you need to replace the fuel pump mesh? After trying, I gave up and went to work in a Peshkarus.
Replacing the fuel pump mesh on the injector with your own hands. Replacing the Chevrolet Niva fuel filter.
Replacing the fuel pump mesh. When removing the module, try not only to drain the gasoline from the glass as carefully as possible, but also not to damage the FLS float. The turn switch lever is stuck.
Yesterday I tried to drive it and the engine doesn’t turn over even up to speed. There was a suspicion that it was the fuel filter or the fuel pump mesh.
Still, the mileage has exceeded, I didn’t particularly choose gasoline all this time - I refueled wherever I had to, and the fuel pump grid and fuel filter on my Chevrolet NIVA have not yet been changed and have never been serviced in any way.
Since I can’t get to the fuel filter without a hole in replacing the mesh on the Chevrolet Niva fuel pump, and I don’t really want to lie on the ground at -7 outside, I decided to start with the fuel pump mesh.
Replacing a Chevrolet Niva fuel pump grid The fuel pump is located under the right rear passenger seat, which is diagonal from the driver’s seat.
All about low and high beam lamps on a Chevrolet Niva car
Chevrolet is a popular SUV in the budget segment. The car was developed taking into account long trips over rough terrain and adapted for the city.
Until 2009, lensless designs were used in head optics. Since 2009, the Niva Chevrolet low beam lamp is a single-filament halogen design with a power of 55 watts.
The luminous element is installed statically, which allows the use of a 99% reflective surface.
When replacement is necessary
The factory equipment assumes the installation of halogen class H7 12v/55W. The marking stands for:
- base 7;
- works from an on-board network of 12 volts;
- power 55 W.
Low beam lamps provide comfortable lighting at dusk and provide optimal illumination in rain and snow. Since the Niva car is designed for driving on difficult roads, reinforced plastic is installed in the optics housing, which is less susceptible to scratches and chips.
During typical operation, the front part of the Niva is subjected to significant mechanical loads: shaking, driving over potholes, etc. Constant increased vibration reduces the life of the running lights. Part that will need to be replaced:
- if the power of the element has decreased and the road is not illuminated enough;
- the element flashes periodically;
- The consumable is completely non-functional.
Change the bulbs in both headlights at the same time. After replacement, it is recommended to adjust the optics unit.
Lamp selection
Among the large assortment, it is easy to determine which lamps are on the Chevrolet Niva. The car is standardly equipped with a lamp with an H1 socket, 60 W for long-range lighting, and a halogen H7 standard, with a power of 55 W for low beam. The service life of each element is 3500 hours.
Optics from different manufacturers differ in brightness level and color temperature: white, yellow light. The lamps illuminate the road well in fog, rain, and snowfall.
The near-halogen lighting from Philips H7 12 55 has a precisely calibrated filament point placement, which allows for good visibility at night. Popular manufacturers of low running lights:
- Osram H7 12;
- Philips H7;
- Bosch H7 55W.
General characteristics for all classes of low beam lamps:
- service life more than 2,500 hours.
- easy to install by yourself;
- clear fixation of the light beam;
- full power until the end of operation.
It is not recommended to install fluorescent lamps with a power of more than 55 W on the Niva: the lampshade may overheat and the wiring may burn out. In addition, the battery efficiency increases, the battery discharges 20% faster.
In addition to standard halogen ones, LED and xenon lamps are installed in Niva optics. When installing xenons, the wiring is completely re-equipped and an ignition unit is installed in the engine compartment. Replacing halogens with xenon and LEDs is prohibited by traffic regulations.
DIY lamp replacement
An advantage in car maintenance remains replacing the low beam lamp on a Chevrolet Niva yourself. The work takes up to 20 minutes both for self-installation and in a car service. To work you will need:
- open-end wrench 10;
- rags;
- flashlight, mirror (if replacement is being done for the first time).
When replacing the optics, it is recommended to check the contacts and operation of the Chevrolet Niva fog lamp, which is also easy to replace with your own hands. The process of installing a new element step by step:
- Using a 10mm wrench, unscrew the nut and remove the terminal from the battery.
- Unscrew the washer reservoir clamps and move it to the side.
- Clean the protective cover of the headlight unit.
- Remove the cover.
- Disconnect the lamp contacts and remove it from the housing.
- Install new one.
To properly disconnect the contacts, pull on the connector, then disconnect the wire ends from the terminal. At the same time, the latch moves up, the spring latch moves back.
When installing a new consumable, proceed in the reverse order:
- Hold the lamp only by the base.
- Install the element exactly into the groove of the diffuser.
- Tighten the latch.
- Connect contacts.
- Secure with latch.
- Connect the wiring to the battery and check operation.
Replacing it yourself does not require any skills. It is important to follow the procedure for assembling or disassembling the headlight and not touching the glass with your hands. A microscopic fingerprint will remain on the bulb, which sooner or later will lead to incorrect operation of the optics.
Source: https://InfoKuzov.ru/remont/blizhnij-svet-shevrole-niva
If the lamps still don’t light, look for where the fuse is located.
If, after replacing the low beam bulb, the headlights still do not come to life, it is likely that the fuses supplying them have blown. To check their serviceability, you need to get to the fuse box, which is located to the left of the steering column and is closed by a cover, which, in turn, is secured with two screws. Unscrew the screws and remove the cover.
Location of the fuse box on the Chevrolet Niva
As I said earlier, in 2009 a restyling was carried out, which also affected the mounting block of the car. If we have a Niva produced before 2009, then we focus on the following photo:
Fuse box on Niva until 2009
Here, fuses F2 and F12 are responsible for the left and right low beam lamps, respectively. On models produced after 2009, the fuse numbering has remained the same, but their location has changed. In the photo below I marked F2 and F12 with arrows.
Fuse box on Niva after 2009 release
That's all about replacing low beam lamps in a Chevrolet Niva. After reading this article, you can easily fix this minor problem yourself.
Chevrolet Niva is a budget SUV with good performance. The car body is comfortable, the engine is powerful, and the equipment is of high quality. The manufacturer took into account the peculiarities of our roads and offered a car that drives confidently both on asphalt and off-road.
Owners of Chevrolet Niva, as a rule, operate it in difficult conditions. Falling stones or branches negatively affect the condition of the headlights, because they are one of the most vulnerable parts of the vehicle. Not only the body is damaged, but also the internal part of the structure. As a result, the light bulbs fail faster.
Two types of lighting elements are installed as standard: H7 and H1. The first provides low beam, the second high beam. The channel points in them are optimally placed, which allows you to get a good luminous flux at any time of the day.
When choosing a light bulb, it is important to take into account the manufacturer's recommendations. He pays special attention to two parameters: the type and power of the light bulb. You can find out which devices are best to use in a Chevrolet Niva from the table below.
How to replace a low beam lamp on a Chevrolet Niva
On a Chevrolet Niva, replacing a low beam lamp is quite simple if car owners familiarize themselves with the advice and recommendations of specialists in advance. We will analyze the step-by-step replacement process further in the article.
Replacing a low beam lamp on a Chevrolet Niva
A modern car is seen not as a luxury, but as a means of convenient transportation. Moreover, many perceive the car as a “faithful four-wheeled iron assistant” that helps transport almost any cargo.
Nowadays, buying exactly the brand of car that will satisfy all your preferences is quite simple. After all, numerous manufacturers - both domestic and foreign - offer customers cars with different communications and in different price segments.
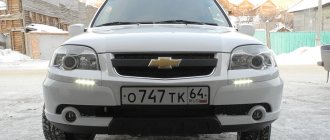
For lovers of fishing, hunting, and even simple summer residents, the Chevrolet Niva is an excellent option - an SUV with direct drive, a very attractive design and excellent performance characteristics. This model copes well with domestic roads, the surface of which, to put it mildly, is not very good.
What is the tire pressure on a Niva Chevrolet
Since the car of this model is most often used in off-road conditions, damage is observed in the front part of the car body. Which element is less protected? Of course, headlights for illumination.
Damage can be either mechanical in nature or appear due to a minor defect, for example, if a light bulb burns out in the headlights.
Replacing a low beam lamp on a Chevrolet Niva that has become unusable will help you eliminate this problem yourself.
The replacement process is quite simple, and the instructions provided to the attention of readers by professionals in their field will help in this work.
Step-by-step replacement process
The easiest way for owners of a Chevrolet Niva is to go to a service station to replace the lamp - the source of low-beam illumination of the car. Specialists who know their business will do all the work quickly and correctly, but they will also require money from their clients.
Having a little experience and having the most necessary tools, home craftsmen can easily cope with such work on their own, following the recommendations and advice. Initially, experts recommend studying each stage, and then you just need to follow the instructions and believe in your own success.
To avoid discomfort for the driver and get exactly the effect that you would like, you should replace not only the faulty lamp, but also a fully working one. This is explained quite simply - car lamps have not only different powers, but also excellent characteristics. If the headlights are illuminated by different lamps, it will not be possible to create comfortable and, most importantly, safe driving conditions.
Low beam on Niva Chevrolet - lamp replacement
Low beam headlight Niva Chevrolet
Lamp selection
Type
So, if the low beam light on your car does not light up, then most likely the reason for this is its burnout. Accordingly, before you decide to replace it, you need to select and purchase a new lamp.
To do this, first of all, you need to figure out which low beam lamp is installed on the Niva Chevrolet. There are two types:
Lamp typeFeaturesH4Double-filament (combined high and low beam)H7Single-filament
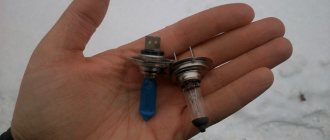
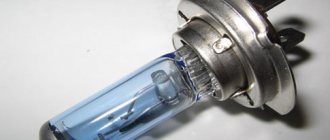
H7 standard halogen bulb
In our case, we will need an H7 low beam lamp - on the Niva Chevrolet, the headlight unit is divided into two compartments, respectively, separate single-filament bulbs are used for low and high beam lighting.
Advice! It is better to purchase light bulbs in sets, i.e. immediately for the right and left headlights. Otherwise, their light spectrum may not match.
In addition, the service life of light elements is usually almost the same.
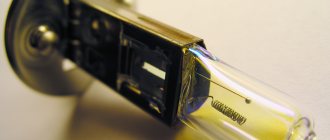
Xenon bulb H7
What to look for when choosing
Of course, in addition to the design type of the lighting element, it is also necessary to pay attention to some of its characteristics. The most important parameter is the luminous flux power. It largely depends on the operating principle of the lighting element.
Below is a comparison of the power of light fluxes per watt of power of different types of lamps:
Lamp type Luminous flux power, 12 lm/W Incandescent 12 Halogen 16 Halogen with quartz glass 24 Xenon arc 91 LED 132 Sodium gas discharge Up to 200
Not only the power of the luminous flux, but also its price depends on the operating principle of the lighting element. The most affordable are halogen bulbs, and the most expensive are xenon and LED.
In the photo - LED light bulb
It should be noted that in addition to being cheap, they also have other advantages:
- Good light penetration. Therefore, they illuminate the road better than others in bad weather.
- They do not require the installation of additional equipment, unlike LED and xenon ones. Therefore, it is not difficult to replace the light bulb yourself.
Therefore, despite the lower brightness and yellowish color of the light flux, they are the most common.
Advice! You can find halogen bulbs on sale that provide a white or bluish luminous flux, close to xenon light. Headlamp diagram
Replacing the lamp
Replacing the low beam light bulb on a Niva Chevrolet, as mentioned above, is quite simple.
The main thing is to follow the following sequence:
- First of all, you need to open the hood and disconnect the “-” battery terminal. If work is being done on the left headlight, then for convenience the battery can be completely removed. On the right side, you can remove the glass washer reservoir, which will also provide more working space.
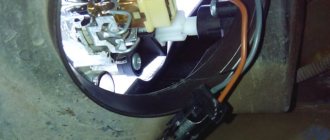
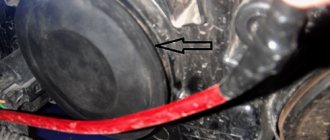
- Then you need to remove the headlight plug, which is secured with a latch made of hardened wire. Some modifications use two round plugs installed above the low and high lighting compartments. In this case, you just need to unscrew the plug (number 6 in the photo).
- After dismantling the casing, you need to disconnect the block with wires from the base with your own hands.
Spring latch
- Next, you need to remove the latch that presses the base to the headlight base. You just need to squeeze the spring with your fingers and remove its edges from the base.
- Now you can remove the burnt out light bulb and install a new one in its place.
- Then the work is done in the reverse order - install the fixing spring, put the block on the contacts of the base and then install the casing, which is fixed with a latch, or a round plug.
Note! When replacing the light bulb, do not touch the glass bulb, as fingerprints will remain on its surface.
They will lead to an increase in temperature in this place and rapid burnout of the lighting element.
Here, in fact, are all the instructions for replacing the lamp. (See also the article Niva Chevrolet wiring diagram: features.)
Chevrole Niva low and high beam wiring diagram
Other possible faults
If the low beam headlights on a Chevrolet Niva do not light up after replacing the lamps, then the causes of the malfunction may be the following:
- Blown fuses;
- Poor contact of the connectors - in this case, the connector is easily put on the contacts and is poorly fixed, or there is noticeable oxide on the contacts;
- Break in the car wiring in the area from the headlight to the fuse box;
- Faulty low beam switch or relay - unlike previous cases, with such faults two headlights do not light up at once.
- Poor contact of the ground wire in the headlight itself - in this case, all light sources in the headlight do not light up.
In all these cases, restoring the lighting will not be difficult. The main thing is to correctly determine the cause of the malfunction. To do this, you may need a multimeter, which will allow you to determine the area of the open circuit.
Features of DIY replacement
Before you begin replacing or repairing fuel lines, you must relieve the pressure in the gasoline supply system to the engine. To do this you will have to perform the following steps.
- It is necessary to de-energize the fuel pump, which supplies gasoline to the engine injectors. The fuel pump power relay is located in the passenger compartment on the driver's side. When you remove the front dashboard cover, a block consisting of four relays opens. The fuel pump relay is the third in a row.
- After turning off the fuel pump, you need to “burn” the fuel remaining in the system. To do this, you need to start the engine and leave it running until it stalls due to lack of gasoline.
- For a final check, try to start the engine again by turning the starter for a few seconds.
Removal of flexible hoses is carried out from the engine compartment.
- The location where the hoses are attached to the inlet tube is indicated by a yellow warning mark. You need to remove the hose from the tube by disconnecting the plastic clip and pulling the hose in the opposite direction.
- The second end of the hose is connected to the fuel filter with a fastening nut. You can unscrew it with a 10 key.
- After inspecting the fastening points, they begin installing a new hose. It is attached in a similar way - the end connected to the fuel line is attached to the fixing nut, the other end is attached to the plastic retainer.
In the same way, change the hose connecting the outlet tube and the fuel line of the gas tank.
Replacing metal elements may require the use of a lift or inspection pit. The fuel lines are located underneath the vehicle, so you will need a flashlight to inspect for damage.
As already mentioned, if the damaged area is small (no more than 15 cm), then it can be cut off with a grinder and replaced with a hose. Only reinforced hoses made of petrol-resistant rubber, marked Fluroelastomer (fluoroelastomer), are suitable. The hose fits over the fuel line, so its inner diameter must be equal to the outer diameter of the pipe.
If the size of the removed damaged area exceeds 15 cm, a metal tube is used for replacement. The connecting elements are pieces of reinforced hose, which are placed on the metal ends of the pipeline and connecting tube. The length of each hose section should not exceed 10 cm.
If the damage to the fuel pipes of the Chevrolet Niva is larger, then their repair is impractical. In this case, you will have to replace the fuel lines with new ones.
The outlet and inlet pipes of the fuel line are removed quite simply. To do this, you do not need to use a lift or inspection hole - all work is performed from the engine compartment.
- De-energize the vehicle by disconnecting the negative terminal of the battery.
- Disconnect the rubber hose attached to the tube with a clamp.
- Unscrew the second end of the tube from the fuel filter using a 10 mm wrench.
The main fuel lines connecting the gas tank to the fuel filter are removed after installing the Chevy Niva on the inspection hole.
- Lower the gas tank slightly so that it does not interfere with dismantling. To do this, use a mounting tool, which is used to press the gas tank until it comes slightly off the mounting hinges.
- Disconnect the flexible hose connecting the line to the fuel filter. If the outlet line is changed, disconnect the hose connecting it to the outlet pipe.
- The line is connected to the gas tank using spring clamps. To disconnect, pull the tube in the opposite direction. After the clamp has been released, pull the line out by hand.
- Install a new handset. If the fuel supply line is changed, then its long end is inserted into the engine compartment and attached to the connection hose with the fuel filter. The other end is connected to the gas tank using spring clips.
- When replacing the outlet line, one end of it is attached to the gas tank with clamps, the other is screwed to the hose connecting the line to the gasoline outlet tube.
Tools for work
Before starting work, you should prepare several tools and the most necessary items so that in the future you will not be distracted while searching for them. So, to replace you will need:
- car key size 10;
- 2 replacement lamps;
- portable flashlight and small mirror;
- protective hand gloves and clean rags.
And, of course, it will not be superfluous to stock up on hard work, attention and accuracy in order to correctly complete each stage of the replacement.
Car owners who follow all the steps according to the instructions know that replacing low beam lamps does not cause difficulties . Even people who have never changed parts on a car can cope with this process.
The whole job consists of removing the old light bulb and installing a new one . Sometimes light adjustments are required.
Preparatory process
First, choose a site for the correct location of the car . Next, the car is put on the handbrake. Then de-energize the on-board network by turning off the ignition and disconnecting the negative contact wire on the battery.
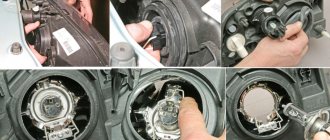
Removing old light bulbs
specific recommendations for replacing low beam lamps in the headlights of any vehicle.
Carrying out the procedure you only need:
- Clear the work area to facilitate the process.
- Remove the rear protective panel, as well as the module with wiring from the mounting socket.
- Carefully remove the product from the cartridge.
- Assemble all disassembled parts.
- Insert new part.
When installing a new lamp, it is important to consider the basic rules:
- Do not touch the flask with your hands. Prepare cotton gloves or napkins in advance.
- The part is inserted into the socket using a special technology, ensuring ideal fastening of the element. An incorrectly installed part quickly fails and cannot be repaired.
- After the procedure is completely completed, it is necessary to check the functionality of the part. This requires connecting the terminal to the battery, turning on the ignition and low beam.
How to remove the tidy
To dismantle the panel you will need to follow a simple sequence of steps.
- Disconnect the battery and put the car on the handbrake.
- Next, you need to take a Phillips screwdriver and unscrew the two screws at the top.
Next, you need to open the plugs on the dashboard and remove two more screws. They are located to the right of the hazard warning button and the warning lamp panel.
- After this, the board is pulled out towards itself, simultaneously with pressing in the latch
- Then two more screws under the cladding are unscrewed.
- At the end, the terminal blocks are disconnected and the part is completely removed from the machine.
- The car is assembled in reverse order.
How to replace lamps in headlights and lanterns of Lada Niva (Chevrolet)
During operation, the lamps in the headlights or rear lights may burn out.
You can replace them yourself. To avoid breaking anything, it is recommended that you read the instructions contained in the vehicle's owner's manual. Attention!
Wear gloves when installing a halogen lamp to avoid leaving marks on the lamp bulb.
Top manufacturers of shock absorbers for chevrolet niva
Anyone can replace the rear shock absorber in Chevrolet Niva cars in 10 minutes. To do this, he will first need to do the preparatory work:
Use a metal brush to clean the threads of the fasteners;
Replacing the rear shock absorbers of a Chevy Niva occurs in the following order:
- Using a wrench, unscrew the bolt of the lower fastening of the device.
- Using two spanners, unscrew the nut from the bolt on the upper shock absorber mount, holding it with your hand.
- They take out the part.
- The new shock absorber is installed in the reverse order.
This spare part for Chevrolet Niva cars is made in different parts of the world. The site contains reviews of shock absorber manufacturers from countries such as Japan, the Netherlands, Russia, South Korea, Belarus.
In March 2022, 7 manufacturers took part in the rating of shock absorbers for Chevrolet Niva on PartReview. It is based on 26 reviews and 83 votes.
You can also find out what Chevrolet Niva owners chose among manufacturers of such spare parts as:
Water pump,
Thermostat,
Springs,
Battery,
CV joint,
and others.
It is interesting that all companies sell shock absorbers either individually or in pairs, rarely as a whole set. This is because the characteristics of the front and rear shock absorbers as requested by drivers are very different and depend on a large number of factors, for example:
- on the number of people in the car;
- on the volume of cargo;
- from motion sickness of passengers;
- on the nature of the roads.
Therefore, each driver individually selects the type of shock absorbers for himself, based on his anatomical and psychological characteristics, for example, someone likes it to be softer in the front and hard in the back, or vice versa. It is clear that the greater the load, the stiffer the shock absorbers should be. In this regard, it is good that modern products have adjustments and settings. Therefore, when asking yourself which rear shock absorbers are best for Niva-Chevrolet, take into account the factors described above.
In practice, it is not always possible to immediately understand what we want, and therefore on forums they often write that they bought some, tried them, didn’t like them, and took others. Therefore, before purchasing, it is recommended to carefully study the forums, this will help you save money.
Read news about the new Niva
- Do-it-yourself power bumper for Niva: Drawings, manufacturing and installation |
- Clutch adjustment on Niva 21214 - Online reference book to help the car owner - looking for and fixing faults
- How to eliminate vibration of the VAZ-21213 transfer case
- Fuses and relays (location and purpose of fuses and relays) Niva Chevrolet "
- Mud tires for Niva 4x4: radius 15 and 16 - which one is better to install "
- Liquids used and filling volumes Niva VAZ 21213, 21214, 2131 lada 4×4
- Wheel stud M12x1.25x41 2121, 21213, 2131, 21214, 2123 rear
- Niva Chevrolet transfer case: device, connection diagram and how to use?
Review of optics on the famous Niva: what do caring owners need to know?
High-quality lighting increases the safety of the driver and other road users. Thanks to modern technologies, more powerful and reliable light sources have become available. Many drivers tune their Niva headlights, improving not only the quality of light, but also giving their car individuality. The article is devoted to Niva optics: which one is better to choose, how to change light bulbs, what tuning options exist.
Vehicle optics can be external or internal. External includes:
- headlights;
- front lights: turn signals, daytime running and side lights, PTF;
- rear lights: PTF, turn signals, brake lights, side lights, turn indicators, fog lights, reverse lights;
- rear room lighting.
Internal optics include lighting inside the cabin, lighting of instruments, doors, and other elements of the cabin.
Interior lighting
Each optical element performs specific functions. Front optics are designed to illuminate the road in poor visibility and at night. Turn signals and tail lights play a warning role.
Criterias of choice
The quality of light largely depends on the lamps installed in the headlights.
The following types of light bulbs are used in modern optics:
- halogen;
- xenon;
- LED
The most popular until recently, halogen lamps are gradually being replaced by xenon lamps, as they have a more intense light beam and a longer service life. LED bulbs have become popular among owners of the Niva 21214 SUV. They are often used as DRLs on the Niva, as well as a source of main lighting. They have brighter light, consume minimal energy, and are less susceptible to mechanical damage (video author – UniversalMAN).
A large number of optics with high-quality flashlights have appeared on the modern automotive market. Therefore, the owner of an SUV has the opportunity to purchase VAZ 2121 crystal, tank, lens headlights.
Lamp replacement procedure
To replace the lamp in the headlight unit, you need to unscrew the screws securing the decorative radiator protection and remove it. Next, loosen the screws securing the rim, you need to turn it counterclockwise and remove it. Then disconnect the wire block, unclip the spring latch and remove the light bulb. Then install a new one and reassemble.
To replace the lamp in the rear light, you need to remove the plastic plug from inside the trunk, disconnect the wiring block, release the latches and remove the assembly with the bulbs. To remove the lamp from the socket, you need to unscrew it counterclockwise.
To change a light bulb in the cabin, you need to remove the lampshade, which is held in place by two springs. The bulbs in the headlight and side turn signal are replaced by removing the socket from the engine compartment side. Indicator lamps and instrument lighting lamps are changed after dismantling the instrument panel.
Photo gallery “Replacing lamps on Niva”
1. Change the lamp in the headlight. 2. Change the light source in the rear light. 3. Remove the front light.
Basic adjustment aspects
Correctly adjusted optics illuminate the road well and do not blind oncoming drivers.
Before adjustment, you need to inflate the tires, place a person in the front seat or place a load weighing about 80 kg in the driver’s seat. Thus creating normal operating conditions for the car.
The machine must then be installed horizontally. At a distance of 5 meters from the car, you need to place a screen or drive the car away from a flat wall at this distance. You need to apply markings on the screen or wall according to which the headlights will be adjusted.
Scheme for adjustment
Then, using the adjusting screws, the light is adjusted according to the markings.
Ideas for tuning headlights and their implementation
The most common tuning options for Niva:
- Replacing standard optics with a new alternative.
- Installation of lensed optics.
- Darkening optics.
- Creating the effect of angel eyes.
- Installing headlight covers.
- DRL installation.
To improve the quality of light, many drivers install xenon on the Niva. LED headlights have become popular.
LED headlights on Niva
They shine well, give the car an attractive appearance, and are easily installed on all modifications of the Niva. As a tuning option, an additional daytime running light is installed on the rear lights.
Loading …
"Installing LED headlights"
This video demonstrates how to install LED headlights on a Niva (the author of the video is Two in the Niva).
Source: https://avtozam.com/vaz/niva/fary-vybor-zamena-i-regulirovka/