License plate lighting is one of the requirements of the “Rules of the Road...”. Failure to comply with the latter is subject to administrative liability in the form of a fine. Service station technicians recommend systematically checking lighting fixtures before each trip at night.
Step-by-step replacement instructions:
- Turn off the ignition.
- Squeeze the parking brake.
- Use a screwdriver to unclip the light on the trunk lid.
- We remove the element in the base.
- We insert a new similar or LED option.
- We assemble in reverse order.
Problems
There is one big problem - the risk of burning out the electronics unit, which, by the way, happened to many Vesta owners. For example, if you put LEDs in the DRL of a sedan, then after a short time they will simply stop shining. As a rule, in such cases, the fuses are replaced, which are marked in the instructions with the symbols F16 and F17.
Replacement must be done carefully
However, there are none under the cover that covers the fuse box. In the end, it all ends with a burnt-out electronics unit, which has to be replaced. It's all about the higher resistance of the diodes, which is why Vesta's electronics unit cannot withstand it.
The most unpleasant thing is that this is not a warranty case, so contacting the dealership for a warranty replacement will not help. You have to buy the unit yourself, and it is quite expensive - it is not always possible to find a part even for 8,000 rubles, and sometimes the price tag for an element reaches 19,000 rubles!
Moreover, such a problem can arise not only because of LEDs. If you thoughtlessly select and install components, it is more than possible to end up with a burnt-out unit.
Short circuit protection has tripped
The optional body electronics unit uses drivers (vnq6004sa), which have built-in non-volatile memory and electronic short circuit protection. After the electronic protection is triggered, the lighting control driver stops supplying voltage to the headlights or DRL contacts until it receives an unlock command from the controller.
If the command is not received independently, then it is possible to unlock the EMM manually using a special Grade-X scanner (available from LADA dealers). After connecting the device, you need to find the corresponding functions (left or right side lighting) and check the appropriate boxes. After which we perform a reset to factory settings, and the operation of the dimensions with DRLs is restored.
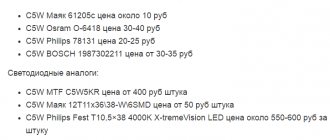
What to buy?
One of the Drayvovites, who is known in the community under the nickname 22KAZAK, carefully studied this issue before replacing the lamps in all the above components on his Lada Vesta Altai sedan. As a result, he came to the conclusion that it is possible to replace factory lamps with an analogue one, but only if you purchase tested, certified products and proper installation, so this point must be monitored especially carefully.
So, to replace you will need:
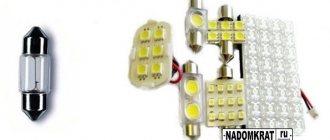
- Low beam – LED lamps OPTIMA CL-6 LED HEADLIGHT. Installing such lamps will also require the purchase of universal rubber covers for the headlamp.
- Dimensions and DRLs are MTF W21/5W LEDs. They fully comply with the requirements and match the polarity.
- License plate light – PHILIPS.
Channels burned out
In some cases, as a result of a short circuit in the additional body electronics unit, one or two channels burn out (the dimensions on only one side do not work, or they do not light up at all). You can restore the operation of the EMM unit using a conventional relay by connecting it externally to the body electronics unit (directly to the wires from the connectors of this unit):
- If one channel is burned out, you will need a relay with one group of contacts
- If two channels burn out, you will need a relay with 2 groups of contacts
Schemes for restoring the operation of the channels of the additional body electronics unit responsible for the operation of the side lights and DRLs:
- Restoring dimensions (the dotted line indicates the second channel of dimensions, in this case we install a relay with two groups of contacts);
- Restoration of the left DRL;
- Restoration of the right DRL;
- Restoration of DRL (left and right).
Addition to scheme No. 1 (restoring dimensions):
Addition to diagram No. 3 (restoration of the right DRL):
Addition to diagram No. 4 (restoration of left and right DRL):
If the license plate light and buttons in the cabin do not light up
. Restore the burnt channel according to scheme No. 1, only instead of d11 you need to restore d24. That is, we swap two wires S2-D11 and S2-D24, the rest is the same. In other words, S2-D24 and P2-B2 go to the contact group. And the relay coil goes to S2-D11 and P1-A10. We disconnect D24 from the EMM (more details on the 2nd page of comments).
Attention! If the short circuit occurs as a result of the installation of LEDs or during the installation of non-standard equipment (for example, a rear view camera, interior lighting, etc.) connected to the standard wiring (the factory integrity of the wiring is broken), then the warranty does not apply to the additional body electronics unit.
Checklist for installing a lampshade
- Take the necessary measurements;
- Using the obtained parameters, cut out a stencil from available materials (paper, cardboard);
- Disassemble the lampshade, mark the recesses for the bolts on the model;
- On the ceiling of the cabin, select the place where you would like to install the lamp;
- Fix the stencil on the ceiling where the lamp will be installed with adhesive tape;
- Trace the outlines;
- Attach the lamp, make sure the parameters match;
- You need to cut the sheathing with a tool with a very sharp blade to eliminate uneven, torn edges;
- After cutting, reattach the lampshade and correct the contours;
- Where the screws will be screwed in, attach metal clamps;
- Secure the lampshade.
You can connect the device to a car radio, a standard lighting fixture, or a luggage compartment lamp.
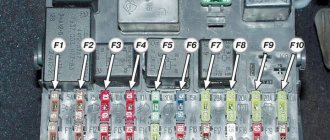
Schematic location in the engine compartment
| Name | Block pinout |
| RP 1 | Lighting, seat heating |
| RP 2 | Responsible for the cigarette lighter |
| RP 3 | Heated rear window |
| RP 4 | Front windows |
| RP 5 | Interior heater (stove) |
| RP 6 | Window lifter for rear doors |
| RP 7 | Gasoline pump |
| RP 8 | Car socket (powered by 12 Volts) |
| RP 9 | Heated windshield |
| RP10 | Heating relay |
| RP11 | Starter |
| RP12 | Cruise control |
Connecting interior lighting
If the Lada Vesta model is not equipped with LED lighting in the niche on the control panel, the car owner can easily install it himself.
To do this you will need wires, a plastic corner, double-sided adhesive tape, and LEDs.
Algorithm of actions
Secure the LED to the plastic corner using double-sided adhesive tape. Secure the corner into the recess on the front panel so that the LED faces the cigarette lighter. Remove the side cover of the recess in the center. To do this, just unscrew one mounting bolt. Connect the LED to the cigarette lighter socket. To replace or install a new interior lamp, first remove the old lamp, then install a new one in its place. The algorithm of actions is identical to the algorithm for installing the lamp in the rear part of the cabin. No additional measurements or stencil making are required.
AvtoVAZ prescription (unlocking circuits in EMM)
The EMM unit goes into defense. To unblock channels:
- Without removing the block from the EMM block, connect the connector with the wire to the white block, pin 3 (free).
- Connect the other end of the wire to the glove box illumination block (green wire).
- Turn on the ignition for 2-3 seconds.
- After turning off the ignition, remove the wire connection.
- Use Grade-X to clear errors in the EMM block.
- Check the functioning of the previously blocked circuit in the EMM unit.
Apparently, to unblock the circuits in the EMM block, you should apply 12 V to the 3rd pin of the EMM block for 2-3 seconds. Then reset the errors using a scanner, and this can be not only a Grade-X scanner. The order was posted by one of the users of www.lada-vesta.net.
Front panel illumination
The front panel backlight is activated when external lighting devices are turned on. Car owners note that they experience some inconvenience when reading indicators when exposed to direct sunlight. Car owners are trying to independently improve the LED lighting of Lada instruments. Car enthusiasts should take into account that any intervention, modification or improvement of lighting fixtures will result in loss of warranty coverage. If the owner nevertheless decides to improve the lighting, it is necessary to adhere to the algorithm of actions.
Sequence of events
Remove the glove container. To do this, open it and press out the latches that hold the lid. Apply a little force, pull the cover towards you, it will come off. Remove the glove box light. Using a small screwdriver, press out the lamp and disconnect the wires. Unscrew the five bolts and remove the glove compartment. To improve lighting, purchase two 600 V LEDs. Unscrew the hook and screw securing the body of the pulp and paper machine. In connector c1 you need to cut the dark blue wire. In connector c2, strip the blue-red wires. Connect two diodes. In the received kit, connect the dark blue wire to the end of the wire of the same color in connector C1. The green wire is connected to the end of the dark blue wire, which is located inside the harness. The red wire is connected to the end of the blue-red wire in connector c2. Next, the steps are performed in reverse order. If all steps are followed, the panel illumination will be improved. Switching on will be done by turning the ignition key.
Reviews
| № | Positive |
| 1. | Nikolay Dmitrievich (drive2.ru): the car is three years old, the original license plate lamp is installed, there are no comments on the work. |
| 2. | Semyon (prom.ua): on the advice of his comrades, I replaced the stock NZ lighting lamps with LED ones. |
| 3. | Sergey (drom.ru): the NC backlight is installed as standard, no comments. Maybe in the future I will install LED backlighting. |
| 4. | Konstantin (rozetka.ua): in three years of operation of the car, I replaced the NC light once; it burned out on the left side. I didn’t contact the service, I managed it on my own. |
| 5. | Vladimir (Auto.ru): after the winter, the glass on the NC backlight began to fog up. Disassembled, cleaned, wiped, installed back. Since then the glass has not sweated. |
| 6. | Nikolay (Auto.Mail.Ru): the current backlight works flawlessly; in four years I replaced the lamp on the right side once. |
| 7. | Kirill (drive2.ru): lighting is just lighting, I can’t say anything special. Maybe I'll install diodes, they are brighter than their stock counterparts. |
| 8. | Sergey (drive2.ru): lighting is similar to Lada Kalina, Granta, Priora. The technology has been copied, even the lamps are identical. |
| Negative | |
| 9. | Vladimirovich (prom.ua): the rear license plate light on the left side systematically burned out. Changed it three times. After carrying out a comprehensive diagnostic at the service station, it turned out that the reason was in the fuse for the license plate illumination. |
| 10. | Alexander (Bibika.ru): loose fixation of the lamp in the base leads to the lighting flickering. I contacted the service for a replacement under warranty - they refused because it was not a warranty issue. Managed it on my own. |
| 11. | Valentin (drive2.ru): the backlight is dim, the light is yellow, in a word, it’s not good. |
| 12. | Semyon (Avtodispatcher.ru): I recently replaced the NC lighting, now the license plate is visible from a distance of at least 50 meters. |
Room lighting
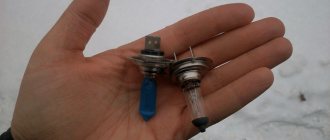
Lighting for the Lada Vesta number is provided by two light bulbs. Lamps often burn out, so drivers must be able to fix this problem themselves and replace the lamps.
The procedure is not complicated and does not require special skills or abilities.
Sequence of events
Use a sharp object to pry the lid of the lantern. Take it out. Remove the lamp and install a new one in its place. A 5V light bulb is built into the lantern. Reinstall the flashlight in reverse order. When removing the flashlight, pry it with a sharp object from the left side.
How to replace lamps
The main cause of backlight malfunctions is burnt out lamps. You can replace them yourself.
This requires:
When all the tools have been collected and the lamps have been purchased, you can begin to follow the instructions.
How to change the license plate backlight on “Vesta”:
The manufacturer recommends using original spare parts. Changing the device configuration yourself may violate safety requirements.
Source
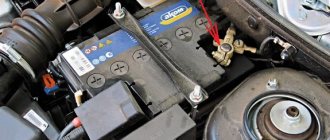
Place the car in the workplace, stop with the handbrake, and turn off the ignition. Raise the hood, disconnect the “–” terminal from the battery (key “10”).
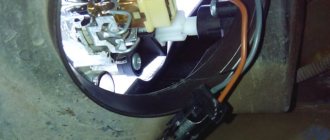
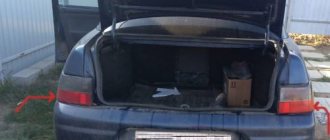
In the socket of the trunk lid lining, the lamp is held in place by a retainer and a spring latch.
Insert a flat-head screwdriver into the groove on the left side of the lamp 1, Figure 13-1, carefully move it to the right, disengage the latch and remove the license plate lamp from the socket in trim 2 of the trunk lid (flat-head screwdriver).
Disconnect block 1, Figure 13-2, of the rear auxiliary wiring harness from socket 2 and remove license plate light 4.
To replace the license plate light bulb, you must:
— remove lamp 1, Figure 13-1, license plate light from the socket in trim 2 of trunk lid 3 (flat screwdriver);
— remove lamp 3 from the socket by pulling it towards you.
Install a new lamp in the license plate light in the reverse order of removal. The type of lamp installed is W5W.
Install lamp 1, Figure 13-1, license plate lighting in the reverse order of removal. When installing, ensure that the license plate light is securely fixed in the trunk lid lining socket.
Video
Source
Installation of rear seat lighting Lada Vesta
To illuminate the rear passengers, you can use an LED strip, which is placed on a pipe under the front row of seats. The neon glow from below will turn on every time the doors are opened. The LEDs are connected to the standard lighting lamp, to the cigarette lighter socket.
For this purpose, the rear courtesy light is used. Installation rules and sequence of events have already been described earlier.
Guys, everyone who wants to install diodes. Today I installed luxury in the doors, doh, Bordachek, trunk lighting, license plate lighting, everything is fine. Only the license plate lighting from Priora took sockets for the lamps and everything is fine in the DRL at the rakite market, I bought the lamps already unpinned 650₽ came out and everything works fine.
Diodes for license plate illumination, reverse gear. And a little about the lampshades in the luxury suite.
In general, after replacing the light bulbs with diodes in the DRLs/dimensions, I wanted to change the regular light bulbs in the back.
If everything is more or less clear with the reverse gear, then difficulties arose with the license plate illumination due to the deluxe configuration and the cartridges in the license plate illumination. I started looking for ways to solve the issue of license plate illumination. The first thing that happened was to buy diodes “specially designed” for Vesta at the Vesta shop. But damn, pay 600 rubles for two scarves with 3 diodes + delivery of 100 rubles, and if they then burn out, order again, wait. In general, hemorrhoids were obtained at my own expense.
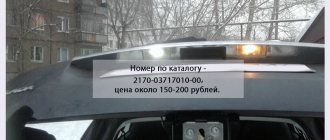
This is actually what came under article number 27.3717 - I do not recommend ordering (they are also 1118-3717010-02)
.
As I understand it, this friend came across lampshades from old stock, but I have already received a new one.
Thus, the correct lampshade has the article number: 21700-3717010-00
Well, then, with peace of mind, I proceeded to order diodes for reverse and license plate lighting. For 600 rubles we bought 10 of these diodes
The installation seems simple. Using plastic spatulas, remove the clips, remove the casing and the 8 (sort of) nuts that hold the trim. Then we simply snap the sockets and insert new diode bulbs.
Source
Engine Control System Controller
The controller (KSUD) is the central device of the engine control system. It receives information from sensors and controls actuators, ensuring optimal engine performance at a given level of vehicle performance. On LADA VESTA vehicles, the controller is located in the vehicle's engine compartment on the left support of the front suspension strut.
Location of the controller in the engine compartment of cars of the LADA VESTA family:
- controller
The controller controls actuators such as the fuel injectors, electric throttle body, ignition coil, oxygen sensor heater, canister purge valve and various relays.
The controller controls the switching on and off of the main relay (ignition relay), through which the supply voltage from the battery is supplied to the system elements. The controller turns on the main relay when the ignition is turned on. When the ignition is turned off, the controller delays turning off the main relay for the time necessary to prepare for the next turn on (completion of calculations, setting the throttle valve to the position prior to starting the engine).
The KSUD performs the immobilization function by exchanging codes with the CBKE (VSM controller). If as a result of the exchange it is determined that the codes are not correct, then the engine start blocking in the control system is not removed.
The controller also performs a system diagnostic function. It detects the presence of malfunctions in system elements, turns on the alarm and stores codes in its memory that indicate the nature of the malfunction and help the mechanic carry out repairs.
The LADA VESTA vehicle has a data exchange interface between the ECM, diagnostic block and controllers (control units) of other vehicle systems via the CAN bus.
Via the CAN bus, immobilizer codes are exchanged between the ECM and CBKE, information about the operating parameters of the engine, transmission, ABS, sensor status, etc. is exchanged.
The CAN bus is a two-wire line:
- low level line CAN L (contacts “X1.1/H5”, “X1.2/D5” of the ECM);
- high level line CAN H (contacts “X1.1/H4”, “X1.2/D4” of the ECM).
Attention: - The controller is a complex electronic device, the repair of which should only be carried out at the manufacturer's factory. During operation and maintenance of the vehicle, disassembling the controller is prohibited.
— Unauthorized modification of the controller software can lead to deterioration in engine performance and even to engine failure. — In this case, the vehicle manufacturer’s warranty obligations for maintenance and repair of the engine and control system are lost. — The controller supplies various devices with a supply voltage of 5 V or 12 V. In some cases, it is supplied through controller resistors that have such a high rated resistance that when a control light is connected to the circuit, it does not light up. In most cases, a regular voltmeter with low internal resistance will not give accurate readings. — To monitor the voltage of the controller output signals, a digital voltmeter with an internal resistance of at least 10 MOhm is required.
Controller memory
The controller has three types of memory: programmable read-only memory (ROM), random access memory (RAM), and electrically programmable memory (ERM).
The controller memory is non-volatile, i.e. its contents are retained when the power is turned off.
Read-only memory (ROM)
The ROM stores the control program, which contains a sequence of operating commands and calibration information. Calibration information represents control data for injection, ignition, idle speed, etc., which in turn depend on the vehicle weight, engine type and power, transmission ratios and other factors.
Central and automatic locking/unlocking of door locks from the interior and outside of the car
Central door locking/unlocking. To lock the locks of all doors from the passenger compartment, press the button on the instrument panel, the indicator on button 1 (Fig. 3) will light up for a while, then go off. If the hood, trunk or one of the doors was open when the button was pressed, the doors will unlock again. Close the doors, hood, trunk, press the lock button, all doors will be locked. The side door locks are unlocked when any front door is opened from the passenger compartment. To forcefully lock the doors, and arm them if any door is open, you need to press and hold the button for a while.
- Door lock switch.
- ESC (Electronic Stability Control) switch.
Note. Before forcefully locking, make sure that all passengers have exited the vehicle and that the ignition keys do not remain in the vehicle.
DRIVER RESPONSIBILITY
If you decide to drive with the doors locked, remember that this may make it difficult for rescuers to gain access to the vehicle in an emergency. Enabling the automatic locking of the side doors when driving. With the engine running, press the central locking button on the instrument panel and hold it for five seconds. Immediately after pressing the button, the LED will light up and the doors will be locked. Turn off the engine. The function is activated.
Start the engine, after starting to move at a speed of about 10 km/h, the doors will automatically lock if they have not been locked.
The doors will unlock when you press the central locking button or when you open any door from the passenger compartment while the car is stationary.
Disabling the automatic locking of the side doors when driving. With the engine running, press the central locking button on the instrument panel and hold it for five seconds. The function is disabled.
Automatic unlocking of side doors in the event of an accident. In the event of an accident, if the airbags are deployed, the locks of all side doors are automatically unlocked.
Note. Central locking has protection for door locks against overheating. If the doors are locked and unlocked repeatedly within a short period of time, the system stops responding to pressing a button on the instrument panel, as well as to pressing buttons on the remote control. If this happens, do not press the button on the instrument panel or the buttons on the remote control for a while, after which the system will be fully restored.