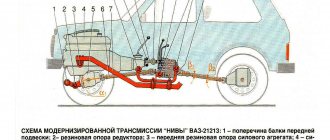
Benefits of use
A device such as a subframe has many advantages, the main one of which, as we have already noted, is the reduction of noise and vibrations in the cabin.
In addition, this device is the only protection for the lower part of the transfer case. By the way, on the conveyor the Niva is already equipped with special fastenings to the floor, which allow mounting supports on the transfer case. Thus, installing a transfer case subframe on a Niva will take the car enthusiast no more than 30 minutes. Another thing is to make this part yourself (in this case, the work can take several days).
Removal
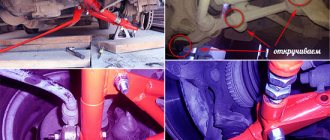
Place the vehicle over an inspection ditch or on a lift. Release the parking brake and place the transfer case and transmission shift levers in neutral. Remove the floor housing trim trim, the lever hatch covers and the handles from the levers.
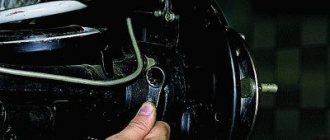
Disconnect the flexible speedometer drive shaft from the transfer case and the wires from the differential lock warning lamp sensor. While turning the driveshafts, disconnect the driveshaft flanges from the transfer case shafts.
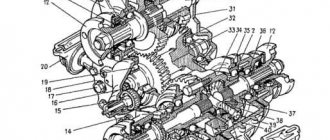
Unscrew the nuts 3 (Fig. 3-40) of the bolts securing the brackets 1 of the transfer case suspension (supports) and remove it along with the brackets and spacers 5, which are installed under the brackets. Label each gasket so that you can put them in place in the same quantity.
Rice. 3-40. Attaching the transfer case to the car:
1 — transfer case suspension bracket; 2 — filler plug; 3 — nut for fastening the suspension bracket; 4 — drain plug; 5 - adjusting shims
Flaws
The main disadvantage of the subframe is the reduction in the vehicle's ground clearance (by several centimeters). But still, this upgrade has virtually no effect on the cross-country ability of the SUV.
The main disadvantage of the subframe is the reduction in the vehicle's ground clearance (by several centimeters). But still, this upgrade has virtually no effect on the cross-country ability of the SUV.
Most likely, the absence of the element in question in the car’s factory configuration is explained by complex production technology (a special
However, no matter how many reasons we name, the fact remains: the transfer case subframe is installed on the Niva only through the efforts of the car owners themselves. Even at service stations, not everyone undertakes their manufacture or installation.
Differential locking
Sometimes you can come across a misconception about why a small handle is needed next to the shift lever on a Niva. Some car owners believe that it is needed to connect front-wheel drive. However, the front-wheel drive of this car is permanently connected. As is the rear one. Cars of the Niva family have permanent all-wheel drive. The handle actually serves to switch the operating modes of the differential of the transfer mechanism.
In the “forward” position, the differential operates as usual, but if you move it back, the differential is locked, and the forces from the motor are applied to the differentials of the axles, which makes the drive more rigid. It is worth noting that there are also special types of locks for front and rear axles.
In theory, when used in conditions where the car is stuck, it will be able to overcome the obstacle if there is sufficient traction on at least one wheel. In this case, it is better to lock the differential before overcoming an obstacle, but never after entering an area that is difficult to overcome. This application of locking will avoid wear and damage to the transmission.
We install transfer case subframes on the Niva Comfort SUV: where is the protection attached?
It is mounted on the corners at the bottom of the device. As for the type of connection, it, similar to the two options listed above, is bolted. However, the holes in the body of the side parts of the device and the lower part of the corners are made according to the threaded principle. The protective sheet is part of the load-bearing structure, which forms a kind of box and gives the subframe greater strength. Accordingly, the box will be less vulnerable to various mechanical damage, which will have a positive effect on the Niva’s cross-country ability.
Additional holes
An additional window is cut under the drain plug to drain the oil. You can drill holes in any place convenient for you, without bothering with the accuracy of the markings. Car enthusiasts also make technological windows to drain the water formed between the sidewalls of the channel and the dirt that gets there. The protection is enhanced by corners that are attached to the box support and the frontal part of the entire device. This design will protect the transfer case from all kinds of impacts on stumps, ditches and other obstacles that can lead to deformation of the subframe.
Also interesting: Chevrolet Niva gearbox diagram video
How can you improve your device for extreme driving?
In this case, you can change the profile of the sidewalls of the device, which will make it flatter and more durable. The corners are welded not only to the transfer case brackets, but also to the side shelves of the channel. They are also attached inside the last element. At the end you should have a frame of four corners. This design makes it possible to cut the sidewalls of the channel to fit the corner flange. As a result, the height of the subframe will be reduced by 50%, and the strength will double.
What dangers can await a motorist while driving?
As practice shows, even such a device as a subframe does not guarantee 100% protection for the transfer case and other components of the car while driving off-road. Therefore, if you often operate the Niva in rural areas, where there is a danger of “picking up” a stump or some other object that is difficult to notice in uncut grass, install the special protection on the subframe that we talked about in the previous paragraph. Then the risk of transfer case deformation will be reduced to zero. If there is no such protection, both the subframe and the box itself will deteriorate.
So, we found out how to make a transfer case subframe for a Niva with our own hands. Whether you need it or not - decide for yourself.
So, we found out how to make a transfer case subframe for a Niva with our own hands. Whether you need it or not - decide for yourself.
Alternative fastening designs from folk craftsmen
Car owners learned how to make subframes for Niva 21213 with their own hands. Their advantage is that damaged parts can be replaced without removing the entire device from the machine. But such systems also have a drawback - it is necessary to constantly check the reliability of the bolts, since they often unscrew.
Shaking problem
Many drivers who have a VAZ 2121 Niva at their disposal have encountered the fact that the cabin vibrates strongly while driving, especially off-road or at high speed. Vibrations that spread almost throughout the entire cabin cause a lot of inconvenience and constant discomfort. Technically, this was not corrected, so the people’s minds had to independently find a way out of the current situation.
After installing the transfer case subframe, the ground clearance will slightly decrease, but the car will be much more comfortable to drive.
Centering method
To carry out this work you will need a lift, although with some skill you can get by with simple supports. First you need to prepare the car. If there is a lift, it is raised up. If supports are used, the corners of the machine are jacked up one by one and it is placed on them. Please note that all supports must be stable, otherwise the work will be unsafe. You should also prepare the tool in advance. If there are no plans to simultaneously replace other parts, then it is quite possible to get by with a ratchet and a “13” head. During operation, an assistant must be in the cabin.
Adjustments are made in the following order:
- To begin with, you should evaluate the condition of the splines on the cardans. If they are very worn, then most likely you will not be able to perform the alignment correctly. In case of significant wear, parts should be replaced;
- The transfer case mount is inspected. Often the displacement can be seen with the naked eye;
- Next, loosen the transfer case mount. Just don’t unscrew it completely;
- After this, start the engine and “accelerate” the car to a speed of 80-90 km/h. In this case, the transfer case will fall into place on its own;
- The crucial point is to consolidate the result obtained. This can be achieved in 2 ways. Mechanics argue which one is better, but both are used in everyday life. Most often, the engine is turned off, and with its help the transfer case and cardan shafts are stopped.
- All that remains is to quickly tighten the nuts. Disadvantage here 2. Stopping the box in this way can have a negative impact on its condition.
- Also, you need to tighten the fastener as quickly as possible, otherwise it will be of no use. A more reliable, but technically complex method is to tighten with the engine running;
- The car is lowered to the ground and testing is performed.
If the vibration persists, the procedure should be repeated.
Subframe drawings for Niva photo
The protection is mainly used for models 21214, 2121, 21213, which have vibration problems. To assemble a subframe on the field with your own hands for a transfer case, you will need metal channels, angles, bolts and a sheet of thin metal as the main materials. In addition to materials, you need to get diagrams or a drawing of the subframe. The simplest design consists of two transverse parts and two crossbars that connect them. Tools worth preparing:
- grinder;
- drill;
- measuring instruments - calipers, ruler;
- bank;
- hammer.
To protect against metal filings, you should take protective clothing made of thick fabric.
There are several design options, so the number of channels and angles may vary depending on the drawing.
To eliminate various vibrations and noise in a Niva Chevrolet car, it is possible to install a subframe. The subframe reduces the force transmitted from the transfer case to the car body. Mounting the transfer case minimizes angular vibrations in the longitudinal-vertical plane of the body. The subframe shifts the path through which vibrations and noise travel into the body.
Also interesting: Construction and repair of the VAZ 2121 Niva transfer case
Between the mounting holes, the mounting angles to the cross member and spar can be of free sizes in length and distance. It is necessary to observe the size of the height of the attachment to the subframe, and, by the way, you can use the attachment to the spar of other schemes instead of the corners. You can make two types of dispensers. Basic type and reinforced.
The type of connection of the subframe protection is bolted, and is attached at the bottom to the corners. But at the same time, the holes must be threaded in the lower flange of the corners and in the body of the sidewalls of the subframe. To impart strength, sheet protection is used; it forms the part of the structure that forms the box. In order to be able to drain oil, water and trapped dirt, it is necessary to make several holes under the drain plug and between the sidewalls of the channel in any convenient place.
Let's look at a reinforced version of installing a subframe on a Niva on our own. If the structure is flatter and stronger, it will provide greater protection; for this it is necessary to change the profile of the sidewalls of the subframe. At the level of the cutout for the transfer case, just as in the first case, with the corners of the protection fasteners, the corners are welded inside the channel onto the side panels from the outside with the shelf down.
Important to remember! Do not get confused, the subframe must be installed asymmetrically to the location of the engine and gearbox.
There are already a huge number of reviews about the manufacture of such a stretcher; if you have not yet made such a miracle for yourself, then download the diagrams and create a design!
Manufacturing according to the scheme
Although the market has no shortage of offers, it is possible to save money by making a subframe for Niva 2121 with your own hands according to the drawings.
In the creation process, you will need a 4 mm sheet of cold-rolled steel 0.525x0.350 m, angles 35x35, 70x50, 70x70 with a length of 0.7 m, 0.4 and 0.4 m, respectively, as well as a 0.73 meter channel 16. Used as fasteners bolts M8, M10, M12x1.25 and M12x1.5. In the creation process you will need a 4 mm sheet of cold-rolled steel 0.525x0.350 m, angles 35x35, 70x50, 70x70 with a length of 0.7 m, 0.4 and 0.4 m, respectively, as well as a 0.73 meter channel 16. M8, M10, M12x1.25 and M12x1.5 bolts are used as fasteners.
Assembly options
The first step is to measure the distance for the parts. Using the subframe drawings, we assemble the structural parts according to the measurements obtained.
Here are three build options:
- A simple version of the Niva-Comfort type frame, where you only need 5 main parts and a couple of fasteners for them. It is assembled from five square-shaped channel pieces with an additional reinforcement strip. The ends of the four parts are bent into the frame and holes are drilled into them for bolted connections. The frame parts can be welded or bolted together. A more complex design consists of almost a dozen parts and is assembled according to three drawings.
- In this homemade version, one wide channel is used as a basis, in which there will be a hole exactly for the transfer case. On the sides of the channel there are large corners, and at the ends there are shelves made from smaller corners. All parts are connected exclusively by bolted connections. This design protects the bottom of the machine well, but is more labor-intensive for manual production. The great advantage of this particular option is the installation of engine crankcase protection, which can be connected to the subframe; in addition, the protection of all parts around is improved.
And also interesting: Niva tuning: 145 photos of ideas on how to improve the VAZ 2121 with your own hands || Niva tuning dirt
Standard tool:
• Calipers and ruler;
An alternative tuning option is permissible using not corners, but a square profile with a section of 60x30 or 40x25.
There are ideas of placing the RC and the checkpoint on the same “frame”.
Installing parts and protecting the bottom
Niva 21214 and most new models in this series have fastenings for installing protective body kits, so there should be no problems with installing the subframe. Factory versions, similar to the Niva Comfort frame, already have ready-made fastenings and they only need to be screwed into the right place. To install homemade products, you may have to make additional fastening points. You can, of course, screw everything directly to the cornfield frame, but this is not recommended.
You can make other protective parts for the Niva yourself. For example, engine crankcase protection in the form of a plate, which is located near the transfer case, is very easy to make even at home. It can be conveniently attached to the transfer case subframe, thus creating a whole protective kit.
If you often use your Niva for off-road driving, then you will need to assemble protective kit No. 2 of a complex design. It provides comprehensive protection for the lower part of the body and even perfectly covers the transfer case mount. Unfortunately, there is only No. 1 on sale - Niva Comfort, which is not capable of providing good protection for the underbody from external damage.
A purchased subframe is easier to install yourself, but it bends easily. If you often travel through the mountains or country roads, it is better to use a reinforced design. The same applies to a purchased reinforced plate for the engine. If you want to equip your field with a protective system, it is better to make all the parts yourself according to the drawings.
Transfer case location and functions
The transfer case is attached directly to the underbody of the vehicle. But the device vibrates strongly during movement. Therefore, good fixation is necessary.
The transfer case performs the following functions:
- Distribution of torque between the drive axles so that the vehicle's maneuverability is high without causing power circulation.
- Increased wheel torque at high resistance. For example, on uneven or steep roads.
- Ensuring stable vehicle movement at low speeds.