Many drivers who have a VAZ 2121 Niva at their disposal have encountered the fact that the cabin vibrates strongly while driving, especially off-road or at high speed. Vibrations that spread almost throughout the entire cabin cause a lot of inconvenience and constant discomfort. Technically, this was not corrected, so the people’s minds had to independently find a way out of the current situation. And the solution turned out to be quite simple - the transfer case needs a structure that will absorb vibrations. Installing a subframe solves this problem.
The ready-made protective metal frame Niva Comfort is suitable for models 2121, 21213, 21214. The main purpose of the protective part is to eliminate all vibration from the transfer case. But the benefits of installing a subframe on a field turn out to be much greater:
After installing the transfer case subframe, the ground clearance will slightly decrease, but the car will be much more comfortable to drive.
DIY crankcase protection 2121 drawings
For a long time I was planning to build myself a crankcase protection, and finally I figured something out.
I used this pattern to cut the sheet. I made the pattern out of cardboard, then redrew it, it seemed like the dimensions all matched, and I didn’t have to adjust the protection to the location.
1. At the rear, I attached an angle No. 50 to the longitudinal link mount, through steel plates 4 mm thick:
2. On the corner, from the inside, I welded two M8 nuts.
3. The protection sheet was first cut along the fold lines with a grinder to about half the depth, and after bending it was boiled:
4. The mounting holes were marked in place. Two holes in front with standard thread:
One in the center, fastened with an M8 bolt into a standard bracket on the beam with a flush-mounted hexagon socket bolt:
At the back there are two M8 bolts to the nuts on the corner:
5. Inside, on the frontal part, I welded several stiffening ribs, the main thing is that they are located to the left and right of the pallet, otherwise they may touch!
6. I painted it this way because I had paint and a spray gun.
7. I coated the inner surface with anti-corrosion mastic.
8. RPM did not make a hole for the drain plug. It doesn’t take that long to remove the protection, and you don’t need to drain the oil from the RPM every day.
Source
Detailed description
Steel crankcase protection NLZ
- Computer simulation of impact.
- Galvanized fasteners without drilling.
- 2 mm high strength steel.
- Maximum coverage area.
- Stiffening rib.
- Powder coating.
- Maintaining clearance.
- Damping elements.
- Plugs for technological holes.
The NLZ crankcase protection is made of high quality steel. It reliably protects the underbody of your car from various damages when hitting curbs, protruding manholes, edges of damaged asphalt or during road repairs. The thickness of the metal of the car body is 0.6-0.8mm, and 2mm is the thickness of high-quality steel protection. This is exactly the thickness of the NLZ product, which will not fail in extreme situations.
Each protection undergoes a simulated computer test under impacts of 1500 and 3000 Newtons. When impacted with a force of 1,500 Newtons, it should not be deformed, and when impacted with a force of 3,000 Newtons, it should preserve the car.
For mounting, standard technological holes in the car are used; drilling of the body is not required. All fasteners are galvanized, serve for many years and can be reused, if necessary, dismantle the product.
The development is individual for each car and takes into account all its features.
The NLZ steel protection has an additional system of stiffening ribs for maximum strength.
High-quality powder coating allows it to be protected from corrosion during use and storage. The product closely follows the plane of the bottom and has minimal impact on ground clearance.
The presence of plugs provides quick access to drain holes. During vibration, friction is inevitable in places where the metal is closest to the power elements of the body. Shock absorbers dampen sound and keep metal elements intact.
Protection from the crankcase to the transfer case to the field
Author: admin · Published 12/21/2015 · Updated 05/24/2016
Do-it-yourself protection of the crankcase, bottom, and units in the field. Simple and cheap. For this we need:
- Sheet metal from 3 to 5 mm.
- Drill, drill bits
- Bulgarian, circles
- Rust converter and paint
- Mounting bolts and nuts
- Hammer, keys
- Roulette
- Brackets and bushings of the VAZ 2121 stabilizer
Everything was measured according to our own vision of good protection, the length and width can be varied as desired.
Let's start with protecting the RPM (Front Axle Gearbox).
We cut a piece of metal according to the shape, make 4 holes for mounting on the stabilizer. We make the necessary bend to go around the front beam and overlap the standard engine protection
Treated with a rust converter
We paint and attach to the car
Next, let’s slightly modernize the standard crankcase protection:
It can be attached to the standard protection by welding or bolts. Next, we proceed to protect against RPM to the end of the transfer case. Having carefully measured everything, we proceed to adjusting the sheet to the dimensions we need.
First we make only 2 holes for attaching to the stabilizer
We manufacture protection hangers
We paint and attach:
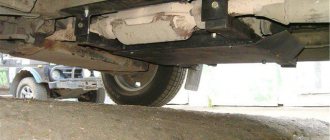
The side mounts are standard gearbox mounts. The rear fastenings are on studs, which were made in advance. To simplify the process, the rear mount can be made on the transfer case cushions.
The general view turned out like this
The protection has a big plus, it is light. For example, the largest rear part weighs just over 5 kg
And it does not protrude below the muffler, which has no effect on the ground clearance.
In addition to its direct purpose, protection can also be useful as a “ski.” The flat bottom of the car allows you to move along the track and the protruding parts (units) of the bottom do not play the role of an “anchor”, do not cling to the ground and thereby do not slow down the car.
Source
Sequence of work
- We purchase (make) a tying kit. When making it yourself, we drill holes in the pan in accordance with the diameter of the studs .
- We securely install the car on supports, preferably above the inspection hole.
- Drain the oil from the gearbox.
- We dismantle the CV joint drives, having first freed the steering knuckles of the wheels.
- Disconnect the front driveshaft from the flange.
- We remove the axle gearbox from under the car.
- On a flat working surface, separate the bottom tray and side covers of the RPM.
- On top of the CV joint drive covers, using elongated studs, we fasten the earring brackets. It is possible to replace the installation sequence of covers and brackets, depending on the kit you choose.
The front axle decoupling is complete, your SUV has become much more comfortable on the highway and more reliable off-road.
Guide to replacing the front axle oil seal Niva Chevrolet
Advantages and disadvantages of the Chevrolet Niva suspension design and is it worth repairing it yourself?
Why do you need a Chevy Niva suspension lift and how to make it yourself?
Do-it-yourself protection for the field 2121 drawings
For a long time I was planning to build myself a crankcase protection, and finally I figured something out.
I used this pattern to cut the sheet. I made the pattern out of cardboard, then redrew it, it seemed like the dimensions all matched, and I didn’t have to adjust the protection to the location.
1. At the rear, I attached an angle No. 50 to the longitudinal link mount, through steel plates 4 mm thick:
2. On the corner, from the inside, I welded two M8 nuts.
3. The protection sheet was first cut along the fold lines with a grinder to about half the depth, and after bending it was boiled:
4. The mounting holes were marked in place. Two holes in front with standard thread:
One in the center, fastened with an M8 bolt into a standard bracket on the beam with a flush-mounted hexagon socket bolt:
At the back there are two M8 bolts to the nuts on the corner:
5. Inside, on the frontal part, I welded several stiffening ribs, the main thing is that they are located to the left and right of the pallet, otherwise they may touch!
6. I painted it this way because I had paint and a spray gun.
7. I coated the inner surface with anti-corrosion mastic.
8. RPM did not make a hole for the drain plug. It doesn’t take that long to remove the protection, and you don’t need to drain the oil from the RPM every day.
Recommendations
The variety of protection models on the market allows you to choose it for almost any car. It is important for the owner to understand what he needs: a decorative element “to calm the soul” or real engine armor. Factory-made metal parts will protect on soft soils and from small crushed stones. For aggressive riding or trials you will need something more serious. Some owners even install armored steel. The main thing is that there is no need to specifically test the elements for strength. This is fraught not only with damage to the power plant, but also with body repairs.
Manufacturing according to the scheme
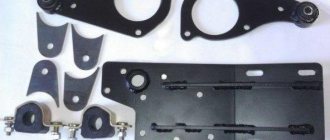
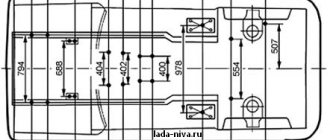
Although the market has no shortage of offers, it is possible to save money by making a subframe for Niva 2121 with your own hands according to the drawings.
In the creation process, you will need a 4 mm sheet of cold-rolled steel 0.525x0.350 m, angles 35x35, 70x50, 70x70 with a length of 0.7 m, 0.4 and 0.4 m, respectively, as well as a 0.73 meter channel 16. Used as fasteners bolts M8, M10, M12x1.25 and M12x1.5. In the creation process you will need a 4 mm sheet of cold-rolled steel 0.525x0.350 m, angles 35x35, 70x50, 70x70 with a length of 0.7 m, 0.4 and 0.4 m, respectively, as well as a 0.73 meter channel 16. M8, M10, M12x1.25 and M12x1.5 bolts are used as fasteners.
Found cheaper
Engine protection for Lada Niva 21214M (2010—2019) No. NLZ.52.17.030
Transfer case protection for Lada (VAZ) 21214M (2010—2019) (installation together with NLZ.52.17.020) No. NLZ.52.17.220
Interior mats for Lada 4×4 2131 5-door. (1995—2019) No. 16005003
- Product information
- Shipping and payment
- Installation About the manufacturer —>
- Exchange and return
- Guarantee
- Reviews
Standard tool:
• Calipers and ruler;
An alternative tuning option is permissible using not corners, but a square profile with a section of 60x30 or 40x25.
There are ideas of placing the RC and the checkpoint on the same “frame”.
Shipping and payment
Payment Methods
| NLZ.52.17.030 | |
| Material | Steel |
| Brand | NLZ |
| A country | Russia |
| Protection for ? | Engine |
| Thickness? | 1.8 mm |
| Fasteners? | Included |
| Gearbox type | Manual transmission |
| Engine ? | 1.7 petrol |
| Guarantee | 24 months |
| Applicability: | Lada (VAZ) Niva 1993—2019 |
| Weight: | 8.51 kg |
| Cash to courier | You can pay for the order upon receipt to the courier upon delivery or at the pick-up point in your city |
| Cashless transfer | The order can be paid from the organization's current account for legal entities or from a personal account |
| Bank cards | Payment by bank cards is possible on the website or upon receipt |
For more information about payment, see the “Payment” section.
Preparation.
1. After the initial preparation of the elements, finishing processing and connection into a single structure is carried out: 1. In the channel, in accordance with the diagram, rectangular windows are cut out, ending no closer than 0.8 cm to the edge of the edge. Bevels (chamfers) are eliminated;
2. In corners measuring 70x50 or 70x70, holes are made for bolted connections, after which they are tacked by welding.
3. Corners of 35x35 cm are fixed to the lower edge of the channel, to which sheets are welded to protect against impacts and dirt. In the latter, for the purpose of access to the drain plug and regular cleaning, service holes are cut out.3. Corners of 35x35 cm are fixed to the lower edge of the channel, to which sheets are welded to protect against impacts and dirt. In the latter, service holes are cut out in order to gain access to the drain plug and regular cleaning.
How to choose parts: average prices
If you carry out a complete re-equipment of a Chevrolet Niva with the installation of power steps, then the cost of work at a service station will exceed 15,000 rubles. If you repair it yourself in parts, you can save more than 10,000 rubles. If you use a profile pipe to strengthen the sidewall and suitable steel sheets for the power stage, then the cost of the material will not exceed 2,000 rubles.
Body sills
Original replicas of Chevrolet Niva are produced directly by the workshops of AvtoVAZ, KamAZ and dozens of companies. In the production of the threshold and amplifier, low-carbon steel is used; the parts are not galvanized, but are covered with transport primer.
Original replicas fit in size and in most cases do not require additional trimming or straightening. Replica cost:
- Threshold left, right from AvtoVAZ from 3,000 rubles. thing.
- Perforated amplifier - 1200 rub. thing.
Plastic covers
Plastic body kits and trims are produced by dozens of companies. When choosing, take into account the year of manufacture of the car and the exact dimensions so that you do not have to cut the plastic yourself. The cost of the kit, which includes self-tapping screws if the installation is carried out with bolts, auto glue if the part is glued to the main threshold, starts from 300 rubles.
Protective pad
Protective parts are made of stainless steel and additionally chrome plated. The cost of power protection for Niva starts from RUB 3,000. for a set of two parts. Certified body elements can cost from 10,000 rubles. for a set of threshold protection with overlays and power steps.
Design modification.
To strengthen the subframe and reduce the profile height (up to 2 times), it is possible to additionally equip the side shelves of the channel with 4 corners at the level of the hole under the transfer case, followed by cutting off the sidewalls to the corner flange.
Finer tuning is provided by connecting the spar and subframe through couplings/bushings.
Strengthening thresholds
Power thresholds are made from a profile pipe with a cross-section of 3 mm. The procedure is performed as part of a standard replacement when the old products have served their purpose. Strengthening benefits:
- improving the functionality of the Niva’s load-bearing body;
- corrosion protection;
- there is no need to do power steps.
The execution procedure is similar to that described above, only the steel profile is additionally welded. Motorists on the forums write that the work is labor-intensive and long, so it’s easier to immediately buy a reinforced unit. Similar services are provided at service stations.
Installation
For ease of installation, the car is fixed on a lift or above a pit. Pre-preservation of surfaces (attachment points, subframe) is carried out using protective agents, for example, Movil.
The finished product is tried on site individually for each vehicle. 4 holes are drilled along the perimeter of the structure, symmetrical relative to the center line. Having previously loosened the transfer case fasteners.
Having placed the plates on the interior side, as in the photo, the subframe is attached to the side members with M12x1.25 bolts.
The RK brackets are sequentially removed, turned over and freely fixed to the subframe. The position of the shaft flanges is adjusted until minimal gaps are formed by moving the entire structure. Alignment is performed at 3000 rpm with the machine standing.
The bolts are thoroughly tightened.
Modification of the drainage tube (extend)
The standard tube drains water in such a way that it gets onto the metal of the body, where rust appears over time. Our task is to lengthen the drainage tube using a dropper so that the water leaves bypassing the spar.
The whole process is also shown in the video:
Installation of subframe step by step video
Video 2 off-road rides
Tuning a Niva 2121 with your own hands, traditionally for the “classic” model range, is a relatively simple process. The result is the creation of exclusive modifications of the all-terrain vehicle, which in appearance, interior and technical characteristics are not inferior to foreign middle-class models. Do-it-yourself car tuning can be turned into a profitable business, and Niva 2121 will become a training ground and will allow you to gain the necessary knowledge and skills.
Why is this necessary?
We have already discussed with you tuning Chevrolet Niva, where I suggested installing thresholds and a body kit as a solution for external modifications. But he didn’t tell anything in detail about them. It's time to fix it. In addition, the installation of such elements is becoming increasingly popular. They allow you to enhance the visual effect, as well as provide more important protective properties.
No one forces you to do or install anything with your own hands. This is a solution for those who do not like the standard appearance of the Niva and want to make some changes. If in doubt, go to the virtual 3D tuning program, try on different thresholds and other elements on the car to understand how it might look in reality.
What Nivas do you know? I can remember the following:
- Chevrolet Niva;
- VAZ 2121;
- 21213;
- 3131;
- 21214;
- Urban.
These are all good cars that could benefit from additional sill installation.
They have several main functions:
- Protecting the car from stones and other objects flying out from under the wheels. It is because of them that scratches appear, then chips and the process of corrosion of the exposed metal begins;
Protecting the thresholds with appropriate elements is considered a competent, although not mandatory, solution for the Niva.
If you decide to install a lift kit for your Niva, or you are going to additionally install a power bumper, it would be logical to complete all this tuning by installing thresholds for the appropriate protective purpose.
Gentlemen, this is what our cunning guy developed for us
to bring all this to life you need 1.5 or 2 mm metal measuring 1.5 * 1 meter, an angle grinder, a hammer, a drill and beer. everything is ready in a couple of hours.
DIY tuning of Niva 2121 for off-road
Initially, the Niva 2121 was created as a universal all-terrain vehicle that feels comfortable off-road and in the city. Therefore, it is logical that off-road tuning of the Niva 2121 is especially popular.
This is due to its relative simplicity. To create, or rather, enhance the image of an SUV, you need to install on your car:
- Larger diameter wheels with tires designed for extreme off-road use. It should be recalled that low-profile tires are not relevant in this case. It is also necessary to take into account that installing large-diameter disks requires impressive torque figures. Ignoring this rule will lead to premature wear of the power unit
- Installing arch extensions on a Niva will solve several problems at once: get rid of splashes of dirt on the wings and doors, expand the possibilities in terms of choosing the diameter of the disks, and complement the tuning composition
- Power kit. It consists of a powerful kenguryatnik. It is easy to make it yourself from pipes. A structure is installed on the rear door, onto which the spare tire is attached. It will also perform a protection function. A winch must be installed. It will help off-road and give the car an aggressive, masculine look.
Suggested options
There should be no problems with where to buy such elements. Go to Avito, browse the Internet, or just go to auto parts stores. The assortment is now huge, and the price is reasonable.
The question is what is your goal when setting thresholds. The type of elements directly depends on this.
In total, 3 categories of thresholds are offered for the Niva.
- Decorative. These are plastic covers that are mounted on the sides of the car. They are somewhat similar to car moldings in that they are easy to install and inexpensive. They have certain protective properties, since plastic prevents damage to the car from small stones, dirt, etc. You shouldn’t expect help from them off-road. Moreover, there is a risk of damaging and breaking them, since plastic is cheap and fragile;
I can’t say specifically how much these or those thresholds cost. There are a lot of options, including a Boomer design and some unique designs, the prices of which are prohibitive.
But you can start with painted plastic parts. Installation is extremely simple; replacement is completed in a matter of minutes if the previous ones were damaged. If you prefer the repair option, that is, there are thresholds that can be restored but provide increased protection, take steel or chrome-plated products. The plastic is purely for decoration, so they will only get in the way when driving off-road.
Installation methods
If you purchased a set of thresholds for the Niva, you should first find out what installation method they are designed for before purchasing.
There are two connection methods in total.
- Removable. These are often plastic or metal products. To install them on the car body, appropriate metal screws are used. Their advantage is that the thresholds can be quickly removed and replaced with new ones, if necessary. The mount is not the most reliable, but in fact the most practical;
- Welding. As you understand, welding machines are used here. This method is important to use if you have metal or chrome thresholds. I don’t recommend using the device without experience and skills. An option for those who are confident in their decision and are ready for long-term use of thresholds on the body of their Niva.
Tuning the Niva 2121 engine
Traditionally, upgrading the power unit of a domestic SUV should begin with reworking the carburetor. A simple solution would be to install an advanced modification with an enlarged diffuser, also called a throttle. This spare part can also be replaced on a standard injector model. If you completely change this unit, it is recommended to install an electronic ignition system.
Tuning the Niva 2121 carburetor will be most effective together with replacing the camshaft. This gives an impressive increase in power. And here, to avoid overheating, it is necessary to install a radiator with a larger surface area.
Tuning the Niva 2121 engine also includes correcting the engine geometry. This is done by increasing the diameter of the valves. About 10% of the power comes from sealing them. It wouldn't hurt to do the same with the intake and exhaust manifold pushers. To increase the power of the power unit at high speeds, a turbine should be installed. At the same time, it is advisable to replace the intake and exhaust manifolds with advanced modifications.
If the car will be used in extreme off-road conditions, it is necessary to install a snorkel. It will allow you to overcome water obstacles without consequences for the engine.
Chip tuning of the Niva 2121 is ineffective, since the car is equipped with an atmospheric engine. There is no need to waste money on purchasing equipment or time on re-flashing. This will only give small improvements to the driving characteristics of the SUV.
Adaptation to harsh conditions
Niva 4x4 is optimally adapted to difficult winter climates. It easily overcomes snow obstacles, and an effective heating system maintains a comfortable microclimate in the cabin even in the most severe frosts. The car is perfect for use during winter fishing and hunting, as well as for long-distance and any domestic trips. Maximum comfort during the cold season is provided by:
- modified engine design, guaranteeing a confident start in low temperatures;
- wide and straight doorways for easy entry even in bulky outerwear;
- large controls for the ability to quickly launch vehicle systems without removing gloves;
- improved lock design, protected from freezing and allowing you to easily open the car in the cold.
Tuning the suspension of Niva 2121
Since the Niva is an all-wheel drive SUV, when tuning it is necessary to pay attention to the suspension. The first step is the Niva lift - increasing the ground clearance. This will create an impressive reserve for overcoming various obstacles. The concept of tuning the Niva 2121 chassis, as well as a suspension lift, includes:
- Installation of spacers between suspension elements. You can make them yourself or buy them in stores.
- Installation of shock absorbers "Rancho"
- Installation of springs VAZ 2104
- Strengthening the front and rear axles using steel boxes
The Niva 2121 suspension lift is a simple process from a technological point of view that can significantly increase the vehicle's cross-country ability. It must be remembered that lifting is directly dependent on the size of the wheels; the larger their diameter, the more significant modifications will be required. Therefore, it is necessary to maintain a balance so that tuning the Niva 2121 suspension with your own hands does not turn into a headache.
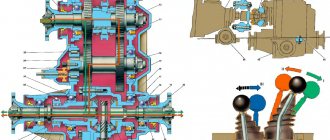
Tuning of the Niva 2121 transfer case is also necessary, although this process is largely a refinement. The main problem is the backlash of the front and rear axle shafts. It can be eliminated by installing new components:
- Bearings (it is better to install a double-row variety)
- Lids
- Valov
- Flanges
A good solution would be to strengthen the shaft support. To do this, instead of the original flange, install a modernized one, which has an additional bearing and oil seal.
The second common problem with transfer case is leaking seals. The solution here is extremely simple, you should correctly install high-quality oil seals and the childhood disease of the unit will be eliminated.
The third problem is the correct alignment of the transfer case in the horizontal and vertical plane. This is necessary to reduce vibration and, accordingly, wear of the moving parts of the unit. You can do the alignment manually, but it takes a lot of time, requires patience and the result does not always meet expectations. It is much easier to use a subframe - a special design that is attached to the bottom and greatly simplifies the alignment of the transfer case.
Shaking problem
Many drivers who have a VAZ 2121 Niva at their disposal have encountered the fact that the cabin vibrates strongly while driving, especially off-road or at high speed. Vibrations that spread almost throughout the entire cabin cause a lot of inconvenience and constant discomfort. Technically, this was not corrected, so the people’s minds had to independently find a way out of the current situation. And the solution turned out to be quite simple - the transfer case needs a structure that will absorb vibrations. Installing a subframe solves this problem.
The ready-made protective metal frame Niva Comfort is suitable for models 2121, 21213, 21214. The main purpose of the protective part is to eliminate all vibration from the transfer case. But the benefits of installing a subframe on a field turn out to be much greater:
After installing the transfer case subframe, the ground clearance will slightly decrease, but the car will be much more comfortable to drive.
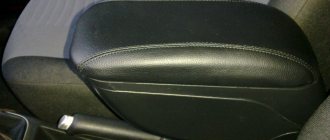
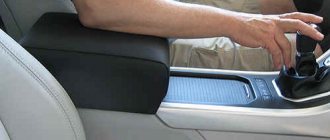
Tuning the interior of Niva 2121
Tuning the interior of the Niva 2121 is carried out according to the standard scheme. It is necessary to replace the interior trim and doors, as well as upgrade the seats. They can be replaced with new sports ones or improved upon the original ones. The second option is expensive and takes a lot of time, so a complete replacement of the seats would be a rational alternative.
To reupholster the interior, you can use your own materials or buy ready-made specialized kits. The interior of the SUV, made in light colors, looks great. It is recommended to do it yourself under the guidance of an experienced specialist. As a last resort, you should study some course or master class on this process.
Also an integral part of interior modernization is the installation of a new steering wheel. It is possible to improve the original one by reupholstering it with various materials and installing additional elements.
Letter of the law
Another controversial issue regarding power kits is the legality of their installation.
Just recently, car owners were shocked by the fact that in Russia the government banned the use
metal kenguryatniks. This is what beginners call literally everything that protrudes from the front of the car and is made of metal.
But remember that there is nothing in common between a bumper and a power bumper. These are different concepts with their own nuances. Regarding legislation, there is no clear law that would prohibit you from putting a body kit on your car. But if you want to make such a change to the design, you will have to take care of the corresponding entry in the PTS. It's not that difficult, don't worry.
Just recently, car owners were shocked by the fact that in Russia the government banned the use
Tuning the instrument panel of Niva 2121
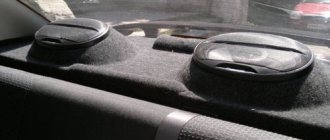
Traditionally, domestic designers developed the Niva not as a luxury, but as a means of transportation, and equipped it with an instrument panel that looks dull and sad. There are many tips on how to bring it to mind with your own hands. In this case, it will be transformed, but its functionality will remain at the same level. Therefore, the best tuning of the Niva 2121 panel is its complete replacement.
A good option would be to install a Flash electronic instrument cluster. This is a futuristic design, complemented by a number of functional features:
- Arrows replaced with LED arcs
- Oil and fuel level indications via scales and digital values
- Built-in trip computer with excellent viewing angle
- Availability of diagnostic service
- Ability to update software versions by simply uploading a new assembly in place of the old one without dismantling the panel
Tuning the Niva 2121 torpedo is often due to the need to install a new modification. Standard minimalism is quite difficult to modernize. The only effective option is to cover the torpedo with various materials or cover it with carbon film.
Complete replacement
Thresholds on Niva Urban and other models are completely replaced in case of severe wear. Sequencing:
- Cut off the old structure, inspect it, assess the condition of the unit.
- Trim the reinforcement in the central parts of the holes.
- Cut off the old element that is used to connect to the floor covering.
- Prime the internal parts of the system.
- Cut the profile to the required length, weld the ends, weld them to the amplifier.
- Make an insert without removing the stand, and weld the joints.
- Take the original threshold, cut off about 2 cm along the bottom, make holes with a drill and weld everything in place.
- Raise the car to weld a new connecting element.
- Weld part of the front fender.
- Fill and prime the joints.
If everything is done correctly, the homemade elements will look like originals and will harmoniously complement the exterior of the vehicle. A machine is used for welding with the spar.
Tuning Niva 2121 doors
In addition to replacing the door trim, you can enhance the interior lighting, in particular the thresholds. To do this, it is necessary to install lamps. They will become a useful element and emphasize the high level of comfort of the tuning car. To make this improvement you will need:
- Ceiling lamps
- Edging for lampshades
- Switches, sensors
- Light bulbs. They can be of bright colors, which will make the car bright and respectable
- Wires
- Isolation
Installing additional lighting will not take much time, but it will become a useful and stylish element of the interior.
Body upgrade
There are many ways to improve the body, and the driver himself chooses the direction of tuning work to give unique qualities to his car.
Headlights and fog lights
The Niva's standard optics quickly fail and require replacement. But such a need can be considered as an opportunity to improve the appearance of the car. It is recommended to install similar lighting devices of higher quality from other manufacturers.
Installing xenon, lens or diode optics radically changes the appearance. Fog lights will organically complement the image of the car and increase the safety of the vehicle.
Moldings
Such elements are installed mainly to protect the body from various contaminants, damage and to evenly distribute the load during impacts. Properly selected moldings can give the car a more presentable appearance.
When tuning, different types of structures are used, which differ not only in the material of manufacture, but also in their functions.
- Overhead. The most popular option, installed on the body frame, doors and fenders. Made from rubber, plastic and chrome steel. Thanks to the elasticity of the part, it is possible to increase the rigidity of the body, thereby increasing the maneuverability of the vehicle.
- Hidden. Covers the gaps between the glass and the body, preventing dust and moisture from entering.
- Threshold covers. Moldings protect elements from mechanical damage and give a stylish look to the car.
Radiator grille
There are many ways to make your car more original. But the first thing that attracts attention in the car is the radiator grille. The choice of material, color and shape depends on the purpose pursued during tuning.
Grilles made of carbon look attractive and stylish. A piece made of aluminum or stainless steel will add originality to the car. Considering the cost of the material, many use fiberglass to make this element.
Particular attention should be paid to the shape of the updated radiator grille. It should smoothly continue the outline of the car, harmoniously fitting into the design. This helps improve aerodynamic properties by directing the air flow over the hood.
Tuning the trunk of Niva 2121
The Niva's extensive luggage compartment is an advantage only at first glance. The large volume provides absolutely no functionality, and the rib at the bottom of the trunk is a completely unnecessary element that interferes with loading. On later modifications it is missing. Also in the way is the folding shelf, which divides the trunk into two parts in the transverse plane.
It is best to remove these disturbing elements and install a box with pockets, drawers, compartments, which will allow you to organize the loaded items. It can be made from wood and metal. Corners or tubes should be used as a frame; it is subsequently sheathed with plywood or other material and trimmed with fabric. Before installing the box, it would not hurt to install noise and thermal insulation on the body.
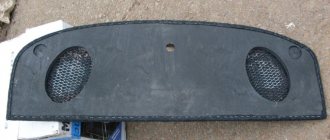
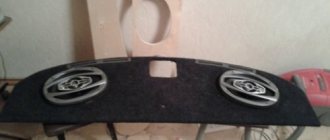
You can also go the standard route and install a speaker system, LCD monitor or other fashionable gadget in the trunk. The latter option is impractical if the car is being tuned for difficult off-road conditions.
An expeditionary trunk for the Niva wouldn't hurt. It will allow you to take a lot of things and save internal space. It will also be a harmonious addition to off-road style. An alternative would be to install an arc with headlights. This will increase the driver's visibility. It is a useful element when driving in bad weather conditions.
Exchange and return
You can refuse the goods at any time before its transfer, and after its transfer within 14 days. Return of a product of proper quality is possible if its presentation, consumer properties, as well as a document confirming the fact and conditions of purchase of the specified product are preserved. If the consumer refuses the goods, the Seller is obliged to return to the Buyer the amount of money paid to the latter under the contract, with the exception of the seller’s expenses for delivery of the returned goods from the Buyer, no later than ten days from the date the Buyer submits the corresponding demand.
Returns and exchanges of goods are possible only if their appearance, integrity of packaging and documents are preserved.
For more information about payment, see the “Returns” section.
Tuning headlights of Niva 2121
Tuning the optics of the Niva 2121 sets the tone for the overall modernization concept. For example, installing headlights from Mercedes Gelandewagen will create the ambience of a powerful, aggressive SUV. Sports modifications of the headlights will add dynamics to the appearance and emphasize the streamlined shape. High power LED headlights can be installed to increase visibility. Another good option is to install lensed, crystal or bi-xenon headlights.
The standard models have virtually no potential for modernization, so it is better to replace them with new ones.
Tuning the rear lights of the Niva 2121 is carried out according to the same scheme as upgrading the optics. It is easier and more efficient to replace standard lights with new modifications.
Source
Overlay functions
Fenders or wheel arch extensions are arched, round, or less often square plates that are installed along the rim of the car's fender, protecting the edge. They are mounted on the body with self-tapping screws through special plates or with auto glue. 80% of the fastening of arches to the wings of the VAZ 2121 is carried out in standard places; the manufacturer produces repair inserts (arches) of the wing for all modifications of the VAZ, made of stainless chrome-plated steel. The purpose of the inner linings on the wheel arches:
- protection of the inner part of the wing metal from premature corrosion;
- improving the appearance of the car;
For Niva, extensions are produced that protrude beyond the dimensions of the body. The elements are mounted on both cut and uncut standard elements. The additional purpose of the part is to protect the side windows from dirt and small stones when driving off-road.
Thresholds made of profile pipe 80x40 — Lada 4x4 3D, 1.7 l., 2003 on DRIVE2
I had a presentiment for a long time that I would have to do this - although I really didn’t want to. But their time has come...
On the last rides, the long longitudinal rod was torn off from the bottom. Somehow we made it to the garage. While we were driving, the car behaved strangely: the bridge tried to turn, but the short thrust still held. When I crawled under the car and started poking it with a screwdriver, I realized that everything was held there by mastic and dried clay. I came to the difficult decision that I needed to weld the sills and strengthen the fastenings.
We decided to weld a profile pipe. At work I spent a lot of time studying the issue (thanks to my fellow drivers in the field) and finally got an idea of “how, what and where” and drew up a work plan. Over the weekend we bought a profile pipe 80x40x2mm L-3000mm, as well as threshold-to-floor connectors - 2 pcs.
Left threshold
Right threshold
, after opening it I saw that the amplifier was more or less alive, although I literally disassembled the inside of the threshold with my hands. I cut the amplifier 35mm below the line where I cut the threshold, so that a profile pipe could be welded onto it, and both pillars coming out of the body:
At the same time I cut out the rotten part of the floor:
Muted profile:
The front pillar was welded through a 4mm steel plate. The rear one docked perfectly.
I also decided, instead of the standard platform for long rods, to weld cross members from the same profile between the threshold and the spar:
I also welded a 50x50x3mm profile pipe into the front connector of the threshold and spar:
On both sides I closed the threshold with the floor with connectors (that is, for one threshold - two connectors), and I already invented the corners and ends from scraps. After everything was welded, I drilled 8mm holes to fill the sill cavity with Movil through them. The holes were closed with purchased rubber plugs.
Everything is top coated with rust converter, then primer with zinc and then mastic.
I also made a hole in the rear part at the lowest point to drain water or condensate, and also with a plug.
www.drive2.ru
What are the dangers of using homemade thresholds?
The main difficulty is the complexity of their production. Removable and non-removable structures must be made in accordance with the regulations, using welding, drawing and other technologies. You can save your budget, but you need the appropriate skills to carry out the work.
The top flange will be durable, practical and aesthetic if it is made from high quality raw materials. The same can be said about the shelf, stamping under the door, sidewall, bottom flange. If the work is performed incorrectly, parts may sag, rust, and as a result their characteristics will change.
The fastenings are made reliable, otherwise the thresholds may fall off, which will increase the risk of injury. The tightness of the connections prevents moisture and dirt from entering the joints. So there are no risks when using high-quality homemade thresholds, but making them that way is not easy. You need to work according to the described scheme and use high-quality materials.