Acoustic shelf Priora Sedan: advantages and features of creation
Acoustic shelf Priora sedan
The acoustic shelf of a Priora sedan is quite expensive, so many people decide to do it themselves. In addition, the acoustic shelf of the factory model Priora sedan is not of high quality, which is why it can be broken as a result of mechanical stress. And if you make it at home, you can be 100% sure of its quality.
Purpose and design features
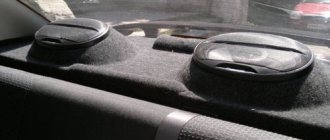
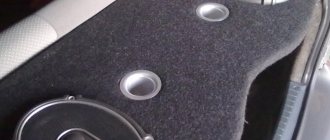
The element is located behind the row of rear seats, regardless of whether it is a sedan, station wagon or hatchback. On the Priora, both a regular and an acoustic shelf can be installed from the factory, although the latter can be called such a stretch. It is designed to secure speakers and other devices that reproduce sound. It has cutouts for standard elliptical-shaped speakers measuring 6x9 inches.
The factory shelf is in most cases made of plastic. Due to weak fastenings, it constantly rattles, which reduces the sound quality.
Installing an acoustic shelf solves several problems at once:
- sound quality becomes higher;
- when playing audio recordings, extraneous noises cease to be heard, this is especially noticeable at high volumes;
- you can install speakers of any shape and size (relevant for a homemade product);
- the ability to create a competent acoustic scene in the car thanks to the correct location of the speakers.
The only advantage of a factory-made acoustic shelf is that you don’t need to spend time and effort making it yourself. Otherwise, it has more minuses than pluses.
Advantages
Priora sedan acoustic shelf
A DIY acoustic shelf can be decorated with various materials. That is, this option is suitable for those Priora owners who want to create a unique interior design. Let's look at some of the benefits:
Note: it is best to use natural wood treated with a special moisture-resistant compound.
Priora sedan acoustic shelf
Advantages and disadvantages of homemade products
A DIY shelf has a lot of positive aspects:
- precise adjustment to the dimensions of the luggage compartment;
- the ability to use any acoustics connection scheme;
- you can use any material for manufacturing and upholstery - in order to increase durability, it is better to choose natural wood treated with moisture-proof compounds;
- Compared to a standard acoustic shelf, a homemade one does not rattle or vibrate;
- you can create a product according to your own drawings and increase the amount of usable trunk space.
Among the disadvantages, they note only the need to spend free time, especially if you have to develop everything yourself. You also need to have skills in handling various power tools, for example, a jigsaw.
Features of creating shelves
Acoustic shelf in Priora sedan
You can create an acoustic shelf for a Priora at home in different ways. In general, there are several main methods used during such a process. Fans of loud music can even create an acoustic stage in their car. Most often, inexpensive materials (chipboard, plywood or MDF) are used to make shelves. Subsequently, it is covered with carpet. Working with such materials is not difficult, especially since the end result will please many. However, some choose expensive options to realize this goal - natural wood, leather, and the like.
Acoustic shelf for Priora sedan
Note: To avoid problems with rattling and vibration after fixing the shelf, it should be installed in hard places using high-quality fasteners.
Three common ways to solve problems
Among car enthusiasts, there are 3 quite popular methods for eliminating squeaks:
- Dismantling the shelf and gluing it with soundproofing materials.
- Replacing the element with a new purchased product (wooden shelf).
- Manufacturing of a fixation system using fabric Velcro.
In the first case, several materials and devices are used to perform the work: - vibroplast; - uniton; - construction hair dryer. The goal of all work is to paste over the lower part of the product using various sealing and soundproofing materials. In addition, the places where the shelf comes into contact with its installation location are also glued.
The second option is quite simple and does not require labor-intensive manipulations. All you need to do is buy a new product and install it to replace the old one. The advantages of this approach lie in the material used to make the shelf - wood or plywood, which do not produce squeaks when in contact with hard elements.
The third solution is similar to the first, except that the principle of the idea is to firmly fix the problematic element to the place of its installation and prevent it from moving while the car is moving. To do this, ordinary Velcro, which is used in the manufacture of clothing, is attached to the corners of the product.
Making a shelf
The standard shelf of the Priora Sedan can be used to make it easier to make a similar model with your own hands. It can be used as a layout. But to make the work easier, it is better to additionally make a layout from cardboard.
Acoustic shelf Priora sedan
Acoustic shelf on the Priora sedan itself
Note: they are installed between the ovals for the speakers, it is recommended to use at least 2-3 bars.
Note: during the work, extra holes may appear that need to be sealed with cardboard so that the mounting foam does not get inside the product itself.
DIY acoustic shelf for Priora sedan
Finalization of the standard model
There is no need to make a new shelf, since the standard one can be made more stable. Of course, this option will be cheaper. After all, in this case you will only need to buy polyurethane foam. With the help of such material it will be possible to achieve high rigidity of the structure, so it will withstand any mechanical stress well.
Modification of the standard shelf
In addition, the resonance in the system will be increased, so the sound of musical compositions will be much better. To bring this idea to life, it is necessary:
Ideal shelf for Priora
Note: Air will begin to accumulate inside, causing it to not dry evenly. To avoid this, you can pierce the foam with a nail, and then lightly press it down.
DIY shelf
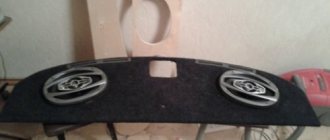
The self-made shelf is not inferior in quality to standard models. Many people choose this option, since the price of a homemade product is much lower than what they would have to pay to purchase a finished model. Before starting work, you need to familiarize yourself with the photos and videos offered on the Internet. We hope our instructions will also not be superfluous.
Source
What are the advantages of a homemade shelf in a hatchback compared to a purchased one?
Those who decided to equip not only the rear shelf, but also the sides of the car, highlight the following advantages of making all the components themselves:
- A homemade rear shelf will fit perfectly into the dimensions of the trunk,
- It is possible to choose the wiring diagram for the speaker system yourself, in which the sound of all musical compositions without exception will cause frantic joy,
Attention! If you decide to make a shelf manually, then it is best to choose natural wood for the body, which will be treated with a special moisture-resistant compound. This will significantly increase the durability of the structure.
What do you need to know before making an acoustic shelf for a Priora hatchback?
- For upholstery, experts advise using materials made from artificial and natural leather. This will give the shelf a solid look, and a high-quality finish will completely hide the new speakers from your fellow travelers.
- By choosing the right size and shape of the shelf, you can achieve maximum effect in sound and bass, even when purchasing budget speakers for Priora,
- When creating a layout for the rear parcel shelf, you must first calculate its dimensions according to the diameter and dimensions of the purchased speakers. Otherwise, at the installation stage you will have to redo the assembled circuit again.
Making an acoustic shelf for Priora Sedan
The standard acoustic shelf of the Priora Sedan is not very different in quality and easily breaks under minor mechanical stress. The optimal solution: make an acoustic shelf with your own hands, adapting it to your needs.
Advantages of making a shelf with your own hands:
In addition, by making an acoustic shelf yourself, you can be sure of its reliability and quality. Even using the best materials for manufacturing, the cost of a homemade shelf will be less than the cost of a purchased one.
how to remove the rear shelf of a Lada Priora hatchback | Topic author: Svetlana
Mikhail probably used a sledgehammer.
Alexandra Frankly takes out.
installation of an acoustic shelf on a Priora sedan. – YouTube
installation of a Free Air Oriole subwoofer in a Priora sedan shelf – Duration: 16:46. Dmitry Gruzdev 86,222 views · 16:46. Subwoofer in the back.
How to install a lock to open the trunk with a button on the Lada Kalina
Replacing the cabin filter on a Volkswagen Polo sedan video
What kind of oil to fill in the Volkswagen Golf 2 1.3 engine
How to remove the rear parcel shelf on a Priora sedan video: comments
Thanks for your help on this issue. I did not know it.
Of course, I apologize, but this doesn’t quite suit me. Who else can tell me what?
In my opinion, you are wrong. I'm sure. Let's discuss this. Write to me in PM, let's talk.
There's something to it. I see, thank you very much for your help in this matter.
You are making a mistake.
This message is incomparable))), I’m very interested
Making a layout
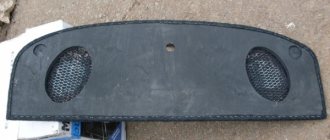
A standard acoustic shelf installed in a car can serve as a model for making a new one. From it you can subtract the required dimensions and format of the structure. But it is inconvenient to use it in practice, so you should first make a mock-up. First you need to dismantle the standard shelf and get a sheet of thick cardboard of the appropriate size. We attach the removed shelf to the cardboard, outline the perimeter, include holes for seat belts in the layout, select the location of the speakers and draw their diameter with a marker on the cardboard.
Next, use a cardboard knife to cut off all excess along the edges of the cardboard layout and cut holes for the speakers. Remove podiums for speakers from the standard shelf, which will also serve as mock-ups for new ones.
Refinement of standard acoustic shelf
A quick and cheap solution to the problem of instability of a standard shelf would be to modify it and increase the rigidity of the structure. This idea will cost a little less than making it yourself, but it will also be a little different.
Stages of work on finalizing a standard acoustic shelf:
Treating a standard acoustic shelf with polyurethane foam will not only increase rigidity and prevent squeaks when playing music loudly, but will also improve the acoustic properties of the sound. If desired, you can additionally install wooden blocks between the speakers, and also, if necessary, change the dimensions of the speakers to the size of the new ones.
For optimal sound, do not place additional car interior parts or other objects on the acoustic shelf.
The simple steps mentioned above will help you turn a standard acoustic shelf into an element of interior decor with excellent sound properties.
Source
Features of opening the trunk of the Lada Kalina
Owners of the Lada Kalina car are almost unanimously surprised: with all the bias towards Europe, the trunk lock of the Kalina hatchback in the basic configuration for some reason can only be opened with a key. For many, the situation immediately became quite common: the driver gets into the car, starts the engine, and then remembers that he needs to put something from the passenger compartment into the trunk. Further actions are similar to a joke.
You need to turn off the engine, remove the key from the ignition, get out of the car, and so on. If you imagine all this in an environment of time shortage, one can only feel sorry for the owner. In addition, if someone happened to approach the trunk of a car with something heavy in their hands, the procedure for opening it with a key turned into something difficult. Another problem could have arisen: in regions where real frosts occur in winter, the lock cylinder would at times freeze tightly.
Then another interesting detail became clear: the craftsmen who climbed under the trunk trim to understand the internal structure realized that there was still a place for the lock activator and even a standard electrical connector for wires. And then the same craftsmen began to solve the problem of how to modify Kalina to increase the comfort of use. The complete trunk lock drive is not available for sale as a single set, so the parts will have to be obtained separately.
Manufacturing process
You will need: 2 sheets of 10 mm plywood, a tool, a jigsaw, a drill, furniture corners, carpet, glue or a furniture stapler.
We cut out a shelf from plywood according to the drawing. The sides will be more accurate if you remove the plastic sides from the car and trace them in the place where the shelf will fit.
The side part of the shelf is an optional part of the acoustic shelf (if you buy a ready-made rear shelf, this element is not present). We fix it at an angle to the shelf using furniture corners. We bend them in place on the car.
We make another copy of the shelf template without a lid, only leaving small protrusions that will hold the lid. We fasten two sheets of plywood together with glue and screws. The lid is held in place by these hinges.
All that remains is to tighten the rear shelf with carpet using glue or a furniture stapler.
We install the resulting structure into the car, securing it around the perimeter in four places in the trunk.
The result is a non-removable, acoustic shelf with sidewalls. This drawback can be solved by using simpler fasteners, or by using a different design where the side parts will remain standard. Let us remind you that if you decide to leave the standard rear parcel shelf, but it creaks terribly, follow these recommendations.
Rear Shelf rattles
- Thank you
- I do not like
Vyacheslav RB 03 Apr 2011
After inserting the speakers into the rear shelf, the latter began to rattle. At first I thought it was junk that was in a plastic box in the trunk, but after cleaning it the rattling sound remained. Even when you're not driving, you can hear it at idle.
Kind people! If anyone has encountered a similar problem, tell me what to do! I myself am thinking of using sealant around the perimeter, but I’m not sure that the idea is a good one. Maybe a window seal? I would like to make it so that it is not visible.
Thanks in advance! Post edited by Vyacheslav RB: 03 April 2011 - 01:57
- Thank you
- I do not like
21099i 03 Apr 2011
After inserting the speakers into the rear shelf, the latter began to rattle. At first I thought it was junk that was in a plastic box in the trunk, but after cleaning it the rattling sound remained. Even when you're not driving, you can hear it at idle. .
double-sided tape will help you. I use it to treat squeaky plastic.
- Thank you
- I do not like
Vyacheslav RB April 03, 2011
double-sided tape will help you. I use it to treat squeaky plastic.
Is it thick enough? The gaps there turned out to be quite strong, thicker than adhesive tape.
- Thank you
- I do not like
Savel_yev 03 Apr 2011
After inserting the speakers into the rear parcel shelf, the latter began to rattle. At first I thought it was junk that was in a plastic box in the trunk, but after cleaning it the rattling sound remained. Even when you're not driving, you can hear it at idle.
Kind people! If anyone has encountered a similar problem, tell me what to do! I myself am thinking of using sealant around the perimeter, but I’m not sure that the idea is a good one. Maybe a window seal? I would like to make it so that it is not visible.
And if you try to fill the cracks with paralon. Just so that it is thicker. That’s how I treated mine. My subwoofer in the trunk made it all rattle.
- Thank you
- I do not like
Slava86 21 Feb 2012
After inserting the speakers into the rear shelf, the latter began to rattle. At first I thought it was junk that was in a plastic box in the trunk, but after cleaning it the rattling sound remained. Even when you're not driving, you can hear it at idle.
Kind people! If anyone has encountered a similar problem, tell me what to do! I myself am thinking of using sealant around the perimeter, but I’m not sure that the idea is a good one. Maybe a window seal? I would like to make it so that it is not visible.
insulation with foil. and screw the speakers through the shelf directly into the hardware.
Refinement of the station wagon shelf
Acoustic shelf lada priora
You can start modifying the standard factory shelf if you don’t want to change it. On a station wagon, the factory shelf does not have a straight surface for mounting speakers. What is the point of revision? Ensure a flat surface, that's right. The material in this case will also be plywood, the thickness of which is 20 mm. As for the width, 35 cm is what you need.
Note. Note that the factory shelf is made of 2 layers of plastic.
Note. In the process of such refinement, a difference is possible. To avoid this, it is recommended to cut 2mm plywood along the contour of the cut out part, and then glue the whole thing to a thick piece of plywood.
Important nuances
Acoustic shelf for lada priora
You need to know the following. The acoustic shelf for a station wagon should have distinctive features and be different from the shelf from a sedan. In principle, the manufacturing does not have any special differences, but a number of subtleties are still present. Not only the sound element, but also the safety of the people inside the car will depend on them. The difference implies not only the mounting of the shelf and its features, but also a number of other differences. For example, it is impossible not to take into account the size of the car interior. A station wagon, as you know, is larger than a sedan, so you need to pay attention to this.
Do it yourself or buy ready-made
Those who appreciate the high-quality sound of the Priora’s built-in audio system unequivocally say that it’s only made with their own hands. A well-fixed acoustic shelf, processed with high-quality materials, will reveal the entire rich sound background of the player. And if there is an additional amplifier in the trunk, the Priora will become a magnificent mobile music center.
The process of manufacturing an acoustic shelf for a Priora sedan
This is a rather complex operation that requires certain skills in working with wood. To make a high-quality shelf you will need the following tools and materials:
First of all, the shelf installed at the factory is dismantled.
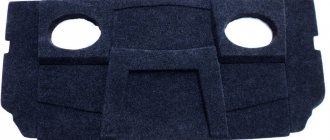
It is necessary to cut out a layout from cardboard. Then, on this layout, holes are drawn for the available speakers.
A layout is placed on the prepared sheet for making a shelf, and a silhouette is made with a pencil. A workpiece of a given shape is cut out with a jigsaw. When all the necessary cuts have been made, the edges are sanded to remove burrs.
Manufacturing
Priora acoustic shelf
As you can see, such shelves stand in different ways. But one thing is for sure - to have a good quality acoustic shelf, you will have to pay at least 1.5 thousand rubles. A fair question arises: is it possible to make such a shelf with your own hands, taking into account your own wishes regarding its design. The answer is clear - of course, it is possible.
First way
Here's what you'll need for this:
Note. Let us note right away that the shelf can be made using different templates and technologies. You can find a template anywhere today. Fortunately, there are no restrictions on this. Just search on various sites.
Priora acoustic shelf
Advice. In this case, a drill can also provide an invaluable service. You can easily use it to cut holes for the speakers by making dots along the marked circle on the plywood. The saw will easily pass along such a circle.
Note. Reupholstering involves fixing the carpet to the shelf using glue and a stapler. For high-quality reupholstery, it is recommended to first place pieces of burlap on the ends of the shelf, and only then carpet on top of them.
Acoustic shelf on Priora
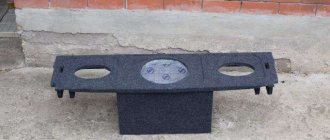
To install the sidewalls, they can be fixed to standard fasteners or additional ones can be used. As a result, we get an excellent homemade shelf, the cost of which does not exceed a hundred rubles. The sound quality of the rear acoustics will improve significantly, which can be directed towards the rear window (thus, you can get the effect of reflected sound).
The second method with a folding part
Again, plywood is used, but 2 pieces are already cut out of it. The first piece of plywood can be cut according to the template of the factory standard shelf. It is recommended to leave the second piece 2 cm shorter. Let's get started:
Advice. It is advisable to use Moment or epoxy as glue. They are the most suitable for this type of work.
Note. You don’t have to make it again, but cut it off from the factory one and screw it to the new one.
What happens in the end?
The rear shelf on the Priora, created with your own hands, will not be inferior in quality or appearance to standard models, which are sold in a wide range in any online store. In addition, creating a shelf for your own design from professionals or ordering it from an online store will cost you much more than you will assemble the option you like in your garage. The most important thing is that before starting work, be sure to read the photographs of the manufacture and installation of the shelf on the Priora.
I IMMEDIATELY WANT TO EXPRESS HUGE THANK YOU to Gogik173, WITHOUT HIM THIS WOULD NOT BE REALISTIC)
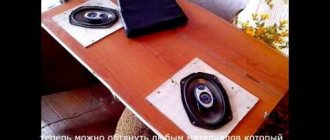
Well, it's time to tell everything in order.
Three days ago I decided to make an acoustic shelf for a Prioric Hatch. One large chipboard and one large sheet of plywood for the shelf itself, as well as several smaller boards for the sides.
Started work. I removed the shelf and the side panels (the latter are held on by 4 screws - 2 on the trunk lid side, 1 in the center of the side panel and 1 on the seat side).
I drew out the left side panel, started cutting it out, took a long time and painfully to adjust everything to size, but... I’ve never seen wooden shelves before, obviously nothing worked out for me, I couldn’t figure out how to put it in its regular place.
As a result, the day went down the drain.
The next day I went to a friend to get patterns for the sides and shelves. He offered to help with the production, I couldn’t refuse, because... I was sure that I couldn’t cope on my own.
I went to the store and bought everything I needed, namely, several packages of self-tapping screws of different lengths with wide heads, a piano hinge, carpet - 1.5 m, mounting glue for wood, metal hangers (using them in the future we will secure parts of the side panels between each other and install them in their normal place.)
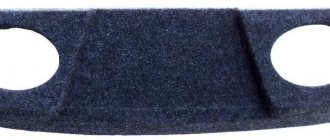
Then the procedure began for drawing the sides according to the pattern and then sawing them out.
After all the parts of the side panels were cut out, they were fastened with self-tapping screws, and the “hump” was screwed to the main part of the side panel using metal hangers.
We tried on the first side panel - it fit like a original, there were small gaps in some places - just under the carpet)
Then they cut out the second one and repeated the steps.
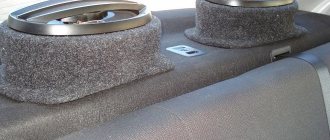
The next day we tried to fit the speakers into the side panels, as usual - from above, it turned out that we were a little wrong with the size of the holes for the speakers, but it was not scary, we just covered the holes with a secret mesh)) and covered them with carpet on top, and seated the column from below. How they covered it with carpet - glue was purchased for installation, and a construction stapler was also borrowed. The upper part of the side panel was coated with glue and a carpet was applied, then with a little effort the edges were tightened and stapled from below.
And voila - we got amazing sidewalls, just like straight from the factory)
Then, using the same metal hangers, we secured them into the standard holes. To be honest, I was initially skeptical about these hangers - how would such little things hold heavy wafers made of chipboard and plywood. But my fears were in vain, the sides were firmly attached)
Then the shelf itself.
Since the sides were made according to the stock dimensions, they decided to make the shelf accordingly, i.e. We measured the dimensions using the stock shelf.
Measured and cut. At first we were a little wrong with the width, but thank God we didn’t cut it enough) we trimmed it a little more on the sides - the result is that it fits like a native.
Installed in the intended place. At this point, at 8 pm, the two-day work was completed.
According to rough estimates, carpet, glue, hinge, screws, hangers cost about 500-600 rubles.
Refinement of the factory version of the acoustic shelf
Of course, it is not always possible to invest, or simply not everyone has the ability to work with wood. But don't be upset. After all, it is quite possible to carry out minor modifications to a part installed at the factory. And although this is not the option of installing a shelf yourself, however, such a modification will significantly improve the sound. And you just need to treat the seats with regular foam and put a layer on the entire lower part of the part. This will allow you to secure the soundbar tightly enough and almost completely avoid vibration. This is, so to speak, a budget option.
How to remove the rear door trim on a Priora
For the rear doors, the sequence of actions is approximately the same, and even easier, but it is worth considering the design features and location:
- use a Phillips screwdriver to unscrew the bolt from the recess for the door handle;
- Two bolts are also unscrewed in the recess of the armrest. If necessary, the entire pad is removed from the clips and removed;
- If the rear windows are manual and not automatic, then the handles are simply pryed off with a flat-head screwdriver and snapped off;
- the cap from the door lock is twisted off;
- Three bolts are unscrewed from the bottom of the casing;
- Using a special puller or a flat screwdriver, the trim is carefully removed from the clips. It is done!
Assembling the door will require the same steps, but in reverse order.
Review of popular shelves on Priora
Priora station wagon acoustic shelf
Let's look at the most popular shelves sold today in stores in our country. First, let’s find out what technical characteristics stand out for the shelves on the Priora that have sidewalls.
| Type | Rear acoustic shelf with sides |
| Automobile model | 2171 station wagon |
| Material | Plywood or MDF |
| Shelf/sidewall thickness, mm | 10/25 |
| Possibility of upgrading the shelf | Can be made directional (for an additional fee of 200 rubles) |
| Possibility of installing a subwoofer | It is also possible for an extra charge |
| Shelf cost | 1600 rubles |
It is clear that the main advantage of a shelf with sides is the location of the speakers (see How to choose speakers for a car radio on your own). They do not stand on the main plywood, but on the side parts. This provides a unique opportunity to conveniently load cargo into the trunk for transportation. Now you won’t have to remove the shelf with the speakers every time. In addition, it is possible to select the desired color of the polo, depending on individual preferences and matching the interior color.
Graphite shelf produced in Tolyatti
| Type | Acoustic shelf |
| Price | 1250 rubles |
| Possibility of reupholstery with imported fabrics | For extra charge |
| Suitable Speakers | 6x9/13 cm/16 cm |
| Shelf dimensions, cm | 130x50x30 |
| Shelf weight, kg | 7 |
Priora station wagon acoustic shelf
Shelf without sides Tolyatti
| Type | Acoustic shelf without sides |
| Speaker sizes | 13/16/20 cm |
| Price | 700 rubles |
| Shelf weight, kg | 8 |
| Dimensions, cm | 130x70x40 |
What to do when the rear parcel shelf rattles on a station wagon, hatchback or liftback
Unlike the sedan, the rear parcel shelf of the station wagon and hatchback is not rigidly fixed. This solution, on the one hand, allows you to increase the capacity of the trunk, and on the other hand, the shelf becomes an additional source of squeaking. What are the most practical ways to soundproof the rear shelf?
The instructions will be useful for owners:
- liftback Lada Granta;
- station wagon/hatchback Lada Priora;
- Lada Vesta station wagon;
- station wagon/hatchback Lada Kalina;
- SUV Lada 4×4;
- station wagon Lada Largus.
To get rid of crickets that appear due to the fault of the rear shelf, it is recommended to perform a number of actions. You should start with an anti-creaking agent (Madeline), which should be glued to the places where the shelves touch.
Next, you need to fix the rear parcel shelf so that it does not dangle or bounce while driving. At the same time, so that it can easily rise when opening the trunk. We recommend installing a trunk shelf bracket, which is used on foreign cars. Catalog number: 965 677 80. Or use the rubber shelf stop from the VAZ 2111.
There is also a ready-made solution that will eliminate squeaks and rattles - this is an acoustic shelf. As a rule, they have sufficient weight that does not allow the shelf to bounce on bumps. In addition, the acoustic shelf is covered with a material that performs anti-creaking functions.
Making a layout
A standard acoustic shelf installed in a car can serve as a model for making a new one. From it you can subtract the required dimensions and format of the structure. But it is inconvenient to use it in practice, so you should first make a mock-up. First you need to dismantle the standard shelf and get a sheet of thick cardboard of the appropriate size. We attach the removed shelf to the cardboard, outline the perimeter, include holes for seat belts in the layout, select the location of the speakers and draw their diameter with a marker on the cardboard.
Making an acoustic shelf with your own hands
To improve the appearance of the product, it is recommended to use artificial or natural leather. High-quality casing made of sound-permeable materials will help hide the speakers from prying eyes. If you choose the size and shape of the shelf wisely, you can achieve maximum effect when playing low frequencies using budget playback equipment.
You should create a layout after purchasing the speakers, since the holes in the finished product must exactly match the dimensions of the built-in devices.
Creating a Layout
To create a layout, you can use the shape of a standard acoustic or regular Priora shelf. Taking its dimensions as a basis, calculate the required dimensions. First you need to remove the shelf from the car and attach it to a previously prepared cardboard sheet. Next, use a marker to outline the product, including the slots for the seat belts. After this, you can select any location to install the speakers and mark it on the layout.
The excess part of the cardboard is cut off with scissors or a stationery knife, and holes for the speakers are also cut out. If there are podiums for speakers on the factory shelf, then they are also removed and used to create a layout.
To work you will need the following tools:
First, you need to attach the cardboard model to the material that will be used for the future acoustic shelf, and trace all the lines with a marker. For manufacturing, it is advisable to use composite materials made of thick wood. Usually this is a panel up to 25 mm thick, for the manufacture of which a plywood sheet or MDF panel is used.
Making a shelf for a sedan
The creation process includes the following steps:
Podium templates are cut out on a separate piece of material using a jigsaw. They are fixed to the workpiece using mounting foam. After the sealant has completely hardened, excess pieces should be cut off with a stationery knife. Slots are cut for seat belts.
The workpiece is processed on all sides with fine-grained sandpaper until the surface is smooth, after which all seams are sealed with sealant. The shelf is covered with finishing material - you can use adhesive bases based on epoxy resins for this.
If non-vibroplast is used for finishing, then it is better to additionally apply any sound insulation.
Now all that remains is to install the structure in its original place. To secure it, it is better to use strong bolts that will not loosen over time. If you are installing a homemade product, it is important to adjust the dimensions correctly.
Creating a shelf for a hatchback and station wagon
The same materials are used for manufacturing and the algorithm of actions is also almost identical. The difference is that the standard shelf without sidewalls in cars with these body types consists of two parts. One of them reclines for easy loading of luggage.
Ways to refine the product
Removing the shelf from the trunk of a Lada Priora takes no more than a minute. In hatchback and station wagon you need to pull it up and then remove it. In a sedan body the removal process is more complicated:
- you need to disconnect the wire block from the additional brake light and from the speakers (if any);
- pull the locking strap up and remove the back of the rear sofa;
- lower the armrest down and unscrew the fastening screws of the luggage compartment hatch;
- press the 4 locking elements;
- lift the front part a little and pull it towards you, overcoming the force of the seals until the latter come out from under the rear window.
To put the shelf in place, repeat all steps in reverse order.
The process of finalizing the shelf in a sedan
The standard design is not of good quality and most often begins to rattle and creak. If it is not possible to make a shelf yourself, modify the factory one.
To work you will need:
- polyurethane foam;
- scotch;
- noise and vibration insulation material;
- glue, preferably epoxy;
- silicone sealant.
The upgrade looks like this:
- The standard shelf is removed from the car along with the speakers.
- All holes are sealed with tape - it is important to prevent polyurethane foam from getting into them.
- The bottom surface is moistened for better adhesion to the sealant.
- Polyurethane foam is applied to the lower part and after 40 minutes it is pressed down to increase rigidity. The sealant must be pierced in several places with a nail to expel excess air.
- You should wait until the foam has dried completely and treat all seams with silicone sealant.
- Noise-vibration insulation material is glued to the outside with epoxy glue.
- If desired, you can top the product with textiles.
This modification increases the rigidity of the structure, prevents squeaks, and improves sound quality.
To ensure that nothing interferes with the sound, no foreign objects are allowed on the acoustic shelf.
Improvement method without polyurethane foam
On Lada Priora hatchbacks and station wagons, using the method using polyurethane foam is undesirable. The thickness of the product is considerable, and for a large surface area this threatens sagging. For this reason, other materials are used for modification: modelin, anti-creak or vibroplast.
First you need to make the structure heavier. To do this, noise-vibration insulation material is glued to the bottom side. In this case, a construction hair dryer is used to heat the vibroplast and a tool for rolling out the insulation - any hard roller will do. Weighting will prevent rattling.
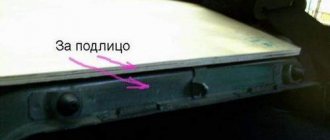
Then all surfaces that come into contact with each other are covered with modelin. This refers to the shelf holders on the sides and the contact points of the plastic linings with the luggage compartment pillars. Sealants for windows and doors, used in construction, may also be suitable for pasting. The purpose of this stage is to remove squeaks.
As additional measures, you can use components from foreign cars instead of standard rubber bumpers. They press the shelf more tightly to the trunk lid in the closed position and prevent it from moving and bouncing when driving on uneven roads.