VAZ 2112 acoustic shelf
As you know, achieving good sound in a car interior, where there is very little free space, is quite difficult. But this can be done if you use some devices, one of which is a homemade or store-bought acoustic shelf. There are a lot of components inside a car that interfere with normal sound. It's not just the noise of the engine or the hum of a moving car. The weak stereo effect is mostly due to the rear speakers and the direction of their sound. In other words, a large number of barriers arise between the speaker and the listener, in which the sound disappears. Of course, the problem can be solved and this can be done in several ways:
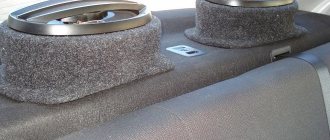
Acoustic shelf VAZ 2112 with sides
- Point sound. This method involves installing the speakers (see How to choose speakers for your car radio yourself) so that they are aimed directly at the listener. In order not to deprive any of the passengers of sound, this method involves directing the speakers to the center of the cabin, thereby avoiding obstacles.
Note. In this case, the speakers are installed on the ceiling using a podium. But this method has disadvantages. In particular, there is no way to firmly fix the speaker, which will lead to rattling and other errors. In addition, this method of installing the speaker risks a complete lack of bass.
- Reflected sound. The speakers in this case are directed to the rear window. Thus, the stereo effect is enhanced, and the sound becomes much more voluminous. This method is much easier to implement than the first and the bass sound will not suffer from such a dislocation.
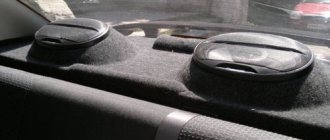
Note. The reflected sound method implies the presence of an acoustic shelf. Only the store shelf is made in such a way that the speakers face the ceiling, where some of the sound is dampened by soft and fleecy material. In addition, if the VAZ 2112 car has headrests on the seats, then these are additional obstacles. Therefore, it is recommended to make a shelf yourself, especially since it is not so difficult.
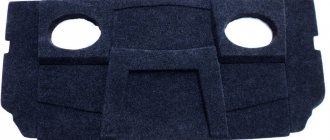
In such a situation, there is only one way out - independent soundproofing of the rear parcel shelf of the Lada Vesta sedan. And everything is simplified by the fact that this operation does not require serious knowledge. It just takes effort.
You can buy vibration and noise insulation for the rear parcel shelf of the Lada Vesta sedan in many online stores. Both types of material will be required for the job. According to owner reviews, a total of about 1 m² of insulation is required. This is important, since it often comes in sheets of different sizes.
The tables below present various materials, with prices and parameters.
Vibration isolation
| Name | Thickness (mm) | Length/Width (m) | Price, rub.) |
| PRACTIK 4.0 | 4.0 | 0.75/0.46 | 260 |
| Alphard 2.0 | 2.0 | 0.60/0.40 | 131 |
| LOUD SOUND LS-2 | 2.0 | 0.70/0.49 | 120 |
| SHUMOFF M3 | 3.0 | 0.37/0.27 | 75 |
| Kicx VIBROBLOCK SUPER | 2.7 | 0.37/0.54 | 144 |
Noise insulation
| Name | Thickness (mm) | Length/Width (m) | Price, rub.) |
| SCHUMOFF COMFORT 3 | 3.0 | 0.75/1.0 | 600 |
| Splen | 4.0 | 0.75/1.0 | 345 |
| Kicx ST (fabric) | 1.0-1.5 | 1.0/10.0 | 396 |
| Aura VDM-BT10 | 10 | 0.75/1.0 | 400 |
| Shumoff Bass | 1.6-2.3 | 0.75/0.54 | 380 |
In fact, there are a lot of materials, with different parameters and purposes. Therefore, the purchase will depend on the budget and intentions.
Homemade shelf
Lada Kalina station wagon acoustic shelf
No matter how good the purchased shelf is, a homemade one will give it a hundred points ahead. The point is not only that you will have to pay for the store from your own pocket. A shelf made with your own hands can withstand impacts better, is stronger and more efficient. In addition, despite the large number of different store shelves, it is quite difficult to truly choose the model that would suit a true connoisseur of sound. So you have to learn to do it yourself.
First way
Plywood sheet for acoustic shelf
So, here are the step-by-step instructions:
- Take a sheet of plywood, preferably not too thin;
- Cut out two parts.
- We fasten the sheets to each other using self-tapping screws, glue and foam;
- Now we need to make the folding part of the shelf. A sheet of plywood is ideal for this task.
The manufacturing instructions for this shelf imply that the acoustic podiums will be placed on a hinged lid or there will be none at all.
Second way
Ready-made acoustic shelf
The next method for making a shelf for Kalina is as follows:
- First comes preparation. Everything unnecessary is removed from the interior, including the rear sofa, which may interfere with work;
- The decorative standard shelf and insulation, if any, are dismantled;
- Markings are applied to the plywood. Instead of a template, the standard shelf itself appears, which was removed.
- The future product is cut out using an electric jigsaw;
- The shelf is first tried on in place;
- If everything is good, then holes for the podiums are outlined;
- The holes are cut oval;
- On a separate sheet of plywood, a podium template is created, also with holes;
- Both parts are connected to each other with glue and screws;
DIY shelf made from two pieces of plywood
- Another fitting is carried out;
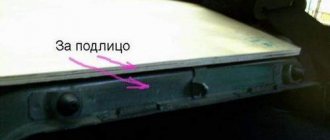
- Now you will need to cut holes in the iron part of the shelf.
Cutting holes in metal
An acoustic shelf made by yourself must be given the proper appearance. To do this, it is first ground, then sanded and covered with some material, depending on the interior of the Kalina.
The acoustic shelf must be installed so that the speakers face the rear window, thereby solving the issue of reflection. During the work process, various visual aids will provide invaluable assistance: video reviews, photo materials, drawings and diagrams. The price of store-bought acoustic shelves is not high, but why pay extra.
Spot and reflected sound
Acoustic shelf Kalina hatchback
Here's what you need to know:
Note. In order to be able to bring pinpoint sound to the middle of the cabin, bypassing obstacles, the speakers are installed under the ceiling. But the disadvantages of this design are obvious: the difficulty of firmly fixing the speakers on the ceiling, the complete absence of bass, etc.
Note. The disadvantages of store-bought acoustic shelves are precisely that they do not have the correct direction of the speakers. Installed in their designated places, the speakers on a store's acoustic shelf are directed toward the ceiling, where the fleecy material dampens some of the sound. If we also take into account the location of the headrests and seated passengers, then the effect of reflected sound will be practically impossible to achieve.
It is for this reason that it is recommended to make an acoustic shelf yourself in order to be able to ensure the correct direction of the speakers.
Review of the store shelf for Kalina hatchback
Shelf acoustic viburnum hatchback
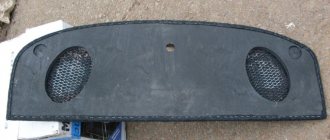
Popular acoustic shelf with sides. It greatly improves sound quality compared to the standard factory one. Let's look at the positive features of this shelf:
- It is made of plywood and covered with carpet. Thanks to this, vibration is significantly reduced;
- An acoustic shelf of this type with sidewalls is also an excellent functional detail that allows you to install speakers of any size, even heavy ones, into your car.
- An acoustic shelf with sides is an excellent solution for a music lover. It will give you the opportunity to enjoy all the nuances of musical sound;
- This shelf also makes it possible to build the right acoustic stage;
- Noises and squeaks, as well as other interference are eliminated;
- Thanks to the beautiful appearance of the shelf, the appearance of the interior is also improved. The acoustic shelf harmonizes perfectly with the interior;
- You can place large speakers on this shelf.
Acoustics for VAZ cars
In a word, this is a good shelf made of high quality materials (mainly MDF). It is covered with carpet, and instead of plastic sidewalls, strong and reliable wooden elements are installed.
Characteristics
| Type | Acoustic shelf |
| Purpose | Cars with hatchback body type (Lada Kalina) |
| Shelf material | MDF/plywood |
| Speaker size, cm | 13/16/20 |
| Possibility of hidden installation | Eat |
| Availability of sidewalls | Eat |
| Price | 1000 rub. |
Types of procedure
New generation Kalina with full audio kit
Depending on the vehicle's configuration, audio preparation may vary.
The “Standard” package involves connecting wires only to the head unit, that is, you can only install the radio. At first glance, it appears that there are no wires on the doors, as well as for the rear of the audio system. In fact, there are wires, but only on the driver's side door, and they are not routed outside. The car owner will have to complete the wiring for the speakers on the doors himself and run the wires for the rear of the audio system.
The “Norma” package includes preparation for installing the head part of the audio system, and the wires in the doors are already completely routed. In this case, the car owner will only have to independently connect the car radio and speakers and cut a hole in the doors.
Speaker installation process
Installing the rear speaker, oddly enough, is even easier than the front speaker. We take the spacer and screw it to the back door, after which all that remains is to secure the speaker and connect it. With the front door, everything looks more complicated - there you need to glue threaded washers under the holes for the bolts. And normally these washers are held in place by brackets, which are not included in the “standard” configuration.
Rear and front door without trim
Each speaker is screwed onto 4 threaded screws, but it is better to connect the connectors first. One pair of speaker wires goes into each door, and they come from the main connector intended for the radio. Before making the connection, it is better to test the wires for breaks.
We have discussed in full how to install speakers in Kalina 2. We will not consider the method of installing and connecting the radio, but note that it is not at all necessary to dismantle the center console for this.
What is audio preparation
This is equipping the car with wiring, with the help of which in the future the owner of the car will independently install the audio system chosen according to his taste and budget. The car owner installs a radio, speakers, and a subwoofer. An acoustic shelf is mounted as an alternative to standard preparation for speakers.
Such audio preparation is important for those who value high-quality sound and who care about how music sounds in the interior of their car. For those who do not want to waste money on a cheap standard audio system, but want to install high-quality musical equipment.
Preparing the door for installing the column
Audio preparation is carried out by those who prefer everything exclusive and individual. Real car audio requires a special professional approach and attention to detail. Needless to say, such high qualities cannot be achieved at a factory due to conveyor production.
Installing a high-quality audio system yourself does not always lead to excellent sound. This is all due to the fact that the interior of a car is not considered ideal for acoustics. Sound waves from the speakers are distortedly reflected from the windows and other surfaces of the car. And speakers are often installed in the wrong place, since during factory audio preparation, holes are drilled in standard, inconvenient places.
Sound reproduction is also affected by factors such as electrical interference, engine and external noise, and constant vibrations. Fortunately, now all interference can be easily eliminated and the system can be modified, you just need to know how to do it. If your own knowledge is not sufficient to install and modify the audio system, experienced car audio specialists will come to the rescue. The main requirements, after high-quality sound, remain reliability and ease of control of the system.
Installing speakers in Kalina with your own hands
Lada Kalina cars are available in several trim levels
Most of them do not have speakers in the doors, and for many this is very important, because installing additional audio elements can significantly improve sound quality. However, it is not uncommon to have to change the speakers that are installed on the rear shelf, since the sound quality they produce leaves much to be desired.
In this publication, we will look at how to choose speakers for Lada Kalina and how to install them on the rear shelf and in the doors.
Choosing speakers for Lada Kalina
To choose the right audio speakers for your Lada Kalina car, you should focus on the highest quality models, as well as the standard sizes provided by the manufacturer:
1. The size of the speakers in the front doors is 13 centimeters. 2. The rear speakers in a Lada Kalina sedan should have a size of 18 centimeters, in a station wagon - 16 centimeters, but in a hatchback body there are no standard speakers, so you can cut holes in the shelf for any speakers.
Another important point when choosing speakers for Lada Kalina is the fact that the main speakers should be front-facing, and the speakers installed in the rear parcel shelf should be additional. Let us recall that in the previous article we looked at why the window regulator on a viburnum does not work and how to repair it with your own hands.
Installing front speakers on Lada Kalina
There are two main methods for installing front speakers in the Lada Kalina door apron:
1. The first method can be called the “fast method”. To implement it you must follow these steps:
— apply the columns to the door trim and trace them with a marker; — put the speakers aside and use a sharp knife to cut out the casing along the drawn contour; — we install the speakers in the doors so that the connectors are at the bottom, since otherwise when the windows are lowered, they can break the wires.
2. The second method can be called the “quality method”, since after its implementation the result is a more pleasant sound.
The essence of the method is to install the speakers under the door trim on special spacers
It is important to note that using the second method, you can afford to install larger speakers, up to 16 centimeters
How to install speakers in the rear shelf of Kalina
The installation of speakers in the rear parcel shelf of a Lada Kalina car is somewhat different, depending on the body in which the car is made.
1. Installation of rear speakers in Lada Kalina station wagon.
There are no special features for installing audio speakers in this body; everything is simple and intuitive.
2. Installation of rear audio speakers in Lada Kalina hatchback.
In this case, you need to cut holes for the audio speakers and secure them with self-tapping screws, otherwise everything is “standard”.
3. Installation of rear audio speakers in Lada Kalina sedan.
In this case, you should dismantle the rear shelf by removing it from the mounting clips. Next, we cut the metal to the size we need, fasten the speakers with self-tapping screws and mount the shelf in place using new clips.
If your car has recently been purchased and you are wondering whether the warranty will remain after installing the speakers on Kalina yourself? The official website contains the following information: “if the car’s wiring was not damaged during installation of the speakers, then the car will not be removed from warranty,” but from personal experience I advise you to consult an AvtoVAZ service station.
Coaxial or component
Choosing the right speakers is not that easy. There are currently two types of car speakers in use: coaxial and component. Coaxial speakers include several speakers at once, the so-called strips. There are two-, three- and even four-way speakers. Component speakers are designed to reproduce only a certain segment of frequencies: low, high or medium.
Let’s make a reservation right away that the price tag between coaxial and component speakers varies very, very much; component speakers belong to HI-FI and HI-END equipment and are expensive, and also require a professional amplifier (possibly more than one) and competent installation. Moreover, the location of such speakers in the car is of no small importance for the overall sound quality.
Lada Kalina Hatchback › Logbook › Installing speakers in the rear parcel shelf
I got my hands on Beltek 120 watt speakers. But if it’s due to connections, it means that something is wrong with them) They wheezed very loudly. I took them apart, cleaned them with alcohol where I could get to, went to a car wash and blew them out with air. I came home, collected them, checked them... The wheezing disappeared, which I was very happy about) After that, I decided to put them in my viburnum. Their size is 6x9, later they plan to have something more powerful, and I’m thinking about the shelf. leave it or make it yourself or buy it from chipboard. I took off the radio and saw a block with wires.
I thought that all these wires go to their intended places. But as it turned out, no. Later, after rummaging on the Internet, I realized that the Kalina hatchback did not have standard audio preparation for the rear speakers; the wires in the block, behind the fuse block, ran out. Of course, it was possible to throw new wires, but I wanted aesthetics) So I started looking for terminals called papa lyre 1.6mm.
Having traveled half the city, I realized that I couldn’t find them in various radio and auto stores, I started searching on the Internet, came across a site where they sold such terminals for 5 rubles, but delivery from St. Petersburg cost 200 rubles, the total amount was 220 rubles, a little expensive, I thought I am for the terminals. I went a different route) I went to a local car sales website and started looking for “cars for parts.” I looked at station wagons and sedans, they had rear audio preparation. I found a station wagon, called, and agreed with the seller for 100 rubles + small spare parts in the form of screws and caps. I came to the seller, removed 4 wires from the common wiring that went to the back along with the terminals, they are pulled out of the block very simply, with a needle. The next day, I started setting up the whole thing. Inserted the terminals into the block.
What do we gain from homemade shelves?
- There is no noise either from rattling factory devices (if there were any) or from objects rolling around the trunk;
- The aesthetic appearance of the cargo compartment has been significantly improved;
- Tools and things are kept in a strictly defined place.
And at the same time, the useful volume of the trunk remained practically unchanged - after all, these pockets, in fact, were not used. So a DIY trunk shelf will satisfy both your aesthetic needs and practical needs.
If your car does not have a rear parcel shelf or you need a parcel shelf that can be quickly folded or unfolded, then this article is just for you. It’s easy to make an awning shelf yourself. So the DIY author decided not to buy a shelf, but to make it himself.
Tools and materials: - Slats; - Fabric; - Threads; - Sewing machine; - Sandpaper; - Centimeter; - Fabric cutter; - Iron; - Paper; - Computer; - Printer;
Homemade shelf
Characteristics
Install the acoustics in the VAZ yourself
As was written above, few people are satisfied with the sound quality in a car, especially coming from the rear speakers. The sound in the interior of budget hatchback cars, such as Kalina, suffers especially. Making an acoustic shelf that fits the size of this car is quite simple. First, we prepare the necessary materials and tools:
- Plywood, 7 mm thick;
- Tape measure or ruler;
- An electric saw (if not, then a regular jigsaw for wood will do);
- Steel tape;
- Corners and hinges;
- Piano hinges.
The initial stage of work involves taking the dimensions of the shelf.
Rear acoustic shelf
We draw a sketch of the future product on paper. We record the measurements.
- Initially, the sidewalls are made. They are, as a rule, mirrored - having made one, you can easily make another;
- We carry out a test fitting;
- We install the parts in their original places;
- We take measurements again, now for the main part of the shelf;
- We cut out the elements;
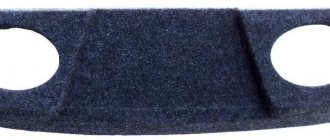
Reworking the side shelves
- We connect them together using piano hinges;
- We install the hinge clamps and try them on;
- We also put the seat back on Kalina to check whether the trunk door closes.
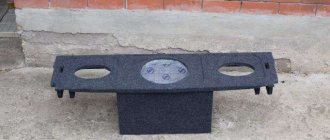
It's time to decide on the location of the speakers. The most powerful speakers today are 6x9-inch oval-type speakers.
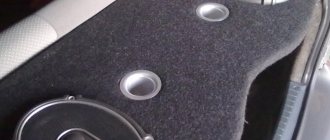
Shelf with carpet sides
We prepare holes for the speakers by cutting them out in plywood.
The shelf is almost ready, but all that remains is to cover it with fabric or, in other words, retighten it:
- We take carpet (an ideal material for such cases) and cut pieces of the required size from it, keeping a margin of 3-4 cm on each side;
- We always wrap the edges of the shelf and secure them with a stapler.
We install the sidewalls, speakers, and then place everything in its standard places.
Layout development
First of all, you need to think about what kind of future shelf you imagine, how it will be attached to the body (or to the rear seat support), how much luggage space you will allocate for it, how many levels it will have (one- or two-story design) and etc.
The simplest option:
Attach a piece of chipboard on top parallel to the floor of the trunk, and attach a smaller piece perpendicular to the first to it using corners. Below, between the extreme horizontal points, there is a vertical part that will prevent objects placed inside from moving along the floor.
A more intricate option involves dividing the space horizontally with a shelf into two levels. The bottom floor is the trunk floor, the second is a measured piece of chipboard or thick, 10-12 millimeters, plywood. In this case, in the upper floor it will be possible to cut an entrance for the neck of the fire extinguisher, thanks to which it will be firmly held in a vertical position.
It is better to consider those that are already in the case as mounting holes, so as not to make new holes. The developed drawing is cut out on cardboard and assembled to check its compliance with the realities of your trunk. If everything went smoothly, all the details coincided with the contours of the surrounding space, you can start cutting.
Front speakers Kalina
There is audio preparation in the front doors, but on new Kalinas, in the standard configuration, there is no wiring in the front doors.
Set 13cm. Speakers in the front doors of Kalina can be installed in various ways. 1) Quick and easy installation, no need to remove door trim. Just attach the ring from the speaker to the door trim and circle it with a marker. Use a sharp knife to cut a hole in the upholstery. It is worth considering that the standard audio wires are short, so it is best to install the speakers in the viburnum door with the connectors facing down, otherwise the wiring may break when the glass is released.
2) Installation of speakers through spacers. This method, together with noise insulation, gives better sound quality. You will need to remove the door trim and attach the spacer rings from the kit (or make them from plywood) in the car door.
If you choose the second method, then it is recommended to consider 16cm. speakers. Depending on the model of speakers of this size, they can be installed without spacers and no modifications will be required, or you will have to cut the door iron or install spacers.
Modification of the trunk of the viburnum | Club LADA
The rear shelf of Priora, Kalina and Granta is famous for its crickets, they are especially noticeable on hatchbacks and station wagons. According to statistics, 70% of car owners, after purchasing a domestic car, almost immediately soundproof the rear of the car. Do you know what to do if a shelf creaks?
If desired, all logos on the trunk lid can be removed. There are several ways to remove nameplates from a car; we will consider them separately.
Soundproofing the trunk brings a significant effect when it comes to a hatchback or station wagon body. Let's figure out how to make soundproofing of the trunk lid of Kalina with your own hands.
The Lada Kalina does not have a trunk button, so you have to open it only with the key. The photo report is devoted to how to make the trunk door open using a separate button.
To prevent various rubbish from hanging out in Kalina’s trunk, you can buy a special universal net to contain the load. But if a false floor is installed, then all the things from the trunk will be decoratively hidden.
The trunk of a car deserves special attention, especially when it is of impressive size. Tuning the trunk of Kalina, like any other car brand, consists of a set of modifications, we’ll talk about them
Everyone knows that the rear parcel shelf of Kalina rises up along with the trunk lid. However, the elastic bands that hold the trunk shelf in place are too long, causing it to rise up a little, forcing us to bend over to put things in the trunk. Do you know how to make access to Kalina’s trunk more convenient?
To repair the lock of the fifth door of a Kalina hatchback or station wagon, or to replace the purifier gearmotor, you will first have to remove the upholstery of the fifth door.
If there is a need to transport large cargo and the standard trunk of the car is no longer enough, then there are two options: buy a trailer or transport the cargo on the roof. Do you know how to install roof rails on a Granta or Kalina sedan?
Initially, the owners began to notice water in the trunk of Kalina and Priora hatchback/station wagon, and later the new Granta liftback inherited this problem. We find out the possible reasons for the appearance of water in the trunk and ways to eliminate this problem.
xn—-8sbabr6ahc3e.xn--p1ai
Result
As a result of independent production, you get exactly the same or a completely original rear acoustic shelf of the Priora Hatchback, not much different from the assortment in the store. In addition, making it yourself will, oddly enough, be faster and cheaper. You don’t have to wait for your order to be delivered, and the upholstery fabric can be selected at the right price and quality.
The main thing in this process is to study the specifics of the acoustic system, calculate the dimensions of the future shelf and then boldly take up the instrument.
It will be difficult for a non-professional to decide how to choose the size and material to obtain the most comfortable sound production. But if you want, it’s quite possible to find diagrams and instructions for any type of acoustics and car.
Front speakers Kalina
There is audio preparation in the front doors, but on new Kalinas, in the standard configuration, there is no wiring in the front doors.
Set 13cm. speakers can be installed in the front doors of Kalina in various ways. 1) Quick and easy installation, no need to remove door trim. Just attach the ring from the speaker to the door trim and circle it with a marker. Use a sharp knife to cut a hole in the upholstery. It is worth considering that the standard audio wires are short, so it is best to install the speakers in the viburnum door with the connectors facing down, otherwise the wiring may break when the glass is released.
2) Installation of speakers through spacers. This method, together with noise insulation, gives better sound quality. You will need to remove the door trim and attach the spacer rings from the kit (or make them from plywood) in the car door.If you choose the second method, then it is recommended to consider 16cm. speakers. Depending on the model of speakers of this size, they can be installed without spacers and no modifications will be required, or you will have to cut the door iron or install spacers.
Self-installation of a radio on a Lada Kalina
Improved car radio
Even in the “Standard” configuration, where the audio preparation is minimal, installing the radio will not be difficult, since all the wires necessary for this are already routed into the connector. The only problem that a car owner may encounter is the order and correctness of connecting the wiring to the system itself.
The two connectors for the radio are covered with a cover, which must be removed before installing the system. One connector is for powering the radio, and the second is for running under the door speakers.
Black and pink wires are the main ones for power supply
It is important to know and use the correct wiring diagrams, otherwise you can simply short out all the terminals and burn the fuses. At best, you simply cannot achieve the desired sound result.
Be sure to insulate all wires connected directly. Even those wires that are not useful for connecting the radio must be insulated in order to avoid their contact and short circuit.
Delivery by transport company (cash on delivery, no prepayment)
Advantages:
- the cost of delivery of heavy and large-sized orders is much cheaper than that of Russian Post;
- There are practically no restrictions on the weight and dimensions of cargo;
- There is a wooden crate service - this is an additional guarantee of the integrity of the order.
Disadvantages: unfortunately, there are branches only in cities.
The estimated cost of delivery for an order up to 30 kg is 450 rubles.
List of transport companies with which we cooperate:
- TC "PEK" (cash on delivery service available);
- TC "Business Lines";
- TC "Energia";
- TC "KASHALOT" (KIT) (cash on delivery service available);
- TC "SDEK" (cash on delivery service available);
- TC "DPD";
- TC "ZhelDorExpedition";
- TC "VOZOVOZ";
- TC "Baikal-Service".
To send your order by transport company:
The cost of delivery is calculated based on the volume, weight of the selected product and the distance from the city of Tolyatti.
To send an order you must:
- indicate full name recipient;
- Your locality and region;
- series, number of passport or driver's license;
- Your phone number (contact).
TC "Business Lines" - Urgent delivery of goods from 1 kg throughout Russia. The exact cost can be found on the official website of the delivery service - https://www.dellin.ruTK "PEK" - Guaranteed safety of cargo for the entire duration of cargo transportation, clear information support, delivery of goods throughout almost the entire territory of Russia, Belarus and Kazakhstan in optimal time and accurately calculated cost of services. The exact cost can be found on the official website of the delivery service https://pecom.ru/ru/calc
Delivery methods to Togliatti
We deliver tuning to the regions of Russia and the CIS countries through transport companies: Business Lines, PEK, Energia, Ratek, KIT, Baikal Service and ZhelDorExpedition.
The exact cost of delivery to the destination city can only be calculated by an employee of the transport company after the goods are delivered to their warehouse. The cost of delivery by our car to the terminal is 100 rubles.
Intercity freight transportation is paid separately upon receipt of the goods you ordered!
This is exactly the settlement that our system automatically identified. If you are located in another location, please indicate it below to correctly calculate the delivery cost:
what is called a photo taken in the heat of the day. )
So. where did I get such speakers from, read my previous blog post. www.drive2.ru/cars/lada/k…tran2005/journal/3099981/
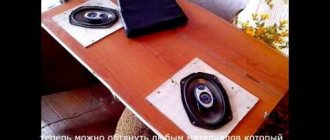
Today we are making a shelf. I do it specifically for these heads. don't like the sound. I’ll just cut out new shapes for oval pancakes. now this is no longer a problem. The problem initially is that no one will give you the exact dimensions. No matter how much I scoured the Internet, I couldn’t find anything. even in my car, despite the fact that the plastic sides are the same. the shapes of one side are very different from the other. I had to act at random. adjusting, trimming, sawing. and clearing out everything unnecessary.
Required tools: 10mm plywood - 1 sheet. The size I had was 1.5X1.5 from old stocks. The screws are different, a lot. ELECTRIC JIGSAW, you can’t do without it. Grinder Drill Glue The engraving machine also helped me a lot. 2 linear meters of adhesive-based carpet, it’s better to take more, at least two and a half. otherwise it’s just a stretch. Perforated plates from the household magician at a price of 10pX10pcs The three smallest window awnings seem to be all.
We look at the photos, read the comments on them and write our own.
Acoustic shelf Kalina Universal
The Kalina Universal acoustic shelf is purchased to improve the sound characteristics and general modernization of the rear speaker system. The Kalina Universal acoustic shelf, if made correctly, is an ideal place to install large speakers that can provide clear and powerful sound from the rear. In this article we will get acquainted with what kind of shelves there are and how to make one with your own hands.
Making a shelf
The standard shelf of the Priora Sedan can be used to make it easier to make a similar model with your own hands. It can be used as a layout. But to make the work easier, it is better to additionally make a layout from cardboard.
Acoustic shelf Priora sedan
To do this, remove the standard shelf. Then you need to take a sheet of thick cardboard or thin plywood and use a marker to transfer the dimensions of the standard shelf. Using a utility knife, cut out the layout. You should also use a marker to circle the places that are intended for seat belts. We should not forget about places for speakers (see How to choose speakers for a car radio on your own). Then everything happens as follows:
- Transfer the outline of the layout onto a sheet of plywood;
- Using an electric jigsaw, cut out the base for the future shelf;
- To increase the rigidity of the structure, it is necessary to strengthen it with supports made of wooden blocks, which are fixed using self-tapping screws. There is usually little space left between them, which is not recommended. To eliminate this problem, you should use a sealant;
Acoustic shelf on the Priora sedan itself
Note: they are installed between the ovals for the speakers, it is recommended to use at least 2-3 bars.
- Take another piece of chipboard, which is necessary for cutting out the acoustic podiums. The models will be podiums taken from the standard device. They should be placed on the base and outlined with a pencil;
- It is also necessary to mark with a pencil the places through which air will flow;
Note: during the work, extra holes may appear that need to be sealed with cardboard so that the mounting foam does not get inside the product itself.
- Seal the podiums with polyurethane foam. Wait until everything is dry;
- Take a sharp knife, with which you should remove all excess;
- To level the surface, it must be treated with fine sandpaper;
- Find old nylon tights and soak them with epoxy glue. The resulting material should be wrapped around the entire construction of polyurethane foam;
- The box for seat belts must be made in such a way that they enter it from the side;
DIY acoustic shelf for Priora sedan
- Start assembling the structure. For this, it is also advisable to use metal screws, with the help of which the strength of the entire structure will be increased;
- Install the created shelf on the sedan, securing it with bolts.
Finalization of the standard model
There is no need to make a new shelf, since the standard one can be made more stable. Of course, this option will be cheaper. After all, in this case you will only need to buy polyurethane foam. With the help of such material it will be possible to achieve high rigidity of the structure, so it will withstand any mechanical stress well.
Modification of the standard shelf
In addition, the resonance in the system will be increased, so the sound of musical compositions will be much better. To bring this idea to life, it is necessary:
Seal all holes and edges of the product with tape so that they do not get dirty; Moisten its back surface with water; Now you can start working with foam
It must be released smoothly and carefully so that it is distributed evenly; The foam will begin to dry in about 40 minutes. At this stage it must be pressed down on both sides, otherwise it will expand too much.
This will make the foam layer more rigid and dense;
Ideal shelf for Priora
Note: Air will begin to accumulate inside, causing it to not dry evenly. To avoid this, you can pierce the foam with a nail, and then lightly press it down.
- The structure should be insulated with a special rubber seal (where necessary). Leave the shelf for about a day until the foam dries completely.
- To prevent the shelf from creaking or rattling, its frame should be covered with insulating material;
- After this, it can be installed in its normal place.
DIY shelf
The self-made shelf is not inferior in quality to standard models. Many people choose this option, since the price of a homemade product is much lower than what they would have to pay to purchase a finished model. Before starting work, you need to familiarize yourself with the photos and videos offered on the Internet. We hope our instructions will also not be superfluous.
Acoustic shelf with sides for 1.6 thousand rubles
Among the advantages of such a shelf are simple installation, without the use of additional modifications and binders. So, instead of the usual plastic sides, this shelf uses wooden ones. The speakers, in turn, are fixed on them. But the main advantage of such a shelf is that when it is removed, and this can happen often if the owner periodically transports large cargo in the trunk, the speakers (see How to choose speakers for a car radio on your own) will remain in place.
Installing speakers on the door
Before installing the speakers, you need to remove the door panel and make a suitable hole in it, which must correspond to the size of the purchased speakers.
Attach the speaker to the door panel with screws by inserting it into the prepared hole. Then select the necessary wires and connect them to the speakers. As a rule, the outside of the speaker is covered with a special mesh.
Speakers from 5 to 13 cm are installed on the front doors of the car. Sometimes skilled craftsmen manage to install 16-inch speakers - this has a positive effect on the sound quality. But large speakers can create some inconvenience in the cabin, especially for the driver. They will prevent the glove compartment lid from opening or interfere with the driver while driving the vehicle.
After installing an audio system in a Lada Kalina car, you may encounter two problems.
- The radio does not turn on and there is no sound.
- A short circuit has occurred and the fuse has blown.
Both of these problems are the result of improperly connected wires. There is only one way out - carefully check all connections, following the instructions.
The question that worries many buyers of Lada Kalina cars with audio equipment without a standard radio and speakers is whether the warranty is still valid if you install the audio system yourself. The answer is pleasing: warranty service is maintained. But often dealership employees scare their customers by refusing warranty service if the audio system is not installed in their showroom. In fact, this is a standard way of extorting money from a client.
Practical installation operations, connecting amplifier, speakers
The standard location of the factory radio sets the geometric parameters of the new head unit, since it is quite difficult to independently upgrade the dashboard and dashboard. There is no room left to install the amplifier in the dashboard. Among tuning enthusiasts, the glove box (with the lid removed) or the additional shelf underneath it have become popular places to install reinforcement.
When using an additional shelf, it must be made of durable materials (steel, duralumin corners). Rigid mounting of the amplifier is not recommended; it is better to use rubber dampers. Additional lighting is made from an LED strip or a lamp embedded in the bottom of the glove compartment.
The location of the amplifier and equalizer on an additional shelf under the glove box allows you to minimize the length of the power cable. Additional devices are connected to the car battery using copper cables of increased cross-section. The cross section is calculated using a special table that takes into account the total power of the head unit and amplification equipment. It is necessary to install an additional fuse (no closer than 30 centimeters from the battery).
When choosing a front-facing system, installation of acoustics in the front doors comes to the fore. The simplest option involves using inexpensive, compact coaxial speakers. Such speakers fit into the standard places of the factory speakers. Before purchasing, you need to check the speaker connectors in the standard radio to avoid re-soldering the connections.
Simple operations for disassembling the door panel are available to novice tuners, but you need to disassemble the door carefully, remembering the sequence of operations. The most vulnerable point is the plastic clips, which are easy to break. There is no need to drill new technological holes for wiring when installing coaxial speakers. Inexpensive speakers, unfortunately, will not allow you to achieve hi-fi sound quality; for this you need to use component speakers.
Installing speakers in Granta front doors
The standard acoustics in Grant are 13 cm speakers. They do not produce good sound, but they are easily installed in the factory holes for the speakers without unnecessary manipulation. The procedure for dealing with them is simple:
- connect the speaker cables, observing the polarity;
- fix with screws in regular places in the metal of the door or directly on the door card;
- install grids (in common parlance - grills).
An important disadvantage is that the center of the mounting hole and the place under the grill do not coincide. This means that when installed with complete grills, they will look asymmetrical and clumsy.
Standard acoustics most often do not produce a rich sound and, when installed with their own grids, look poor.
How to install larger speakers
The car has standard seats for speakers. But what if you need to install larger speakers? This problem can be encountered when installing speakers in car doors. For high-quality installation, special podiums are used, which are purchased ready-made or made for a specific car model and speaker size.
Podiums help speakers sound better due to the extra volume they provide and allow you to install the right size speakers. Sometimes podiums are also installed on the rear parcel shelf of a car, but this is done mainly to improve sound quality.
Installing music
If you have a VAZ 2190 in the basic configuration (or Norma) with audio preparation, then installing music will entail the following steps:
- Removing the radio cover - on the back side there are ISO connectors for power and speaker wires. You will have to run the wires to the rear speakers yourself if you plan to install an acoustic shelf, since from the factory the wires are routed only to the doors;
- Installation of a 1-DIN radio (for 2-DIN you will have to farm, cutting out a jumper in the panel and looking for a suitable frame);
- Finding and connecting the plug of the pre-installed antenna - often the antenna wire on the roof is lost under the ceiling trim and it turns out to be easier to install the antenna separately than to find the factory cable;
- Pulling wires into the trunk to connect an amplifier, subwoofer and speakers installed in an acoustic shelf.
- To install the amplifier, you will also need a separate power cable from the engine compartment directly from the battery terminal through a fuse.
Removing the jumper in the panel trim is mandatory when installing a 2-DIN GU. Installing an acoustic shelf entails dismantling it behind the back of the rear seat. The non-standard shelf will cover the ISOFIX mounts!
If your car does not have audio preparation, you will have to separate the power wires for the radio and the speaker wires in the door.
The process of removing and installing a shelf
- We place the car on a flat platform, open the rear row of doors to provide full access to the shelf;
- lower the backrest of the rear row of seats;
- unfasten the seat belt fastenings, having first unscrewed the fastening bolts;
- unscrew the fasteners for the child seat;
- use a screwdriver to pry up three plastic latches;
- pull it towards you and remove the plastic shelf.
Finally, we install the new one and assemble the components in the reverse order.