Everything you need to close and open the trunk
To get started, you should decide on a list of what you will need to assemble the electric drive. First of all, you must have an electric drive mechanism in stock, and you can buy it in almost every car store in any country. Of course, the electric drive mechanisms are the same in their functions, but they often differ from each other. There are car owners who try to make this kind of mechanism with their own hands. For reliability and confidence in its performance, it is necessary to install a factory mechanism. The complete set of the mechanism consists of:
1. Electrical wiring.
2. Terminals.
3. Motor.
4. Documents with instructions.
5. Buttons with safety lock.
Immediately ask for warranty service or repairs. Quite often such services are not provided in markets, but in car dealerships it is just the opposite. A typical set of materials and tools will be needed for installation. There are times when you need to have additional wires because the factory assembly is not enough. To secure the wires, purchase items for one-time use, such as:
· Insulating tape;
· Tubes;
· Clips.
All of the above serves as the main material for fastening and installing the electric trunk drive. The electric trunk drive is a mechanism consisting of the following connected devices:
1. Motor.
2. Fuse.
3. Button with rod.
In order for the rod to work, several types of drive are known. Often there are mechanisms with magnetic plates and an electric motor. The electric one is long-lasting and of high quality, which is why it is the most consumed. When you want to buy an electric drive, think carefully about the purposes for which it will be used. In case of opening, thanks to the button located inside the vehicle, then you can use the standard model, and if suddenly using a remote control with an alarm (remote), then you should get more funds. In the Russian Federation you can find several types of electric drives:
1. With reinforced fastening.
2. Side mounting.
3. Standard.
Don't forget, you have to take your gear purchase seriously. If you buy a fake of poor quality, you will not receive guaranteed reliability and long-term operation. Do not ignore goods that are produced in the Russian Federation, as many buyers do. In modern times, domestic electric drives are produced no worse than foreign ones.
How to remove an old lock
The process of removal and replacement on hatchback (2113, 2114) and sedan (2115) cars is different, although the principle of operation is the same.
The procedure for removing the mechanism on a VAZ-2114
:
- Remove the plastic cover. The upholstery is attached to 10 pistons, which just need to be pryed off with a screwdriver. Access to the mechanism will open.
Removing the trunk lid
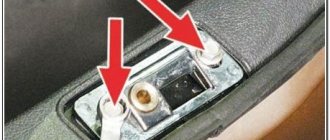
- Unscrew the 2 bolts with an “8” key. The action must be carried out carefully; on one side there are terminals responsible for the windshield wiper and brake light on the spoiler.
Unscrewing 2 bolts
- Remove the faulty element.
If the lid does not close, adjustment is required.
Removing and replacing the trunk lock of the VAZ-2115 sedan
:
- Remove the plastic cover by unfastening the pistons.
- Access to the faulty part is open; the drive rod needs to be straightened. Unscrew the corresponding screw (not all the way). Remove the rod from the bushing.
Trunk lid lock drive
- Go to the cylinder lever. Remove the mechanism rod and remove it.
- Unscrew the 3 nuts of the product and dismantle it. Unscrew the cylinder mounting bolt and remove.
Twisting the fastening nuts
Installation of the larva
So, you have removed the lock, and now you need to remove the plate securing the main spring from it. There will be no special problems with this, as well as with dismantling the guide.
Difficulties arise when removing the repelling mechanism. It is held on a hinge. To pull the latter out, you need to drill a hole with a diameter of no more than 3.5 millimeters on the side, against its end.
The pin is simply knocked out with a hammer through the resulting hole. Only after this will you be able to gain access to the larva itself.
The named element of the locking device is fixed with a special pin. Since you won’t need the old cylinder, you can safely knock it out without worrying about its integrity.
Place a new one in place of the old one. Secure it with a 50 mm nail shortened to the required size - it fits easily into the pin hole. This circumstance can subsequently create problems - an improvised pin can spontaneously fall out due to vibration. After this, the castle will, of course, need repairs again. To save yourself the trouble of wasting time, coat the nail fragment with silicone sealant.
Electric trunk drive: which is more reliable, factory or self-assembly?
Before implementing any idea, you should think carefully and prepare everything you need. In a situation with an electric trunk drive, first of all, you need to purchase the mechanism itself. Today, this is not a problem, because it is easy to find in virtually any auto parts store. Very often, all such electrical mechanisms, depending on the manufacturer or other minor design features, differ from each other, but the operating principle remains the same.
Therefore, some car enthusiasts assemble the required mechanism at home, but for the greatest confidence that the end result will be positive, it is advisable to purchase a ready-made device.
Preparation for installation
We purchase a lock kit. There are a lot of manufacturers of auto parts on the market now, but there are no special differences between the kits
It is important that the device has a warranty card and instructions for use and connection. Also in the box you will find:
Additionally, you need to stock up on a set of standard tools: pliers, screwdriver, screwdrivers, multimeter, drill with carbide drill bit. In addition to the standard accessories, immediately buy additional wires; it is quite possible that the length of those you find in the box will not be enough for you. Black heat-resistant insulating tape, corrugated tubes, and clips for fastening the trim will also be useful, since very often the trim of car elements is attached to disposable ones.
Device Features
To open the trunk remotely, automakers use two main methods. The first involves installing an electric drive in the cover, and the second involves the use of pneumatic drives. The latter option is considered more reliable, but also more expensive.
The lid can also be controlled using an electric drive in various ways. This can involve buttons on the dashboard, buttons on the doors, handles on the trunk itself, and remote controls. Each option, in principle, looks attractive and potentially convenient. Therefore, the motorist needs to decide for himself what kind of result he wants to get.
It is important to understand that the remote control is convenient, but it can be easily lost. Plus, the installation involves a very complex set of works
Because of this, the most optimal option is to locate the button inside the car interior.
The electric drive device includes several main components. The drive with an electric motor is quite practical, reliable, durable and hardy under active conditions. Less commonly, you can find drives that use magnetic plates. The design is more complex and can create a number of additional problems. It's better not to use them.
The undeniable advantage of the device is that it is quite possible to install it yourself, and on almost any car. If you read various forums, study the work of various craftsmen, of which Moscow alone includes several hundred, as well as the whole of Ukraine, you can see clear examples of the implementation of electric drives on a wide range of car models and brands.
For clarity, I will give several examples where such a system is available from the factory or can be installed on your own:
- Audi Q5;
- Kia Optima;
- Mercedes W211;
- Volkswagen Touareg;
- Chevrolet Niva;
- VAZ 2170 (Priora sedan);
- Lada Vesta SV;
- Ford Kuga 2nd generation;
- VAZ 2114;
- VAZ 2115;
- VAZ 2104;
- Lada Granta;
- Skoda Superb, etc.
There really are a lot of options. It is almost impossible to list everything. That is, you understand that you can install an electric trunk lid on any car.
Features of the electric drive
Electric drives have only a few different parts. The most commonly used drive is an electric motor. Such a device is considered practical, durable, and reliable. Drives with magnetic plates are used much less frequently. This is a more complex device that creates more problems. Experts do not recommend installing them on VAZ cars of older models.
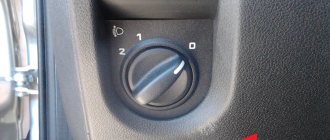
Particular care must be taken in selecting installed equipment and control methods. The standard type means only opening from the passenger compartment after pressing a button. To work with remote control you will have to purchase more expensive electric drives. Connecting them is quite difficult, so you will have to use the services of a car electrician.
Benefits of this option
Many people do not find anything special in this option, but once you try the electric trunk drive, you immediately begin to appreciate all the advantages. The positive aspects of the option to automatically open the trunk on the VAZ-2107 include:
- Convenience. By the time the driver leaves the cabin, the trunk will already be open.
- Practicality. There is no need to remove the keys from the ignition switch to open the trunk with the key, especially if you have just started the engine and are warming it up.
- Fashion. Almost all modern cars are equipped with such an interesting option, so the “seven” with this function will look more interesting against their background, especially with tuning.
Next, we’ll look at what the procedure for installing an electric drive for opening the trunk on a VAZ 2107 is with your own hands.
What is required for the work
Before starting the work process, you should purchase the necessary equipment. To carry out the work you will need:
- A button that, when pressed, will activate the electric drive. The best option is a button from a VAZ-2110 car, the cost of which is about 50-80 rubles.
- The relay is four-pin and has a special terminal for it.
- Activator.
- Wires.
- Female and male connectors, as well as electrical tape and heat shrink.
You can easily find any of the components in any auto store, and then install and connect it to your car yourself.
Installation of the activator
Initially, it is necessary to install an activator, which is an electric drive that works to retract or repel, depending on the connection. The first step is to remove the lock and install the activator rod. To remove the lock, you will need to unscrew two nuts.
After this, you need to drill a hole in the side of the lock to insert the rod and connect it to the lock tongue. The rod will need to be bent (secured), it should look something like the one shown in the photo below.
After fixing the rod to the lock, the latter can be installed in place. It is advisable to remember the tilt level of the lock and install it as well, so that you do not have to adjust it during installation. Now you can attach the activator to the trunk. To do this, you will need 2 self-tapping screws and a special plate, which comes with the product. After this, you can manually try to see if the lock will work when opening. When the activator is installed on your VAZ 2107 car, you can proceed to the next stage - connection.
Connecting the product
Before carrying out connection work, be sure to disconnect the negative terminal from the battery. To begin with, we present the diagram according to which the product will function.
The electric lock will be supplied with 12V power directly from the battery, although you can also use a wire from the cigarette lighter. First, connect the wire to the “+” terminal of the battery.
The battery supplies power to the relay, which can be located both in the cabin and in the engine compartment, which will be much more rational. From terminal “86” the wire is fed to the trunk opening button, which can be located in any convenient place on the dashboard. To install the button that will open the trunk lid, you will need to drill a hole of the appropriate diameter in the dashboard.
Useful video
You can visually familiarize yourself with the possibilities of making a trunk from a button in the video below:
At this point, all work can be considered completed. Ideally, it will take a couple of hours to provide the luggage compartment of your car with automated opening, which is provided on most foreign cars today.
Do-it-yourself installation of an electric trunk lock drive for a VAZ 2109/VAZ 2114.
In this article I will talk about the correct self-installation of the electric trunk release drive on VAZ 2108, VAZ 2109, VAZ 2113, and VAZ 2114 cars.
There is no information on the correct connection of the electric drive to these cars on any website, so this information will help you. The electric drive for unlocking the trunk is a very convenient feature that allows you to not constantly remove the keys from the ignition to open the trunk. This article will also talk about connecting the electric drive to the alarm key fob so that it can be unlocked from the alarm key fob remote control.
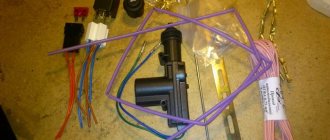
For this we need:
- reinforced door unlocking drive of the Saturn type (ordinary drives for this car will not work) - costs about 250 rubles. — trunk release button — 50 rubles — relay 90.3747.10 and relay contacts — 50 rubles. — cable — 20 rubles — wires — 30 rubles.
Dashboard wiring
The electrical circuit of the instrument panel is the most complex, since it contains 34 devices. But you can figure it out too. Here is a list of available devices.
The instrument panel is a complex device
- The plug to which plug 9 of the front wiring is connected.
- Plug for connecting plugs 10 and 11 of the front wiring.
- The connector to which socket 1 of the rear wiring is connected.
- Connector for connecting socket 2 of the rear wiring.
- Control unit for dimensions, low beam, emergency lights.
- Mechanical ignition switch.
- Route bookmaker mode switch.
- Wiper switch.
- Dashboard.
- Light switch.
- Switch for the electric trunk lock.
- Diagnostic block.
- The connector to which the air intake box harness plug is connected.
- Rear window defroster switch.
- Emergency light switch.
- Brake light switch.
- Connector for connecting audio system speakers.
- The connector to which the car radio is connected.
- Device on the steering wheel.
- Driver's airbag module.
- Absent.
- Fuse block.
- Power steering (ESR).
- Cigarette lighter socket.
- Climate control console illumination lamp.
- Tidy light bulb.
- The socket to which the ignition system wiring plug is connected.
- Control device.
- Clutch pedal position indicator switch (only on cars with a manual gearbox).
- E-gas.
- Climate control system resistor.
- Electric motor for interior heater.
- Interior heater switch.
- Door lock control module.
Many car enthusiasts who independently “pump” their cars are wondering: how to properly connect the electrics? This question arises in almost any installation. After all, simply screwing on blocks, locks and strips is not difficult, but only properly connected electricians can make the system work
If we take into account one of the most pressing problems - the installation of remote control locks for the fifth door, then the correct wiring diagram for the electric trunk lock will help us here. You can find it either in the instructions that should be included with the device, or you can take it from a reliable source, but it is better to use proven options and ask friends and acquaintances what scheme they used
Installation instructions for the electric trunk lock
If you are lucky with the standard lock, it locks and holds the tailgate well, then there is no need to change it. .jpg" alt="Window lifter roller" width="700″ height="525″ srcset="" data-srcset="https://vazremont.com/wp-content/uploads/2017/06/foto-3- 1..jpg 300w, https://vazremont.com/wp-content/uploads/2017/06/foto-3-1-660×495.jpg 660w" sizes="(max-width: 700px) 100vw, 700px »>
In this case, you must have with you:
- window lifter roller;
- door activator;
- steel cable;
- wires with terminals;
- relay with four contacts;
- 10 A fuse.
Data-lazy-type=”image” data-src=”https://vazremont.com/wp-content/uploads/2017/06/foto-4.jpg” alt=”Bicycle cable” width=”700″ height =»525″ srcset=»» data-srcset=»https://vazremont.com/wp-content/uploads/2017/06/foto-4..jpg 300w, https://vazremont.com/wp-content /uploads/2017/06/foto-4-660×495.jpg 660w" sizes="(max-width: 700px) 100vw, 700px">
To automate the opening of the trunk, it is necessary to ensure that the lock latch is pulled. For this purpose, a special roller is installed on the wiper gear housing. The steel cable is pulled through the roller and secured with conventional clamps. Experienced riders often use a bicycle cable because it is durable and flexible. Using it you can quite easily connect the door activator to the lock tongue. .jpg" alt="Connection diagram" width="960″ height="423″ srcset="" data-srcset="https://vazremont.com/wp-content/uploads/2017/06/foto-5. .jpg 300w, https://vazremont.com/wp-content/uploads/2017/06/foto-5-768×338..jpg 660w" sizes="(max-width: 960px) 100vw, 960px">
You can connect the entire structure to the cigarette lighter if you do not have the proper knowledge of the car's electrical circuit. You just need to connect the plus from the cigarette lighter to the button and then to the lock. The negative comes from the taillight. Or carry out the operation of the trunk lock 2114 using a special relay.
Instructions for dismantling and replacing the mechanism
Installing an electric trunk lid
Buy a suitable device. You can choose the appropriate part for your Lada Granta car. This is a good option because it has an electric drive and a limit switch. Unfortunately, when installing a part of this option, you will have to install your own fastening; you can make it from a small steel angle, for example, 40 * 40 * 4 mm. The corner can be cut with a suitable tool, for example, a grinder
It is important to consider the size of the purchased device, as well as the location where it will be installed. The manufactured metal part must be coated with a suitable color. Then plug the hole from the previously installed lock. To do this, you can use the plug from the manual window lifter.
It also needs to be painted the same color. If during installation of the product it was necessary to get rid of the wiper, you can use the wires coming from it and connect one to the drive of the part, and the second to the connector of the mounting block. Return the bracket and tighten the finished fixation device.
Additional modernization of locks
If you dream of your car doors opening and closing as smoothly as in foreign cars, try installing silent locks. Such a device can be installed on any model of Zhiguli. For representatives of the retro era, such modernization is also possible, but the locks themselves will have to be filed a little. By the way, you can also put it on the trunk. In general, there is no limit to perfection.
And the installation is, in truth, very simple and transparent. It is enough to dismantle the old locks, try not to drop the necessary elements inside the door, or remove the trim in advance. And then install new analogues on two bolts. There are situations when, after installation, the door does not close tightly or warps slightly, causing cracks to form. Solving the problem is also very simple by adjusting the location of the device. In general, initially try to secure it exactly where the old one was.
Adjusting the tailgate lock.
- We unscrew the lock lock so that it can be moved with light force.
- Now you need to close the door and look through the glass to ensure that the lock spike is opposite the latch socket.
- After this, we move the latch all the way back and slam the door. This will ensure the lock lock is in the optimal position.
- Open the door and tighten the bolts securing the clamp in the position in which it was installed.
- It is also necessary to check that the door closes. If the door does not close tightly. then you need to remove the adjusting plate from under the clamp.
- If the door closes too tightly, on the contrary, you need to add a plate under the latch.
You can make the adjustment plates yourself from tin or sheet iron.
Adjusting the latch and replacing the trunk lock on a VAZ 21099:
Removal: 1) First, to remove the lock from the trunk lid, use a wrench or an extension with a head cap to unscrew the two nuts that secure the lock to the trunk lid.
2) Once the retaining nuts are removed, remove the inner lock from the cover by hand.
3) Next, remove the small spring from the same place and check its condition.
Note! If the spring suddenly becomes too compressed or skewed, replace it with a new one!
4) And then from the inside of the trunk lid, remove the button with the cylinder and check the condition of the button in the same way.
Note! Replace the lock button that is not working and also slows down when pressed with a new one!
Note! The trunk lid lock of the VAZ 21099 car is not dismountable, so do not try to repair it or do anything with it. If the lock is in a defective condition and is faulty, then it must be replaced with a new one!
1) First, put the entire system back together. That is, if you previously removed the button with the cylinder and a small spring, then install them in their places in the reverse order of removal.
2) Next, take the new lock in your hands and install it in its place, still tightening it with the same fastening nuts.
3) After installation, try closing and opening the trunk lid. If, when closing the lid, the trunk lock suddenly does not fit into the hole in the latch, usually in this case a distinct knock is heard in the area of the lock, and the lid closes very poorly, in this case:
• First, pick up the extension socket and use it to remove the two bolts that secure the clamp.
• Next, adjust the clamp and then screw these bolts back. Thanks to this operation, achieve clear closing and opening of the trunk lid.
Installation of an electric lock and automatic trunk opening of a VAZ 2114
Good afternoon
The topic may be a bit of a bummer, but I’ll write it anyway (perhaps the thread will be useful to someone). I thought for a long time about what kind of trunk opening system to make, there were several options, which would be more reliable. In the end, I chose a system that, without any special modifications, turned out to be reliable (I’ve been riding for a year now without any problems). In general, I found these drawings and ordered them from a turner I know. In the end I got something like this.
Installation in a regular place without any adjustments.
I’ll take off the lock to show clearly how this system works.
Everything is ready, the connection is started according to this diagram
This is how it works:
In terms of warmth, this whole thing worked well, but with the advent of cold weather it stopped opening, in the end it was necessary to make a thread to push out the shock absorber, because it was missing a little bit. I carefully disassembled the shock absorbers, holding them in a vice through a glove so as not to screw up the rod; it was very difficult to unscrew.
I took it and went to the store. I picked up the springs at the VAZ store. In a nearby store I bought rubber bands (cuffs from the Japanese) to fit the rod to secure the spring.
It turned out something like this:
And again the trunk opens BY itself!
Thank you all for your attention!
Comments 137
As I understand it, the stops are from station wagons?!))
There should be a number on the stop itself, isn't there?
I sold this car already, so I can’t give you any advice)
Damn, cool mess) I open it with a button, but I just need one person to press the button, and the second to open the trunk (it doesn’t open by itself(
That’s not interesting)) the trunk should open on its own)) If not, then what’s the point of the button!)
here it is (I think maybe I can get new stops, maybe it will help) if it doesn’t help, I’ll have to be so confused too)
there are rubber bumpers screwed into the doors at the edges; they are twice as long as the standard ones. I have these (I got them from the VAZ store). If you don’t need the lid to lift on its own, but just to open it just a little, then they’ll be enough for you.
That's the point, you need to do it yourself) but not shoot) They are ordinary, with a spring it opens a little and that's it
nah)) it doesn’t happen like that)) so that it goes smoothly))) it smells like Lexus))
Yes, you just need to install some kind of drive, which costs as much as the whole car and that’s it: D
Or maybe more expensive))
Does the plastic cover then snap back into place?
Awesome implementation, it’s a pity that I didn’t see it three years ago, when I drove the 14.
Hello, following your example, I did the same for myself, but there is one “BUT”, the solenoid does not have enough strength to open the hook, do you have it regular or reinforced?
Hello, following your example, I did the same for myself, but there is one “BUT”, the solenoid does not have enough strength to open the hook, do you have it regular or reinforced?
What are the gas struts? (partner number) They don’t look like stock.
From golf 6 stock.
Cool stuff, I'll have to look into this issue.
Or it was possible to install a lock from a grant, there is an electric drive inside the lock and a limit switch on the lock, the limit switch makes it possible to turn on the light in the trunk when it is opened!) There is a lock right next to the Kalino now, it is creaking, I will install one from a grant, it is many times better Kalinovsky, the response part itself is thicker than that of viburnum. And there will be no solenoid that pulls the lock opening tongue! Some advantages in general)
Honestly, I haven’t seen any downsides in this design yet! How much does this grand lock cost? Does it fit into the standard places or does it need to be modified? Does the windshield wiper motor interfere with these locks?
with a built-in electric drive, the lock costs about 1000 rubles, plus the counter part is 300 rubles. It fits into the standard places, it’s like the Kalinovsky one, the brush will probably need to be either removed or a fastening made. The only downside is that there is an extra solenoid on the trunk lid, there is a wire stretching from it to the lock, I don’t like it)
For some)) For me this is not a minus; in my opinion, there are much more problems with the grand lock. Either sacrifice a brush or invent a fastening. It’s also more costly))
I installed the Kalino lock without any additional fastenings) The cylinder is not needed, and neither is the brush) the trunk is completely sealed, so the brush and cylinder were not a problem for me. Whether it’s more expensive or not, these are only advantages to the comfort of using a car =)
Honestly, I haven’t seen any downsides in this design yet! How much does this grand lock cost? Does it fit into the standard places or does it need to be modified? Does the windshield wiper motor interfere with these locks?
www.drive2.ru/l/4886898/ here you can see what it looks like)
with a wiper and an external WORKING larva is not mine. I’m looking for how to do it myself
Or it was possible to install a lock from a grant, there is an electric drive inside the lock and a limit switch on the lock, the limit switch makes it possible to turn on the light in the trunk when it is opened!) There is a lock right next to the Kalino now, it is creaking, I will install one from a grant, it is many times better Kalinovsky, the response part itself is thicker than that of viburnum. And there will be no solenoid that pulls the lock opening tongue! Some advantages in general)
I bought a grant lock, I’ll install it soon, maybe I’ll write about it)))
Write of course, it’s interesting to see! Did you buy it with an electric drive inside the lock?
Yes, with an electric drive, there is a desire to push the avetka into the coat like in foreign cars))))
You'll be really confused if you do it!) Let's do it, then we'll see
WELL IT'S WORTH IT))
Listen, isn’t the bolt that connects the lever and the plate periodically unscrewed?)
Nope, never unscrewed)
I forgot about the washers
Nothing from this design has ever been unscrewed))
I look from the side of technology, not facts
If you’re talking about the castle yourself, then they weren’t there in the first place.
What does the castle itself have to do with it? there are the corresponding bolts. I'm talking about a figured bolt, i.e. the axis of the lever that opens the lock. There would be washers there.
According to the drawings, there is no washer...therefore, the question did not arise...Everything works great! There were no problems. If you want, you can work on it! Everything in our lives is individual!
Sergius71rus
What does the castle itself have to do with it? there are the corresponding bolts. I'm talking about a figured bolt, i.e. the axis of the lever that opens the lock. There would be washers there.
The person didn’t do it himself, so he doesn’t know, but the washer should be there to reduce friction
Handsome, 5+++) in the summer it won’t be too sharp to shoot with springs?
Thank you)) if it shoots, remove the springs for 2 minutes!
SUPER...USE THE LOCK FROM KALINA, YOUNG PODANI, LET THE FORCE BE WITH YOU!
I didn’t want a viburnum lock!
Well done, how long is the spring?
I didn't measure it. Anyway, each shock requires its own spring length. On my stock you can clearly see where it goes, this is where it was played from.
that is, you made it a little larger than the free space of the rod in the closed position?
DIY installation
We adjust the cable tension for proper unlocking and locking of the trunk.
After that, we connect the button itself; for this purpose, there is a special place in the car panel under the instrument panel on the driver’s side.
It would be wrong to place a button near the cigarette lighter or a drawer for small items when there is a regular place for this in the car.
Rice. The simplest connection diagram for the electric drive of the trunk lock.
If you don’t have an additional brake signal, or for some reason you want to use it, then, as mentioned above, we pull a new wire to the bottom of the instrument panel on the driver’s side and connect it to the closer and to the battery through the fuse.
We make final checks and adjustments
You can also simultaneously open the rear door trunk lock using a button and using your alarm key fob (if your alarm has any additional channel) for this we need a relay. And the diagram of the alarm itself.
It is important that for normal operation of the electric trunk drive, when connecting to an additional alarm channel, you need to select a pulse length of 0.8 seconds
Rice. Connection diagram of the trunk electric drive via a button and relay to an additional alarm channel
And here is the relay itself connected to the button and the additional alarm channel.
Making a trunk with a button in a VAZ 2114 is much easier than it seems to many car owners. All work is carried out with a minimum amount of time and physical effort. Without resorting to the expensive services of a professional, you can quickly improve the protection of the luggage compartment of your car yourself. Having completed the work once using simple algorithms and diagrams, the owner of a VAZ 2114 will be able to calmly and easily open the luggage compartment of the car by pressing just one button located in the cabin or on the alarm remote control.
Self-installation
First of all, it is necessary to secure the electric drive to the trunk lid and provide it with a mechanical connection to the lock itself. To do this, you will have to make two cuts on the lock, and bend the resulting free “tongue”. Thus, we gained access directly to that part of the lock, by pulling which the trunk lid will open. Now we attach the long metal stick from the kit so that the lock can close when the system is operating. It is quite possible that you will have to cut off extra centimeters of this pin.
Now our device is installed properly and all that remains is to connect the electrics. To do this, we will use the diagram below.
Important! When working with electrical equipment, remove the battery!
In most cars, electrics operate on 12V positive voltage. However, if you doubt that everything is the same for you, it is better to check with the car dealer and not use this diagram for connection. It is very important to make the correct connection of the wires, since the proper operation of your car as a whole depends on it. At best, some options will simply not work correctly; at worst, a short circuit will occur. And it is not always possible to restore the electrics and electronics of the car after it. And this work will cost a lot of money. In addition to the above, lay wires where standard wiring is already laid. In difficult places, for example, when you have to pull the wire from the passenger compartment to the trunk, it is necessary to use protective corrugated tubes.
Electrical work
To begin with, according to the diagram, we connect all the elements located in the trunk. Now you need to tighten the wires to the driver's door. It all depends on the car model. For some it will be convenient to pull the electrics through the door sills from below, for others the option of protective strips from above is suitable. Immediately secure the wires with cable ties. If the length is not enough, take an additional wire, solder the joint with a soldering iron and rewind it with tape. Let's continue connecting. We connect the negative wire to the electric drive, and then connect the second negative wire to the main control relay. The third, also known as the last wire, needs to be connected to the alarm. To do this, you need to find the control unit; most likely, it is located under the dashboard. In it you will find free contacts for connection.
We check, find the negative one and connect. These are the last steps we need to complete. After this, we return the battery to its place and check the functionality of the system. There are cases when the lock does not have enough traction to close. In this option, it is enough to install an additional spring for the lock and the problem should be eliminated. There is one more point that we have not covered - the remote control button. Installation is very simple, and the connection method is described in the same diagram above. You can use absolutely any analogue for the button, even from power windows. And the location also depends solely on your preferences.
Central locking of VAZ 2115 does not work
Central locking, or "CH" as it is briefly called, is a suitable and necessary item for any car, allowing the owner to open and close any door in the car with just the movement of a hand. But it happens that this system stops working one hundred percent or some of its parts do not work properly.
There are prerequisites that one or another part of the central lock can refuse, and we will talk about each of them in detail below.
Central locking does not work: signs of failure and causes
It happens that no action is taken for the other door when the central locking located on the driver's door is closed. But enough to move it, since the door here was closed. It is immediately clear that there are defects in the central locking, which are facilitated by certain prerequisites.
Among all possible circumstances, defects are the most important.
No contact with disk
With this fault, the contacts inside the drive do not make the correct contacts. There are several reasons for this:
- The traction control that connects the lock button and the drive is done incorrectly. This reason contributes to improper engagement and lack of contact with the drive.
- The button touches part of the skin and does not allow it to be lowered to the required depth to ensure traction contact with the drive. Although the driver's door is locked, there are no signals for the other door.
Tags: vaz 21124, trunk, trunk lid, body
Comments 27
Haven't you seen how the doors are adjusted, and the trunk can also be adjusted?
old proven method =)
It's scary, I think this definitely won't work))
no matter what they say, the trunk lid shouldn’t stand like that, even though it’s a basin, it definitely needs to be adjusted
Yes of course, that's what I want
You're getting to the bottom of this kind of crap. The basins are all crooked!
I want to make it with my own hands)
I still need to sharpen the clubs, they are 10th sticks, these gaps are also noticeable) I will soon do this myself, or look for a ten with 12th sticks)
Replacing the trunk lock on a VAZ-2113 2114 2115
The old mechanism has been removed, a new one needs to be installed. The process is the reverse of dismantling.
The cylinder is replaced with the lock removed. You need to check the condition of the spring. If the element is weak, it needs to be replaced.
When installing a new element, you do not need to immediately tighten the bolts - the trunk will not close. It is recommended to adjust the position of the cover using the latches. The bolts are tightened slowly. This will allow you to make adjustments so that the lid closes tightly. You need to check the seals. When the elements wear out, the cover hits the body, creating vibrations.
The trunk lock of the Lada Samara family often fails. One simple modification will solve the problem. It is enough to install the product from Lada-Granta.
The process is as follows:
- Make a mount from a 40 x 40 mm corner.
- Install the cylinder plug on the lid.
- Connect the wires. “Power up” from the elements going to the wiper. One wire (white with a blue stripe) is connected to the lock drive, the other (yellow with a blue stripe) is connected to the limit switch.
- Install a new product, adjust it, make sure it works.
After these steps, we get a reliable and durable mechanism that will not open on its own and will not rattle.
Before starting work, you need to disconnect the (-) terminal from the battery for safety.
Disconnecting the terminal from the battery
Installing an electric lock on the trunk of a VAZ 2114
- Registration
- Entrance
- To the beginning of the forum
- Forum Rules
- Old design
- FAQ
- Search
- Users
- List of forums AUTOLADA.RU
- Family "Samara"
- 1
- 2
- 3
- 10
- 11
- 12
- >
If it’s not difficult, please take a photo of the already installed structure.
And if it’s not difficult, please put the sizes everywhere. I'm very interested in your solution.
I did almost the same thing!
Where have you been before? And I strained my brain.
Photos: I seem to be doing everything correctly, but the pictures are not inserted
I did almost the same thing!
You did the right thing by straining yourself. Besides, you are better, I would say more competent. And as you said, like a factory.
If only there were some more sizes
I will redo it like yours!
I will redo it like yours!
Wait until I redo it, I haven’t connected the electrics yet, i.e. I checked from an external power source. Everything opens and closes. But it is necessary to carry out tests, so to speak, in field conditions. Yesterday I sweated until night, running wires across the roof. Even I managed to push the wire into the corrugation through which other wires go into the back door. The hemorrhoids are still the same. I dismantled the entire left side of the cabin. True, if you know how to do it, then maybe it’s not so difficult. But I didn't know. I broke 3 hooks in the parts of the middle pillar trim (I wanted to climb up the middle pillar). It turns out that in order to remove them, you must first unscrew the bolt of the upper seat belt fastening; there are 4 self-tapping screws at the bottom; everything is clear here. then you need to move the lower part of the cladding UP so that the hooks come out of the grooves. Then unscrew one self-tapping screw securing the upper part and move it DOWN. As it turned out later, I shot it in vain. It is easier to run the wire under the lining of the left windshield pillar, and under the headliner along with the harness that goes to the rear. Damn, how much easier it is to do everything at the factory, add one extra reason to the harness and a lot of problems are solved. I bought a ten button and will make a relay as it was already written somewhere in the forum that there is separate control from the button and from the signaling system.
But I have already done everything, and the mechanism itself is done, but only poorly. I took the solenoid - “TrunkOpener” (very powerful), so + your development I think it will turn out not bad.
Review of Manufacturer Prices
| Name/article | Price, rub.) |
| electric lock 2191-5606010-10 | from 1500 |
| 2191-5606452 | |
| 2191-5605789-00 | —/— |
| 2191-5603652 | —/— |
| 2191-5604521 | —/— |
| Vartex 56526454 | from 1700 |
| Apollo 54654 | —/— |
| FX-F 82665/22 | —/— |
| Monado fd515545 | —/— |
*prices are current as of 10/09/18.
The opinions of the service station masters agreed on the choice of manufacturer - there is not much difference. When purchasing original products, the service life of the equipment exceeds 5 years. Installation in “makeshift” conditions and poor-quality manufacturing only shorten the period of use of the equipment. Often the owner is to blame for the breakdown, violating the vehicle maintenance regulations.
Equipping the trunk with an electric lock
The electric trunk lock can be installed in another way. To do this, you will need a sheet of steel from which the mounting plate is made. The compartment lining must be carefully removed and the electric drive must be screwed to the steel plate using two metal screws. The plate itself is secured with two M5 screws. We insert the curved end of the rod into the corresponding socket of the electric drive, and clamp its second edge using pliers.
In the process of tightening the electric drive rod, it is necessary to achieve the opening of the lock, for which the length of the rod is adjusted, bending it in the middle. Then comes the process of connecting the electrical wires. The factory trunk wiring harness has a two-pole connector with white and black wires. The white wire must be connected to the blue terminal of the electric drive, and the black wire to the green terminal. This completes the installation of the mechanism.
Interesting on the topic:
loading…
Chevrolet Cruze trunk button: replacement, repair. Button output to the salon
During vehicle operation, breakdowns or unforeseen incidents with the vehicle’s equipment are common. One of these unpleasant cases is the breakdown of the trunk button of a Chevrolet Cruze car.
Below in the article possible breakdowns of the unit and ways to fix it are indicated.
Reasons why the button does not work
The trunk release button on the Chevrolet Cruze model breaks due to its extremely poor location. An engineering miscalculation in the form of installing an element on the outside of the car exposes the part to constant exposure to an aggressive environment.
During operation, the digger often gets exposed to water, dirt or snow. This leads to rapid destruction of the seals. Sometimes it happens that a trip to the car wash can also lead to a breakdown.
The main reasons for node failure are the following factors:
- Oxidation of the contact group located inside the key. As a result, the element’s response to driver manipulations deteriorates.
- Short circuit of contact pairs. If liquid or dirt gets in, the working contacts may inadvertently close. In the future, for this reason, the unit may be triggered randomly and the trunk will open.
The basis for such problems is two questions:
- bad location;
- mediocre sealing of the unit.
Replacing the trunk release button
The replacement procedure is applied in case of failure or revision. Sometimes repairing a broken key is limited only to replacing it.
The process itself is technically simple. To do this you will need to perform the following steps:
- Use the key to open the trunk lid.
- Next you need to remove the fasteners from the casing. There are a total of 12 plastic elements, which are very capricious when applying force. They may break. Therefore, you need to remove the fasteners very carefully.
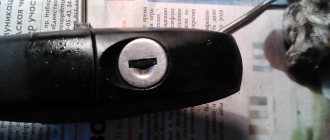
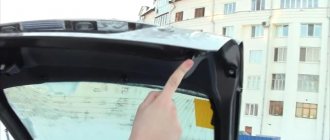
The protective cap of the lock is removed from the end of the trunk lid. The procedure is performed extremely carefully - the plastic is delicate and is afraid of sudden movements.
The next step is to dismantle the casing.
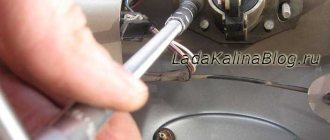
Next, using a “10” key, you need to unscrew the fastenings of the license plate illumination mounting plate. The same part has a button on it.
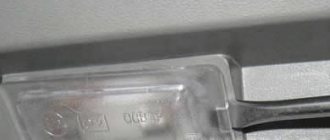
The key terminal block is carefully disconnected. Remove the rubber seal for the electrical wiring from the cover. Remove the decorative strip. The element is fastened with two plastic latches. The procedure can be easily accomplished using a very thin screwdriver or similar tool. It is recommended to exercise great care during work, as there is a possibility of damage to the paintwork at the point of contact.
Replace old elements with new ones. Some experts recommend upgrading moisture protection by applying a layer of sealant.
Assembly must be done in reverse order.